Page 25 of 176

23
Access
2Locking the vehicle with
alarm system
Activation
► Switch off the ignition and exit the vehicle.
► Lock the vehicle using the remote control or
with the “Keyless Entry and Starting” system.
When the monitoring system is active,
this indicator lamp flashes once per
second on the instrument panel and the direction
indicators flash for about 2 seconds.
The exterior perimeter monitoring is activated
after 5 seconds.
If an opening (door or bonnet) is not
properly closed, the vehicle is not locked,
but the exterior perimeter monitoring will be
activated after 45
seconds.
Deactivation
► Press the remote control unlocking
button.
or
►
Unlock the vehicle with the Keyless Entry and
Starting system.
The monitoring system is deactivated: the
indicator lamp on the instrument panel goes off
and the direction indicators flash for about 2
seconds.
If the vehicle automatically locks itself
again (as happens if a door is not
opened within 30 seconds of unlocking), the
monitoring system is automatically
reactivated.
Triggering of the alarm
This is indicated by sounding of the siren
and flashing of the direction indicators for 25
seconds.
The flashing of the direction indicators and of
the alarm warning lamp on the instrument panel
indicate that the alarm was triggered during your
absence. When the vehicle is unlocked using the
remote control or the Keyless Entry and Starting
system, the direction indicators and the warning
lamp on the instrument panel
stop flashing.
Failure of the remote control
To deactivate the monitoring functions:
► Unlock the vehicle using the key in the
driver's door lock.
►
Open the door; the alarm is triggered.
►
Switch on the ignition and start the engine;
this stops the alarm.
The indicator lamp on the
instrument panel goes off.
Locking the vehicle without
activating the alarm
► Lock the vehicle using the key (integral to the
remote control) in the driver's door lock.
Malfunction
When the ignition is switched on, fixed
illumination of the indicator lamp on the
instrument panel indicates a system malfunction.
Have the system checked by a PEUGEOT
dealer or a qualified workshop.
Automatic activation
(Depending on version)
The system is activated automatically 2 minutes
after the last door is closed.
►
T
o avoid triggering the alarm on entering the
vehicle, first press the unlocking button on the
remote control or unlock the vehicle using the
“Keyless Entry and Starting” system.
Deactivating the alarm
► Press the remote control unlocking
button for about 4 seconds. An audible
signal is triggered and the direction indicators
flash 4 times to indicate that the alarm is
deactivated (the indicator lamp on the instrument
panel is deactivated).
►
Reactivate the alarm by pressing the
unlocking button.
Page 26 of 176

4. Left-hand rear (depending on version)
5. Deactivation of electric window controls
located")
24
Access
Electric windows
1.Left-hand front
2. Right-hand front
3. Right-hand rear (depending on version)
4. Left-hand rear (depending on version)
5. Deactivation of electric window controls
located by rear and passenger seats
(depending on version)
Manual operation
► To open/close the window, press/pull the
switch without passing the point of resistance;
the window stops as soon as the switch is
released.
Automatic operation
(Depending on version, for driver only)
►
T o open/close the window, press/pull the
switch past its resistance point: the window
opens/closes completely when the switch is
released.
Operating the switch again stops the movement
of the window.
Window controls remain operational for
approximately 45 seconds after switching
off the ignition or after locking the vehicle.
After that time, the controls are disabled.
To reactivate them, switch on the ignition or
unlock the vehicle.
Anti-pinch
(Depending on version, for driver only)
If the window meets an obstacle while rising, it
stops and immediately partially lowers again.
Deactivating the rear
controls for the rear electric
windows
For your children's safety, press control 5
to deactivate the controls for the rear and
passenger electric windows, irrespective of their
positions.
A confirmation message is displayed. The
message will remain displayed until the controls
are reactivated.
The rear electric windows can still be controlled
using the driver's controls.
Reinitialising the electric
windows
After reconnecting the battery, or in the event
of abnormal window movement, the anti-pinch
function must be reinitialised.
The anti-pinch function is disabled during the
following sequence of operations.
For the driver’s window:
►
Raise the window until it is fully closed.
►
Release then pull the control for at least one
second after the window reaches the closed
position. Repeat the operation twice in a row
.
►
Lower the window fully
.
If an electric window meets an obstacle
during operation, the movement of the
window must be reversed. To do this, press
the relevant switch.
When the driver operates the passengers’
electric window switches, it is important to
ensure that nothing can prevent the window
from closing properly.
It is important to ensure that passengers use
the electric windows correctly.
Pay particular attention to children when
operating windows.
Be aware of passengers and/or other persons
present when closing windows using the key
or the "Keyless Entry and Starting" system.
Page 27 of 176

25
Ease of use and comfort
3Correct driving position
For safety reasons, adjustments must
only be made when the vehicle is
stationary.
Before taking to the road and to make the most
of the ergonomic layout of the instruments and
controls, carry out these adjustments in the
following order:
–
head restraint height.
–
seat backrest angle.
–
seat cushion height.
–
longitudinal seat position.
–
steering wheel height and reach.
–
rear view mirror and door mirrors.
Once these adjustments have been
made, check that the instrument panel
can be viewed correctly from your driving
position.
Front seats
Front head restraints
Adjusting the height
► Upward: pull the head restraint up to the
desired position; the head restraint can be felt to
click into position.
►
Downward:
press lug A to lower the head
restraint.
The head restraint is correctly adjusted when its upper edge is level with the top
of the passenger’s head.
Adjusting the angle
(Depending on equipment)
► Move the upper part of the head restraint
forwards or backwards to adjust the angle.
Removing a head restraint
► Pull the head restraint fully up.
► Press lug A to release the head restraint and
raise it fully.
►
Stow the head restraint securely
.
Refitting a head restraint
► Insert the head restraint rods into the guides
in the corresponding seat backrest.
►
Push the head restraint down as far as it will
go.
►
Press the lug
A to release the head restraint
and push it down.
►
Adjust the height of the head restraint.
Never drive with the head restraints
removed; they should be in place and
adjusted for the occupant of the seat.
Page 28 of 176

26
Ease of use and comfort
The backrest of the seat located next to the
driver, once in the table position, can also be
used as an armrest and has 2 cup/can holders
and a support strap.
For more information on the Seat belts,
refer to the corresponding section.
Folding the backrests
The backrests must only be operated with the vehicle stationary.
While driving, having a passenger in the rear,
behind the front benchseat is prohibited if the
benchseat backrests are tilted.
When sharp deceleration occurs, objects
placed on the folded backrest can turn into
projectiles.
Preliminary operations:
► Lower the head restraints.
► Check that no person or object will interfere
with folding down the backrests (clothing,
luggage, etc.).
► Check that the outer seat belt is properly
tensioned along the pillars, the central belt is
stowed and the tongues of the belts are correctly
in the stowed position.
Deactivation of the front passenger
airbag is recommended.
Manually-adjustable seats
Forwards-backwards
► Raise the control bar and slide the seat
forwards or backwards.
►
Release the bar to lock the seat in position on
one of the notches.
Backrest angle
► Pull the control all the way up and tilt the
backrest forwards or backwards to adjust it.
Height
(driver only)
► Pull the control upwards to raise the seat or
push it downwards to lower the seat, until you
obtain the position required.
Electrically-adjustable seats
Longitudinal
► Push the control forwards or backwards to
slide the seat.
Backrest angle
► Tilt the control forwards or backwards.
Cushion height and angle
(driver only)
► Tilt the rear of the control upwards or
downwards to obtain the required height and
angle.
Electric lumbar adjustment
(driver only)
► Press and hold the front or rear of the
control to increase or reduce the lumbar
support.
2-seat front bench seat
It includes 2 fixed cushions with 2 independent
backrests (adjustable and foldable in the table
position).
Page 29 of 176

27
Ease of use and comfort
3The backrest of the seat located next to the
driver, once in the table position, can also be
used as an armrest and has 2 cup/can holders
and a support strap.
For more information on the Seat belts,
refer to the corresponding section.
Folding the backrests
The backrests must only be operated with the vehicle stationary.
While driving, having a passenger in the rear,
behind the front benchseat is prohibited if the
benchseat backrests are tilted.
When sharp deceleration occurs, objects
placed on the folded backrest can turn into
projectiles.
Preliminary operations:
►
Lower the head restraints.
►
Check that no person or object will interfere
with folding down the backrests (clothing,
luggage, etc.).
►
Check that the outer seat belt is properly
tensioned along the pillars, the central belt is
stowed and the tongues of the belts are correctly
in the stowed position.
Deactivation of the front passenger
airbag is recommended.
► Firmly pull one of the straps 1 to release the
desired backrest.
►
Guide the backrest
2 or 3 down to the
horizontal position.
The maximum load distributed over the backrests, in the table position, is 75 kg.
A heavier load could damage the backrest
frames.
Repositioning the backrests
► Straighten the backrest 2 or 3 and push it
firmly to engage its locking system.
►
Check that the release strap 1
has correctly
returned to its position.
►
Check that the central seat belt is not trapped
during the manoeuvre.
Please note: an incorrectly latched
backrest compromises the safety of
passengers in the event of sudden braking or
an accident.
Backrest angle
Several adjustment positions are possible.
► Pull the strap 1 forwards, then tilt the
corresponding backrest forwards to the desired
position.
Steering wheel
adjustment
Page 30 of 176

28
Ease of use and comfort
Manual model
Day/night position
► Pull the lever to change to the anti-dazzle
"night” position.
► Push the lever to change to the normal "day"
position.
Adjustment
► Set the mirror to the normal “day” position.
Rear bench seat
Bench seat with folding cushions (giving access
to storage compartments) and split folding
backrests (2/3-1/3).
► When stationary , pull control A to release the
steering wheel.
►
Adjust the height and reach to suit your
driving position.
►
Push the control to lock the steering wheel.
For safety reasons, these adjustments
must only be carried out with the vehicle
stationary.
Mirrors
Door mirrors
As a safety measure, the mirrors should be adjusted to reduce the "blind spots".
The objects that you see in the mirrors are
in fact closer than they appear. Take this
into account in order to correctly judge the
distance of vehicles approaching from behind.
Manual adjustment
► Directly manouevre the mirror glass to adjust
the mirror concerned.
Electric adjustment
► Move control A to the right or to the left to
select the corresponding mirror.
►
Move control
B in any of the four directions
to adjust.
►
Return control A
to its central position.
Manual folding
The mirrors can be folded manually (parking
obstruction, narrow garage, etc.).
►
T
urn the mirror towards the vehicle.
Electric folding
Depending on equipment, the mirrors can be
folded electrically from the inside, with the
vehicle parked and the ignition on.
► Press control C.
Lock the vehicle from the outside.
Electric unfolding
► From outside: unlock the vehicle.
► From inside: with the ignition on, press
control
C.
Demisting/Defrosting
Demisting/defrosting of the door mirrors
operates by pressing on the rear screen
defrost control.
For more information on Rear screen
demisting/defrosting , refer to the
corresponding section.
Interior rear view mirror
Equipped with an anti-dazzle system, which
darkens the mirror glass and reduces the
nuisance to the driver caused by the sun,
headlamps of other vehicles, etc.
Page 31 of 176

29
Ease of use and comfort
3Manual model
Day/night position
► Pull the lever to change to the anti-dazzle
"night” position.
►
Push the lever to change to the normal "day"
position.
Adjustment
►
Set the mirror to the normal “day” position.
Rear bench seat
Bench seat with folding cushions (giving access
to storage compartments) and split folding
backrests (2/3-1/3).
Rear head restraints
High position (use):
► Pull the head restraint fully up.
Low position (stowing; when the seats are not
in use):
►
Press the lug
A to release the head restraint
and push it down.
The rear head restraints can be removed.
Removing a head restraint
► Pull the head restraint fully up.
► Press the lug A to release the head restraint
and remove it completely.
►
Store the head restraint.
Refitting a head restraint
► Insert the head restraint rods into the guides
in the corresponding seat backrest.
►
Push the head restraint down as far as it will
go.
►
Press the lug
A to release the head restraint
and push it fully down.
Never drive with passengers seated at
the rear when the head restraints are
removed; the head restraints should be in
place and in the high position.
The head restraint for the centre seat
and those for the outer seats are not
interchangeable.
Folding the backrests
Manoeuvring the backrests should only
be done when the vehicle is stationary.
First steps:
►
Lower the head restraints.
►
If necessary
, move the front seats forward.
►
Check that no person or object might
interfere with the folding of the backrests
(clothing, luggage, etc.).
►
Check that the seat belts are free, not
engaged in the buckles. Release them so that
the backrest can be moved.
► Pull the strap 1 firmly to release the backrest.
Page 32 of 176
.
For more information on the Tool kit,
refer to t")
30
Ease of use and comfort
► With the cushion raised, lift the carpet to
access the storage compartments and the tool
kit (depending on version).
For more information on the Tool kit,
refer to the corresponding section.
Repositioning the seat
cushions
Before lowering the seat cushion to the
normal position, make sure that you take
the seat belt buckle and hold it during the
operation.
► Remove hook 3 from the head restraint rod.
► Guide seat cushion 2 to the horizontal
position and push it firmly to lock it.
► Check that the release strap 1 has correctly
returned to its position, then store it in its case.
► Check that the seat belt buckles did not slip
under the seat cushions during the manoeuvre.
► Guide the backrest 2 down to the horizontal
position.
The maximum load distributed over the backrests is 100 kg. A heavier load could
damage the backrest frames.
Repositioning the backrests
First check that the outer seat belts are
lying vertically flat alongside the backrest
latching rings.
► Put the backrest 2 in the upright position and
push it firmly to latch it home.
►
Check that the release strap 1
has correctly
returned to its position.
►
Ensure that the outer seat belts were not
trapped during the operation.
Please note: an incorrectly latched
backrest compromises the safety of
passengers in the event of sudden braking or
an accident.
Tilting the seat cushions
Manoeuvring the seat cushions must
only be done with the vehicle stationary.
First steps:
►
If necessary
, move the front seats forward.
►
Check that no person or object could interfere
with the tilting of the seat cushions (clothing,
luggage, etc.).
►
Check that the seat belts are free, not
engaged in the buckles.
► Take strap 1 out of the case (located under
the seat cushion) and pull it firmly to release the
seat cushion. ►
T
ilt the seat cushion 2 to the vertical position
(against the backrest).
► Attach hook 3 of strap 1 onto the head
restraint rod.
Under-seat storage boxes
Storage boxes are accessible under the
cushions of the rear bench seat.
 1
1 2
2 3
3 4
4 5
5 6
6 7
7 8
8 9
9 10
10 11
11 12
12 13
13 14
14 15
15 16
16 17
17 18
18 19
19 20
20 21
21 22
22 23
23 24
24 25
25 26
26 27
27 28
28 29
29 30
30 31
31 32
32 33
33 34
34 35
35 36
36 37
37 38
38 39
39 40
40 41
41 42
42 43
43 44
44 45
45 46
46 47
47 48
48 49
49 50
50 51
51 52
52 53
53 54
54 55
55 56
56 57
57 58
58 59
59 60
60 61
61 62
62 63
63 64
64 65
65 66
66 67
67 68
68 69
69 70
70 71
71 72
72 73
73 74
74 75
75 76
76 77
77 78
78 79
79 80
80 81
81 82
82 83
83 84
84 85
85 86
86 87
87 88
88 89
89 90
90 91
91 92
92 93
93 94
94 95
95 96
96 97
97 98
98 99
99 100
100 101
101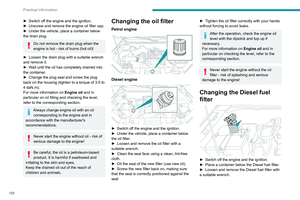 102
102 103
103 104
104 105
105 106
106 107
107 108
108 109
109 110
110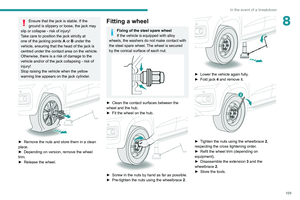 111
111 112
112 113
113 114
114 115
115 116
116 117
117 118
118 119
119 120
120 121
121 122
122 123
123 124
124 125
125 126
126 127
127 128
128 129
129 130
130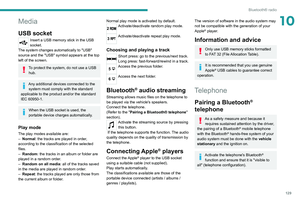 131
131 132
132 133
133 134
134 135
135 136
136 137
137 138
138 139
139 140
140 141
141 142
142 143
143 144
144 145
145 146
146 147
147 148
148 149
149 150
150 151
151 152
152 153
153 154
154 155
155 156
156 157
157 158
158 159
159 160
160 161
161 162
162 163
163 164
164 165
165 166
166 167
167 168
168 169
169 170
170 171
171 172
172 173
173 174
174 175
175