2021 Peugeot Landtrek remove seats
[x] Cancel search: remove seatsPage 27 of 176
25
Ease of use and comfort
3Correct driving position
For safety reasons, adjustments must
only be made when the vehicle is
stationary.
Before taking to the road and to make the most
of the ergonomic layout of the instruments and
controls, carry out these adjustments in the
following order:
–
head restraint height.
–
seat backrest angle.
–
seat cushion height.
–
longitudinal seat position.
–
steering wheel height and reach.
–
rear view mirror and door mirrors.
Once these adjustments have been
made, check that the instrument panel
can be viewed correctly from your driving
position.
Front seats
Front head restraints
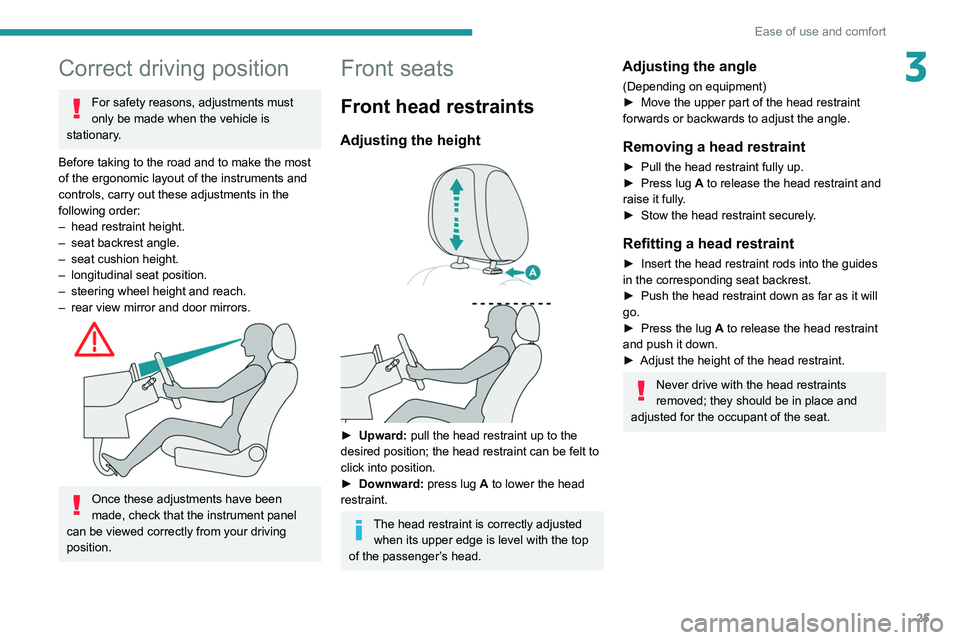
Adjusting the height
► Upward: pull the head restraint up to the
desired position; the head restraint can be felt to
click into position.
►
Downward:
press lug A to lower the head
restraint.
The head restraint is correctly adjusted when its upper edge is level with the top
of the passenger’s head.
Adjusting the angle
(Depending on equipment)
► Move the upper part of the head restraint
forwards or backwards to adjust the angle.
Removing a head restraint
► Pull the head restraint fully up.
► Press lug A to release the head restraint and
raise it fully.
►
Stow the head restraint securely
.
Refitting a head restraint
► Insert the head restraint rods into the guides
in the corresponding seat backrest.
►
Push the head restraint down as far as it will
go.
►
Press the lug
A to release the head restraint
and push it down.
►
Adjust the height of the head restraint.
Never drive with the head restraints
removed; they should be in place and
adjusted for the occupant of the seat.
Page 31 of 176
29
Ease of use and comfort
3Manual model
Day/night position
► Pull the lever to change to the anti-dazzle
"night” position.
►
Push the lever to change to the normal "day"
position.
Adjustment
►
Set the mirror to the normal “day” position.
Rear bench seat
Bench seat with folding cushions (giving access
to storage compartments) and split folding
backrests (2/3-1/3).
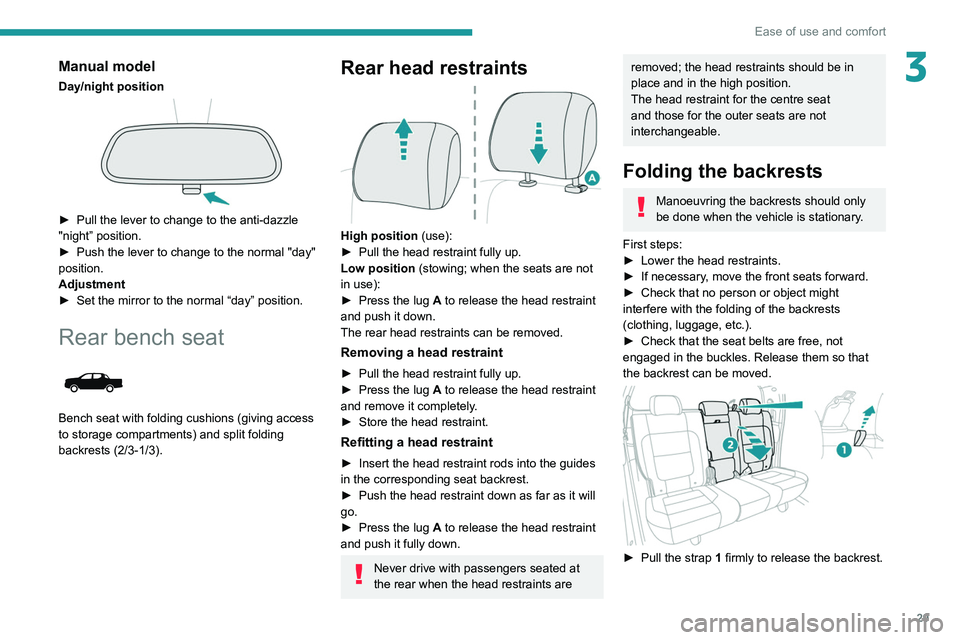
Rear head restraints
High position (use):
► Pull the head restraint fully up.
Low position (stowing; when the seats are not
in use):
►
Press the lug
A to release the head restraint
and push it down.
The rear head restraints can be removed.
Removing a head restraint
► Pull the head restraint fully up.
► Press the lug A to release the head restraint
and remove it completely.
►
Store the head restraint.
Refitting a head restraint
► Insert the head restraint rods into the guides
in the corresponding seat backrest.
►
Push the head restraint down as far as it will
go.
►
Press the lug
A to release the head restraint
and push it fully down.
Never drive with passengers seated at
the rear when the head restraints are
removed; the head restraints should be in
place and in the high position.
The head restraint for the centre seat
and those for the outer seats are not
interchangeable.
Folding the backrests
Manoeuvring the backrests should only
be done when the vehicle is stationary.
First steps:
►
Lower the head restraints.
►
If necessary
, move the front seats forward.
►
Check that no person or object might
interfere with the folding of the backrests
(clothing, luggage, etc.).
►
Check that the seat belts are free, not
engaged in the buckles. Release them so that
the backrest can be moved.
► Pull the strap 1 firmly to release the backrest.
Page 32 of 176
30
Ease of use and comfort
► With the cushion raised, lift the carpet to
access the storage compartments and the tool
kit (depending on version).
For more information on the Tool kit,
refer to the corresponding section.
Repositioning the seat
cushions
Before lowering the seat cushion to the
normal position, make sure that you take
the seat belt buckle and hold it during the
operation.
► Remove hook 3 from the head restraint rod.
► Guide seat cushion 2 to the horizontal
position and push it firmly to lock it.
► Check that the release strap 1 has correctly
returned to its position, then store it in its case.
► Check that the seat belt buckles did not slip
under the seat cushions during the manoeuvre.
► Guide the backrest 2 down to the horizontal
position.
The maximum load distributed over the backrests is 100 kg. A heavier load could
damage the backrest frames.
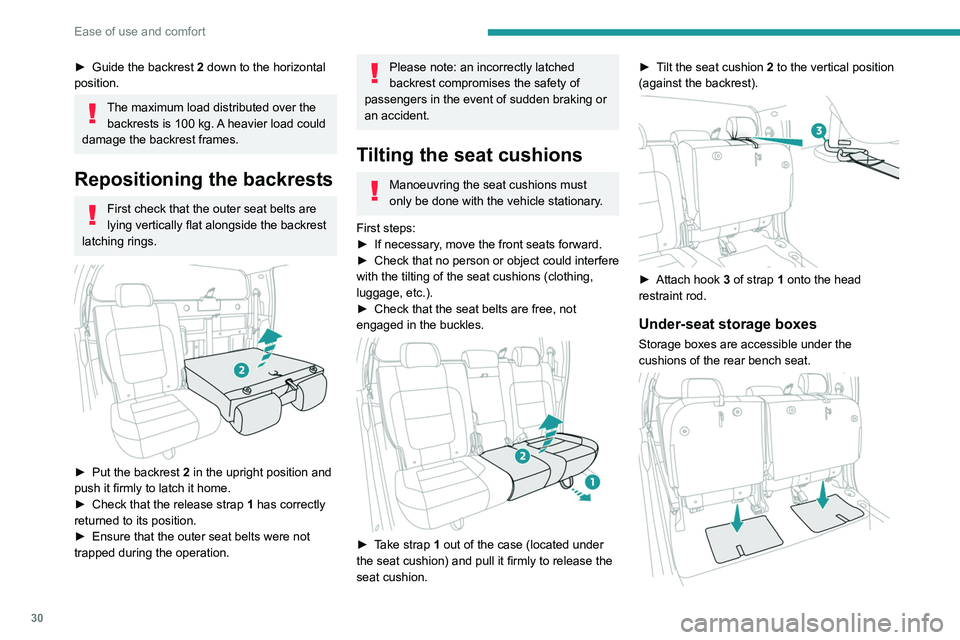
Repositioning the backrests
First check that the outer seat belts are
lying vertically flat alongside the backrest
latching rings.
► Put the backrest 2 in the upright position and
push it firmly to latch it home.
►
Check that the release strap 1
has correctly
returned to its position.
►
Ensure that the outer seat belts were not
trapped during the operation.
Please note: an incorrectly latched
backrest compromises the safety of
passengers in the event of sudden braking or
an accident.
Tilting the seat cushions
Manoeuvring the seat cushions must
only be done with the vehicle stationary.
First steps:
►
If necessary
, move the front seats forward.
►
Check that no person or object could interfere
with the tilting of the seat cushions (clothing,
luggage, etc.).
►
Check that the seat belts are free, not
engaged in the buckles.
► Take strap 1 out of the case (located under
the seat cushion) and pull it firmly to release the
seat cushion. ►
T
ilt the seat cushion 2 to the vertical position
(against the backrest).
► Attach hook 3 of strap 1 onto the head
restraint rod.
Under-seat storage boxes
Storage boxes are accessible under the
cushions of the rear bench seat.
Page 58 of 176

56
Safety
Malfunction
If this warning lamp comes on in the
instrument panel, you must contact a
PEUGEOT dealer or a qualified workshop to
have the system checked.
The airbags may not be deployed in the event of
a serious impact.
In the event of a minor impact or bump at
the side of the vehicle or if the vehicle
rolls over, the airbags may not be deployed.
In the event of a rear or front collision, none of
the lateral airbags are deployed.
Advice
For the airbags to be fully effective,
observe the safety recommendations
below.
Adopt a normal upright sitting position.
Fasten the seat belt ensuring it is correctly
positioned and adjusted.
Do not leave anything between the occupants
and the airbags (a child, pet, object, etc.), nor
fix or attach anything close to or in the way of
the airbag release trajectory; this could cause
injuries during their deployment.
Never modify the original definition of your
vehicle, particularly in the area directly around
the airbags.
After an accident or if the vehicle has been
stolen, have the airbag systems checked.
All work on the airbag systems must only
be performed by a PEUGEOT dealer or a
qualified workshop.
Even if all of the precautions mentioned
are observed, a risk of injury or of minor
burns to the head, chest or arms cannot be
ruled out when an airbag is deployed. The
airbag inflates almost instantly (within a few
milliseconds) then deflates within the same
time discharging the hot gas via openings
provided for this purpose.
Front airbags
Do not drive holding the steering wheel
by its spokes or resting your hands on the
centre part of the wheel.
Passengers must not place their feet on the
dashboard.
Do not smoke as deployment of the airbags
can cause burns or the risk of injury from a
cigarette or pipe.
Never remove or pierce the steering wheel or
hit it violently.
Do not fix or attach anything to the steering
wheel or dashboard, as this could cause
injuries when the airbags are deployed.
Lateral airbags
Use only approved covers on the seats,
compatible with the deployment of the lateral
airbags. For information on the range of seat
covers suitable for your vehicle, contact a
PEUGEOT dealer.
Do not fix or attach anything to the seat
backrests (clothes, etc.), as this could cause
injuries to the thorax or arm when the lateral
airbag is deployed.
Do not sit with the upper part of the body any
nearer to the door than necessary.
The vehicle's front door panels include side
impact sensors.
A damaged door or any unauthorised or
incorrectly executed work (modification or
repair) on the front doors or their interior trim
could compromise the operation of these
sensors - risk of malfunction of the lateral
airbags!
Such work must only be done by a PEUGEOT
dealer or a qualified workshop.
Curtain airbags
Do not fix or attach anything to the roof,
as this could cause head injuries when the
curtain airbag is deployed.
Do not remove the grab handles installed on
the roof, as they play a part in securing the
curtain airbags.
Child seats
The regulations on carrying children are specific to each country. Refer to the
legislation in force in your country.
For maximum safety, please observe the
following recommendations:
– All children under the age of 12 or less
than 1.5 metres tall must travel in approved
child seats suited to their weight , on seats
fitted with a seat belt or ISOFIX mountings.
– Statistically, the safest seats in your
vehicle for carrying children are the rear
seats.
– Children weighing less than 9 kg must
travel in the "rearward facing" position,
whether in the front or rear of the vehicle.
It is recommended that children travel
on the rear seats of the vehicle:
– ‘rearward facing’ up to the age of 3,
– ‘forward facing’ over the age of 3.
Make sure that the seat belt is correctly
positioned and tightened.
For child seats with a support leg, ensure that
the support leg is in firm and steady contact
with the floor.
Recommended child seats and
installation possibilities
For the recommended child seats and
installation possibilities in the vehicle, refer to
the seat manufacturer's instructions or contact
a PEUGEOT dealer.
Page 59 of 176
57
Safety
5For maximum safety, please observe the
following recommendations:
–
All children under the age of 12 or less
than 1.5 metres tall must travel in approved
child seats suited to their weight , on seats
fitted with a seat belt or ISOFIX mountings.
–
Statistically
, the safest seats in your
vehicle for carrying children are the rear
seats.
–
Children weighing less than 9 kg must
travel in the "rearward facing" position,
whether in the front or rear of the vehicle.
It is recommended that children travel
on the rear seats of the vehicle:
–
‘rearward facing’ up to the age of 3,
–
‘forward facing’ over the age of 3.
Make sure that the seat belt is correctly
positioned and tightened.
For child seats with a support leg, ensure that
the support leg is in firm and steady contact
with the floor.
Recommended child seats and
installation possibilities
For the recommended child seats and
installation possibilities in the vehicle, refer to
the seat manufacturer's instructions or contact
a PEUGEOT dealer.
Advice
An incorrectly installed child seat compromises the child's safety in the
event of an accident.
Ensure that there is no seat belt or seat belt
buckle under the child seat, as this could
destabilise it.
Remember to fasten the seat belts or the
harness of child seats, keeping the slack
relative to the child's body to a minimum,
even for short journeys.
When installing a child seat using the seat
belt, ensure that the seat belt is tightened
correctly on the child seat and that it secures
the child seat firmly on the seat of the vehicle.
If the passenger seat is adjustable, move it
forwards if necessary.
Remove the head restraint before
installing a child seat with a backrest on a
passenger seat.
Ensure that the head restraint is stored or
attached securely to prevent it from being
thrown around the vehicle in the event of
sharp braking. Refit the head restraint once
the child seat has been removed.
Installing a booster seat
The chest part of the seat belt must be
positioned on the child's shoulder without
touching the neck.
Ensure that the lap part of the seat belt
passes correctly over the child's thighs.
Use a booster seat with backrest, equipped
with a belt guide at shoulder level.
Additional protections
To prevent accidental opening of the
doors and rear windows, use the "Child lock".
Take care not to open the rear windows by
more than one third.
To protect young children from the rays of the
sun, fit side blinds on the rear windows.
As a safety precaution, do not leave:
–
a child alone and unattended in a vehicle,
–
a child or an animal in a vehicle which is
exposed to the sun, with the windows closed,
–
the keys within reach of children inside the
vehicle.
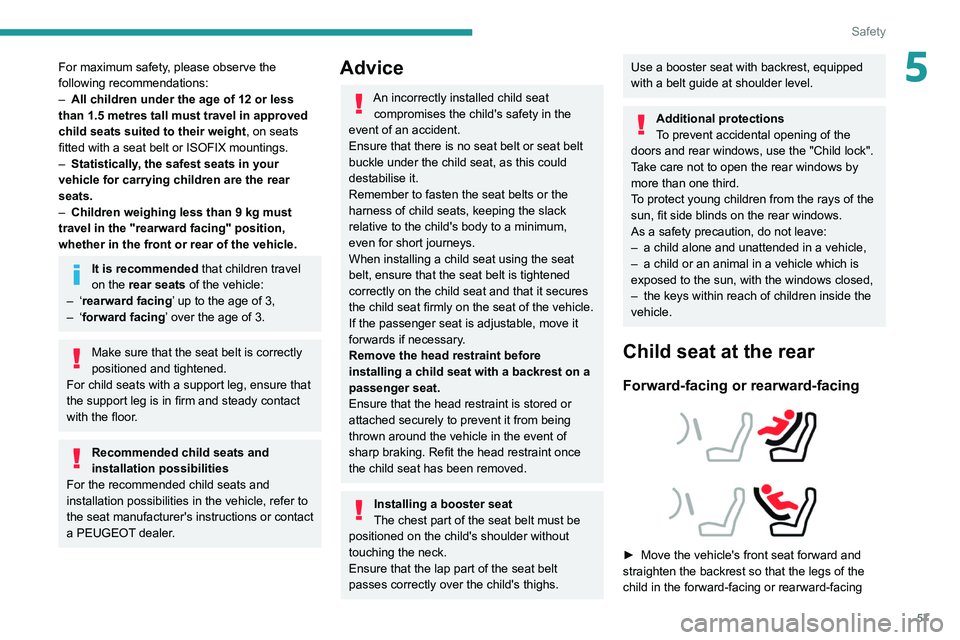
Child seat at the rear
Forward-facing or rearward-facing
► Move the vehicle's front seat forward and
straighten the backrest so that the legs of the
child in the forward-facing or rearward-facing
Page 61 of 176
59
Safety
5
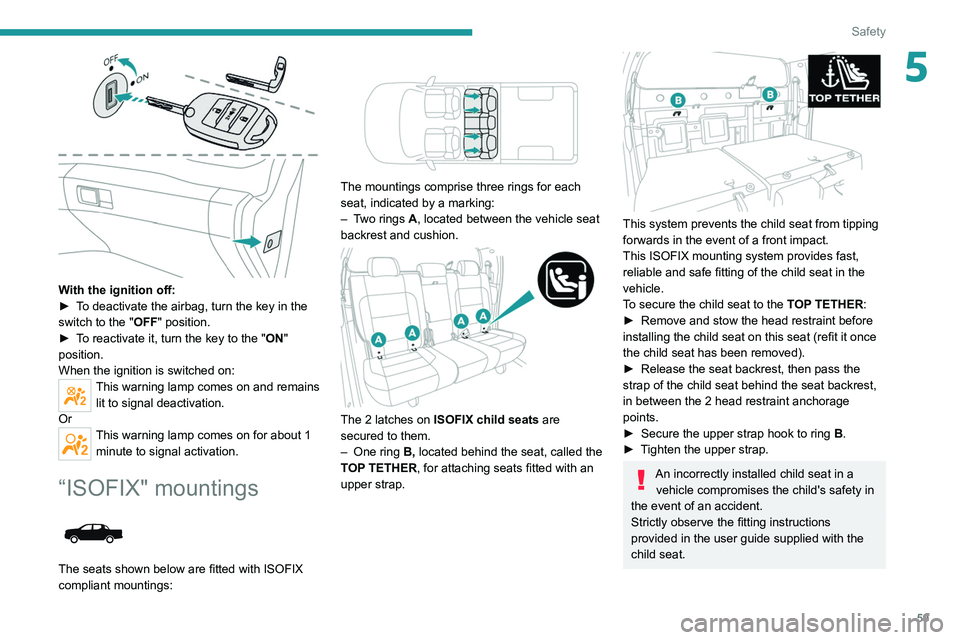
With the ignition off:
► T o deactivate the airbag, turn the key in the
switch to the "OFF " position.
►
T
o reactivate it, turn the key to the "ON"
position.
When the ignition is switched on:
This warning lamp comes on and remains lit to signal deactivation.
Or
This warning lamp comes on for about 1 minute to signal activation.
“ISOFIX" mountings
The seats shown below are fitted with ISOFIX
compliant mountings:
The mountings comprise three rings for each
seat, indicated by a marking:
–
T
wo rings A, located between the vehicle seat
backrest and cushion.
The 2 latches on ISOFIX child seats are
secured to them.
–
One ring
B, located behind the seat, called the
TOP TETHER, for attaching seats fitted with an
upper strap.
This system prevents the child seat from tipping
forwards in the event of a front impact.
This ISOFIX mounting system provides fast,
reliable and safe fitting of the child seat in the
vehicle.
To secure the child seat to the TOP TETHER:
►
Remove and stow the head restraint before
installing the child seat on this seat (refit it once
the child seat has been removed).
►
Release the seat backrest, then pass the
strap of the child seat behind the seat backrest,
in between the 2 head restraint anchorage
points.
►
Secure the upper strap hook to ring
B
.
►
T
ighten the upper strap.
An incorrectly installed child seat in a vehicle compromises the child's safety in
the event of an accident.
Strictly observe the fitting instructions
provided in the user guide supplied with the
child seat.
Page 103 of 176
101
Practical information
7► Clean the seal face using a clean, lint-free
cloth.
►
Screw the new filter back on, making sure
that the seal is correctly positioned against the
contact surface.
►
T
ighten the Diesel fuel filter correctly with
your hands without forcing to avoid leaks.
After the operation, bleed the air contained in the fuel system.
For more information on Running out of fuel
(Diesel) and in particular the procedure for
bleeding the Diesel
fuel system, refer to the
corresponding section.
Cleaning the throttle body
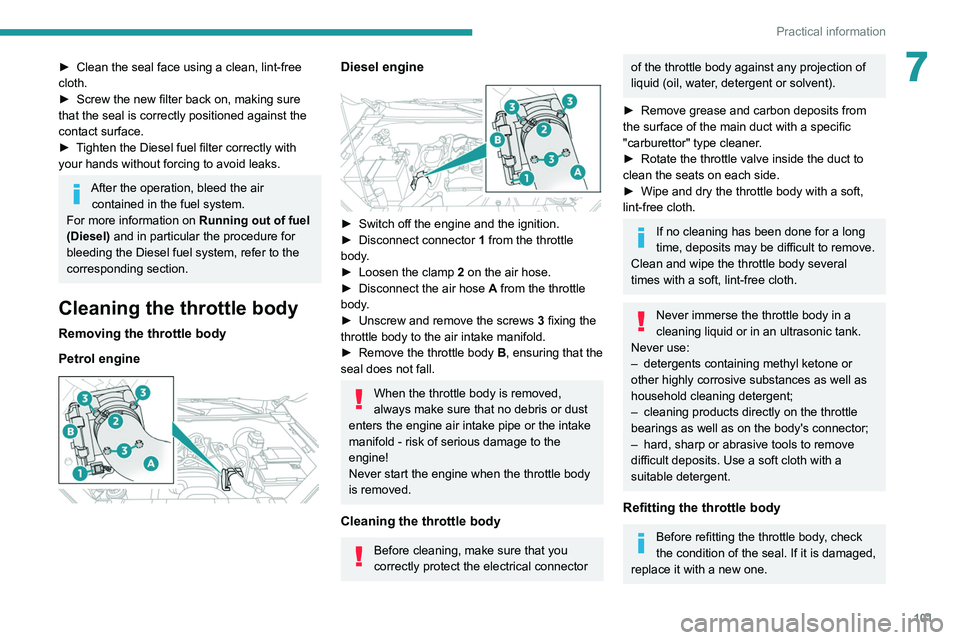
Removing the throttle body
Petrol engine
Diesel engine
► Switch off the engine and the ignition.
► Disconnect connector 1
from the throttle
body.
►
Loosen the clamp 2
on the air hose.
►
Disconnect the air hose A
from the throttle
body.
►
Unscrew and remove the screws 3
fixing the
throttle body to the air intake manifold.
►
Remove the throttle body B
, ensuring that the
seal does not fall.
When the throttle body is removed,
always make sure that no debris or dust
enters the engine air intake pipe or the intake
manifold - risk of serious damage to the
engine!
Never start the engine when the throttle body
is removed.
Cleaning the throttle body
Before cleaning, make sure that you
correctly protect the electrical connector
of the throttle body against any projection of
liquid (oil, water, detergent or solvent).
►
Remove grease and carbon deposits from
the surface of the main duct with a specific
"carburettor" type cleaner
.
►
Rotate the throttle valve inside the duct to
clean the seats on each side.
►
Wipe and dry the throttle body with a soft,
lint-free cloth.
If no cleaning has been done for a long
time, deposits may be difficult to remove.
Clean and wipe the throttle body
several
times with a soft, lint-free cloth.
Never immerse the throttle body in a
cleaning liquid or in an ultrasonic tank.
Never use:
–
detergents containing methyl ketone or
other highly corrosive substances as well as
household cleaning detergent;
–
cleaning products directly on the throttle
bearings as well as on the body's connector;
–
hard, sharp or abrasive tools to remove
difficult deposits. Use a soft cloth with a
suitable detergent.
Refitting the throttle body
Before refitting the throttle body, check
the condition of the seal. If it is damaged,
replace it with a new one.