2021 Peugeot Landtrek radio controls
[x] Cancel search: radio controlsPage 5 of 176

3
Contents
7Practical information
Recommended fuel 88
Refuelling 88
Towing device 89
Snow chains 89
Roof bars 90
Bonnet 90
Engine compartment 91
Checking levels 92
Checks
94
Maintenance 96
Free-wheeling 102
Advice on care and maintenance 102
8In the event of a breakdown
Warning triangle 104
Fire extinguisher 104
Running out of fuel (Diesel) 105
Tool kit 105
Spare wheel 106
Changing a bulb 11 0
Changing a fuse 11 3
12
V battery 11 6
Towing the vehicle 11 9
9Technical data
Engine technical data and towed loads 122
Petrol engines 123
Diesel engines 124
Dimensions 125
Identification markings 125
10Bluetooth® radio
Menus 127
Steering mounted controls 128
Radio 128
Media 129
Telephone 129
11Peugeot Connect 10" Touchscreen
First steps 131
Steering mounted controls
131
Menus 132
Navigation 133
Radio 133
Music player 133
Telephone 134
Applications 135
Settings 136
■
Alphabetical index
Page 15 of 176

13
Instruments
1
► Press the control on the steering wheel and
select “Reinitialise”.
Only trip "2” can be reset; trip "1” is
automatically reset after the vehicle has
been switched off for a few minutes.
Definitions
Range
(miles or km)Distance that can still be travelled with the
fuel remaining in the tank (based on the
average fuel consumption over the last few miles
(kilometres) travelled).
This value may vary following a change in driving
style or relief, resulting in a significant change in
the current fuel consumption.
When the range falls below 19 miles (30
km),
dashes are displayed.
After filling with at least 5 litres of fuel, the range
is recalculated and is displayed if it exceeds 62
miles (100
km).
If dashes instead of figures continue to be
displayed while driving, contact a PEUGEOT
dealer or a qualified workshop.
Average fuel consumption
(mpg or l/100 km or km/l)
Calculated since the last trip computer reset.
Average speed
(mph or km/h)Calculated since the last trip computer
reset.
Distance travelled
(miles or km)Calculated since the last trip computer
reset.
Monochrome screen
Displays
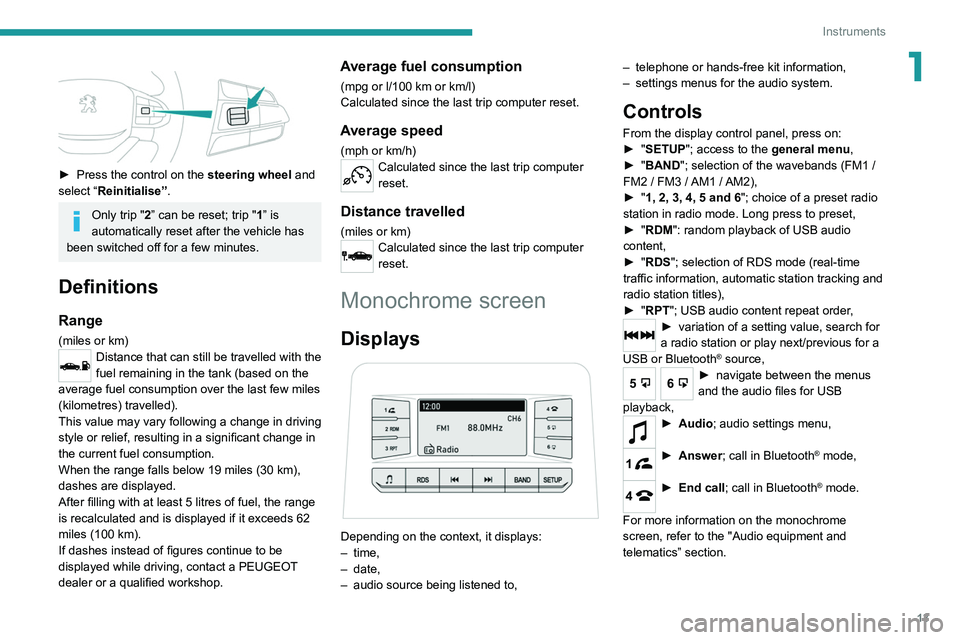
Depending on the context, it displays:
– time,
–
date,
–
audio source being listened to, –
telephone or hands-free kit information,
–
settings menus for the audio system.
Controls
From the display control panel, press on:
►
" SETUP"; access to the general menu,
►
"
BAND "; selection of the wavebands (FM1
/
FM2
/ FM3 / AM1 / AM2),
►
"
1, 2, 3, 4, 5 and 6"; choice of a preset radio
station in radio mode. Long press to preset,
►
"
RDM": random playback of USB audio
content,
►
"
RDS"; selection of RDS mode (real-time
traffic information, automatic station tracking and
radio station titles),
►
"
RPT"; USB audio content repeat order,
► variation of a setting value, search for
a radio station or play next/previous for a
USB or Bluetooth
® source,
56► navigate between the menus
and the audio files for USB
playback,
► Audio; audio settings men u,
1► Answer; call in Bluetooth® mode,
4► End call; call in Bluetooth® mode.
For more information on the monochrome
screen, refer to the "Audio equipment and
telematics” section.
Page 16 of 176

14
Instruments
Touch screen
This system gives access to the following elements:
–
Permanent
display of the time.
–
Display and reminder of air conditioning
system settings.
–
V
ehicle functions and equipment setting
menus.
–
Audio system and telephone controls and
display of related information.
–
Display of visual manoeuvring aid functions
–
Navigation system controls and
display
of related information (depending on
version).
For safety reasons, always stop the
vehicle before performing operations
that require sustained attention.
Some functions are not accessible while
driving.
Recommendations
This screen is of the capacitive type.
Do not use pointed objects on the touch screen.
Do not touch the touch screen with wet hands.
Use a soft, clean cloth to clean the touch screen.
Principles
Use the buttons indicated on the touch screen to
access the various menus.
* Depending on equipment.
After a few moments with no action on the second page, the first page is
displayed automatically.
To deactivate/activate a function, press the slider
that appears opposite the function. The slider
changes to orange to indicate that the function
is activated.
Return to the menu page.
Menus
It is possible to modify the appearance of
the touch screen by selecting a different
background and display mode ( Classic,
Sport or Technology ). Depending on the
selected mode, the menus can be displayed
in various locations and in different ways.
For more information on changing the
appearance of the touch screen, refer to the
Audio equipment and telematics section.
Example with the " Classic” display mode.
Media
Refer to the “Audio equipment and
telematics” section.
Radio
Refer to the “Audio equipment and
telematics” section.
Navigation*
Refer to the “Audio equipment and
telematics” section.
Telephone
Refer to the “Audio equipment and
telematics” section.
Settings
Main system settings.
Vehicle settings
Activation, deactivation and settings for
certain functions.
File
Direct access to system content or USB
content.
Help
Page 38 of 176

36
Ease of use and comfort
Opening
► To access the closed storage compartment,
lift the lever to open the lid.
This storage compartment can be used to house portable devices (mobile phone,
MP3 player, etc.) which can be connected to
the USB/Jack sockets or charged from the 12
V accessories socket in the centre console.
Closing
► Close the cover until it locks.
Sun visor
► With the ignition on, raise the concealing
flap; depending on the version, the mirror is
illuminated automatically.
Glove box
► To open the glove box, raise the handle.
With the ignition on, the glove box is lit when
open.
Depending on version, it contains an adjustable
ventilation nozzle, distributing the same
conditioned air as the vents in the passenger
compartment.
Never drive with the glove box open
when a passenger is at the front. It may
cause injury during sharp deceleration!
Cigarette lighter/12 V
accessory socket(s)
► To use the cigarette lighter, press it in and
wait a few seconds until it pops out automatically.
► To use a 12 V accessory (max. power:
120 W), remove the cigarette lighter and connect
a suitable adaptor.
You can use this socket to connect a telephone
charger, a bottle warmer, etc.
After use, put the cigarette lighter back into place
straight away.
The connection of an electrical device not approved by PEUGEOT, such as a
USB charger, may adversely affect the
operation of vehicle electrical systems,
causing faults such as poor radio reception or
interference with displays in the screens.
USB socket(s)
Sockets 1, 2 and 3 (depending on version) can
be used to charge a portable device.
Socket
1 also enables audio files sent to your
audio system to be played via the vehicle's
speakers.
These files can be managed using the steering
mounted controls or those on the touch screen.
Depending on version,
socket 1 also allows a
smartphone to be connected by MirrorLink
TM,
Android Auto® or CarPlay®, enabling certain
smartphone applications to be used on the touch
screen.
For best results, use a cable made or approved
by the device manufacturer.
These applications can be managed using the
steering-mounted controls or the audio system
controls.
When the USB port is used, the portable
device charges automatically.
A message is displayed if the power drawn
by the portable device exceeds the current
supplied by the vehicle.
For more information on how to use this
equipment, refer to the Audio equipment
and telematics section .
Front armrest
(Depending on version)
It includes a storage space.
Page 99 of 176

97
Practical information
7In the event of contact with the eyes,
immediately rinse the eyes with large
amounts of water or with an eye wash
solution for at least 15 minutes. Seek medical
attention if you feel a persistent burning
sensation or irritation.
Never go underneath the vehicle raised
using a jack; always use an axle
stand-type support.
When working on the vehicle's electrical
system, take care not to cause a short circuit -
risk of burns and fire.
Flammable products and all sources of heat
(sparks, for example) must be kept away from
the battery, the fuel tank and all components
of the fuel system.
Never run the engine in a closed space
without sufficient ventilation; always use a
ventilation system such as an exhaust gas
extractor, for example.
Never leave liquids (oil, coolant) unattended.
Keep these liquids out of the reach of children
and animals.
The liquids and components replaced must have the same characteristics and
comply with the manufacturer's
recommendations.
General checks
Check the following components to ensure
proper operation and longevity of the vehicle.
For more information on the components
to be
checked, refer to the Checking levels, Checks
and Advice on care
sections.
Daily checks
Check that all vehicle lamps (front and
rear) are working properly.
Check the condition of the door mirrors and
the adjustment controls.
Check that all the doors can be opened,
closed and locked correctly.
Regularly check all levels, the condition of the
tyres and the bodywork.
Monthly checks
Check:
–
The engine coolant level.
–
The absence of leaks on all the pipes and
hoses visible on the vehicle as well as the
tanks.
–
The proper functioning of the elements of
the: •
Heating and ventilation system.
•
Air conditioning system.
•
Parking brake (application and release).
•
Horn.
–
The tightening of the wheel nuts (if
necessary
, retighten them to the specific
tightening values).
–
The good condition of the wipers.
– The absence of significant play in the
steering wheel and steering.
–
The correct travel of the brake pedal as
well as the clutch pedal.
General recommendations
related to maintenance
operations
Electronic engine management
computer
The electronic computer is not completely
waterproof. When performing maintenance
in the rain or washing the engine, it must be
protected from water.
Never remove or disconnect any part of the
electronic injection system to avoid the entry
of moisture, oil or any other foreign body.
Do not install a radio antenna or other
equipment likely to generate interference near
the electronic computer.
Do not expose the electronic computer to a
temperature higher than 105°C.
Before any welding operation on the vehicle,
it is essential to disconnect the electronic
computer - risk of damage to the electronic
system components.
Fuel system
All work on the fuel system must be
carried out only by a PEUGEOT dealer or a
qualified workshop.
Page 130 of 176

128
Bluetooth® radio
Media
USB socket
Insert a USB memory stick in the USB
socket.
The system changes automatically to "USB"
source and the "USB" symbol appears at the top
left of the screen.
To protect the system, do not use a USB hub.
Any additional devices connected to the system must comply with the standard
applicable to the product and/or the standard
IEC 60950-1.
When the USB socket is used, the
portable device charges automatically.
Play mode
The play modes available are:
– Normal: the tracks are played in order,
according to the classification of the selected
files.
– Random: the tracks in an album or folder are
played in a random order.
– Random on all media : all of the tracks saved
in the media are played in random order.
– Repeat: the tracks played are only those from
the current album or folder.
Radio:
Short press: Manual step-by-step search
up/down for radio stations
Long press: automatic search of a radio station
Audio
:
Short press: go to the previous/next track
Long press: fast navigation in a track
Short press: selection of the wave ranges
(FM1/FM2/FM3/AM1/AM2)
Radio/Audio:
Short press: enter configuration mode
(time, sound environment, language settings,
etc.)
Short press on the arrows: combination of
settings.
The settings are automatically saved if no action
is taken for 5 seconds.
Steering mounted controls
Change of sound source (radio,
Bluetooth® audio streaming if phone
connected, or USB if USB key connected)”.
Volume adjustment.
Telephone: ending a call.
Radio: selection of the previous radio
station (among the memorised radio stations).
Audio: go to the previous track.
Telephone: answering a call.
Radio: selection of the next radio station (among
the memorised radio stations).
Audio: go to the next track.
Radio
Selecting a station
Press this button to select the radio.
Press consecutively to select the
waveband (FM1/FM2/FM3/AM1/AM2).
Short press: manual search up/down for
radio stations
Long press: automatic search for radio stations
Memorising a station
123456
Once the radio station has been selected, press
and hold one of these buttons to save it.
RDS
The external environment (hills, buildings, tunnels, car parks,
underground, etc.) may block reception,
including in RDS
tracking mode. This is a
normal effect of the way in which radio waves
are transmitted and does not indicate any
failure of the audio system.
RDS, if activated, allows you to continue
listening to the same station by
automatically retuning to alternative
frequencies. However, in certain conditions,
RDS station tracking may not be possible
nationwide, as radio stations do not always
cover the entire country. This can explain the
loss of reception of a station during a journey.
Procedure
Press this button several times to access
the RDS mode (AF - TA - PTY).
Press these buttons to activate/deactivate
the RDS mode (AF - TA - PTY).
AF: When the alternative frequency function
is activated, the system selects the best RDS
frequency (region code) of the station being
listened to. However, in certain conditions,
following this station is not guaranteed over the
whole country, because radio stations do not
cover 100% of the area. When the reception
is weak, the frequency switches to a regional
station.
PTY: the PTY function selects a type of
programme that radio stations broadcast. All this
information is transmitted via the RDS signal on
some radios.
Page 132 of 176

130
Bluetooth® radio
The services available depend on the network, the SIM card and the
compatibility of the Bluetooth
® devices used.
Refer to your telephone’s user guide and your
service provider to check which services you
are able to access.
Procedure from the telephone
Activate the telephone’s Bluetooth®
function.
Select the name of the system in the list of
detected devices.
A message appears on the Bluetooth
® radio
screen to confirm the connection between the
two devices.
Completing the pairing
To complete the pairing, whichever procedure is used (from the telephone or
from the system), confirm that the code is the
same in the system and in the telephone and
validate.
If pairing fails, the number of attempts is not
restricted.
A message appears on the screen confirming the
pairing as well as the Bluetooth
® symbol at the
top left of the screen.
Information and advice
Go to the Brand's website for more
information (compatibility, more help,
etc.).
Managing connections
The telephone connection automatically includes hands free operation and audio
streaming.
Receiving a call
An incoming call is announced by a ring and a
superimposed display on the screen.
The volume of the telephone is independent of
the volume of the radio and the media.
1Answer the call.
Accept the call using the steering- mounted controls.
Ending a call
4During a call, press this button.
End the call (using the steering-mounted
controls).
Page 133 of 176

131
Peugeot Connect 10" Touchscreen
11Peugeot Connect 10"
Touchscreen
GPS navigation -
Applications - Multimedia
audio system - Bluetooth
®
telephone
The functions and settings described
vary according to the vehicle version and
configuration, as well as the country of sale.
For safety reasons and because they
require sustained attention by the driver,
the following operations must be carried out
with the vehicle stationary and the ignition
on:
–
Pairing the smartphone with the system via
Bluetooth.
–
Using the smartphone.
– Connection to the CarPlay®, MirrorLinkTM
or Android Auto applications (certain
applications interrupt their display while the
vehicle is moving).
–
W
atching a video (the video stops when the
vehicle starts to move again).
–
Changing the system settings and
configuration.
To perform system and map updates, visit a Peugeot dealer.
First steps
With the engine running, a short press
mutes the sound. A long press (3 sec)
puts the system on standby. A very long press
(10 sec) restarts the system.
With the ignition off, a short press turns the
system on.
Increase or decrease the volume using the
thumbwheel.
Use the main menu buttons on the touch screen
to access the sub-menus.
Press this button to return to the menu
carousel.
Slide your finger on the touch screen from
top to bottom to display a set of quick
settings (Bluetooth
® connection, volume,
brightness) and notifications.
Press this button to directly access the
quick settings (depending on equipment).
Press the back arrow to go back a level.
The touch screen is of the "capacitive" type.
To clean the screen, use a soft, non-abrasive
cloth (e.g. spectacles cloth) with no additional
product.
Do not use sharp objects on the screen.
Do not touch the screen with wet hands.
Steering mounted controls
Short press: change of multimedia
source.
Long press: access to smartphone voice
commands via the system (available only via the
CarPlay
® or Android Auto).Decrease volume.
Increase volume.
Telephone: refuse an incoming call, hang
up a call in progress.
Radio: short press, access to the previous
memorised station; long press, automatic search
for the previous station.
Media: short press, access to the previous track/
video; long press, fast-rewind in the track/video.
Telephone: answering an incoming call.
Radio: access to the next memorised
station; long press, automatic search for the next
station.