2021 NISSAN FRONTIER transmission
[x] Cancel search: transmissionPage 124 of 492
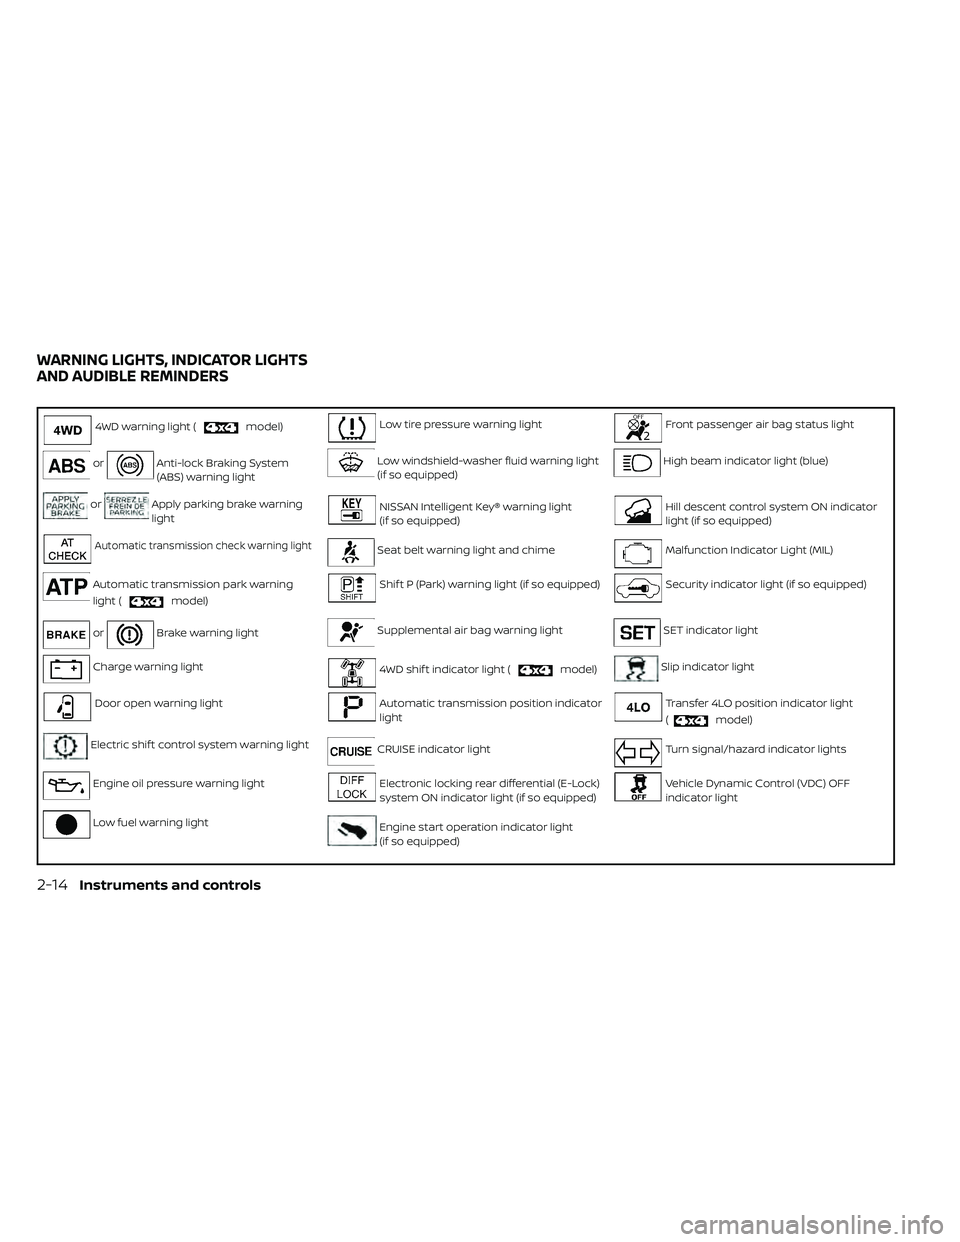
4WD warning light (model)Low tire pressure warning lightFront passenger air bag status light
orAnti-lock Braking System
(ABS) warning lightLow windshield-washer fluid warning light
(if so equipped)High beam indicator light (blue)
orApply parking brake warning
lightNISSAN Intelligent Key® warning light
(if so equipped)Hill descent control system ON indicator
light (if so equipped)
Automatic transmission check warning lightSeat belt warning light and chimeMalfunction Indicator Light (MIL)
Automatic transmission park warning
light (
model)
Shif t P (Park) warning light (if so equipped)Security indicator light (if so equipped)
orBrake warning lightSupplemental air bag warning lightSET indicator light
Charge warning light4WD shif t indicator light (model)Slip indicator light
Door open warning lightAutomatic transmission position indicator
lightTransfer 4LO position indicator light
(
model)
Electric shif t control system warning lightCRUISE indicator lightTurn signal/hazard indicator lights
Engine oil pressure warning lightElectronic locking rear differential (E-Lock)
system ON indicator light (if so equipped)Vehicle Dynamic Control (VDC) OFF
indicator light
Low fuel warning lightEngine start operation indicator light
(if so equipped)
WARNING LIGHTS, INDICATOR LIGHTS
AND AUDIBLE REMINDERS
2-14Instruments and controls
Page 126 of 492
If an ABS malfunction occurs, the anti-lock
function is turned off. The brake system
then operates normally but without anti-
lock assistance. For additional information,
refer to “Brake system” in the “Starting and
driving” section of this manual.
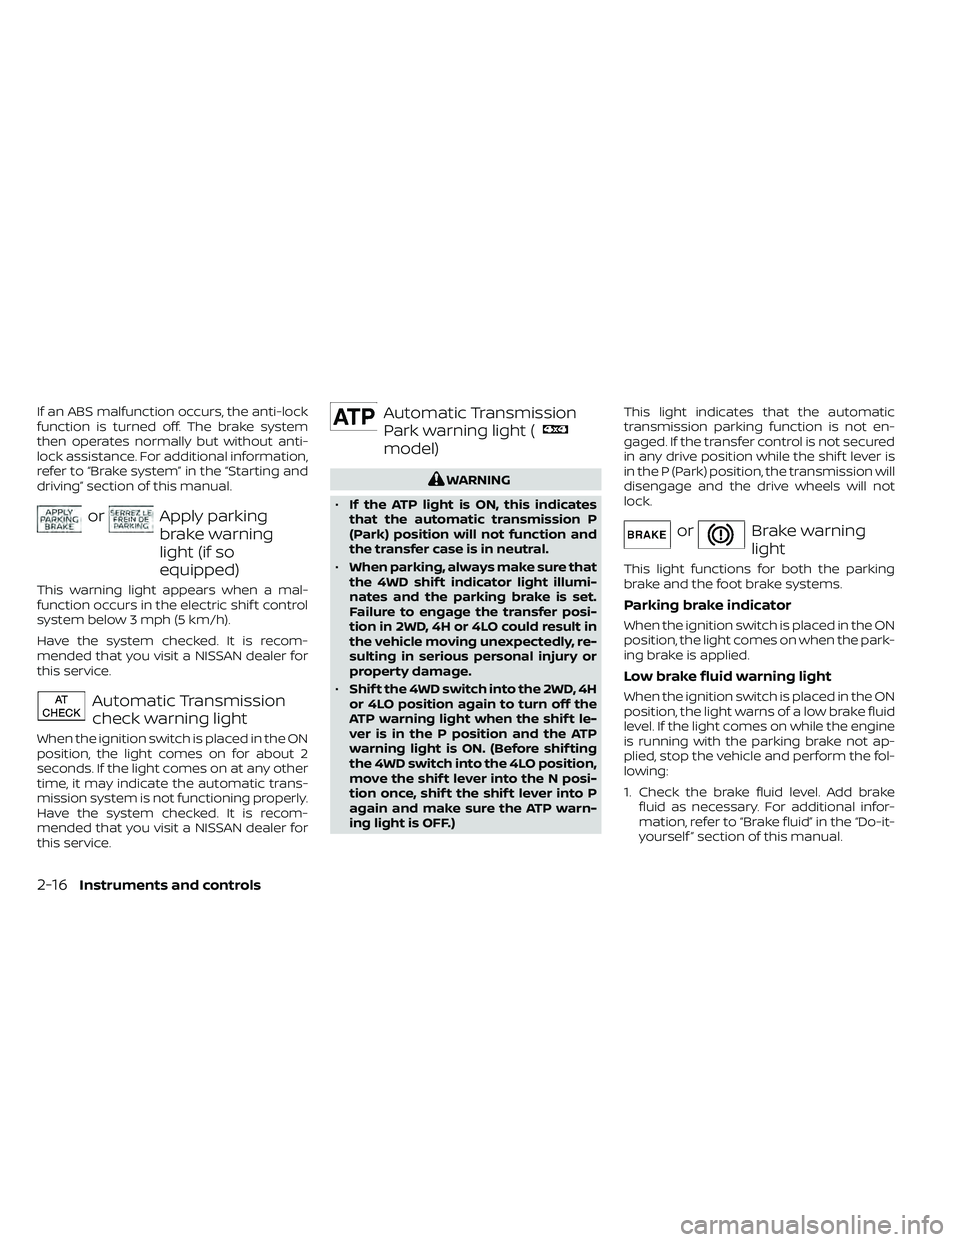
orApply parking
brake warning
light (if so
equipped)
This warning light appears when a mal-
function occurs in the electric shif t control
system below 3 mph (5 km/h).
Have the system checked. It is recom-
mended that you visit a NISSAN dealer for
this service.
Automatic Transmission
check warning light
When the ignition switch is placed in the ON
position, the light comes on for about 2
seconds. If the light comes on at any other
time, it may indicate the automatic trans-
mission system is not functioning properly.
Have the system checked. It is recom-
mended that you visit a NISSAN dealer for
this service.
Automatic Transmission
Park warning light (
model)
orBrake warning
light
This light functions for both the parking
brake and the foot brake systems.
Parking brake indicator
When the ignition switch is placed in the ON
position, the light comes on when the park-
ing brake is applied.
Low brake fluid warning light
When the ignition switch is placed in the ON
position, the light warns of a low brake fluid
level. If the light comes on while the engine
is running with the parking brake not ap-
plied, stop the vehicle and perform the fol-
lowing:
1. Check the brake fluid level. Add brakefluid as necessary. For additional infor-
mation, refer to “Brake fluid” in the “Do-it-
yourself ” section of this manual.
2-16Instruments and controls
Page 133 of 492
– Avoid hard acceleration or decelera-tion.
– Avoid steep uphill grades.
– If possible, reduce the amount of cargo being hauled or towed.
The MIL may stop blinking and come on
steady. Have the vehicle inspected. It is rec-
ommended that you visit a NISSAN dealer
for this service. You do not need to have
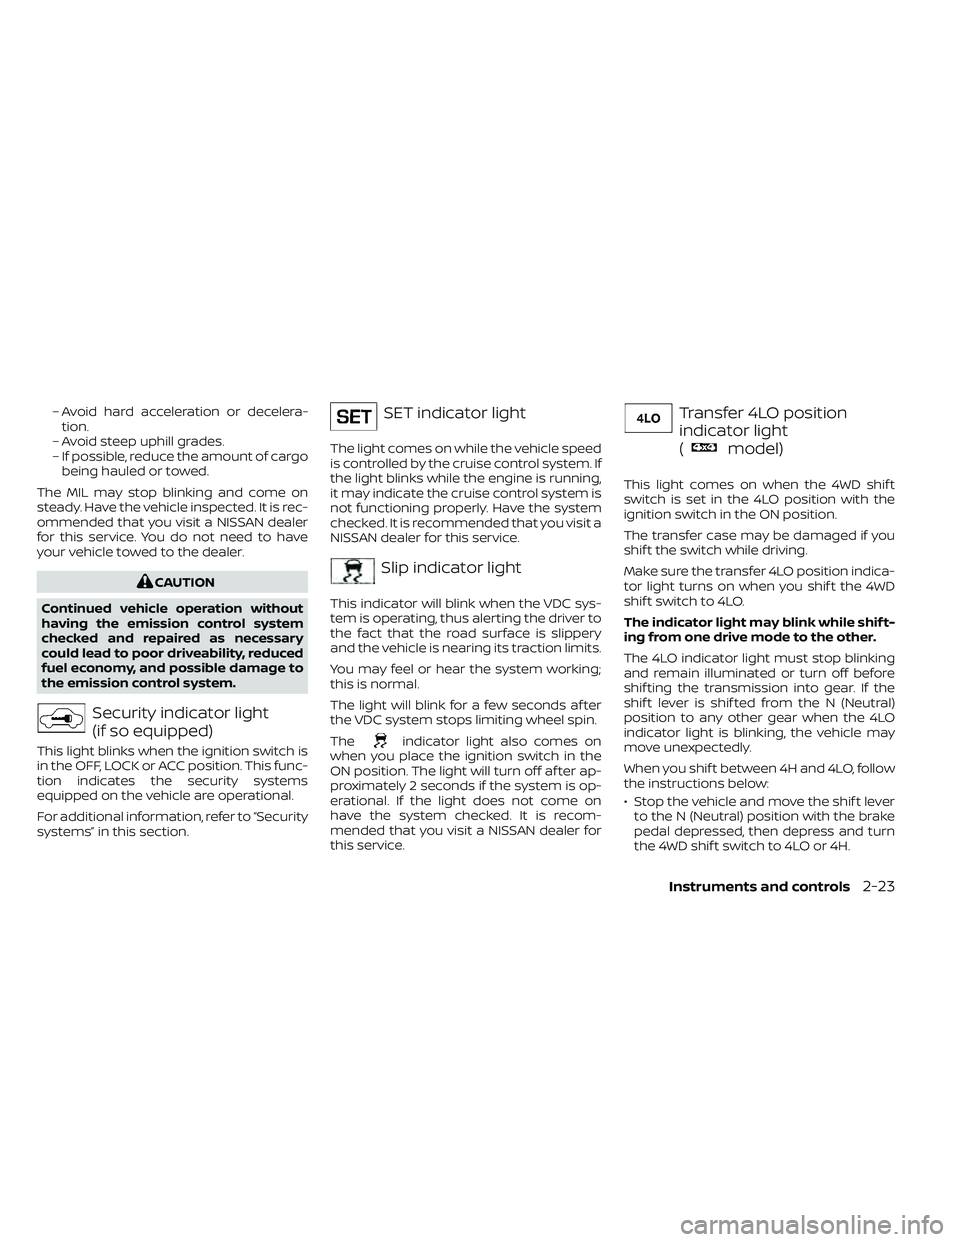
your vehicle towed to the dealer.SET indicator light
The light comes on while the vehicle speed
is controlled by the cruise control system. If
the light blinks while the engine is running,
it may indicate the cruise control system is
not functioning properly. Have the system
checked. It is recommended that you visit a
NISSAN dealer for this service.
Slip indicator light
This indicator will blink when the VDC sys-
tem is operating, thus alerting the driver to
the fact that the road surface is slippery
and the vehicle is nearing its traction limits.
You may feel or hear the system working;
this is normal.
The light will blink for a few seconds af ter
the VDC system stops limiting wheel spin.
The
indicator light also comes on
when you place the ignition switch in the
ON position. The light will turn off af ter ap-
proximately 2 seconds if the system is op-
erational. If the light does not come on
have the system checked. It is recom-
mended that you visit a NISSAN dealer for
this service.
Transfer 4LO position
indicator light
(
model)
This light comes on when the 4WD shif t
switch is set in the 4LO position with the
ignition switch in the ON position.
The transfer case may be damaged if you
shif t the switch while driving.
Make sure the transfer 4LO position indica-
tor light turns on when you shif t the 4WD
shif t switch to 4LO.
The indicator light may blink while shif t-
ing from one drive mode to the other.
The 4LO indicator light must stop blinking
and remain illuminated or turn off before
shif ting the transmission into gear. If the
shif t lever is shif ted from the N (Neutral)
position to any other gear when the 4LO
indicator light is blinking, the vehicle may
move unexpectedly.
When you shif t between 4H and 4LO, follow
the instructions below:
• Stop the vehicle and move the shif t lever to the N (Neutral) position with the brake
pedal depressed, then depress and turn
the 4WD shif t switch to 4LO or 4H.
Instruments and controls2-23
Page 166 of 492
The HomeLink® Universal Transceiver pro-
vides a convenient way to consolidate the
functions of up to three individual hand-
held transmitters into one built-in device.
HomeLink® Universal Transceiver:
• Will operate most radio frequency de-vices such as garage doors, gates, home
and office lighting, entry door locks and
security systems.
• Is powered by your vehicle's battery. No separate batteries are required. If the ve-
hicle's battery is discharged or is discon-
nected, HomeLink® will retain all pro-
gramming.
When the HomeLink® Universal Trans-
ceiver is programmed, retain the original
transmitter for future programming pro-
cedures (Example: new vehicle pur-
chases). Upon sale of the vehicle, the
programmed HomeLink® Universal
Transceiver buttons should be erased for
security purposes. For additional infor-
mation, refer to “Programming
HomeLink®” in this section.WARNING
• Your vehicle's engine should be
turned off while programming the
HomeLink® Universal Transceiver. Do
not breathe exhaust gases; they con-
tain colorless and odorless carbon
monoxide. Carbon monoxide is dan-
gerous. It can cause unconscious-
ness or death.
• Do not use the HomeLink® Universal
Transceiver with any garage door
opener that lacks safety stop and re-
verse features as required by federal
safety standards. (These standards
became effective for opener models
manufactured af ter April 1, 1982). A
garage door opener which cannot
detect an object in the path of a clos-
ing garage door and then automati-
cally stop and reverse, does not meet
current federal safety standards. Us-
ing a garage door opener without
these features increases the risk of
serious injury or death. •
During the programming procedure
your garage door or security gate will
open and close (if the transmitter is
within range). Make sure that people
or objects are clear of the garage
door, gate, etc. that you are
programming.
PROGRAMMING HOMELINK®
If you have any questions or are having
difficulty programming your HomeLink®
buttons, refer to the HomeLink® web site at:
www.homelink.com or call 1-800-355-3515.
NOTE:
Place the ignition switch in the ON posi-
tion (without starting the engine) when
programming HomeLink®. It is also rec-
ommended that a new battery be placed
in the hand-held transmitter of the de-
vice being programmed to HomeLink®
for quicker programming and accurate
transmission of the radio frequency.
HOMELINK® UNIVERSAL
TRANSCEIVER (if so equipped)
2-56Instruments and controls
Page 168 of 492
NOTE:
Once the button is pressed, you have ap-
proximately 30 seconds to initiate the
next step.
6. Return to the vehicle and firmly pressand hold the trained HomeLink® button
for 2 seconds and release. Repeat the
“press/hold/release” sequence up to
three times to complete the training
process. HomeLink® should now acti-
vate your rolling code equipped device.
7. If you have any questions or are having difficulty programming your HomeLink®
buttons, refer to the HomeLink® web site
at: www.homelink.com or call
1-800-355-3515.
PROGRAMMING HOMELINK® FOR
CANADIAN CUSTOMERS AND GATE
OPENERS
Canadian radio-frequency laws require
transmitter signals to “time-out” (or quit)
af ter several seconds of transmission –
which may not be long enough for
HomeLink® to pick up the signal during
training. Similar to this Canadian law, some
U.S. gate operators are designed to “tim-
eout” in the same manner. If you live in Canada or you are having diffi-
culties training a gate operator
orgarage
door opener by using the “Training” proce-
dures, replace “Programming HomeLink®”
step 2 with the following:
NOTE:
When programming a garage door
opener, etc., unplug the device during
the “cycling” process to prevent possible
damage to the garage door opener
components.
1. For additional information, refer to “Pro-
gramming HomeLink®” step 1 in this
section.
2. Using both hands, simultaneously press and hold the desired HomeLink® button
and the hand-held transmitter button.
During training, your hand-held trans-
mitter may automatically stop transmit-
ting. Continue to press and hold the de-
sired HomeLink® button while you press
and re-press (“cycle”) your hand-held
transmitter every 2 seconds until the
frequency signal has been learned. The
HomeLink® indicator light will flash
slowly and then rapidly af ter several
seconds upon successful training. DO
NOT release until the HomeLink® indica-
tor light flashes slowly and then rapidly. When the indicator light flashes rapidly,
both buttons may be released. The rapid
flashing indicates successful training.
Proceed with “Programming
HomeLink®” step 3 to complete.
If the device was unplugged during the
programming procedure, remember to
plug it back in when programming is
completed.
OPERATING THE HOMELINK®
UNIVERSAL TRANSCEIVER
The HomeLink® Universal Transceiver, af ter
it is programmed, can be used to activate
the programmed device. To operate, sim-
ply press and release the appropriate pro-
grammed HomeLink® Universal Trans-
ceiver button. The amber indicator light will
illuminate while the signal is being trans-
mitted.
For convenience, the hand-held transmit-
ter of the device may also be used at any
time.
2-58Instruments and controls
Page 177 of 492
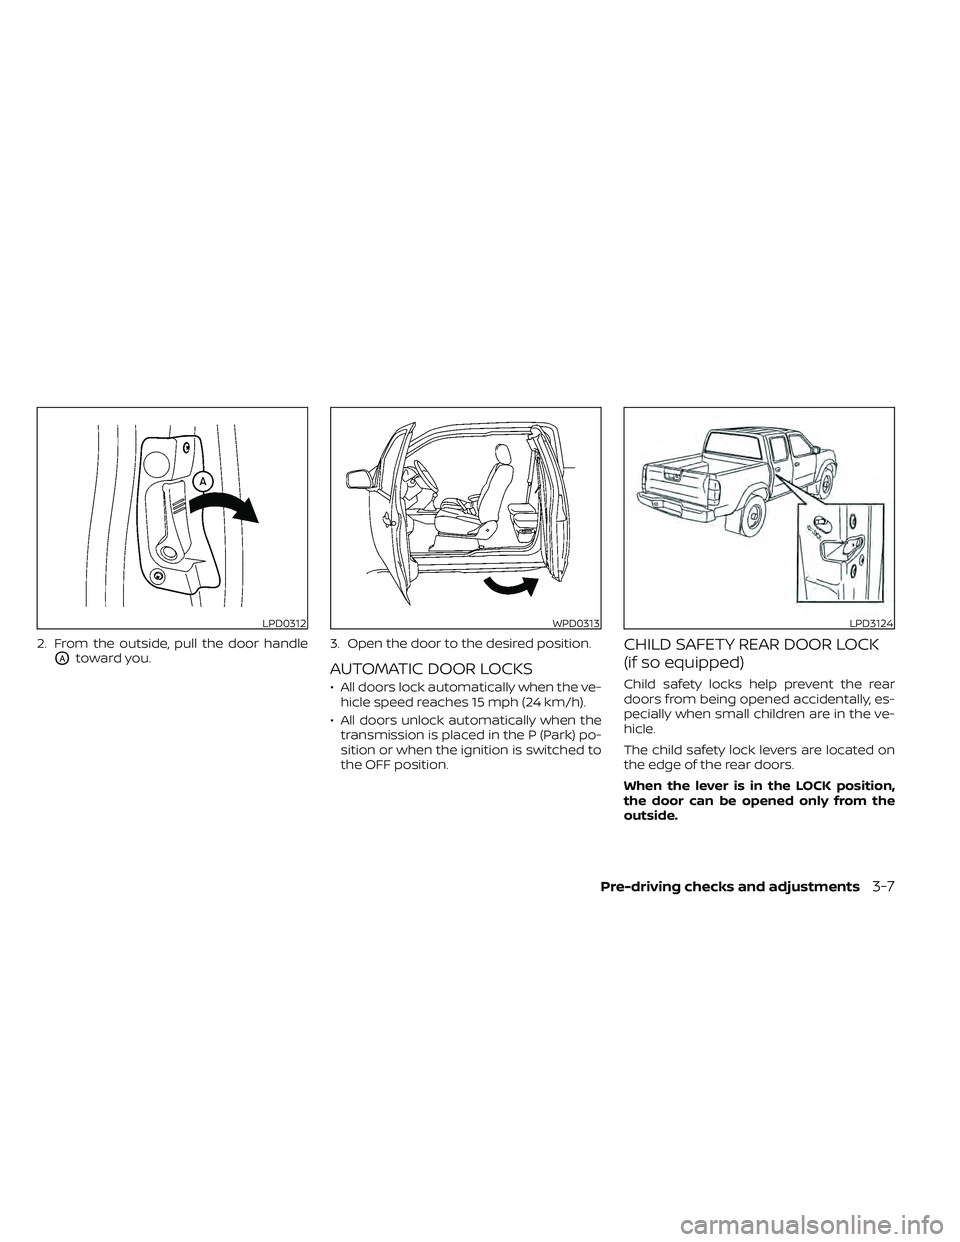
2. From the outside, pull the door handle
OAtoward you.3. Open the door to the desired position.AUTOMATIC DOOR LOCKS
• All doors lock automatically when the ve-
hicle speed reaches 15 mph (24 km/h).
• All doors unlock automatically when the transmission is placed in the P (Park) po-
sition or when the ignition is switched to
the OFF position.
CHILD SAFETY REAR DOOR LOCK
(if so equipped)
Child safety locks help prevent the rear
doors from being opened accidentally, es-
pecially when small children are in the ve-
hicle.
The child safety lock levers are located on
the edge of the rear doors.
When the lever is in the LOCK position,
the door can be opened only from the
outside.
WPD0313LPD3124
Page 308 of 492
5 Starting and driving
Precautions when starting and driving..........5-2
Exhaust gas (carbon monoxide) ..............5-2
Three-way catalyst ...........................5-3
Tire Pressure Monitoring System
(TPMS) .......................................5-3
On-pavement and off-road driving
precautions ..................................5-6
Avoiding collision and rollover ................5-6
Off-roadrecovery ............................5-7
Rapid air pressure loss .......................5-7
Drinking alcohol/drugs and driving ...........5-8
Driving safety precautions ....................5-8
Push-button ignition switch ....................5-10
Operating range ............................. 5-11
Push-button ignition switch positions ........5-11
Emergency engine shut off ..................5-12
NISSAN Intelligent Key® battery
discharge ................................... 5-12
NISSAN Vehicle Immobilizer System .........5-13
Before starting the engine .....................5-13
Starting the engine ............................. 5-13
Driving the vehicle .............................. 5-14
Automatic transmission (A/T) ...............5-14
Parking brake .................................. 5-19
Cruise control .................................. 5-19
Precautions on cruise control ...............5-19Cruise control operations
...................5-20
Break-in schedule .............................. 5-21
Fuel efficient driving tips ........................5-21
Increasing fuel economy .......................5-23
Using 4–Wheel Drive (4WD)
(if so equipped) ................................. 5-23
Transfer case shif ting procedures ...........5-24
Electronic locking rear differential (E-Lock)
system (if so equipped) ......................... 5-29
Parking/parking on hills ........................5-31
Power steering ................................. 5-32
Brake system .................................. 5-32
Brake precautions ........................... 5-32
Anti-lock Braking System (ABS) ..............5-33
Active Brake Limited Slip (ABLS) system ........5-34
Vehicle Dynamic Control (VDC) system .........5-35
Brake force distribution .....................5-36
Hill descent control system (if so equipped) ....5-37
Hill start assist system (if so equipped) .........5-38
Rear Sonar System (RSS) (if so equipped) .......5-39
Cold weather driving ........................... 5-40
Freeing a frozen door lock ...................5-40
Antifreeze ................................... 5-40
Battery...................................... 5-40
Draining of coolant water ...................5-40
Page 317 of 492
•If your engine stalls or you cannot
make it to the top of a steep hill,
never attempt to turn around. Your
vehicle could tip or roll over. Always
back straight down in R (Reverse)
gear. Never back down in N (Neutral),
using only the brake, as this could
cause loss of control.
• Heavy braking going down a hill
could cause your brakes to overheat
and fade, resulting in loss of control
and an accident. Apply brakes lightly
and use a low gear to control your
speed. Use the hill descent control
feature (if so equipped).
• Unsecured cargo can be thrown
around when driving over rough ter-
rain. Properly secure all cargo so it
will not be thrown forward and cause
injury to you or your passengers.
• To avoid raising the center of gravity
excessively, do not exceed the rated
capacity of the roof rack (if so
equipped) and evenly distribute the
load. Secure heavy loads in the cargo
area as far forward and as low as
possible. Do not equip the vehicle
with tires larger than specified in this
manual. This could cause your ve-
hicle to roll over. •
Do not grip the inside or spokes of
the steering wheel when driving off-
road. The steering wheel could move
suddenly and injure your hands. In-
stead drive with your fingers and
thumbs on the outside of the rim.
• Before operating the vehicle, ensure
that the driver and all passengers
have their seat belts fastened.
• Always drive with the floor mats in
place as the floor may become hot.
• Lower your speed when encounter-
ing strong crosswinds. With a higher
center of gravity, your NISSAN is more
affected by strong side winds. Slower
speeds ensure better vehicle control.
• Do not drive beyond the perfor-
mance capability of the tires, even
with 4WD engaged (if so equipped).
• For 4WD equipped vehicles, do not
attempt to raise two wheels off the
ground and shif t the transmission to
any drive or reverse position with the
engine running. Doing so may result
in drivetrain damage or unexpected
vehicle movement which could result
in serious vehicle damage or per-
sonal injury. •
Do not attempt to test a 4WD
equipped vehicle on a 2-wheel dyna-
mometer (such as the dynamom-
eters used by some states for emis-
sions testing), or similar equipment
even if the other two wheels are
raised off the ground. Make sure you
inform test facility personnel that
your vehicle is equipped with 4WD
before it is placed on a dynamom-
eter. Using the wrong test equipment
may result in drivetrain damage or
unexpected vehicle movement
which could result in serious vehicle
damage or personal injury.
• Accelerating quickly, sharp steering
maneuvers or sudden braking may
cause loss of control.
• If at all possible, avoid sharp turning
maneuvers, particularly at high
speeds. Your NISSAN 4WD vehicle has
a higher center of gravity than a pas-
senger car. The vehicle is not de-
signed for cornering at the same
speeds as passenger cars. Failure to
operate this vehicle correctly could
result in loss of control and/or a roll-
over accident.
Starting and driving5-9