2021 NISSAN FRONTIER fuel cap
[x] Cancel search: fuel capPage 14 of 492
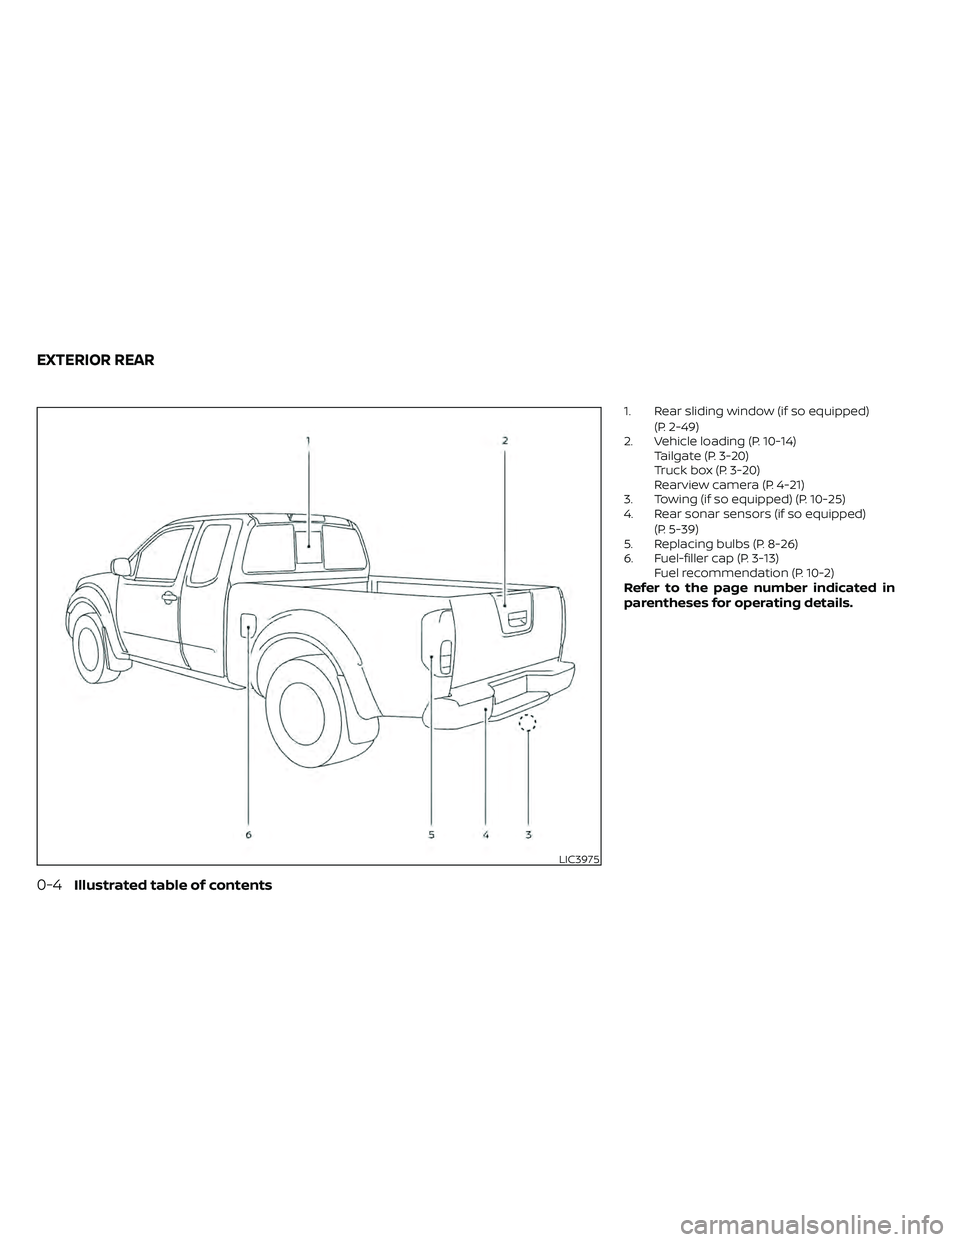
1. Rear sliding window (if so equipped)(P. 2-49)
2. Vehicle loading (P. 10-14) Tailgate (P. 3-20)
Truck box (P. 3-20)
Rearview camera (P. 4-21)
3. Towing (if so equipped) (P. 10-25)
4. Rear sonar sensors (if so equipped)
(P. 5-39)
5. Replacing bulbs (P. 8-26)
6. Fuel-filler cap (P. 3-13) Fuel recommendation (P. 10-2)
Refer to the page number indicated in
parentheses for operating details.
Page 116 of 492
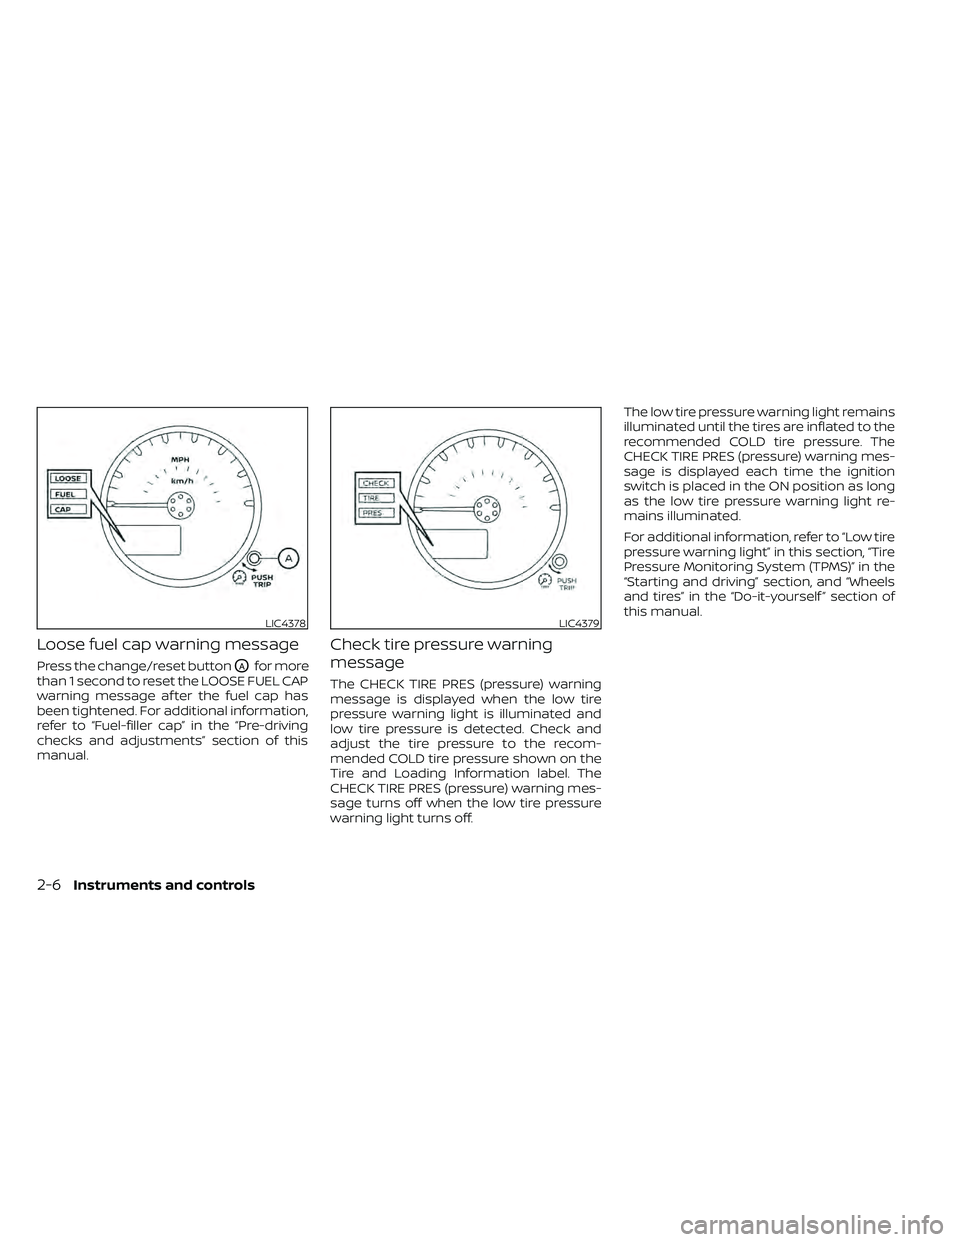
Loose fuel cap warning message
Press the change/reset buttonOAfor more
than 1 second to reset the LOOSE FUEL CAP
warning message af ter the fuel cap has
been tightened. For additional information,
refer to “Fuel-filler cap” in the “Pre-driving
checks and adjustments” section of this
manual.
Check tire pressure warning
message
The CHECK TIRE PRES (pressure) warning
message is displayed when the low tire
pressure warning light is illuminated and
low tire pressure is detected. Check and
adjust the tire pressure to the recom-
mended COLD tire pressure shown on the
Tire and Loading Information label. The
CHECK TIRE PRES (pressure) warning mes-
sage turns off when the low tire pressure
warning light turns off. The low tire pressure warning light remains
illuminated until the tires are inflated to the
recommended COLD tire pressure. The
CHECK TIRE PRES (pressure) warning mes-
sage is displayed each time the ignition
switch is placed in the ON position as long
as the low tire pressure warning light re-
mains illuminated.
For additional information, refer to “Low tire
pressure warning light” in this section, “Tire
Pressure Monitoring System (TPMS)” in the
“Starting and driving” section, and “Wheels
and tires” in the “Do-it-yourself ” section of
this manual.
LIC4378LIC4379
2-6Instruments and controls
Page 132 of 492
Front passenger air bag
status light
The front passenger air bag status lightwill be lit and the passenger front air
bag will be off depending on how the front
passenger seat is being used.
For additional information, refer to “Front
passenger air bag and status light” in the
“Safety — Seats, seat belts and supplemen-
tal restraint system” section of this manual.
High beam indicator light
(blue)
This blue light comes on when the head-
light high beams are on and goes out when
the low beams are selected.
The high beam indicator light also comes
on when the passing signal is activated.
Hill descent control system
ON indicator light (if so
equipped)
When the ignition switch is placed in the ON
position, this light comes on briefly and
then turns off.
The light comes on when the hill descent
control system is activated. If the hill descent control switch is on and
the indicator light blinks, the system is not
engaged.
If the indicator light does not come on
when the hill descent switch is on, the sys-
tem may not be functioning properly. Have
the system checked. It is recommended
that you visit a NISSAN dealer for this ser-
vice.
For additional information, refer to “Hill de-
scent control switch” in this section and “Hill
descent control system” in the “Starting
and driving” section of this manual.
Malfunction Indicator Light
(MIL)
If this indicator light comes on steady or
blinks while the engine is running, it may
indicate a potential emission control mal-
function.
The MIL may also come on steady if the
fuel-filler cap is loose or missing, or if the
vehicle runs out of fuel. Check to make sure
the fuel-filler cap is installed and closed
tightly, and that the vehicle has at least 3
gal (11.4 L) of fuel in the fuel tank.
Af ter a few driving trips, the
light
should turn off if no other potential emis-
sion control system malfunction exists. If this indicator light comes on steady for 20
seconds and then blinks for 10 seconds
when the engine is not running, it indicates
that the vehicle is not ready for an emission
control system inspection/maintenance
test. For additional information, refer to
“Readiness for inspection/maintenance
(I/M) test” in the “Technical and consumer
information” section of this manual.
Operation
The MIL will come on in one of two ways:
• MIL on steady — An emission control sys-
tem malfunction has been detected.
Check the fuel-filler cap if the LOOSE FUEL
CAP warning appears in the trip com-
puter. If the fuel-filler cap is loose or miss-
ing, tighten or install the cap and con-
tinue to drive the vehicle. The
light
should turn off af ter a few driving trips. If
the
light does not turn off af ter a few
driving trips, have the vehicle inspected. It
is recommended that you visit a NISSAN
dealer for this service. You do not need to
have your vehicle towed to the dealer.
• MIL blinking — An engine misfire has been detected which may damage the emis-
sion control system. To reduce or avoid
emission control system damage:– Do not drive at speeds above 45 mph (72 km/h).
2-22Instruments and controls
Page 184 of 492
•Do not attempt to top off the fuel
tank af ter the fuel pump nozzle
shuts off automatically. Continued
refueling may cause fuel overflow,
resulting in fuel spray and possibly a
fire.
• Use only an original equipment type
fuel-filler cap as a replacement. It has
a built-in safety valve needed for
proper operation of the fuel system
and emission control system. An in-
correct cap can result in a serious
malfunction and possible injury. It
could also cause the
Malfunc-
tion Indicator Light (MIL) to come on.
• Never pour fuel into the throttle body
to attempt to start your vehicle.
• Do not fill a portable fuel container in
the vehicle or trailer. Static electricity
can cause an explosion of flammable
liquid, vapor or gas in any vehicle or
trailer. To reduce the risk of serious
injury or death when filling portable
fuel containers:
– Always place the container on the
ground when filling.
– Do not use electronic devices
when filling. –
Keep the pump nozzle in contact
with the container while you are
filling it.
– Use only approved portable fuel
containers for flammable liquid.
CAUTION
• Do not use a fuel containing more
than 15% ethanol in your vehicle. For
additional information, refer to “Fuel
recommendation” in the “Technical
and consumer information” section
of this manual.
• The LOOSE FUEL CAP warning will ap-
pear if the fuel-filler cap is not prop-
erly tightened. It may take a few driv-
ing trips for the message to be
displayed. Failure to tighten the fuel-
filler cap properly af ter the LOOSE
FUEL CAP warning appears may
cause the
Malfunction Indicator
Light (MIL) to illuminate. •
Failure to tighten the fuel-filler cap
properly may cause the
Mal-
function Indicator Light (MIL) to illu-
minate. If the
light illuminates
because the fuel-filler cap is loose or
missing, tighten or install the cap and
continue to drive the vehicle. The
light should turn off af ter a few
driving trips. If thelight does not
turn off af ter a few driving trips, have
your vehicle inspected. It is recom-
mended that you visit a NISSAN
dealer for this service.
• For additional information, refer to
“Malfunction Indicator Light (MIL)” in
the “Instruments and controls” sec-
tion in this manual.
• If fuel is spilled on the vehicle body,
flush it away with water to avoid
paint damage.
3-14Pre-driving checks and adjustments
Page 185 of 492

To remove the fuel-filler cap:
1. Turn the fuel-filler cap counterclockwiseto remove.
2. Put the fuel-filler cap on the cap holder
O1while refueling.
To install the fuel-filler cap:
1. Insert the fuel-filler cap straight into the fuel-filler tube.
2. Turn the fuel-filler cap clockwise until a single click is heard.
LOOSE FUEL CAP warning
message
The LOOSE FUEL CAP warning message
displays in the odometer when the fuel-
filler cap is not tightened correctly af ter the
vehicle has been refueled. It may take a few
driving trips for the message to be dis-
played. To turn off the warning message,
perform the following:
1. Remove and install the fuel-filler cap asdescribed above as soon as possible.
2. Tighten the fuel-filler cap until it clicks. 3. Press the loose fuel cap change/reset
button
OAin the meter for about one
second to turn off the LOOSE FUEL CAP
warning message af ter tightening the
fuel-filler cap.
For additional information, refer to “Meters
and gauges” in the “Instruments and con-
trols” section of this manual.
LPD2699LIC4378
Page 423 of 492
Power steering fluid level* and lines:
Check the level when the fluid is cold, with
the engine off. Check the lines for proper
attachment, leaks, cracks, etc.
Radiator and hoses:Check the front of the
radiator and clean off any dirt, insects,
leaves, etc., that may have accumulated.
Make sure the hoses have no cracks, defor-
mation, rot or loose connections.
Underbody: The underbody is frequently
exposed to corrosive substances such as
those used on icy roads or to control dust. It
is very important to remove these sub-
stances, otherwise rust may form on the
floor pan, frame, fuel lines and around the
exhaust system. At the end of winter, the
underbody should be thoroughly flushed
with plain water, being careful to clean
those areas where mud and dirt may accu-
mulate. For additional information, refer to
the “Appearance and care” section of this
manual.
Windshield-washer fluid*: Check that
there is adequate fluid in the reservoir. The following descriptions are provided to
give you a better understanding of the
scheduled maintenance items that should
be regularly checked or replaced. The
maintenance schedule indicates at which
mileage/time intervals each item requires
service.
In addition to scheduled maintenance,
your vehicle requires that some items be
checked during normal day-to-day opera-
tion. For additional information, refer to
“General maintenance” in this section.
Items marked with
“*”are recommended
by NISSAN for reliable vehicle operation.
You are not required to perform mainte-
nance on these items in order to maintain
the warranties which come with your
NISSAN. Other maintenance items and in-
tervals are required.
When applicable, additional information
can be found in the “Do-it-yourself ” section
of this manual.NOTE:
NISSAN does not advocate the use of
non-OEM approved af termarket flush-
ing systems and strongly advises
against performing these services on a
NISSAN product. Many of the af termar-
ket flushing systems use non-OEM ap-
proved chemicals or solvents, the use of
which has not been validated by NISSAN.
For recommended fuel, lubricants, fluids,
grease, and refrigerant, refer to “Recom-
mended fluids/lubricants and capaci-
ties” in the “Technical and consumer in-
formation” section of this manual.
EMISSION CONTROL SYSTEM
MAINTENANCE:
Drive belts*: Check engine drive belts for
wear, fraying or cracking and for proper
tension. Replace any damaged drive belts.
Engine air filter: Replace at specified inter-
vals. When driving for prolonged periods in
dusty conditions, check/replace the filter
more frequently.
EXPLANATION OF SCHEDULED
MAINTENANCE ITEMS
Maintenance and schedules9-5
Page 424 of 492
Engine coolant*:Replace coolant at the
specified interval. When adding or replacing
coolant, be sure to use only Genuine NISSAN
Long Life Antifreeze/Coolant (blue) or
equivalent with the proper mixture. (For ad-
ditional information on the proper mixture
for your area, refer to “Engine cooling system”
in the “Do-it-yourself ” section of this manual.)
NOTE: Mixing any other type of coolant
or the use of non-distilled water may re-
duce the recommended service interval
of the coolant.
Engine oil and oil filter: Replace engine oil
and oil filter at the specified intervals. For
recommended oil grade and viscosity refer
to “Recommended fluids/lubricants and
capacities” in the “Technical and consumer
information” section of this manual.
Evaporative emissions control vapor
lines*: Check vapor lines for leaks or loose-
ness. Tighten connections or replace parts
as necessary.
Fuel lines*: Check the fuel hoses, piping
and connections for leaks, looseness, or
deterioration. Tighten connections or re-
place parts as necessary.
Spark plugs: Replace at specified intervals.
Install new plugs of the same type as origi-
nally equipped.
CHASSIS AND BODY
MAINTENANCE:
Brake lines and cables: Visually inspect for
proper installation. Check for chafing,
cracks, deterioration, and signs of leaking.
Replace any deteriorated or damaged
parts immediately.
Brake pads and rotors: Check for wear,
deterioration and fluid leaks. Replace any
deteriorated or damaged parts immedi-
ately.
Exhaust system: Visually inspect the ex-
haust pipes, muffler and hangers for leaks,
cracks, deterioration, and damage. Tighten
connections or replace parts as necessary.
Propeller shaf t(s): Check for damage,
looseness, and grease leakage.
In-cabin microfilter: Replace at specified
intervals. When driving for prolonged peri-
ods in dusty conditions, replace the filter
more frequently.
Steering gear and linkage, axle and sus-
pension parts, drive shaf t boots: Check
for damage, looseness, and leakage of oil
or grease. Under severe driving conditions,
inspect more frequently. Tire rotation:
Tires should be rotated every
7,500 miles (12,000 km). When rotating tires,
check for damage and uneven wear. Re-
place if necessary.
Transmission fluid/oil, differential oil: Vi-
sually inspect for signs of leakage at speci-
fied intervals.
Off-road maintenance: Check the follow-
ing items frequently whenever you drive
off-road through deep sand, mud or water:
• Brake pads and rotors
• Brake linings and drums
• Brake lines and hoses
• Differential, transmission and transfer case oil
• Steering linkage
• Propeller shaf t(s) and front drive shaf ts
• Engine air filter
• Clutch housing drain (AWD only)
9-6Maintenance and schedules
Page 434 of 492
10 Technical and consumer information
Recommended fluids/lubricants and
capacities...................................... 10-2
Fuel recommendation ......................10-4
Engine oil and oil filter
recommendations .......................... 10-7
Air conditioner system refrigerant and
oil recommendations .......................10-8
Specifications .................................. 10-9
Engine ...................................... 10-9
Wheels and tires ............................ 10-9
Dimensions and weights ...................10-10
When traveling or registering in another
country ........................................ 10-11
Vehicle identification ........................... 10-11
Vehicle Identification Number (VIN)
plate ........................................ 10-11
Engine serial number .......................10-11
F.M.V.S.S./C.M.V.S.S. certification label ........10-12
Emission control information label .........10-12
Tire and Loading Information label .........10-13
Air conditioner specification label ..........10-13
Installing front license plate ...................10-14
Installing front license plate with
grommets ................................. 10-14Vehicle loading information
...................10-14
Terms ...................................... 10-14
Vehicle load capacity ....................... 10-15
Securing the load .......................... 10-17
Utili-track® channel system
(if so equipped) ............................. 10-18
Loading tips ................................ 10-22
Truck-camper loading information ............10-23
Crew cab models .......................... 10-23
King Cab® models .......................... 10-23
Special Body vehicles ......................10-23
Location for center of gravity ...............10-23
Vehicle load weight capacity ...............10-24
Measurement of weights ...................10-24
Towing a trailer ................................ 10-25
Maximum load limits ....................... 10-25
Towing load/specification ..................10-28
T
owing safety .............................. 10-29
Flat towing – 4WD with automatic
transmission ............................... 10-36
Flat towing – 2WD with automatic
transmission ............................... 10-37
Uniform tire quality grading ...................10-37
Emission control system warranty ............10-38