2021 NISSAN FRONTIER battery replacement
[x] Cancel search: battery replacementPage 134 of 492
You cannot move the transfer 4WD shif t
switch between 4H and 4LO unless you
stop the vehicle and move the shif t lever to
the N (Neutral) position with the brake
pedal depressed.
Turn signal/hazard
indicator lights
The appropriate light flashes when the turn
signal switch is activated.
NOTE:
In case of turn signal light bulb malfunc-
tion, the turn signal will flash at a higher
frequency when the turn signal switch is
activated.
Both lights flash when the hazard switch is
turned on.
Vehicle Dynamic Control
(VDC) OFF indicator light
This indicator light comes on when the
VDC OFF switch is pushed to the OFF posi-
tion, the transfer case is in the 4LO position
(
model), or when the VDC system is
not functioning properly. This indicates the
VDC system is not operating.
Push the VDC OFF switch again or restart
the engine and the system will operate normally. For additional information, refer
to “Vehicle Dynamic Control (VDC) system”
in the “Starting and driving” section of this
manual.
The VDC light also comes on when the
push-button ignition switch is in the ON
position. The light will turn off af ter about 2
seconds if the system is operational. If the
light stays on or comes on along with the
indicator light while you are driving,
have the VDC system checked. It is recom-
mended that you visit a NISSAN dealer for
this service.
If the battery is removed or discharged, the
VDC system is disabled and the VDC indi-
cator light will not turn off af ter 2 seconds
when the ignition switch is placed in the ON
position. To reset the system, you must
perform the reset procedure. For addi-
tional information, refer to “Vehicle Dy-
namic Control (VDC) system” in the “Start-
ing and driving” section of this manual.
If the light does not go off af ter performing
the reset procedure, have the traction con-
trol system checked. It is recommended that
you visit a NISSAN dealer for this service.
While the VDC system is operating, you
might feel slight vibration or hear the sys-
tem working when starting the vehicle or
accelerating, but this is normal. The VDC system will be disabled and the
VDC light will illuminate when the elec-
tronic locking rear differential (E-lock) sys-
tem switch (if so equipped) is turned on
and the E-lock system is engaged. If the
E-lock system disengages or the switch is
turned off, the VDC system will be enabled
and the VDC light will turn off.
AUDIBLE REMINDERS
Brake pad wear warning
The disc brake pads have audible wear
warnings. When a disc brake pad requires
replacement, it makes a high pitched
scraping sound when the vehicle is in mo-
tion, whether or not the brake pedal is de-
pressed. Have the brakes checked as soon
as possible if the warning sound is heard.
Light reminder chime
With the ignition switch placed in the OFF
position, a chime sounds when the driver's
door is opened if the headlights or parking
lights are on.
Turn the headlight control switch off before
leaving the vehicle.
2-24Instruments and controls
Page 181 of 492
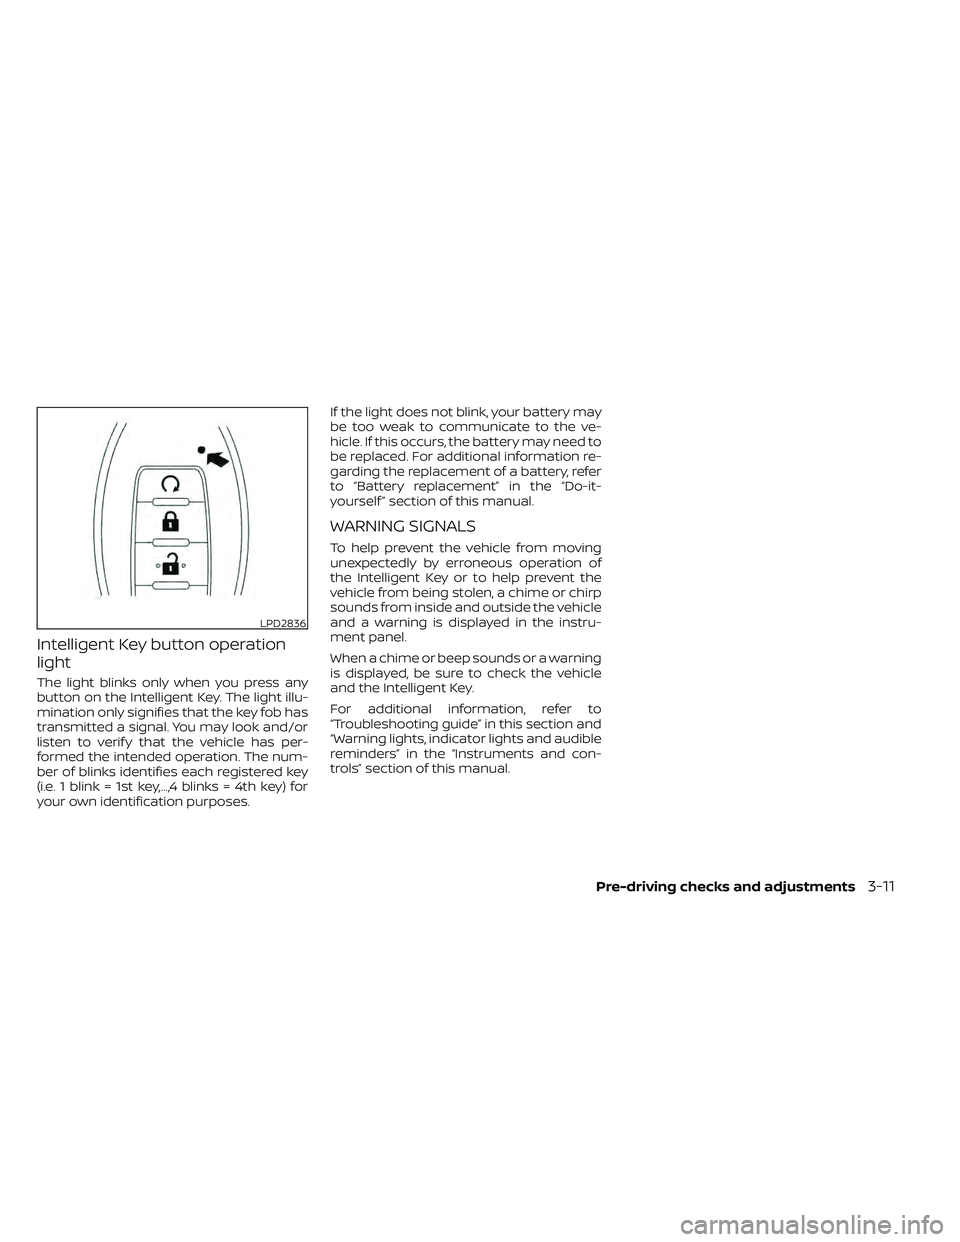
Intelligent Key button operation
light
The light blinks only when you press any
button on the Intelligent Key. The light illu-
mination only signifies that the key fob has
transmitted a signal. You may look and/or
listen to verif y that the vehicle has per-
formed the intended operation. The num-
ber of blinks identifies each registered key
(i.e. 1 blink = 1st key,...,4 blinks = 4th key) for
your own identification purposes.If the light does not blink, your battery may
be too weak to communicate to the ve-
hicle. If this occurs, the battery may need to
be replaced. For additional information re-
garding the replacement of a battery, refer
to “Battery replacement” in the “Do-it-
yourself ” section of this manual.
WARNING SIGNALS
To help prevent the vehicle from moving
unexpectedly by erroneous operation of
the Intelligent Key or to help prevent the
vehicle from being stolen, a chime or chirp
sounds from inside and outside the vehicle
and a warning is displayed in the instru-
ment panel.
When a chime or beep sounds or a warning
is displayed, be sure to check the vehicle
and the Intelligent Key.
For additional information, refer to
“Troubleshooting guide” in this section and
“Warning lights, indicator lights and audible
reminders” in the “Instruments and con-
trols” section of this manual.
LPD2836
Page 182 of 492
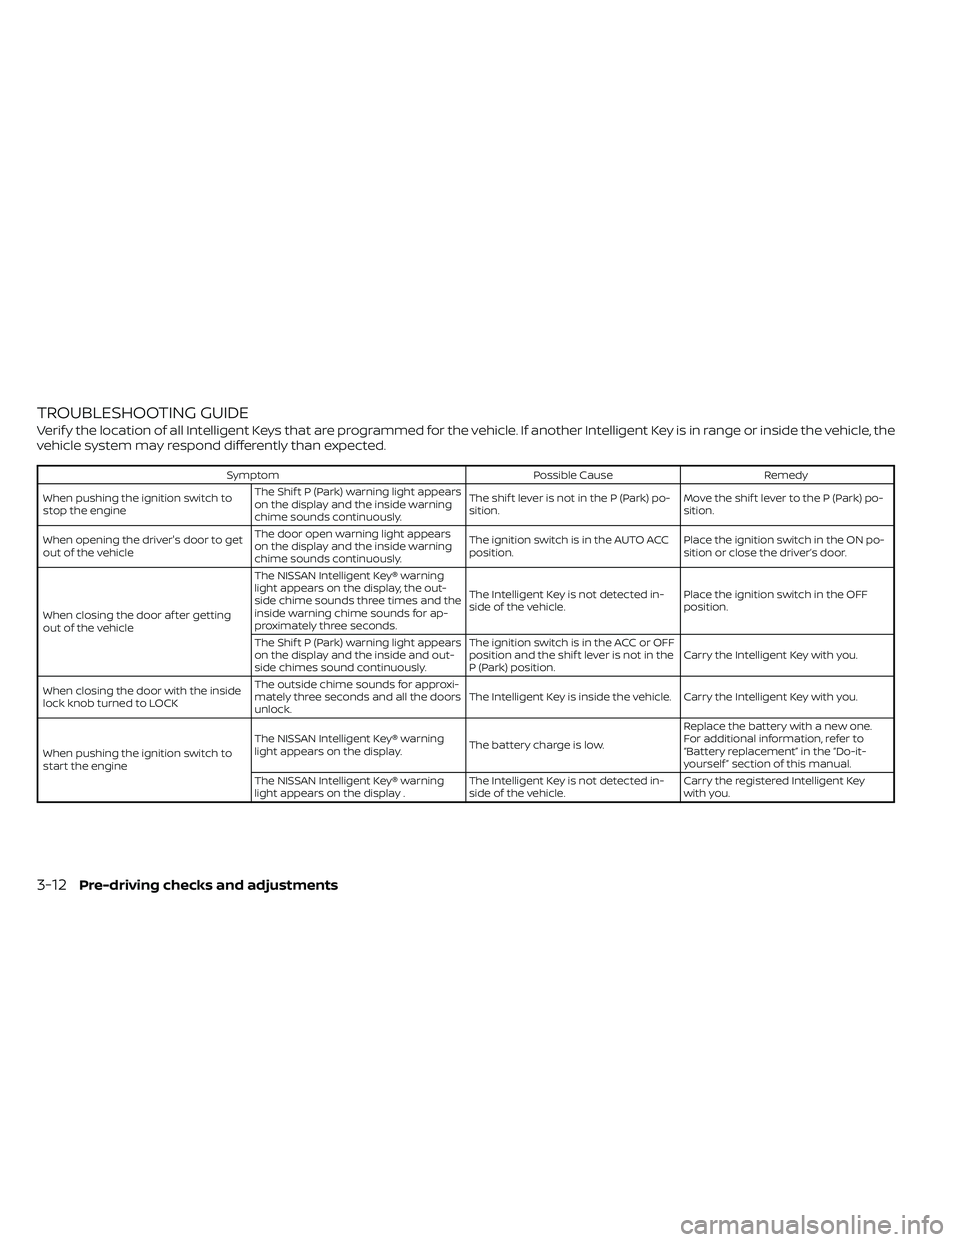
TROUBLESHOOTING GUIDE
Verif y the location of all Intelligent Keys that are programmed for the vehicle. If another Intelligent Key is in range or inside the vehicle, the
vehicle system may respond differently than expected.
SymptomPossible CauseRemedy
When pushing the ignition switch to
stop the engine The Shif t P (Park) warning light appears
on the display and the inside warning
chime sounds continuously. The shif t lever is not in the P (Park) po-
sition.
Move the shif t lever to the P (Park) po-
sition.
When opening the driver's door to get
out of the vehicle The door open warning light appears
on the display and the inside warning
chime sounds continuously. The ignition switch is in the AUTO ACC
position.
Place the ignition switch in the ON po-
sition or close the driver’s door.
When closing the door af ter getting
out of the vehicle The NISSAN Intelligent Key® warning
light appears on the display, the out-
side chime sounds three times and the
inside warning chime sounds for ap-
proximately three seconds.
The Intelligent Key is not detected in-
side of the vehicle.
Place the ignition switch in the OFF
position.
The Shif t P (Park) warning light appears
on the display and the inside and out-
side chimes sound continuously. The ignition switch is in the ACC or OFF
position and the shif t lever is not in the
P (Park) position.
Carry the Intelligent Key with you.
When closing the door with the inside
lock knob turned to LOCK The outside chime sounds for approxi-
mately three seconds and all the doors
unlock.
The Intelligent Key is inside the vehicle. Carry the Intelligent Key with you.
When pushing the ignition switch to
start the engine The NISSAN Intelligent Key® warning
light appears on the display.
The battery charge is low.Replace the battery with a new one.
For additional information, refer to
“Battery replacement” in the “Do-it-
yourself ” section of this manual.
The NISSAN Intelligent Key® warning
light appears on the display . The Intelligent Key is not detected in-
side of the vehicle.Carry the registered Intelligent Key
with you.
3-12Pre-driving checks and adjustments
Page 400 of 492
CAUTION
Be careful not to allow children to swal-
low the battery or removed parts.
NISSAN INTELLIGENT KEY®
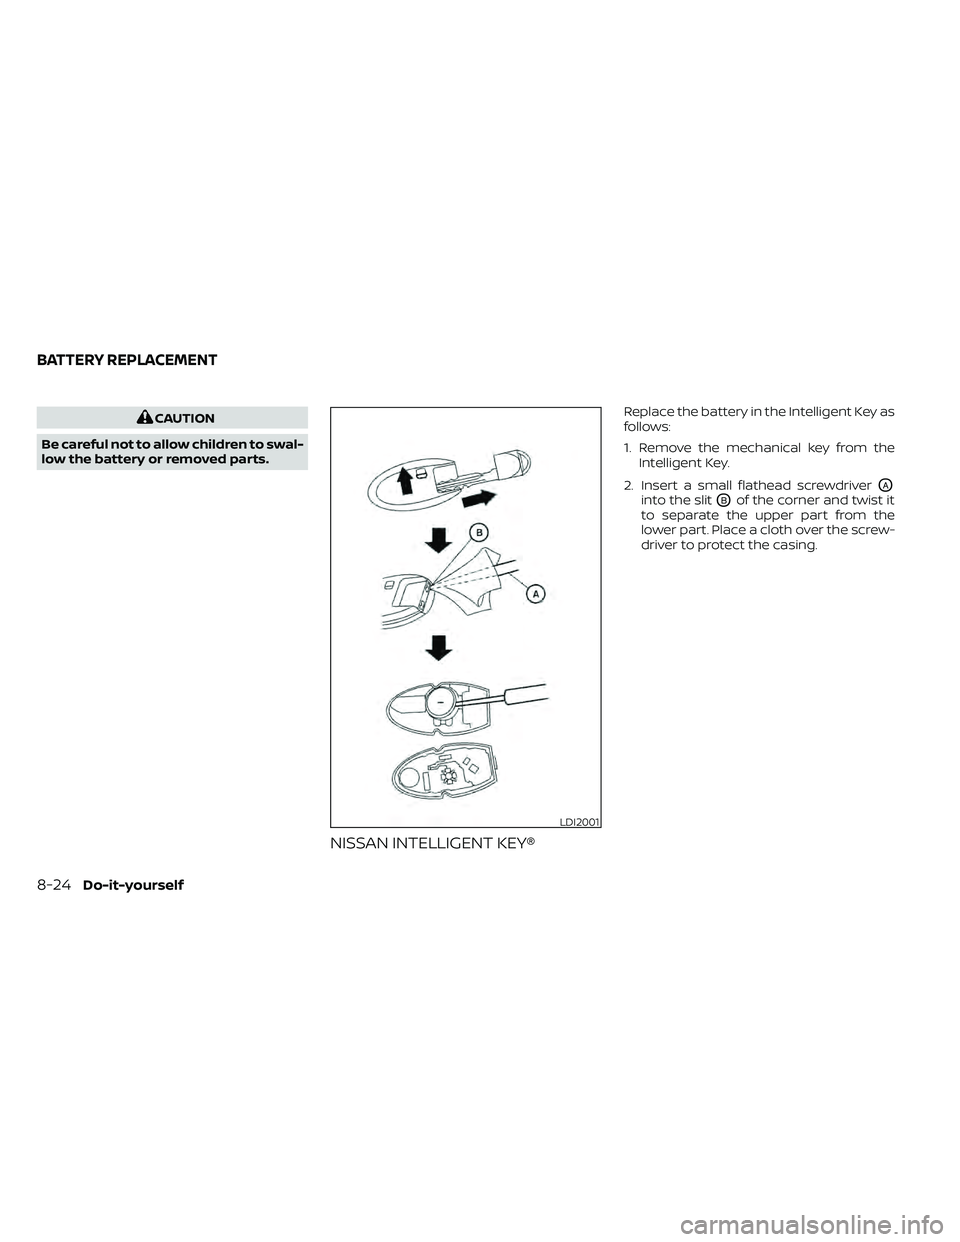
Replace the battery in the Intelligent Key as
follows:
1. Remove the mechanical key from the Intelligent Key.
2. Insert a small flathead screwdriver
OA
into the slitOBof the corner and twist it
to separate the upper part from the
lower part. Place a cloth over the screw-
driver to protect the casing.
LDI2001
BATTERY REPLACEMENT
Page 401 of 492
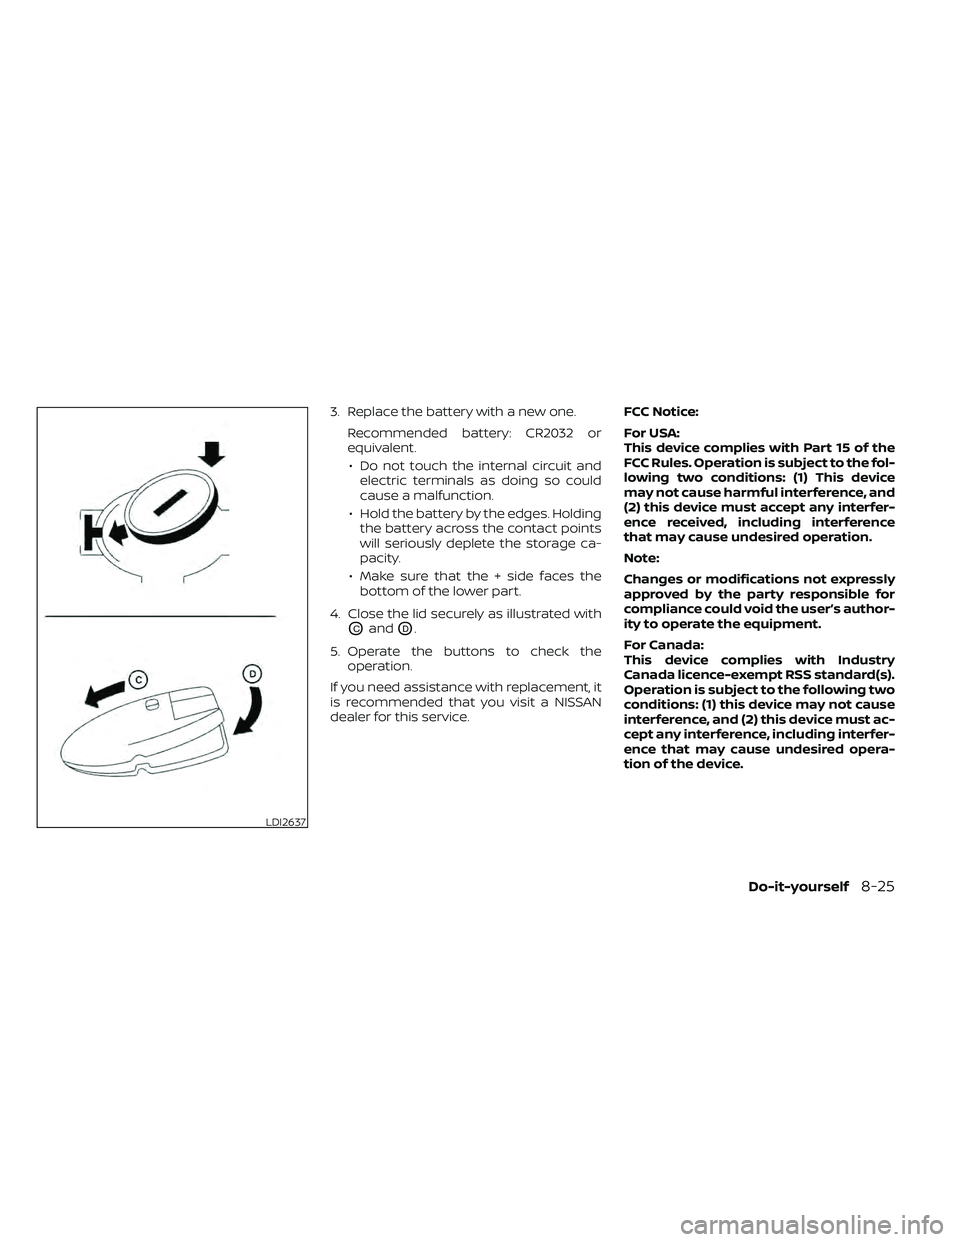
3. Replace the battery with a new one.Recommended battery: CR2032 or
equivalent.• Do not touch the internal circuit and electric terminals as doing so could
cause a malfunction.
• Hold the battery by the edges. Holding the battery across the contact points
will seriously deplete the storage ca-
pacity.
• Make sure that the + side faces the bottom of the lower part.
4. Close the lid securely as illustrated with
OCandOD.
5. Operate the buttons to check the operation.
If you need assistance with replacement, it
is recommended that you visit a NISSAN
dealer for this service. FCC Notice:
For USA:
This device complies with Part 15 of the
FCC Rules. Operation is subject to the fol-
lowing two conditions: (1) This device
may not cause harmful interference, and
(2) this device must accept any interfer-
ence received, including interference
that may cause undesired operation.
Note:
Changes or modifications not expressly
approved by the party responsible for
compliance could void the user’s author-
ity to operate the equipment.
For Canada:
This device complies with Industry
Canada licence-exempt RSS standard(s).
Operation is subject to the following two
conditions: (1) this device may not cause
interference, and (2) this device must ac-
cept any interference, including interfer-
ence that may cause undesired opera-
tion of the device.
Page 403 of 492
4. Turn the bulb retaining ringOAcounter-
clockwise until it is free from the head-
light reflector and then remove it.
5. Carefully remove the headlight bulb. Do not shake or rotate the bulb
OBwhen
removing it.
Replacing the headlight bulb
1. Insert the bulb.
DO NOT TOUCH THE BULB WITH BARE
HANDS.
2. Install and tighten the bulb retainer. • Be sure the lip of the bulb socket con-tacts the headlight body.
3. Push the electrical connector into the bulb plastic base until it snaps and
stops.
4. Connect the negative (-) battery cable.
5. Close the hood.
FOG LIGHTS (if so equipped)
For additional information on fog light bulb
replacement, refer to the instructions out-
lined in this section.
Replacing the fog light bulb
If fog light bulb replacement is required, it is
recommended that you visit a NISSAN
dealer for this service.
Page 480 of 492
Hood release..................3-13Horn.......................2-34
I
Ignition switch
Push-button ignition switch.......5-10Immobilizer system..........2-27,5-13In-cabin microfilter..............8-17Increasing fuel economy..........5-23IndicatorNISSAN Intelligent Key® battery
discharge indicator
............5-12Indicator lights and audible reminders
(See warning/indicator lights and audible
reminders)
...................2-21Inside automatic anti-glare mirror.....3-18Instrument brightness control.......2-33Instrument panel.............0-6, 2-2Instrument panel dimmer switch.....2-33Intelligent Key systemMechanical key................3-3Remote keyless entry operation.....3-9Troubleshooting guide..........3-12Warning signals...............3-12Interior light................. .2-54iPod® Player...............4-60, 4-63
J
Jump seat.....................1-7Jump starting..............6-11,8-14
K
Key.........................3-2Key fob battery replacement........8-24Keyless entry
With Intelligent Key system
(See Intelligent Key system)
........3-9KeysNISSAN Intelligent Key®........3-2,3-8NISSAN Vehicle Immobilizer System
keys..................... .3-4
L
Labels
Air conditioner specification label. . .10-13C.M.V.S.S. certification label.......10-12Emission control information label. .10-12Engine serial number...........10-11Tire and Loading Information label. .10-13Vehicle identification number (VIN). .10-11Vehicle identification number (VIN)
plate.................... .10-11Warning labels (for SRS)..........1-85Launch bar menu...............4-9License plate
Installing the license plate........10-14LightAir bag warning light........1-85, 2-20Brake light (See stop light)........8-28Bulb check/instrument panel......2-15Bulb replacement.............8-28
Charge warning light...........2-17Exterior and Interior lights........8-28Fog light switch..............2-33Fog lights..................8-27Headlight and turn signal switch. . . .2-30Headlight control switch.........2-30Headlights..................8-26Interior light................ .2-54Light bulbs.................8-26Low tire pressure warning light.....2-18Low windshield-washer fluid
warning light................2-19Passenger air bag and status light. . .1-79Security indicator light..........2-23Warning/indicator lights and audible
reminders..................2-21Lights......................8-26Map lights................. .2-55Lock
Child safety rear door lock.........3-7Door locks................. .3-4Power door locks...........3-5, 3-6Loose fuel cap warning............2-6Low fuel warning light............2-18Low tire pressure warning light.......2-18Low windshield-washer fluid
warning light..................2-19Luggage (See vehicle loading
information)..................10-14Luggage rack (see roof rack)........2-48
11-4