Page 28 of 492
Seat lif ter (driver's seat)
Move the switch as shown to adjust the
angle and height of the seat cushion.
Lumbar support (driver's seat)
The lumbar support feature provides ad-
justable lower back support to the driver.
Move the lever forward or backward to ad-
just the seat lumbar area.
REAR BENCH SEAT (if so equipped)
The rear bench seat is non-adjustable.
However, the seats can be folded up and
folded to lay flat. For additional information,
refer to “Flexible seating” in this section.
LRS2898WRS0389LRS2903
1-6Safety-Seats, seat belts and supplemental restraint system
Page 30 of 492

•Head restraints/headrests should be
adjusted properly as they may pro-
vide significant protection against
injury in an accident. Always replace
and adjust them properly if they have
been removed for any reason.
• If the head restraints/headrests are
removed for any reason, they should
be securely stored to prevent them
from causing injury to passengers or
damage to the vehicle in case of sud-
den braking or an accident.
• When returning the seatbacks to the
upright position, be certain they are
completely secured in the latched
position. If they are not completely
secured, passengers may be injured
in an accident or sudden stop.
• Properly secure all cargo to help pre-
vent it from sliding or shif ting. Do not
place cargo higher than the seat-
backs. In a sudden stop or collision,
unsecured cargo could cause per-
sonal injury.
Folding the rear bench seat up (if
so equipped)
To fold the rear bench seat up:
1. Lif t up on the lever, located on the side of the seat, while lif ting the front of the seat
cushion up. 2. Fold the bottom of the seat cushion to-
ward the back of the vehicle until it locks
in place.
LRS2475LRS2476
1-8Safety-Seats, seat belts and supplemental restraint system
Page 31 of 492

3. Repeat this process to raise and securethe seat cushion on the other side of the
vehicle for maximum storage capacity.
To return the rear bench seat to a seating
position, reverse the process. Make sure to
properly push the seat cushion down
into place.
WARNING
• When the vehicle is being used to
carry cargo, properly secure all cargo
to help prevent it from sliding or
shif ting. Do not place cargo higher
than the seatbacks. In a sudden stop
or collision, unsecured cargo could
cause personal injury.
• Do not allow people to ride in any
area of your vehicle that is not
equipped with seats and seat belts.
Be sure everyone in your vehicle is in
a seat and using a seat belt properly.
Never ride in the rear seat unless the
seat bottom cushions are in place
and latched.
• When returning the seatbacks to the
upright position, be certain they are
completely secured in the latched
position. If they are not completely
secured, passengers may be injured
in an accident or sudden stop.
A. Child restraint anchor points
Folding the rear bench seat down
(if so equipped)
The rear bench seatback can be tilted for-
ward to access the child restraint anchor
point locations or the jacking equipment.
To tilt the seatback forward, pull the strap
up
O1and tilt the seatback. The child re-
straint anchor points can be accessed be-
hind the rear bench seatback. The jacking
equipment can be accessed from behind
the passenger's side seatback.
LRS2477LRS2478
Page 59 of 492
For additional information, refer to all Warn-
ings and Cautions in the “Child safety” and
“Child restraints” sections of this manual
before installing a child restraint.
Do not use the lower anchors if the com-
bined weight of the child and the child re-
straint exceeds 65 lbs. (29.5 kg). If the com-
bined weight of the child and the child
restraint is greater than 65 lbs., (29.5 kg) use
the vehicle's seat belt (not the lower an-
chors) to install the child restraint. Be sure
to follow the child restraint manufacturer's
instructions for installation.Follow these steps to install a child re-
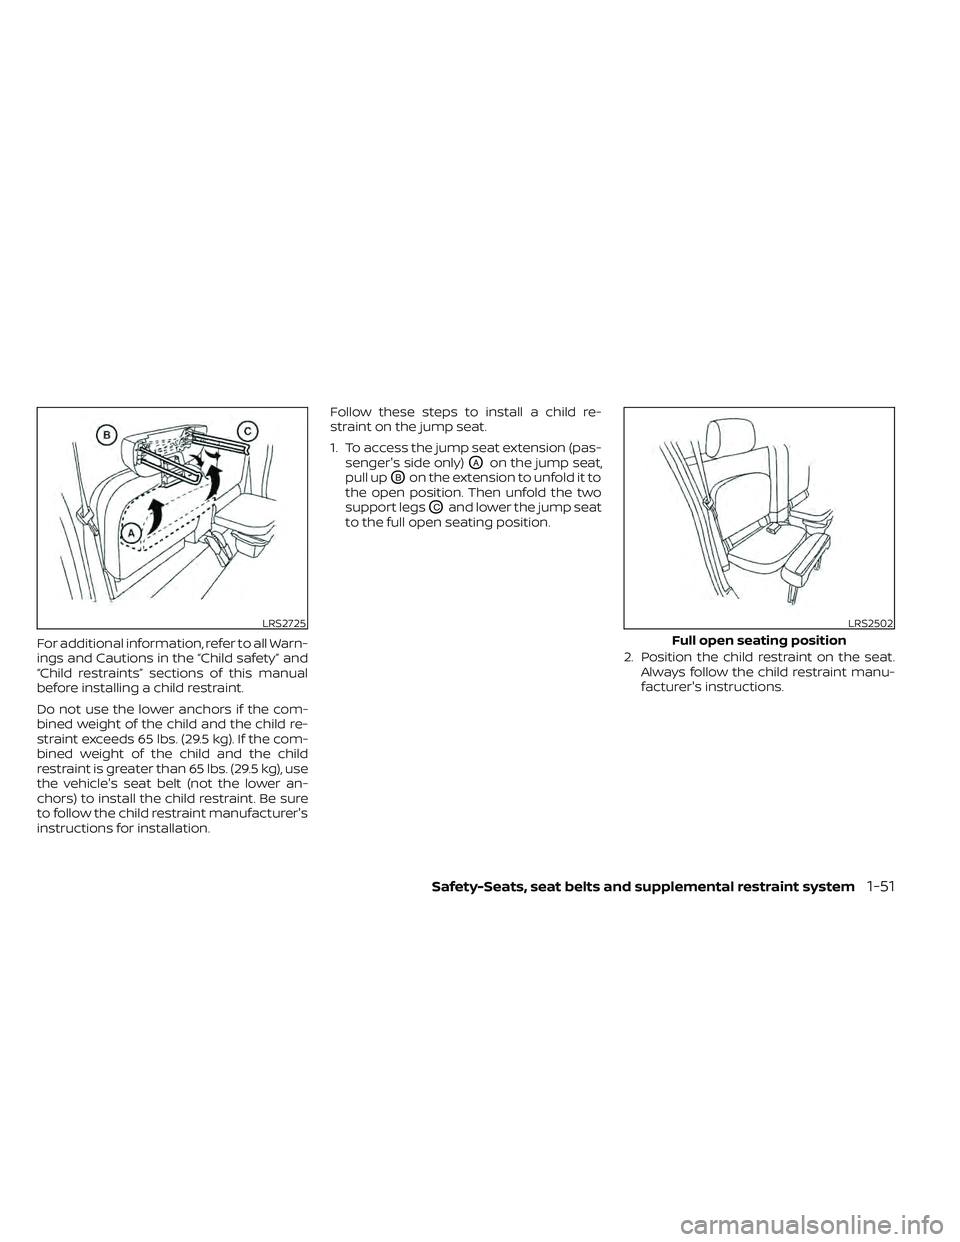
straint on the jump seat.
1. To access the jump seat extension (pas-
senger's side only)
OAon the jump seat,
pull up
OBon the extension to unfold it to
the open position. Then unfold the two
support legs
OCand lower the jump seat
to the full open seating position.
LRS2725LRS2502
Full open seating position
Safety-Seats, seat belts and supplemental restraint system1-37
Page 73 of 492

For additional information, refer to all Warn-
ings and Cautions in the “Child safety” and
“Child restraints” sections of this manual
before installing a child restraint.
Do not use the lower anchors if the com-
bined weight of the child and the child re-
straint exceeds 65 lbs. (29.5 kg). If the com-
bined weight of the child and the child
restraint is greater than 65 lbs. (29.5 kg), use
the vehicle's seat belt (not the lower an-
chors) to install the child restraint. Be sure
to follow the child restraint manufacturer's
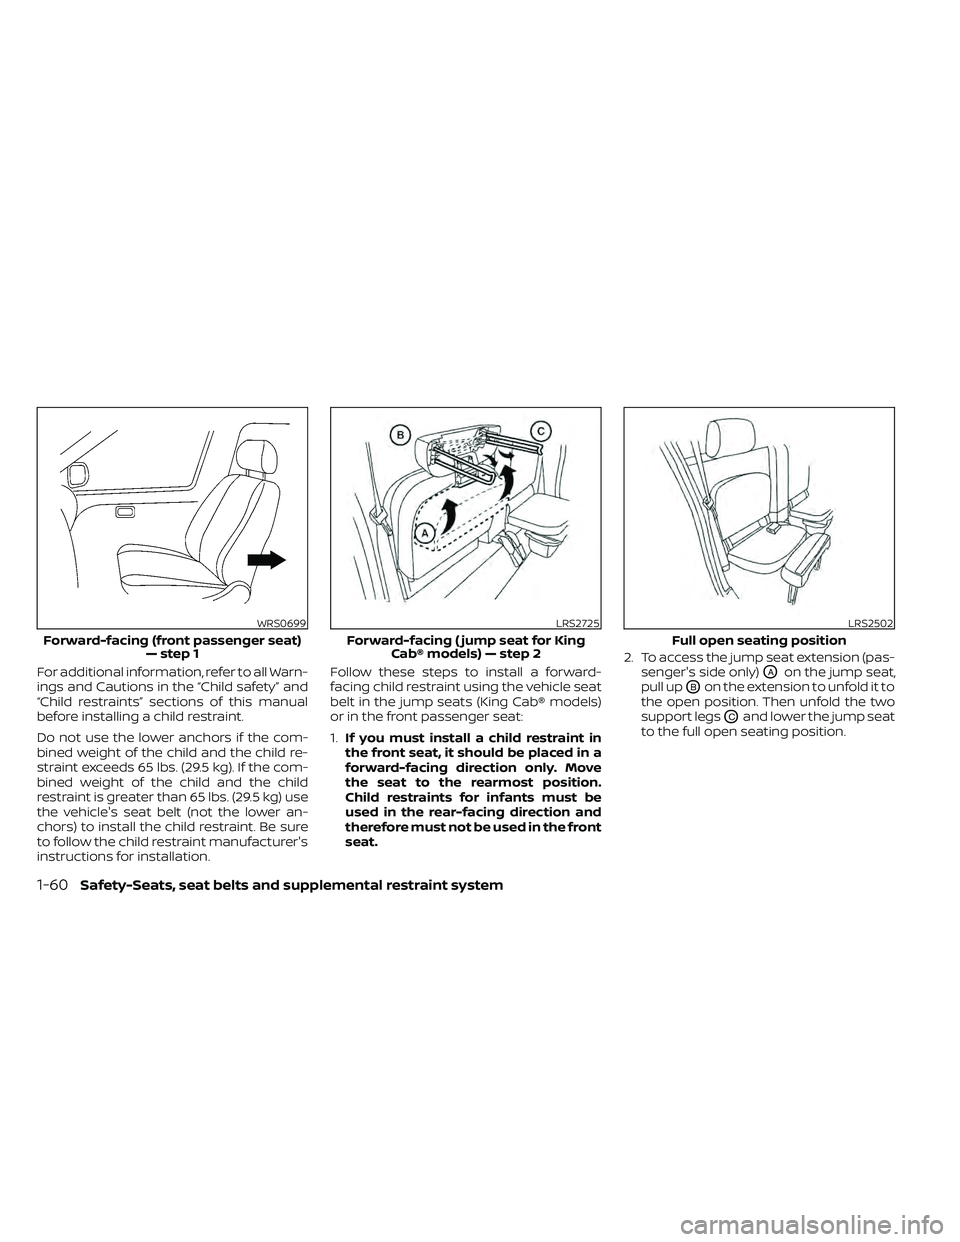
instructions for installation.Follow these steps to install a child re-
straint on the jump seat.
1. To access the jump seat extension (pas-
senger's side only)
OAon the jump seat,
pull up
OBon the extension to unfold it to
the open position. Then unfold the two
support legs
OCand lower the jump seat
to the full open seating position.
2. Position the child restraint on the seat.Always follow the child restraint manu-
facturer's instructions.
LRS2725LRS2502
Full open seating position
Safety-Seats, seat belts and supplemental restraint system1-51
Page 82 of 492

For additional information, refer to all Warn-
ings and Cautions in the “Child safety” and
“Child restraints” sections of this manual
before installing a child restraint.
Do not use the lower anchors if the com-
bined weight of the child and the child re-
straint exceeds 65 lbs. (29.5 kg). If the com-
bined weight of the child and the child
restraint is greater than 65 lbs. (29.5 kg) use
the vehicle's seat belt (not the lower an-
chors) to install the child restraint. Be sure
to follow the child restraint manufacturer's
instructions for installation.Follow these steps to install a forward-
facing child restraint using the vehicle seat
belt in the jump seats (King Cab® models)
or in the front passenger seat:
1.
If you must install a child restraint in
the front seat, it should be placed in a
forward-facing direction only. Move
the seat to the rearmost position.
Child restraints for infants must be
used in the rear-facing direction and
therefore must not be used in the front
seat. 2. To access the jump seat extension (pas-
senger's side only)OAon the jump seat,
pull up
OBon the extension to unfold it to
the open position. Then unfold the two
support legs
OCand lower the jump seat
to the full open seating position.
WRS0699
Forward-facing (front passenger seat) — step 1
Page 91 of 492
For additional information, refer to all Warn-
ings and Cautions in the “Child safety”,
“Child restraints” and “Booster seats” sec-
tions of this manual before installing a child
restraint.
Follow these steps to install a booster seat
in the jump seats:1. To access the jump seat extension (pas-senger's side only)
OAon the jump seat,
pull up
OBon the extension to unfold it to
the open position. Then unfold the two
support legs
OCand lower the jump seat
to the full open seating position.
LRS2725LRS2502
Page 153 of 492
To access the under-seat storage bins:
For King Cab® models, lif t up the jump seat.
For additional information, refer to “Jump
seat” in the “Safety—Seats, seat belts and
supplemental restraint system” section of
this manual.
For Crew Cab models, lif t up the rear bench
seat. For additional information, refer to
“Folding the rear bench seat down” in the
“Safety—Seats, seat belts and supplemen-
tal restraint system” section of this manual.To remove the under-seat storage bins:
1. Turn the knobs to the UNLOCK position
O2.
2. Remove the tray by lif ting it out of the storage bin (King Cab® model). To install the under-seat storage bins:
1. Position the under-seat storage bin so
the holes line up with the holes in the
floorboard.
2. Insert the knobs and turn them to the LOCK position
O1.
LIC0822