Page 9 of 492
Table of
contents
Safety-Seats, seat belts and supplemental restraint system
Instruments and controls
Pre-driving checks and adjustments
Monitor, climate, audio, phone and voice recognition systems
Starting and driving
In case of emergency
Appearance and care
Do-it-yourself
Maintenance and schedules
Technical and consumer information
Index
0
1
2
3
4
5
6
7
8
9
10
11
Page 17 of 492
16. Shif t lever (P. 5-14)
17. Push-button ignition switch (P. 5-10)
18. 4WD shif t switch (if so equipped)(P. 5-23)
19. Climate controls (P. 4-22, P. 4-31)
20. Hazard warning flasher switch (P. 6-2)
21. Tilt steering wheel control (P. 3-16)
22. Cargo lamp switch (P. 2-34) Hill descent control switch
(if so equipped) (P. 2-36)
Outside mirror controls (if so equipped)
(P. 3-17)
Illustrated table of contents0-7
Page 101 of 492

The front air bags operate only when the
ignition switch is in the ON or START po-
sition.
Af ter placing the ignition switch in the
ON position, the supplemental air bag
warning light illuminates. The supple-
mental air bag warning light will turn off
af ter about 7 seconds if the system is
operational.
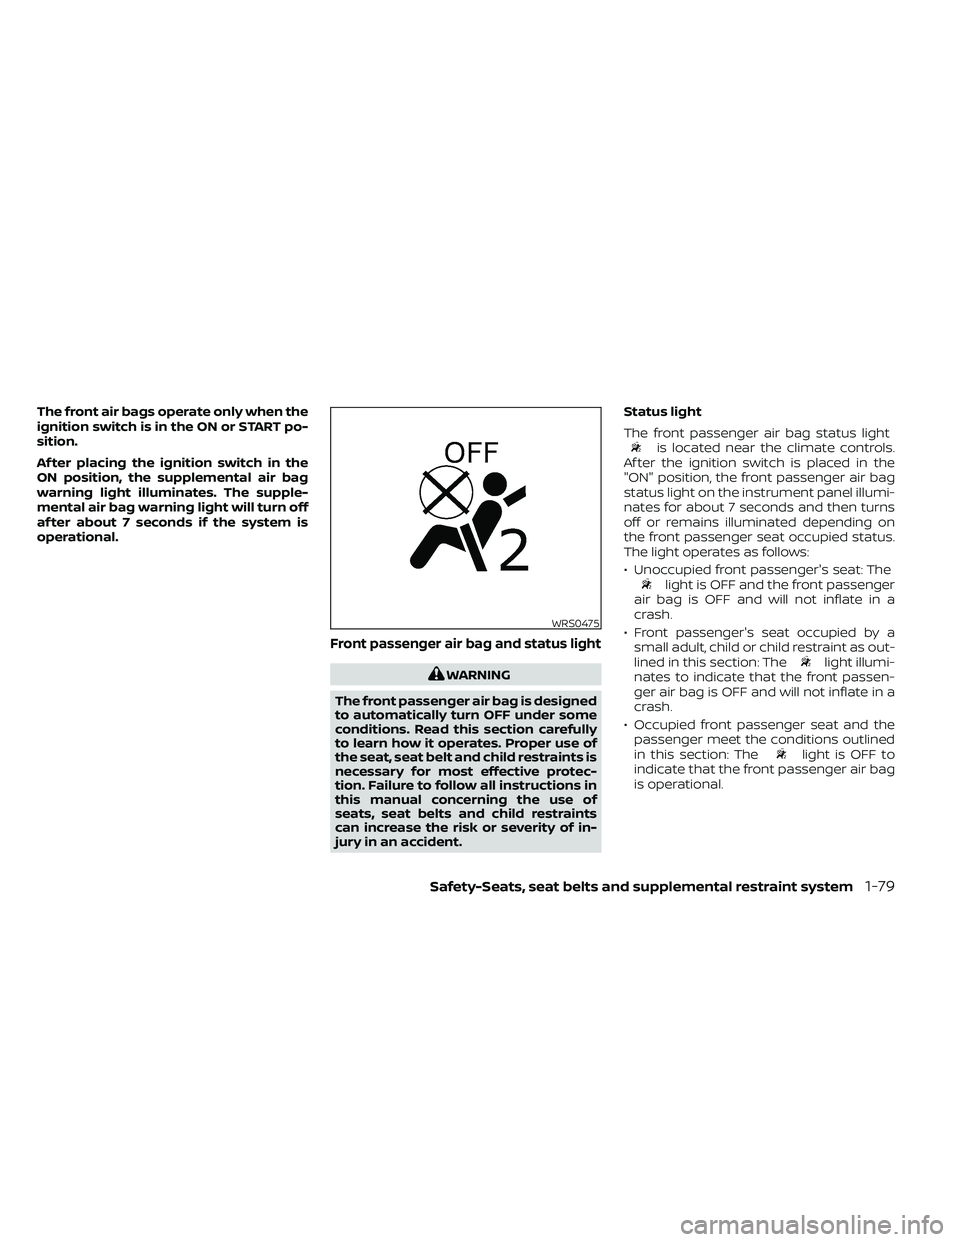
Front passenger air bag and status light
WARNING
The front passenger air bag is designed
to automatically turn OFF under some
conditions. Read this section carefully
to learn how it operates. Proper use of
the seat, seat belt and child restraints is
necessary for most effective protec-
tion. Failure to follow all instructions in
this manual concerning the use of
seats, seat belts and child restraints
can increase the risk or severity of in-
jury in an accident. Status light
The front passenger air bag status light
is located near the climate controls.
Af ter the ignition switch is placed in the
"ON" position, the front passenger air bag
status light on the instrument panel illumi-
nates for about 7 seconds and then turns
off or remains illuminated depending on
the front passenger seat occupied status.
The light operates as follows:
• Unoccupied front passenger's seat: The
light is OFF and the front passenger
air bag is OFF and will not inflate in a
crash.
• Front passenger's seat occupied by a small adult, child or child restraint as out-
lined in this section: The
light illumi-
nates to indicate that the front passen-
ger air bag is OFF and will not inflate in a
crash.
• Occupied front passenger seat and the passenger meet the conditions outlined
in this section: The
light is OFF to
indicate that the front passenger air bag
is operational.
WRS0475
Page 113 of 492
16. Shif t lever (P. 5-14)
17. Push-button ignition switch (P. 5-10)
18. 4WD shif t switch (if so equipped)(P. 5-23)
19. Climate controls (P. 4-22, P. 4-31)
20. Hazard warning flasher switch (P. 6-2)
21. Tilt steering wheel control (P. 3-16)
22. Cargo lamp switch (P. 2-34) Hill descent control switch
(if so equipped) (P. 2-36)
Outside mirror controls (if so equipped)
(P. 3-17)
Instruments and controls2-3
Page 200 of 492
WARNING
• Positioning of the heating or air con-
ditioning controls and display con-
trols should not be done while driv-
ing in order that full attention may be
given to the driving operation.
• Do not disassemble or modif y this
system. If you do, it may result in ac-
cidents, fire, or electrical shock.
• Do not use this system if you notice
any abnormality, such as a frozen
screen or lack of sound. Continued
use of the system may result in acci-
dent, fire or electric shock.
• In case you notice any foreign object
in the system hardware, spill liquid
on it, or notice smoke or smell com-
ing from it, stop using the system im-
mediately. Ignoring such conditions
may lead to accidents, fire or electri-
cal shock. It is recommended that
you visit a NISSAN dealer for
servicing.
4-4Monitor, climate, audio, phone and voice recognition systems
Page 201 of 492
1.MENU button
2.
button*
3. Display screen
4.
(brightness control) button 5. VOL (volume) knob / PUSH
(power)
button
* For additional information regarding the
Bluetooth® Hands-Free Phone System
control button, refer to “Bluetooth® Hands-
Free Phone System without Navigation
System” in this section. When you use this system, make sure the
engine is running.
If you use the system with the engine not
running for a long time, it will discharge
the battery, and the engine will not start.
Reference symbols:
“Example” — Words marked in quotes refer to
a key shown only on the display. These keys
can be selected by touching the screen.
HOW TO USE THE TOUCH-SCREEN
LHA4680
CONTROL PANEL BUTTONS —
MODELS WITHOUT NAVIGATION
SYSTEM (if so equipped)
Monitor, climate, audio, phone and voice recognition systems4-5
Page 210 of 492

Menu itemResult
Audio For additional information, refer to “Audio system” in this section.
Navigation For additional information, refer to the separate NissanConnect® Owner’s Manual.
Phone & Bluetooth For additional information, refer to “Bluetooth® Hands-Free Phone System with Navigation System” in this section.
System Touch this key to select and/or adjust various functions of this system. A screen with additional options will ap-
pear.
Display Touch this key to adjust the appearance of the display.
Brightness Adjusts the brightness of the display.
Display Mode Adjusts to fit the level of lighting in the vehicle. Touch key to cycle through options. “Day ” and “Night” modes are
suited for the respective times of day while “Auto” controls the display automatically.
Scroll Direction Adjusts the direction of the menu scroll. Choose to either move up or down.
Clock/Date Touch this key to adjust the time and date.
Time Format The clock can be set to 12 hours or 24 hours.
Date Format Select from two possible formats for displaying the day, month, and year.
Clock Mode Adjust the mode for the clock. “Auto” uses the system’s GPS to automatically maintain the time. “Manual” allows
you to set the clock using the “Set Clock Manually ” key. Select a time zone using the “Time Zone” key.
Set Clock Manually Adjust the clock manually, Touch the “+” or “-” keys to adjust the hours, minutes, day, month and year up or down. “Clock Mode” must be set to manual for this option to be available.
Daylight Savings Time Adjusts the daylight savings time on or off.
Time Zone Choose the applicable time zone from the list.
Language Touch this key to change the language on the display.
Camera Settings Touch this key to change the camera settings.
Display Mode Touch this key to select the touch-screen display mode (day, night, or automatic).
Brightness Adjust touch-screen brightness.
Contrast Adjust touch-screen contrast.
Color Adjust touch-screen color.
4-14Monitor, climate, audio, phone and voice recognition systems
Page 211 of 492

Menu itemResult
Temperature Unit Touch this key to change the temperature unit being displayed (Fahrenheit or Celsius).
Touchscreen click Toggles the touch-screen click feature on or off. When activated a click sound will be heard every time a key on
the screen is touched.
System Beeps Toggle the system beep tones feature on or off. When activated, a beep sound will be heard when a pop-up mes-
sage appears on the screen or a button on the unit (such as the
button) is pressed and held for 2 seconds.
Return to Factory Settings/Clear
Memory Touch this key to return all settings to default and to clear the memory.
Sof tware Licenses Touch this key to display sof tware licensing information.
Minimize Voice Feedback Touch this key to turn ON or OFF the control voice feedback.
System Sof tware Version Touch this key to display sof tware version information.
Traffic Touch this key display the traffic settings. For additional information, refer to the separate NissanConnect® Own- er’s Manual.
SXM Touch this key to display SXM status information. For additional information, refer to the “Audio System” in this section.
BUTTON
To change the display brightness, press thebutton. Pressing the button again will
change the display to auto or night display
mode.
If no operation is performed within 5 sec-
onds, the display will return to the previous
display.
Press and hold the
button for more
than 2 seconds to turn the display off. Press
the button again to turn the display on.
HOW TO USE THE ON-OFF
BUTTON/VOL (volume) CONTROL
KNOB
Press the ON-OFF button to turn audio
function on and off. Turn the volume con-
trol knob to adjust audio volume.
HOW TO USE THE CAMERA
BUTTON
For additional information, refer to “Rear-
View Monitor” in this section.
Monitor, climate, audio, phone and voice recognition systems4-15