2021 NISSAN FRONTIER radio controls
[x] Cancel search: radio controlsPage 166 of 492
The HomeLink® Universal Transceiver pro-
vides a convenient way to consolidate the
functions of up to three individual hand-
held transmitters into one built-in device.
HomeLink® Universal Transceiver:
• Will operate most radio frequency de-vices such as garage doors, gates, home
and office lighting, entry door locks and
security systems.
• Is powered by your vehicle's battery. No separate batteries are required. If the ve-
hicle's battery is discharged or is discon-
nected, HomeLink® will retain all pro-
gramming.
When the HomeLink® Universal Trans-
ceiver is programmed, retain the original
transmitter for future programming pro-
cedures (Example: new vehicle pur-
chases). Upon sale of the vehicle, the
programmed HomeLink® Universal
Transceiver buttons should be erased for
security purposes. For additional infor-
mation, refer to “Programming
HomeLink®” in this section.WARNING
• Your vehicle's engine should be
turned off while programming the
HomeLink® Universal Transceiver. Do
not breathe exhaust gases; they con-
tain colorless and odorless carbon
monoxide. Carbon monoxide is dan-
gerous. It can cause unconscious-
ness or death.
• Do not use the HomeLink® Universal
Transceiver with any garage door
opener that lacks safety stop and re-
verse features as required by federal
safety standards. (These standards
became effective for opener models
manufactured af ter April 1, 1982). A
garage door opener which cannot
detect an object in the path of a clos-
ing garage door and then automati-
cally stop and reverse, does not meet
current federal safety standards. Us-
ing a garage door opener without
these features increases the risk of
serious injury or death. •
During the programming procedure
your garage door or security gate will
open and close (if the transmitter is
within range). Make sure that people
or objects are clear of the garage
door, gate, etc. that you are
programming.
PROGRAMMING HOMELINK®
If you have any questions or are having
difficulty programming your HomeLink®
buttons, refer to the HomeLink® web site at:
www.homelink.com or call 1-800-355-3515.
NOTE:
Place the ignition switch in the ON posi-
tion (without starting the engine) when
programming HomeLink®. It is also rec-
ommended that a new battery be placed
in the hand-held transmitter of the de-
vice being programmed to HomeLink®
for quicker programming and accurate
transmission of the radio frequency.
HOMELINK® UNIVERSAL
TRANSCEIVER (if so equipped)
2-56Instruments and controls
Page 168 of 492
NOTE:
Once the button is pressed, you have ap-
proximately 30 seconds to initiate the
next step.
6. Return to the vehicle and firmly pressand hold the trained HomeLink® button
for 2 seconds and release. Repeat the
“press/hold/release” sequence up to
three times to complete the training
process. HomeLink® should now acti-
vate your rolling code equipped device.
7. If you have any questions or are having difficulty programming your HomeLink®
buttons, refer to the HomeLink® web site
at: www.homelink.com or call
1-800-355-3515.
PROGRAMMING HOMELINK® FOR
CANADIAN CUSTOMERS AND GATE
OPENERS
Canadian radio-frequency laws require
transmitter signals to “time-out” (or quit)
af ter several seconds of transmission –
which may not be long enough for
HomeLink® to pick up the signal during
training. Similar to this Canadian law, some
U.S. gate operators are designed to “tim-
eout” in the same manner. If you live in Canada or you are having diffi-
culties training a gate operator
orgarage
door opener by using the “Training” proce-
dures, replace “Programming HomeLink®”
step 2 with the following:
NOTE:
When programming a garage door
opener, etc., unplug the device during
the “cycling” process to prevent possible
damage to the garage door opener
components.
1. For additional information, refer to “Pro-
gramming HomeLink®” step 1 in this
section.
2. Using both hands, simultaneously press and hold the desired HomeLink® button
and the hand-held transmitter button.
During training, your hand-held trans-
mitter may automatically stop transmit-
ting. Continue to press and hold the de-
sired HomeLink® button while you press
and re-press (“cycle”) your hand-held
transmitter every 2 seconds until the
frequency signal has been learned. The
HomeLink® indicator light will flash
slowly and then rapidly af ter several
seconds upon successful training. DO
NOT release until the HomeLink® indica-
tor light flashes slowly and then rapidly. When the indicator light flashes rapidly,
both buttons may be released. The rapid
flashing indicates successful training.
Proceed with “Programming
HomeLink®” step 3 to complete.
If the device was unplugged during the
programming procedure, remember to
plug it back in when programming is
completed.
OPERATING THE HOMELINK®
UNIVERSAL TRANSCEIVER
The HomeLink® Universal Transceiver, af ter
it is programmed, can be used to activate
the programmed device. To operate, sim-
ply press and release the appropriate pro-
grammed HomeLink® Universal Trans-
ceiver button. The amber indicator light will
illuminate while the signal is being trans-
mitted.
For convenience, the hand-held transmit-
ter of the device may also be used at any
time.
2-58Instruments and controls
Page 243 of 492
FM radio operation
Press theMENU button and touch the
“FM” key or press the AUDIO button and
select FM on the bottom of the Launch Bar
to bring up the FM display screen.
If another audio source is playing when the
“FM” key is pressed, the audio source play-
ing will automatically be turned off and the
last radio station played will begin playing.
The FM stereo indicator (STEREO) is shown
on the screen during FM stereo reception.
When the stereo broadcast signal is weak,
the radio automatically changes from ste-
reo to monaural reception.
FM Menu
Touch the “FM Menu” key to display the FM
Menu screen options:
• SCAN: To scan tune the stations, touch the “FM Menu” key on the radio screen
and then touch the “SCAN” key. The sta-
tions will be tuned from low to high fre-
quencies and stop at each broadcasting
stations for several seconds. Touching
the “SCAN” key again during this period of
several seconds will stop tuning and the
radio will remain tuned to that station. • Refresh: Touch the “Refresh” key to up-
date the station list displayed on the right
side of the FM Menu screen.
• RDS Info: Radio station and song informa- tion can be displayed on the FM display
screen.
orbuttons to tune
from low to high or high to low frequencies
and to stop at the next broadcasting sta-
tion.
1 to 12 Station memory operations
Up to 12 stations can be registered in the
preset list.
1. Select the FM radio band.
2. Tune to the station you wish to store.
3. Touch and hold one of the preset num- bers in the preset list.
The information such as frequency will be
displayed on the preset list.
To select and listen to the preset stations,
push
oron the steering wheel
briefly or touch a preferred station on the
preset list on the radio screen.
Auxiliary (AUX) devices operation
Connecting auxiliary devices
Connect an AUX device into the AUX input
jack located on the center console below
the heater and air conditioner controls.
The AUX input jack accepts any standard
analog audio input such as from a portable
cassette player, CD player, MP3 player or
phone.
Insert a 1/8 in (3.5 mm) stereo mini plug in
the audio input jack. If a cable with a mono
plug is used, the audio output may not
function normally.
Activation and playing
Turn on the AUX device. Connect an AUX
cable to the AUX device and the AUX input
jack. Select AUX mode from the audio
source menu screen or by pressing the
Source button on the steering wheel.
Monitor, climate, audio, phone and voice recognition systems4-47
Page 246 of 492
Audio main operation
ON-OFF button / VOL (volume) control
knob
Place the ignition switch in the ACC or ON
position and press the ON-OFF button
while the system is off to call up the mode
(radio, CD, AUX, Bluetooth® audio, USB or
iPod®) that was playing immediately before
the system was turned off.To turn the system off, press the ON-OFF
button.
Turn the VOL (volume) control knob to ad-
just the volume.
This vehicle may be equipped with Speed
Sensitive Volume. When this feature is ac-
tive, the audio volume changes as the driv-
ing speed changes.
Audio settings
1. Press the [] button.
2. Touch the “Settings” key.
3. Touch the “Audio” key.
Use the touch-screen to adjust the follow-
ing items to the desired setting:
Audio Bass Adjusts the bass to the desired level.
Treble Adjusts the treble to the desired level.
Balance Adjusts the balance to the desired level. Balance adjusts the sound level between the lef t and right speak-
ers.
Fade Adjusts the fade to the desired level. Fade adjusts the sound level between the front and rear speakers.
Speed Sensitive Vol. Adjusts the speed sensitive volume function, which increases the volume of the audio system as the
speed of the vehicle increases. Set to “ 0 ” to disable the feature. The higher the setting, the more the vol-
ume increases in relation to vehicle speed.
AUX Volume Level Controls the volume level of incoming sound when an auxiliary device is connected to the system. Avail-
able options are Low (Quiet), Medium, and High (Loud).
Bass, treble, balance and fade can also be adjusted by pressing the AUDIO button and turning the TUNE knob to select the item to adjust.
When the desired item is shown on the display, turn the tuning to adjust and then press the AUDIO button until the display returns to the
main audio screen. If the button is not pressed for approximately 10 seconds, the radio or CD display will automatically reappear.
4-50Monitor, climate, audio, phone and voice recognition systems
Page 267 of 492
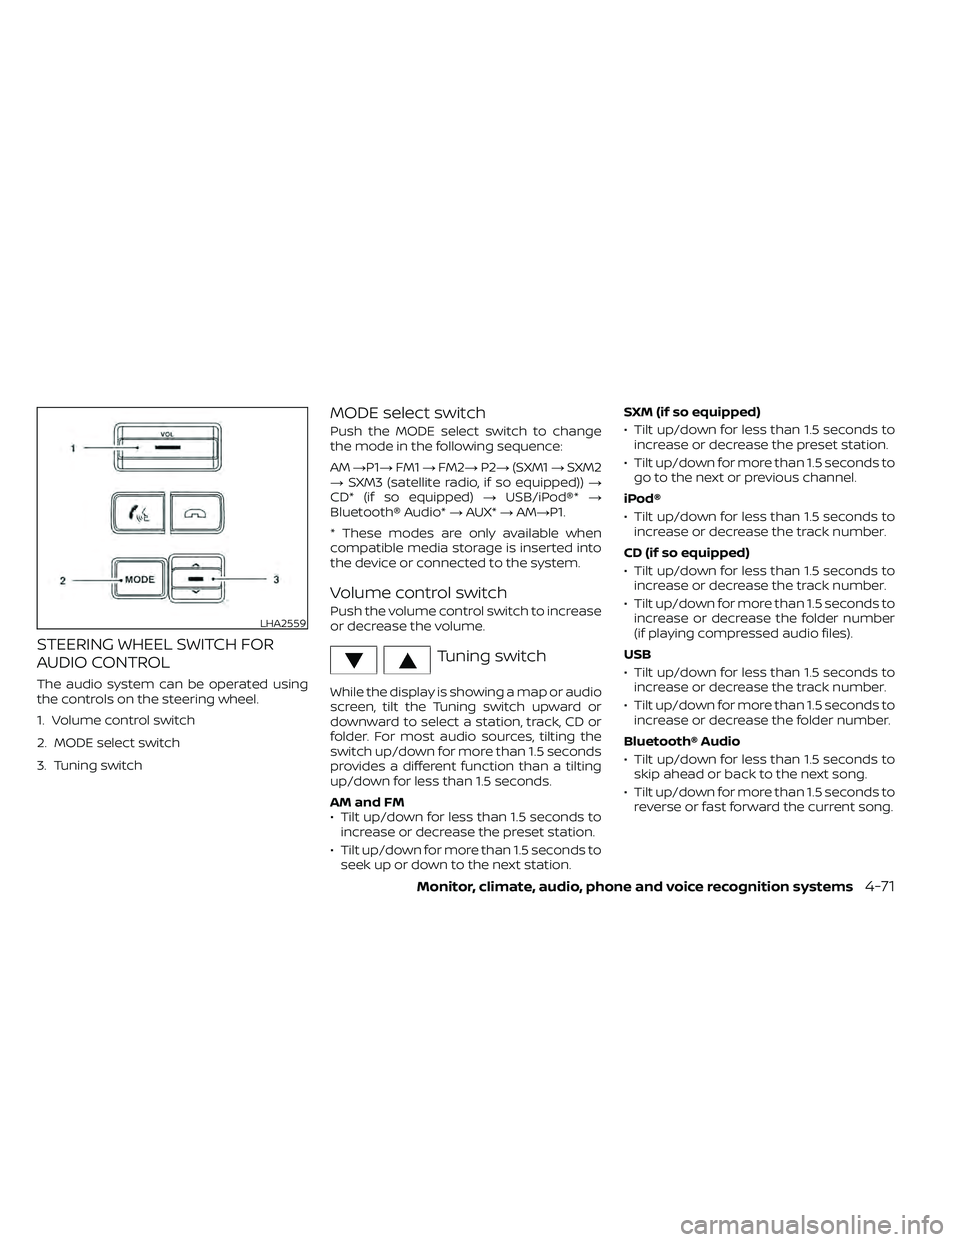
STEERING WHEEL SWITCH FOR
AUDIO CONTROL
The audio system can be operated using
the controls on the steering wheel.
1. Volume control switch
2. MODE select switch
3. Tuning switch
MODE select switch
Push the MODE select switch to change
the mode in the following sequence:
AM→P1→ FM1→FM2→ P2→(SXM1 →SXM2
→ SXM3 (satellite radio, if so equipped)) →
CD* (if so equipped) →USB/iPod®* →
Bluetooth® Audio* →AUX* →AM→P1.
* These modes are only available when
compatible media storage is inserted into
the device or connected to the system.
Volume control switch
Push the volume control switch to increase
or decrease the volume.
Tuning switch
While the display is showing a map or audio
screen, tilt the Tuning switch upward or
downward to select a station, track, CD or
folder. For most audio sources, tilting the
switch up/down for more than 1.5 seconds
provides a different function than a tilting
up/down for less than 1.5 seconds.
AM and FM
• Tilt up/down for less than 1.5 seconds to increase or decrease the preset station.
• Tilt up/down for more than 1.5 seconds to seek up or down to the next station. SXM (if so equipped)
• Tilt up/down for less than 1.5 seconds to
increase or decrease the preset station.
• Tilt up/down for more than 1.5 seconds to go to the next or previous channel.
iPod®
• Tilt up/down for less than 1.5 seconds to increase or decrease the track number.
CD (if so equipped)
• Tilt up/down for less than 1.5 seconds to increase or decrease the track number.
• Tilt up/down for more than 1.5 seconds to increase or decrease the folder number
(if playing compressed audio files).
USB
• Tilt up/down for less than 1.5 seconds to increase or decrease the track number.
• Tilt up/down for more than 1.5 seconds to increase or decrease the folder number.
Bluetooth® Audio
• Tilt up/down for less than 1.5 seconds to skip ahead or back to the next song.
• Tilt up/down for more than 1.5 seconds to reverse or fast forward the current song.
LHA2559
Page 478 of 492

Parking brake operation.........5-19Self-adjusting brakes...........8-20Brake fluid....................8-11Brake system.................5-32Brakes......................8-20Break-in schedule...............5-21Brightness control
Instrument panel.............2-33Brightness/contrast button......4-9, 4-15Bulb check/instrument panel........2-15Bulb replacement...............8-28
C
C.M.V.S.S. certification label.........10-12Capacities and recommended
fuel/lubricants................ .10-2Car phone or CB radio............4-79Cargo
(See vehicle loading information).....10-14Cargo lamp switch..............2-34CD care and cleaning.............4-70CD player (See audio system).......4-54Child restraint with top tether strap. . . .1-32Child restraints.......1-25,1-26,1-28, 1-30Precautions on child
restraints.........1-39, 1-42, 1-54, 1-65Top tether strap anchor point
locations.................. .1-33Child safety rear door lock..........3-7Cleaning exterior and interior......7-2,7-4Clock set/adjustment..........4-7,4-13
Clock setting
(models with Navigation System).....4-13Cold weather driving.............5-40Compact disc (CD) player..........4-54Compass....................2-11Compass and outside temperature
display......................2-10Compass display...............2-10Connect phone................4-72Console box..................2-45Control panel buttons.........4-5, 4-10Back button.................4-13Brightness/contrast button. . . .4-9, 4-15Enter button..............4-5, 4-10Setting button...............4-13With navigation system.......4-10,4-11Controls
Audio controls (steering wheel).....4-71Heater and air conditioner controls. .4-34Heater and air conditioner controls
(manual)...................4-22CoolantCapacities and recommended
fuel/lubricants
...............10-2Changing engine coolant.........8-5Checking engine coolant level......8-5Engine coolant temperature gauge. . .2-7Corrosion protection..............7-7Cruise control.................5-19Cup holders................. .2-46Curtain side-impact and rollover
air bag..................... .1-82
D
Daytime Running Lights (DRL) system. .2-32Defroster switch
Rear window and outside mirror
defroster switch
..............2-29Rear window defroster switch.....2-29Dimensions and weights..........10-10Dimmer switch for instrument panel. . .2-33Display controls (see control panel
buttons)................. .4-5, 4-10Door locks................... .3-4Door open warning light...........2-17Drive belt....................8-15Driving
Cold weather driving...........5-40Driving with automatic
transmission................5-14Precautions when starting and
driving.....................5-2Driving the vehicle...............5-14
E
Economy - fuel.................5-23Electronic locking rear differential (E-Lock)
system.....................5-29Electronic locking rear differential (E-Lock)
system switch................ .2-37Emergency engine shutoff.......5-12,6-3Emission control information label. . . .10-12Emission control system warranty. . . .10-38
11-2