2021 NISSAN FRONTIER battery
[x] Cancel search: batteryPage 165 of 492
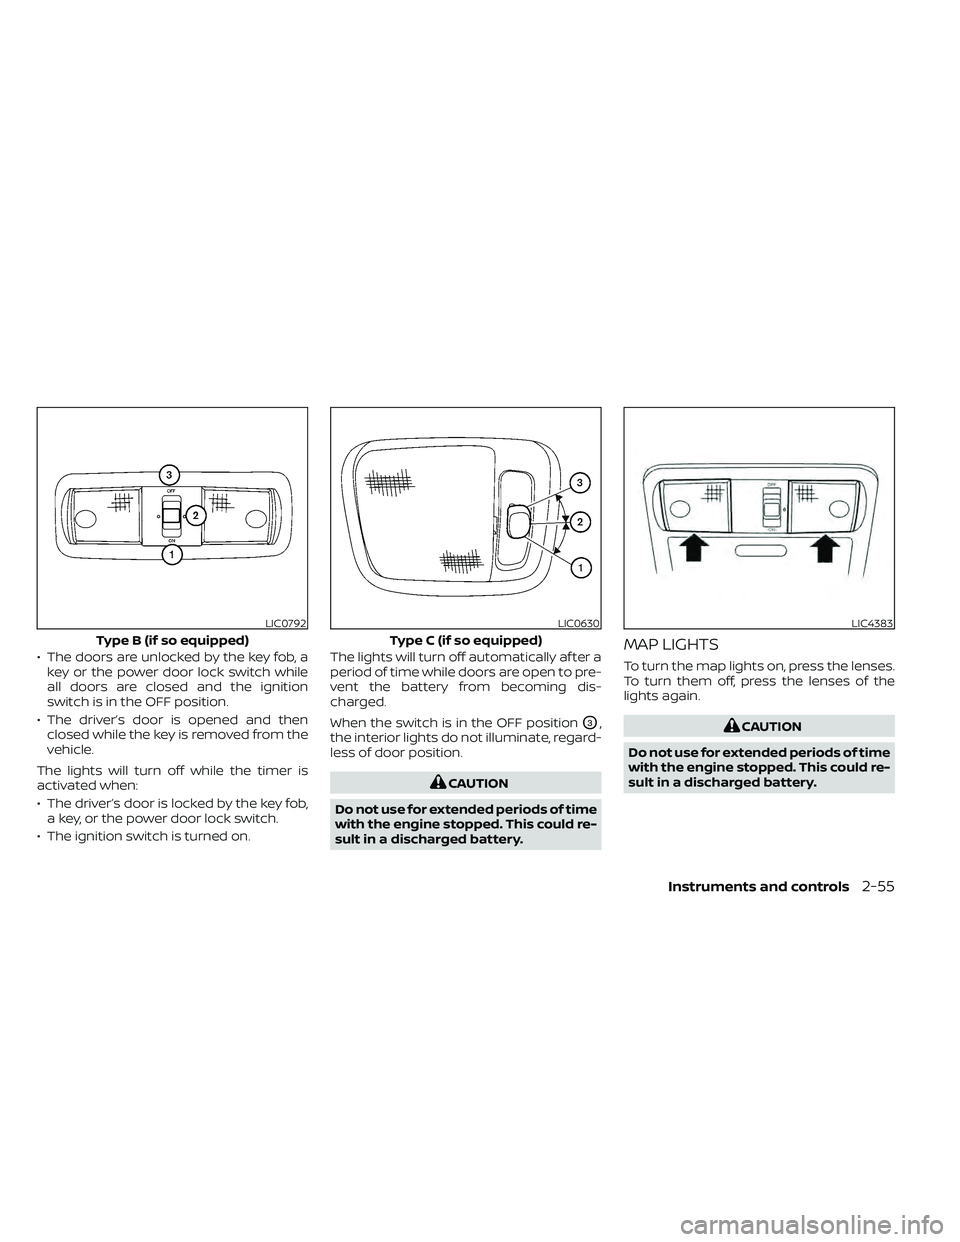
• The doors are unlocked by the key fob, akey or the power door lock switch while
all doors are closed and the ignition
switch is in the OFF position.
• The driver’s door is opened and then closed while the key is removed from the
vehicle.
The lights will turn off while the timer is
activated when:
• The driver’s door is locked by the key fob, a key, or the power door lock switch.
• The ignition switch is turned on. The lights will turn off automatically af ter a
period of time while doors are open to pre-
vent the battery from becoming dis-
charged.
When the switch is in the OFF position
O3,
the interior lights do not illuminate, regard-
less of door position.
Page 166 of 492
The HomeLink® Universal Transceiver pro-
vides a convenient way to consolidate the
functions of up to three individual hand-
held transmitters into one built-in device.
HomeLink® Universal Transceiver:
• Will operate most radio frequency de-vices such as garage doors, gates, home
and office lighting, entry door locks and
security systems.
• Is powered by your vehicle's battery. No separate batteries are required. If the ve-
hicle's battery is discharged or is discon-
nected, HomeLink® will retain all pro-
gramming.
When the HomeLink® Universal Trans-
ceiver is programmed, retain the original
transmitter for future programming pro-
cedures (Example: new vehicle pur-
chases). Upon sale of the vehicle, the
programmed HomeLink® Universal
Transceiver buttons should be erased for
security purposes. For additional infor-
mation, refer to “Programming
HomeLink®” in this section.WARNING
• Your vehicle's engine should be
turned off while programming the
HomeLink® Universal Transceiver. Do
not breathe exhaust gases; they con-
tain colorless and odorless carbon
monoxide. Carbon monoxide is dan-
gerous. It can cause unconscious-
ness or death.
• Do not use the HomeLink® Universal
Transceiver with any garage door
opener that lacks safety stop and re-
verse features as required by federal
safety standards. (These standards
became effective for opener models
manufactured af ter April 1, 1982). A
garage door opener which cannot
detect an object in the path of a clos-
ing garage door and then automati-
cally stop and reverse, does not meet
current federal safety standards. Us-
ing a garage door opener without
these features increases the risk of
serious injury or death. •
During the programming procedure
your garage door or security gate will
open and close (if the transmitter is
within range). Make sure that people
or objects are clear of the garage
door, gate, etc. that you are
programming.
PROGRAMMING HOMELINK®
If you have any questions or are having
difficulty programming your HomeLink®
buttons, refer to the HomeLink® web site at:
www.homelink.com or call 1-800-355-3515.
NOTE:
Place the ignition switch in the ON posi-
tion (without starting the engine) when
programming HomeLink®. It is also rec-
ommended that a new battery be placed
in the hand-held transmitter of the de-
vice being programmed to HomeLink®
for quicker programming and accurate
transmission of the radio frequency.
HOMELINK® UNIVERSAL
TRANSCEIVER (if so equipped)
2-56Instruments and controls
Page 169 of 492
PROGRAMMING TROUBLE-
DIAGNOSIS
If the HomeLink® does not quickly learn the
hand-held transmitter information:
• Replace the hand-held transmitter bat-teries with new batteries.
• Position the hand-held transmitter with its battery area facing away from the
HomeLink® surface.
• Press and hold both the HomeLink® and hand-held transmitter buttons without
interruption.
• Position the hand-held transmitter1-3 inches (26 - 76 mm) away from the
HomeLink® surface. Hold the transmitter
in that position for up to 15 seconds. If
HomeLink® is not programmed within
that time, try holding the transmitter in
another position – keeping the indicator
light in view at all times.
If you have any questions or are having
difficulty programming your HomeLink®
buttons, refer to the HomeLink® web site at:
www.homelink.com or call 1-800-355-3515.
CLEARING THE PROGRAMMED
INFORMATION
The following procedure clears the pro-
grammed information from both buttons.
Individual buttons cannot be cleared. How-
ever, individual buttons can be repro-
grammed. For additional information, refer
to “Reprogramming a single HomeLink®
button” in this section.
To clear all programming:
1. Press and hold the two outer HomeLink® buttons until the indicator light begins to
flash in approximately 10 seconds. Do
not hold for longer than 20 seconds.
2. Release both buttons.
HomeLink® is now in the programming
mode and can be programmed at any
time beginning with “Programming
HomeLink®” - Step 1.
REPROGRAMMING A SINGLE
HOMELINK® BUTTON
To reprogram a HomeLink® Universal
Transceiver button, complete the following:
1. Press and hold the desired HomeLink® button. DO NOT release the button. 2. The indicator light will begin to flash af-
ter 20 seconds. Without releasing the
HomeLink® button, proceed with “Pro-
gramming HomeLink®” - Step 1.
For questions or comments, contact
HomeLink® at: www.homelink.com or
1–800–355–3515 (except Mexico).
The HomeLink® Universal Transceiver but-
ton has now been reprogrammed. The
new device can be activated by pressing
the HomeLink® button that was just pro-
grammed. This procedure will not affect
any other programmed HomeLink® but-
tons.
IF YOUR VEHICLE IS STOLEN
If your vehicle is stolen, you should change
the codes of any non-rolling code device
that has been programmed into
HomeLink®. Consult the Owner's Manual of
each device or call the manufacturer or
dealer of those devices for additional infor-
mation.
When your vehicle is recovered, you will
need to reprogram the HomeLink® Uni-
versal Transceiver with your new trans-
mitter information.
Instruments and controls2-59
Page 179 of 492
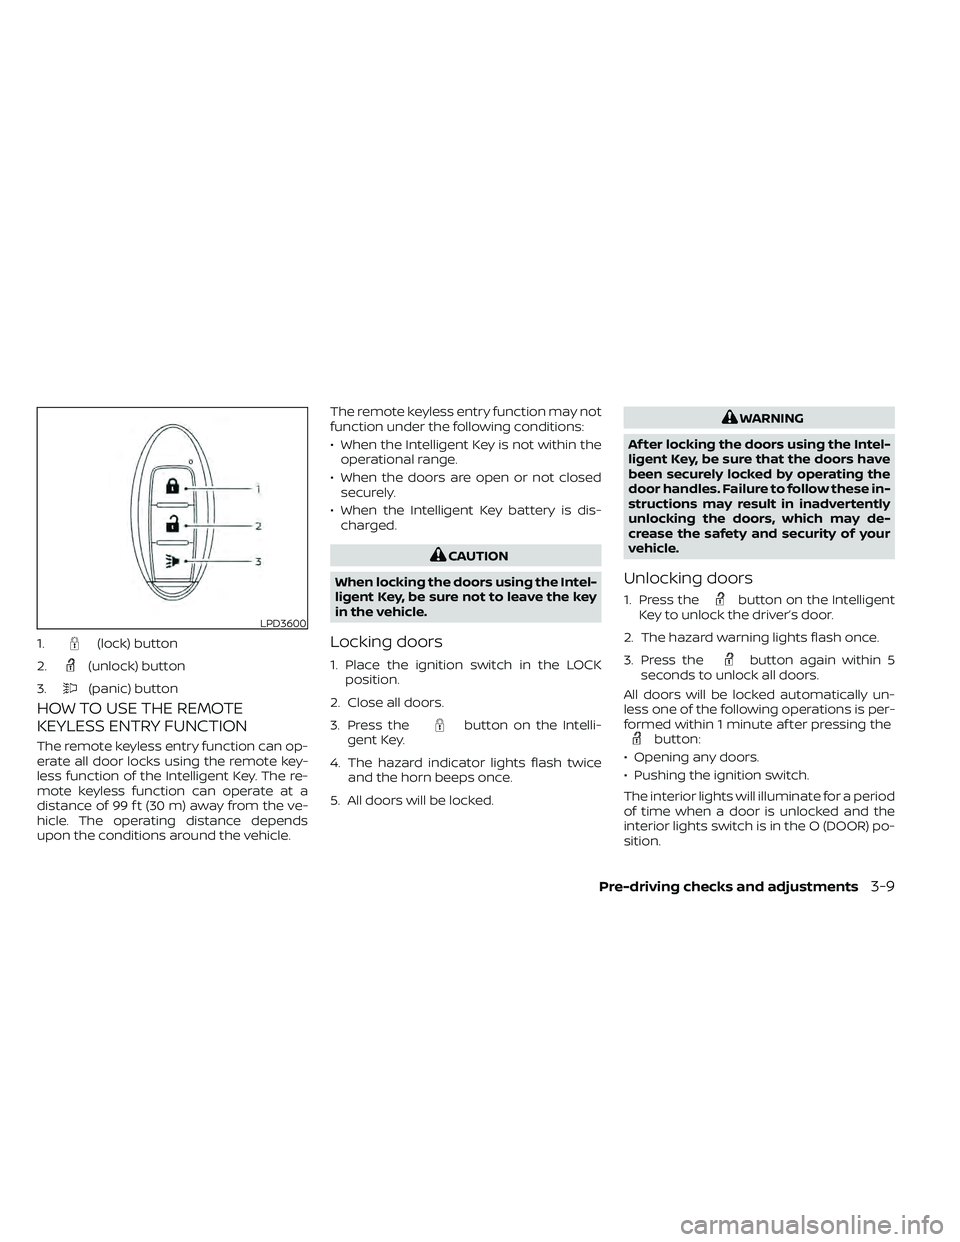
HOW TO USE THE REMOTE
KEYLESS ENTRY FUNCTION
The remote keyless entry function can op-
erate all door locks using the remote key-
less function of the Intelligent Key. The re-
mote keyless function can operate at a
distance of 99 f t (30 m) away from the ve-
hicle. The operating distance depends
upon the conditions around the vehicle.The remote keyless entry function may not
function under the following conditions:
• When the Intelligent Key is not within the
operational range.
• When the doors are open or not closed securely.
• When the Intelligent Key battery is dis- charged.
button on the Intelli-
gent Key.
4. The hazard indicator lights flash twice and the horn beeps once.
5. All doors will be locked.
button on the Intelligent
Key to unlock the driver’s door.
2. The hazard warning lights flash once.
3. Press the
button again within 5
seconds to unlock all doors.
All doors will be locked automatically un-
less one of the following operations is per-
formed within 1 minute af ter pressing the
button:
• Opening any doors.
• Pushing the ignition switch.
The interior lights will illuminate for a period
of time when a door is unlocked and the
interior lights switch is in the O (DOOR) po-
sition.
LPD3600
1.(lock) button
2.
(unlock) button
3.
(panic) button
Page 181 of 492
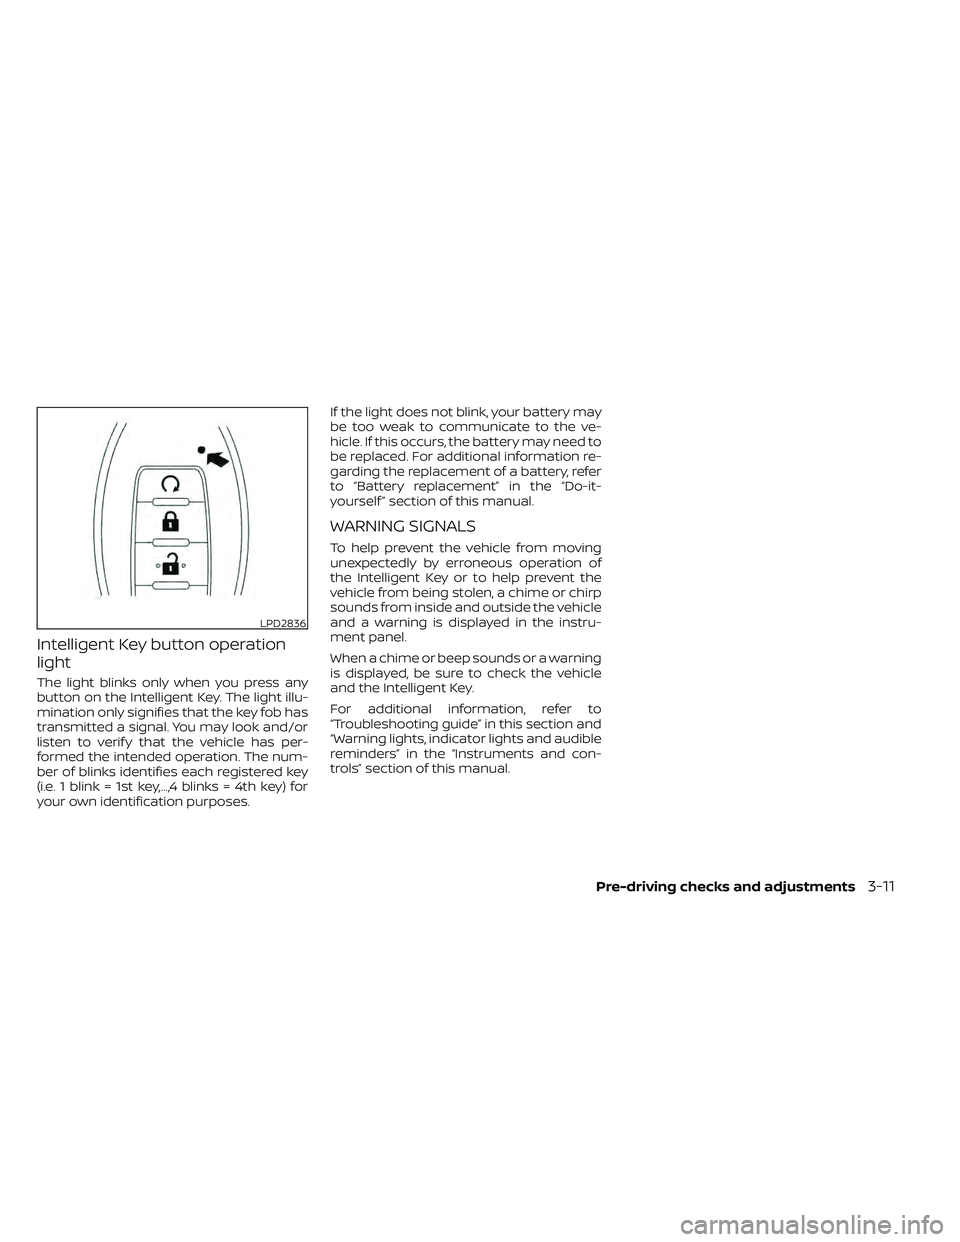
Intelligent Key button operation
light
The light blinks only when you press any
button on the Intelligent Key. The light illu-
mination only signifies that the key fob has
transmitted a signal. You may look and/or
listen to verif y that the vehicle has per-
formed the intended operation. The num-
ber of blinks identifies each registered key
(i.e. 1 blink = 1st key,...,4 blinks = 4th key) for
your own identification purposes.If the light does not blink, your battery may
be too weak to communicate to the ve-
hicle. If this occurs, the battery may need to
be replaced. For additional information re-
garding the replacement of a battery, refer
to “Battery replacement” in the “Do-it-
yourself ” section of this manual.
WARNING SIGNALS
To help prevent the vehicle from moving
unexpectedly by erroneous operation of
the Intelligent Key or to help prevent the
vehicle from being stolen, a chime or chirp
sounds from inside and outside the vehicle
and a warning is displayed in the instru-
ment panel.
When a chime or beep sounds or a warning
is displayed, be sure to check the vehicle
and the Intelligent Key.
For additional information, refer to
“Troubleshooting guide” in this section and
“Warning lights, indicator lights and audible
reminders” in the “Instruments and con-
trols” section of this manual.
LPD2836
Page 182 of 492
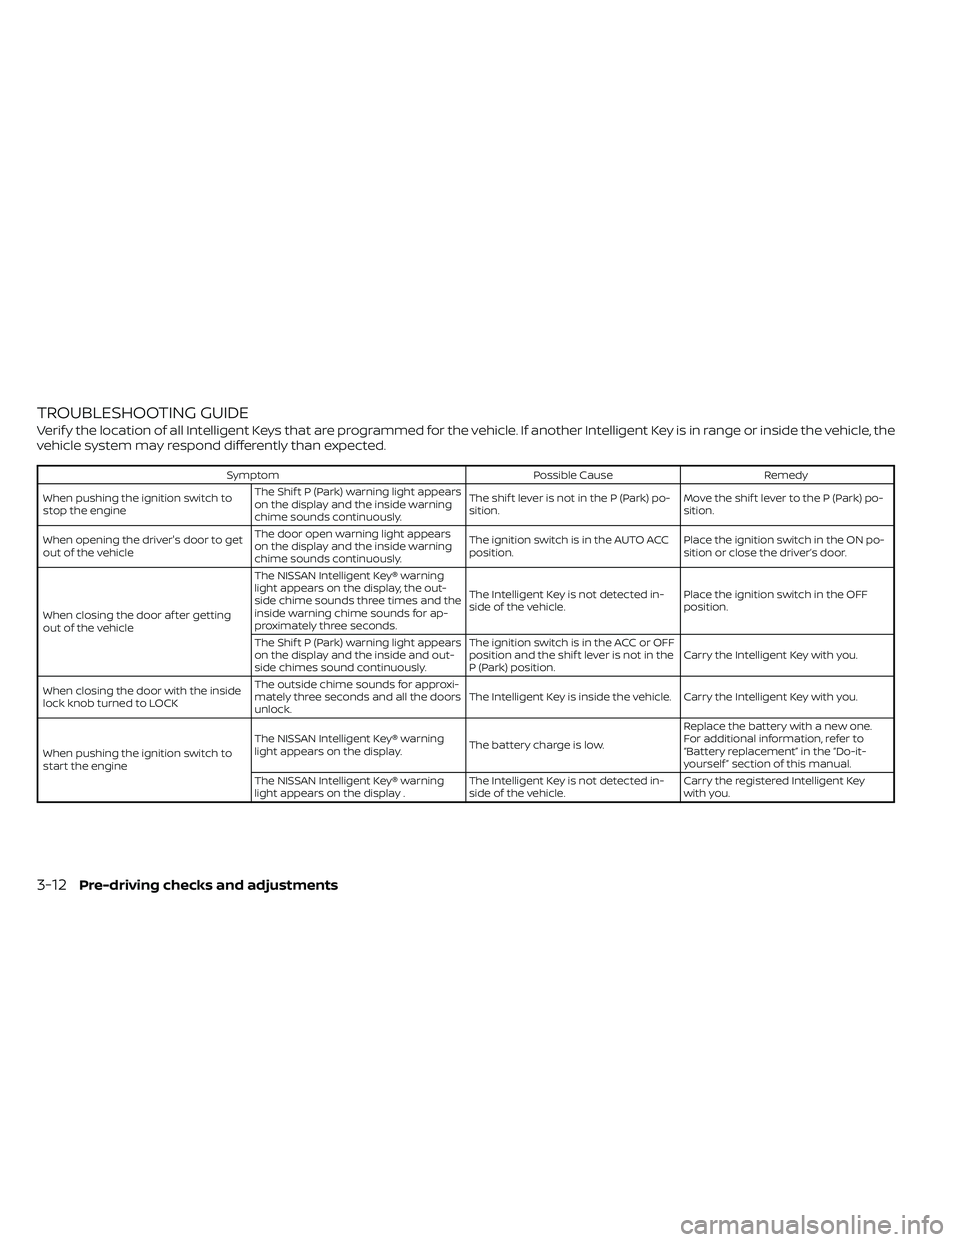
TROUBLESHOOTING GUIDE
Verif y the location of all Intelligent Keys that are programmed for the vehicle. If another Intelligent Key is in range or inside the vehicle, the
vehicle system may respond differently than expected.
SymptomPossible CauseRemedy
When pushing the ignition switch to
stop the engine The Shif t P (Park) warning light appears
on the display and the inside warning
chime sounds continuously. The shif t lever is not in the P (Park) po-
sition.
Move the shif t lever to the P (Park) po-
sition.
When opening the driver's door to get
out of the vehicle The door open warning light appears
on the display and the inside warning
chime sounds continuously. The ignition switch is in the AUTO ACC
position.
Place the ignition switch in the ON po-
sition or close the driver’s door.
When closing the door af ter getting
out of the vehicle The NISSAN Intelligent Key® warning
light appears on the display, the out-
side chime sounds three times and the
inside warning chime sounds for ap-
proximately three seconds.
The Intelligent Key is not detected in-
side of the vehicle.
Place the ignition switch in the OFF
position.
The Shif t P (Park) warning light appears
on the display and the inside and out-
side chimes sound continuously. The ignition switch is in the ACC or OFF
position and the shif t lever is not in the
P (Park) position.
Carry the Intelligent Key with you.
When closing the door with the inside
lock knob turned to LOCK The outside chime sounds for approxi-
mately three seconds and all the doors
unlock.
The Intelligent Key is inside the vehicle. Carry the Intelligent Key with you.
When pushing the ignition switch to
start the engine The NISSAN Intelligent Key® warning
light appears on the display.
The battery charge is low.Replace the battery with a new one.
For additional information, refer to
“Battery replacement” in the “Do-it-
yourself ” section of this manual.
The NISSAN Intelligent Key® warning
light appears on the display . The Intelligent Key is not detected in-
side of the vehicle.Carry the registered Intelligent Key
with you.
3-12Pre-driving checks and adjustments
Page 201 of 492
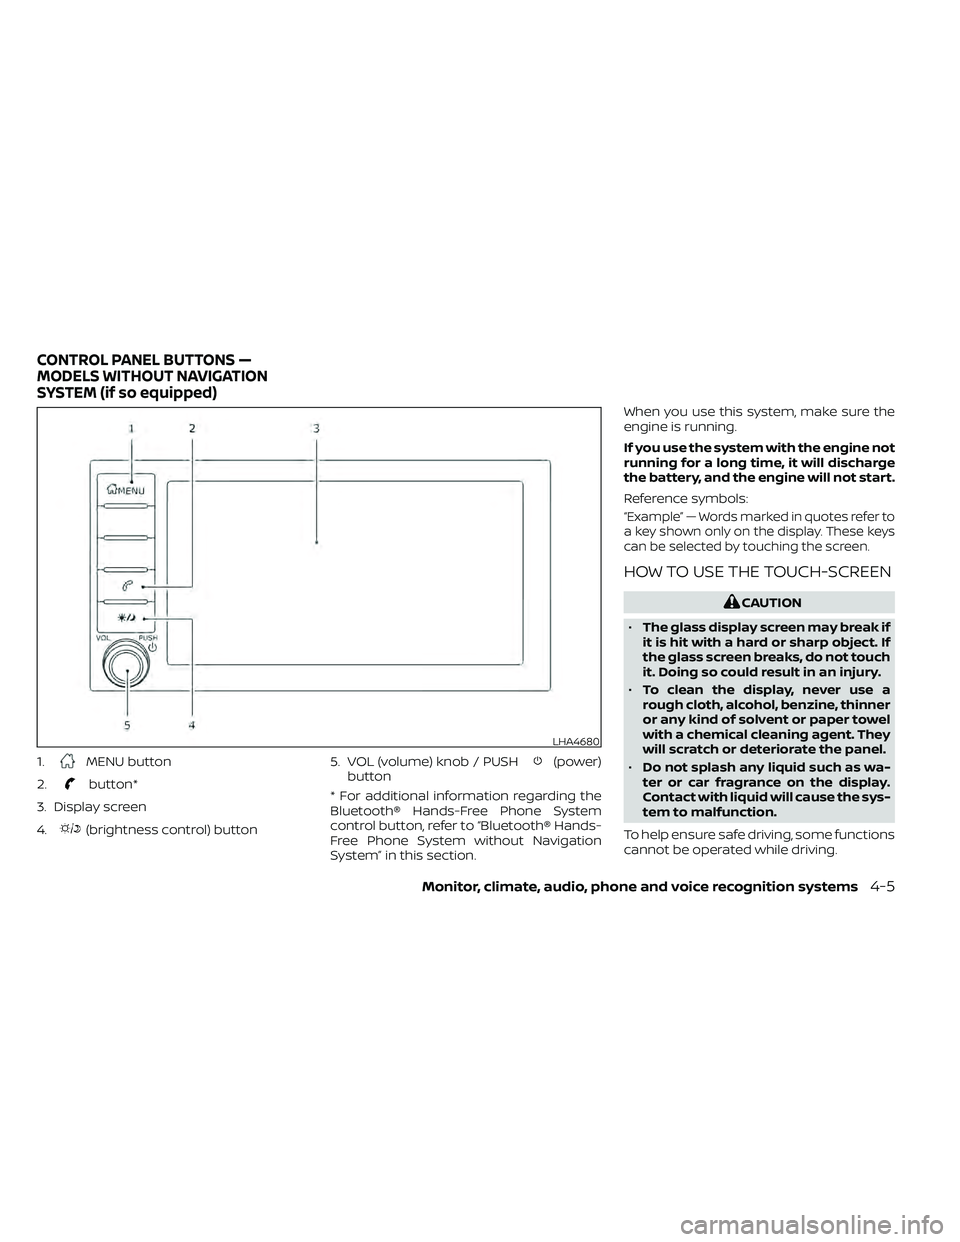
1.MENU button
2.
button*
3. Display screen
4.
(brightness control) button 5. VOL (volume) knob / PUSH
(power)
button
* For additional information regarding the
Bluetooth® Hands-Free Phone System
control button, refer to “Bluetooth® Hands-
Free Phone System without Navigation
System” in this section. When you use this system, make sure the
engine is running.
If you use the system with the engine not
running for a long time, it will discharge
the battery, and the engine will not start.
Reference symbols:
“Example” — Words marked in quotes refer to
a key shown only on the display. These keys
can be selected by touching the screen.
HOW TO USE THE TOUCH-SCREEN
LHA4680
CONTROL PANEL BUTTONS —
MODELS WITHOUT NAVIGATION
SYSTEM (if so equipped)
Monitor, climate, audio, phone and voice recognition systems4-5
Page 206 of 492
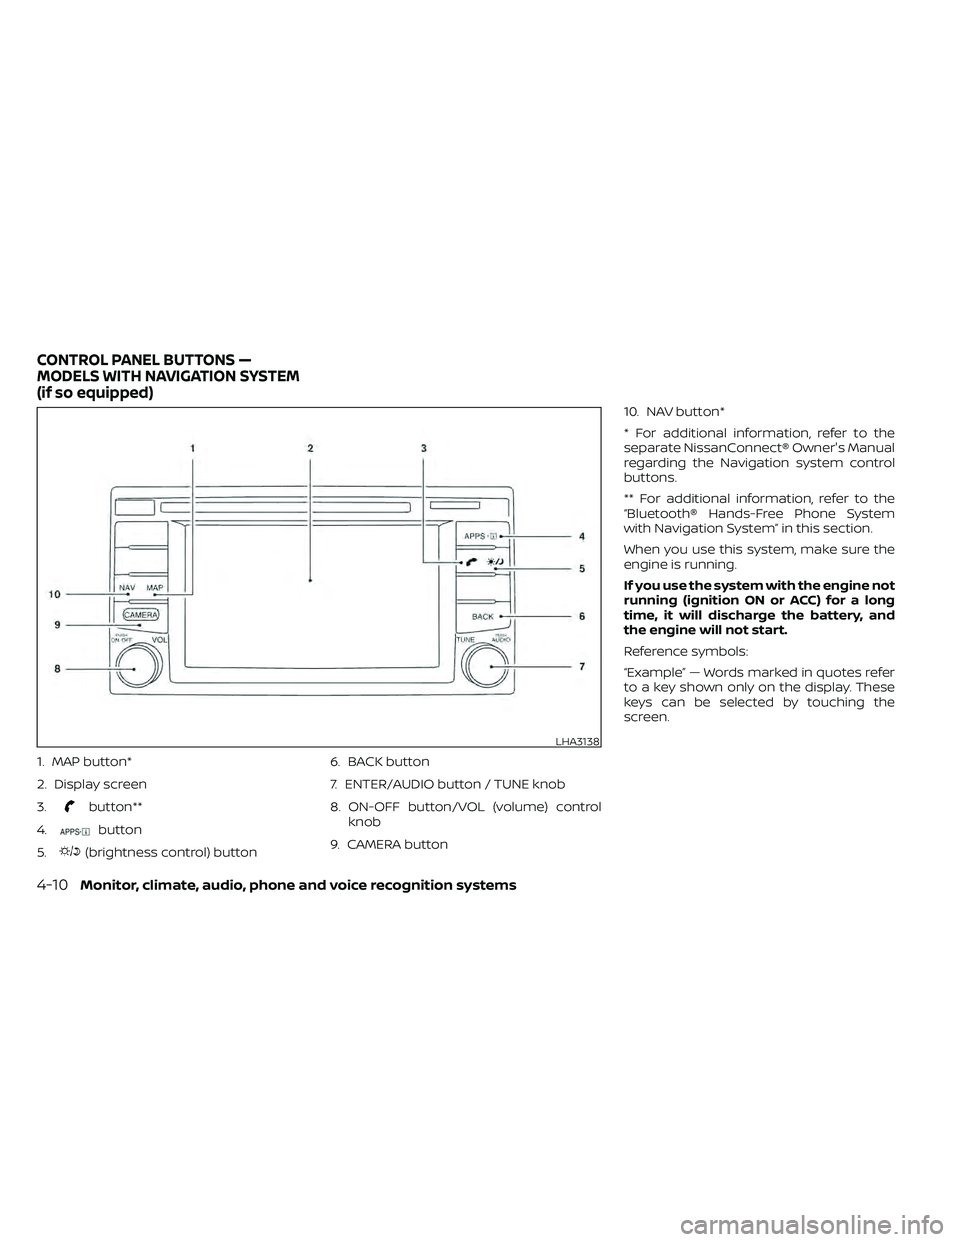
1. MAP button*
2. Display screen
3.
button**
4.
button
5.
(brightness control) button 6. BACK button
7. ENTER/AUDIO button / TUNE knob
8. ON-OFF button/VOL (volume) control
knob
9. CAMERA button 10. NAV button*
* For additional information, refer to the
separate NissanConnect® Owner's Manual
regarding the Navigation system control
buttons.
** For additional information, refer to the
“Bluetooth® Hands-Free Phone System
with Navigation System” in this section.
When you use this system, make sure the
engine is running.
If you use the system with the engine not
running (ignition ON or ACC) for a long
time, it will discharge the battery, and
the engine will not start.
Reference symbols:
“Example” — Words marked in quotes refer
to a key shown only on the display. These
keys can be selected by touching the
screen.
LHA3138
CONTROL PANEL BUTTONS —
MODELS WITH NAVIGATION SYSTEM
(if so equipped)