2021 NISSAN FRONTIER battery
[x] Cancel search: batteryPage 233 of 492
Static and flutter: During signal interfer-
ence from buildings, large hills or due to
antenna position (usually in conjunction
with increased distance from the station
transmitter), static or flutter can be heard.
This can be reduced by adjusting the treble
control to reduce treble response.
Multipath reception: Because of the reflec-
tive characteristics of FM signals, direct and
reflected signals reach the receiver at the
same time. The signals may cancel each
other, resulting in momentary flutter or loss
of sound.
AM RADIO RECEPTION
AM signals, because of their low frequency,
can bend around objects and skip along
the ground. In addition, the signals can be
bounced off the ionosphere and bent back
to earth. Because of these characteristics,
AM signals are also subject to interference
as they travel from transmitter to receiver.
Fading: Occurs while the vehicle is passing
through freeway underpasses or in areas
with many tall buildings. It can also occur for
several seconds during ionospheric turbu-
lence even in areas where no obstacles exist.
Static: Caused by thunderstorms, electrical
power lines, electric signs and even traffic
lights.
SATELLITE RADIO RECEPTION (if so
equipped)
When the satellite radio is used for the first
time or the battery has been replaced, the
satellite radio may not work properly. This
is not a malfunction. Wait more than 10
minutes with satellite radio ON and the ve-
hicle outside of any metal or large building
for satellite radio to receive all of the neces-
sary data.
No satellite radio reception is available and
“NO SAT” is displayed when the SAT band
option is selected unless optional satellite
receiver and antenna are installed and a
SiriusXM® Satellite Radio service subscrip-
tion is active. Satellite radio is not available
in Alaska, Hawaii and Guam.
Satellite radio performance may be af-
fected if cargo carried on the roof blocks
the satellite radio signal.
If possible, do not put cargo over the satel-
lite antenna.
A build up of ice on the satellite radio an-
tenna can affect satellite radio perfor-
mance. Remove the ice to restore satellite
radio reception.
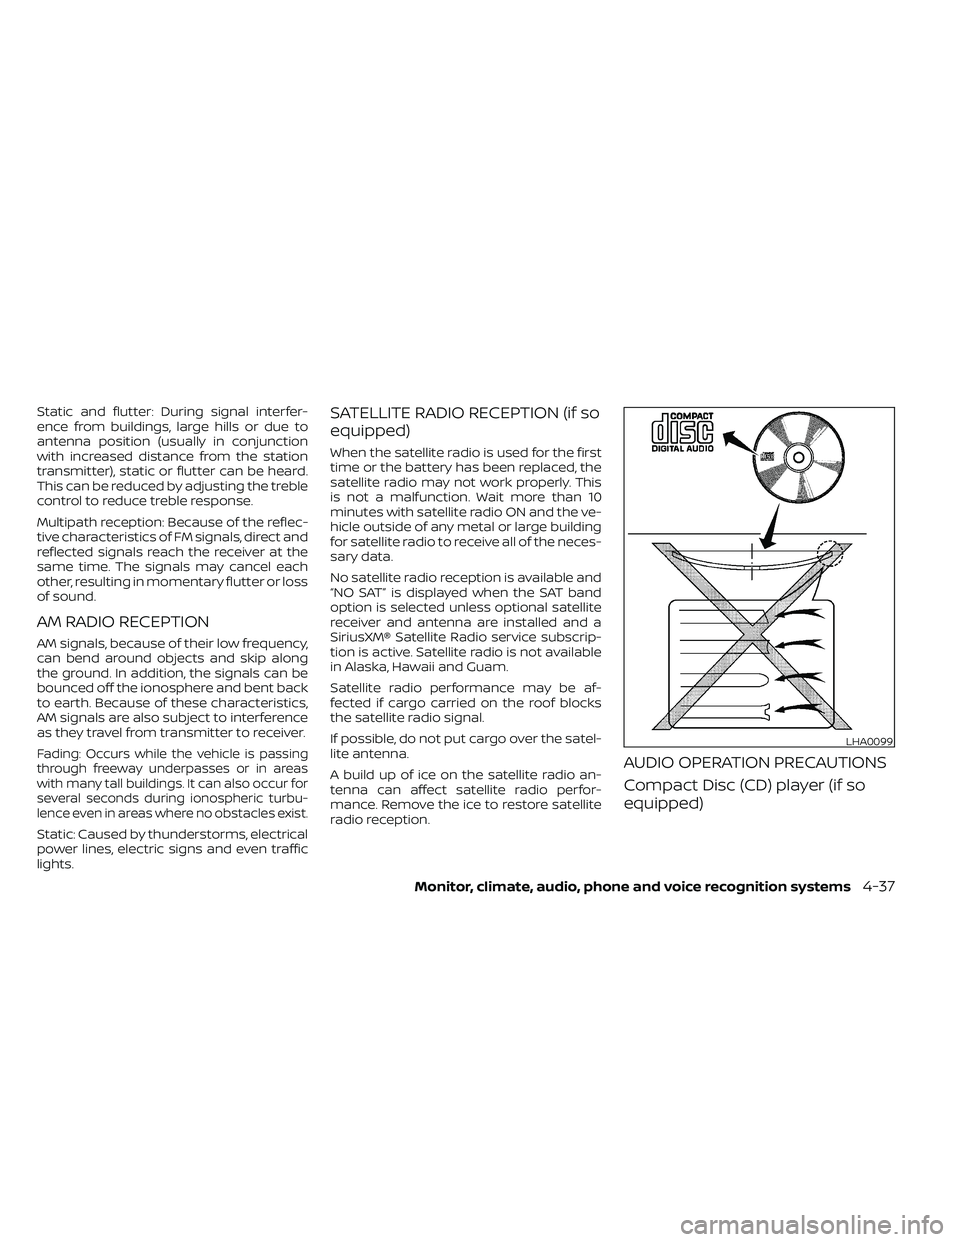
AUDIO OPERATION PRECAUTIONS
Compact Disc (CD) player (if so
equipped)
LHA0099
Page 239 of 492
Bluetooth® streaming audio
• Some Bluetooth® audio devices may notbe recognized by the in-vehicle audio
system.
• It is necessary to set up the wireless con- nection between a compatible
Bluetooth® audio device and the in-
vehicle Bluetooth® module before using
the Bluetooth® audio.
• Operating procedure of the Bluetooth® audio will vary depending on the devices.
Make sure how to operate your audio de-
vice before using it with this system.
• The Bluetooth® audio may be stopped under the following conditions:– Receiving a call on the Hands-Free Phone System.
– Checking the connection to the hands-free phone.
• Do not place the Bluetooth® audio device in an area surrounded by metal or far
away from the in-vehicle Bluetooth®
module to prevent tone quality degrada-
tion and wireless connection disruption. • While an audio device is connected
through the Bluetooth® wireless connec-
tion, the battery power of the device may
discharge quicker than usual.
• This system supports the Bluetooth® Au- dio Distribution Profile (A2DP, AVRCP).
BLUETOOTH® is a
trademark owned by
Bluetooth SIG, Inc. and
licensed to Visteon
and Bosch.
Monitor, climate, audio, phone and voice recognition systems4-43
Page 248 of 492

1 to 6 Station memory operations
Twelve stations can be set for the FM band
(six for FM1, six for FM2) and six stations can
be set for the AM band. Eighteen stations
can be set for the SXM band (six for SXM1, six
for SXM2 & six SXM3).
1. Choose the radio band AM, FM1 or FM2using the FM·AM select button or choose
the radio band SXM1, SXM2 & SXM3 using
the SXM button.
2. Tune to the desired station using manual or seek tuning. Press and hold
any of the desired station memory but-
tons (1 – 6) until a beep sound is heard. 3. The channel indicator will then come on
and the sound will resume. Program-
ming is now complete.
4. Other buttons can be set in the same manner.
If the battery cable is disconnected or if the
fuse opens, the radio memory will be can-
celed. In that case, reset the desired sta-
tions.
Presets can also be selected by touching
the desired preset number on the screen.
Smart Favorites Preset Setup (if
so equipped)
The Smart Favorites feature allows the
user to designate presets, within the SXM1,
SXM2 and SXM3 bands, as their Smart Fa-
vorites. When any of the Smart Favorite
presets are selected, the current track on
that station will play from the beginning of
the song.
To program a Smart Favorite preset:
1. Press the SXM button.
2. Touch the “Setup” key.
LHA2899LHA3085
4-52Monitor, climate, audio, phone and voice recognition systems
Page 257 of 492
CAUTION
• Do not force the USB device into the
USB port. Inserting the USB device
tilted or up-side-down into the port
may damage the port. Make sure
that the USB device is connected cor-
rectly into the USB port.
• Do not grab the USB port cover (if so
equipped) when pulling the USB de-
vice out of the port. This could dam-
age the port and the cover.
• Do not leave the USB cable in a place
where it can be pulled unintention-
ally. Pulling the cable may damage
the port.
For additional information, refer to your de-
vice manufacturer’s owner information re-
garding the proper use and care of the
device.
To connect an iPod® to the vehicle so that
the iPod® can be controlled with the audio
system controls and display screen, use
the USB connection port located on the
center console below the heater and air
conditioner controls. Connect the iPod®-
specific end of the cable to the iPod® and
the USB end of the cable to the USB con-
nection port on the vehicle. If your iPod®
supports charging via a USB connection, its battery will be charged while connected to
the vehicle with the ignition switch in the
ON position. The port is illuminated for bet-
ter visibility when the headlight switch is in
the ON position.
While connected to the vehicle, the iPod®
can only be operated by the vehicle audio
controls.
To disconnect the iPod® from the vehicle,
remove the USB end of the cable from the
USB connection port on the vehicle, then
remove the cable from the iPod®.
* iPod® is a trademark of Apple Inc., regis-
tered in the U.S. and other countries.
Compatibility
The following models are compatible:
• iPod® Classic 5th generation (firmware
version 1.3.0 or later)
• iPod® Classic 6th generation (firmware version 2.0.1 or later)
• iPod® Classic 7th generation (firmware version 2.0.4 or later)
• iPod® Touch 2nd generation (firmware version 4.2.1 or later)*
• iPod® Touch 3rd generation (firmware version 5.1 or later) • iPod® Touch 4th generation (firmware
version 5.1 or later)
• iPod® nano - 1st generation (firmware version 1.3.1 or later)
• iPod® nano - 2nd generation (firmware version 1.1.3 or later)
• iPod® nano - 3rd generation (firmware version 1.1.3 or later)
• iPod® nano - 4th generation (firmware version 1.0.4 or later)
• iPod® nano - 5th generation (firmware version 1.0.2 or later)
• iPod® nano - 6th generation (firmware version 1.1 or later)
• iPhone® 3G (firmware version 4.2.1 or later)
• iPhone® 3GS (firmware version 5.1 or later)
• iPhone® 4 (firmware version 5.1 or later)
• iPhone® 4S (firmware version 5.1 or later)
* Some features of this iPod® may not be
fully functional.
Make sure that your iPod® firmware is up-
dated to the version indicated above.
Monitor, climate, audio, phone and voice recognition systems4-61
Page 260 of 492
CAUTION
• Do not force the USB device into the
USB port. Inserting the USB device
tilted or up-side-down into the port
may damage the port. Make sure
that the USB device is connected cor-
rectly into the USB port.
• Do not grab the USB port cover (if so
equipped) when pulling the USB de-
vice out of the port. This could dam-
age the port and the cover.
• Do not leave the USB cable in a place
where it can be pulled unintention-
ally. Pulling the cable may damage
the port.
For additional information, refer to your de-
vice manufacturer’s owner information re-
garding the proper use and care of the
device.
To connect an iPod® to the vehicle so that
the iPod® can be controlled with the audio
system controls and display screen, use
the USB port located on the instrument
panel. Connect the iPod®-specific end of
the cable to the iPod® and the USB end of
the cable to the USB port on the vehicle. If
your iPod® supports charging via a USB
connection, its battery will be charged while connected to the vehicle with the ig-
nition switch in the ACC or ON position.
While connected to the vehicle, the iPod®
can only be operated by the vehicle audio
controls.
To disconnect the iPod® from the vehicle,
remove the USB end of the cable from the
USB port on the vehicle, then remove the
cable from the iPod®.
* iPod® is a trademark of Apple Inc., regis-
tered in the U.S. and other countries.
Compatibility
The following models are compatible:
• iPod® Classic 5th generation (firmware
version 1.3.0 or later)
• iPod® Classic 6th generation (firmware version 2.0.1 or later)
• iPod® Classic 7th generation (firmware version 2.0.4 or later)
• iPod® Touch 2nd generation (firmware version 4.2.1 or later)*
• iPod® Touch 3rd generation (firmware version 5.1 or later)
• iPod® Touch 4th generation (firmware version 5.1 or later)
• iPod® nano - 1st generation (firmware version 1.3.1 or later) • iPod® nano - 2nd generation (firmware
version 1.1.3 or later)
• iPod® nano - 3rd generation (firmware version 1.1.3 or later)
• iPod® nano - 4th generation (firmware version 1.0.4 or later)
• iPod® nano - 5th generation (firmware version 1.0.2 or later)
• iPod® nano - 6th generation (firmware version 1.1 or later)
• iPhone® 3G (firmware version 4.2.1 or later)
• iPhone® 3GS (firmware version 5.1 or later)
• iPhone® 4 (firmware version 5.1 or later)
• iPhone® 4S (firmware version 5.1 or later)
* Some features of this iPod® may not be
fully functional.
Make sure that your iPod® firmware is up-
dated to the version indicated above.
4-64Monitor, climate, audio, phone and voice recognition systems
Page 275 of 492
When installing a CB, ham radio or car
phone in your vehicle, be sure to observe
the following precautions; otherwise, the
new equipment may adversely affect the
engine control system and other electronic
parts.CAUTION
• Keep the antenna as far away as pos-
sible from the electronic control
modules.
• Keep the antenna wire more than 8 in
(20 cm) away from the electronic
control system harnesses. Do not
route the antenna wire next to any
harness.
• Adjust the antenna standing-wave
ratio as recommended by the
manufacturer.
• Connect the ground wire from the CB
radio chassis to the body.
• For additional information, it is rec-
ommended that you visit a NISSAN
dealer.
• Do not ground electrical accessories
directly to the battery terminal. Do-
ing so will bypass the variable volt-
age control system and the vehicle
battery may not charge completely.
For additional information, refer to
“Variable voltage control system” in
the “Do-it-yourself ” section of this
manual.
• Use electrical accessories with the
engine running to avoid discharging
the vehicle battery.WARNING
• Use a phone af ter stopping your ve-
hicle in a safe location. If you have to
use a phone while driving, exercise
extreme caution at all times so full
attention may be given to vehicle
operation.
• If you are unable to devote full atten-
tion to vehicle operation while talk-
ing on the phone, pull off the road to
a safe location and stop your vehicle.
CAUTION
To avoid discharging the vehicle bat-
tery, use a phone af ter starting the
engine.
CAR PHONE OR CB RADIO BLUETOOTH® HANDS-FREE PHONE
SYSTEM WITHOUT NAVIGATION
SYSTEM (if so equipped)
Monitor, climate, audio, phone and voice recognition systems4-79
Page 277 of 492
• You will not be able to use a hands-freephone under the following conditions:– Your vehicle is outside of the cellular service area.
– Your vehicle is in an area where it is difficult to receive a cellular signal; such
as in a tunnel, in an underground park-
ing garage, near a tall building or in a
mountainous area.
– Your cellular phone is locked to prevent it from being dialed.
• When the radio wave condition is not ideal or ambient sound is too loud, it may
be difficult to hear the other person's
voice during a call.
• Do not place the cellular phone in an area surrounded by metal or far away from
the in-vehicle phone module to prevent
tone quality degradation and wireless
connection disruption.
• While a cellular phone is connected through the Bluetooth® wireless connec-
tion, the battery power of the cellular
phone may discharge quicker than usual.
The Bluetooth® Hands-Free Phone Sys-
tem cannot charge cellular phones.
• For additional information, you can visit www.nissanusa.com/bluetooth or
www.nissan.ca/bluetooth for trouble-
shooting help. •Some cellular phones or other devices
may cause interference or a buzzing noise
to come from the audio system speakers.
Storing the device in a different location
may reduce or eliminate the noise.
• For additional information, refer to the cellular phone owner's manual regarding
the telephone charges, cellular phone
antenna and body, etc.
REGULATORY INFORMATION
FCC Regulatory information
– CAUTION: To maintain compliance with FCC’s RF exposure guidelines, use only
the supplied antenna. Unauthorized an-
tenna, modification, or attachments
could damage the transmitter and may
violate FCC regulations.
– Operation is subject to the following two conditions:1. 1) This device may not cause interfer- ence and
2.2) this device must accept any interfer- ence, including interference that may
cause undesired operation of the
device.
IC Regulatory information
– Operation is subject to the following two conditions: (1) this device may not cause
interference, and (2) this device must ac- cept any interference, including interfer-
ence that may cause undesired opera-
tion of the device.
– This Class B digital apparatus meets all requirements of the Canadian
Interference-Causing Equipment Regu-
lations.
BLUETOOTH® is a
trademark owned by
Bluetooth SIG, Inc. and
licensed to
Panasonic.
USING THE SYSTEM
The system allows hands-free operation of
the Bluetooth® Hands-Free Phone System.
If the vehicle is in motion, some commands
may not be available so full attention may
be given to vehicle operation.
Initialization
When the ignition switch is placed in the ON
position, NISSAN Voice Recognition is initial-
ized, which takes a few seconds. If the
button is pressed before the initialization
completes, the system will announce
“There is no phone connected” and will not
react to voice commands.
Monitor, climate, audio, phone and voice recognition systems4-81
Page 279 of 492
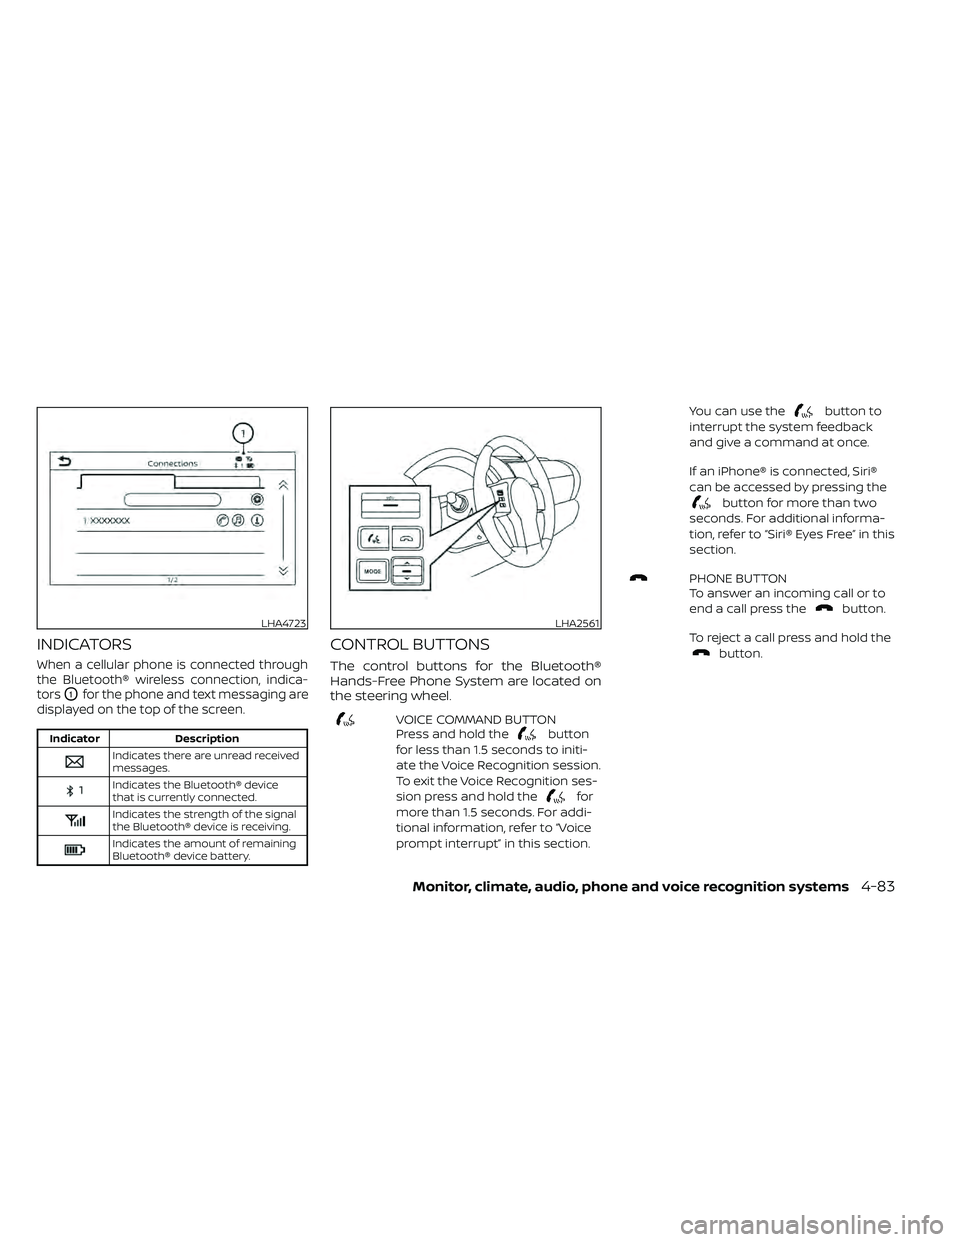
INDICATORS
When a cellular phone is connected through
the Bluetooth® wireless connection, indica-
tors
O1for the phone and text messaging are
displayed on the top of the screen.
Indicates the Bluetooth® device
that is currently connected.
Indicates the strength of the signal
the Bluetooth® device is receiving.
Indicates the amount of remaining
Bluetooth® device battery.
CONTROL BUTTONS
The control buttons for the Bluetooth®
Hands-Free Phone System are located on
the steering wheel.
VOICE COMMAND BUTTON
Press and hold thebutton
for less than 1.5 seconds to initi-
ate the Voice Recognition session.
To exit the Voice Recognition ses-
sion press and hold the
for
more than 1.5 seconds. For addi-
tional information, refer to “Voice
prompt interrupt” in this section. You can use the
button to
interrupt the system feedback
and give a command at once.
If an iPhone® is connected, Siri®
can be accessed by pressing the
button for more than two
seconds. For additional informa-
tion, refer to “Siri® Eyes Free” in this
section.
PHONE BUTTON
To answer an incoming call or to
end a call press the
button.
To reject a call press and hold the
button.
LHA4723LHA2561