2021 HYUNDAI SANTA FE CALLIGRAPHY brake
[x] Cancel search: brakePage 523 of 636

08
8-5
Jump starting procedure
Information
Your vehicle has a battery in the luggage
compartment, but when you jump start
your vehicle, use the jumper terminal in
the engine compartment.
1.
Position the v
ehicles close enough
that the jumper cables will reach, but
do not allow the vehicles to touch.
2.
Av
oid fans or any moving parts in the
engine compartment at all times, even
when the vehicles are turned off.
3.
Turn o
ff all electrical devices such as
radios, lights, air conditioning, etc.
Put the vehicles in P (Park) and set the
parking brake. Turn both vehicles OFF.
4.
Open the engine hood.
OTM080021
5. Connect the jumper cables in
the ex act sequence shown in the
illustration. First connect one jumper
cable to the red, positive (+) jumper
terminal of your vehicle (1).
6.
Connect the other end o
f the jumper
cable to the red, positive (+) battery/
jumper terminal of the assisting
vehicle (2).
7.
Connect the second jumper cable to
the black, nega
tive (-) battery/ chassis
ground of the assisting vehicle (3).
8.
Connect the other end o
f the second
jumper cable to the black, negative (-)
chassis ground of your vehicle (4).
Do not allow the jumper cables to
contact anything except the correct
battery or jumper terminals or the
correct ground. Do not lean over the
battery when making connections.
Page 525 of 636

08
8 -7
If your temperature gauge indicates
overheating, you experience a loss of
power, or hear loud pinging or knocking,
the engine may be overheating. If this
happens, you should:
1.
Pull off the r
oad and stop as soon as it
is safe to do so.
2.
Shift the gear to P (P
ark) and set the
parking brake. If the air conditioning is
ON, turn it OFF.
3.
If engine coolant is running out under
the v
ehicle or steam is coming out
from the hood, stop the engine. Do
not open the hood until the coolant
has stopped running or the steaming
has stopped. If there is no visible
loss of engine coolant and no steam,
leave the engine running and check
to be sure the engine cooling fan is
operating. If the fan is not running,
turn the engine off.
WARNING
While the engine is running,
keep hands, clothing and tools
away from the moving parts
such as the cooling fan and
drive belt to prevent serious
injury. 4.
Check for coolan
t leaking from the
radiator, hoses or under the vehicle. (If
the air conditioning had been in use, it
is normal for cold water to be draining
from it when you stop.)
5.
If engine coolant is leaking out, s
top
the engine immediately and call the
nearest authorized HYUNDAI dealer
for assistance.
WARNING
Never remove the engine
coolant cap and/or water-
cooled intercooler coolant
cap or the drain plug while the
engine and radiator are hot.
Hot coolant and steam may blow out
under pressure, causing serious injury.
Turn the engine off and wait until the
engine cools down. Use extreme care
when removing the coolant cap. Wrap
a thick towel around it, and turn it
counterclockwise slowly to the first
stop. Step back while the pressure is
released from the cooling system. When
you are sure all the pressure has been
released, press down on the cap, using
a thick towel, and continue turning
counterclockwise to remove it.
IF THE ENGINE OVERHEATS
Page 531 of 636
08
8-13
If the indicators do not extinguish after a
few minutes, please visit an authorized
HYUNDAI dealer.
Each wheel is equipped with a tire
pressure sensor mounted inside the tire
behind the valve stem (except for the
spare tire). You must use TPMS specific
wheels. It is recommended that you
always have your tires serviced by an
authorized HYUNDAI dealer.
You may not be able to identify a tire
with low pressure by simply looking at it.
Always use a good quality tire pressure
gauge to measure. Please note that a tire
that is hot (from being driven) will have a
higher pressure measurement than a tire
that is cold.
A cold tire means the vehicle has been
sitting for 3 hours and driven for less
than 1 mile (1.6 km) in that 3 hour period.
Allow the tire to cool before measuring
the inflation pressure. Always be sure
the tire is cold before inflating to the
recommended pressure.
WARNING
• The TPMS cannot alert you to severe
and sudden tire damage caused by
external factors such as nails or road
debris.
• If you feel any vehicle instability,
immediately take your foot off
the accelerator, apply the brakes
gradually with light force, and slowly
move to a safe position off the road.
WARNING
Tampering with, modifying, or disabling
the Tire Pressure Monitoring System
(TPMS) components may interfere
with the system’s ability to warn the
driver of low tire pressure conditions
and/or TPMS malfunctions. Tampering
with, modifying, or disabling the Tire
Pressure Monitoring System (TPMS)
components may void the warranty for
that portion of the vehicle.
Information
This device complies with Part 15 of the
FCC rules.
Operation is subject to the following three
conditions:
1.
This device may not cause harmful
interference.
2.
This device must accept any
interference r
eceived, including
interference that may cause undesired
operation.
3.
Changes or modifications not expr
essly
approved by the party responsible
for compliance could void the user’s
authority to operate the equipment.
Page 534 of 636

Emergency situations
8-16
Changing tires
WARNING
A vehicle can slip or roll off of a jack
causing serious injury or death to you or
those nearby. Take the following safety
precautions:
• Do not get under a vehicle that is
supported by a jack.
• NEVER attempt to change a tire in
the lane of traffic. ALWAYS move the
vehicle completely off the road on
level, firm ground away from traffic
before trying to change a tire. If you
cannot find a level, firm place off
the road, call a towing service for
assistance.
• Be sure to use the jack provided with
the vehicle.
• ALWAYS place the jack on the
designated jacking positions on the
vehicle and NEVER on the bumpers
or any other part of the vehicle for
jacking support.
• Do not start or run the engine while
the vehicle is on the jack.
• Do not allow anyone to remain in the
vehicle while it is on the jack.
• Keep children away from the road
and the vehicle. Follow these steps to change your
vehicle’s tire:
1.
Park on a le
vel, firm surface.
2. Shift the gear to P (P ark), apply the
parking brake, and press the Engine
Start/Stop button to the OFF position.
3.
Press the hazar
d warning flasher
button.
4.
Remo
ve the wheel lug wrench, jack,
jack handle, and spare tire from the
vehicle.
OTM080032L[A] : Block
5. Block both the fr ont and rear of the
tire diagonally opposite of the tire you
are changing.
Page 539 of 636
08
8-21
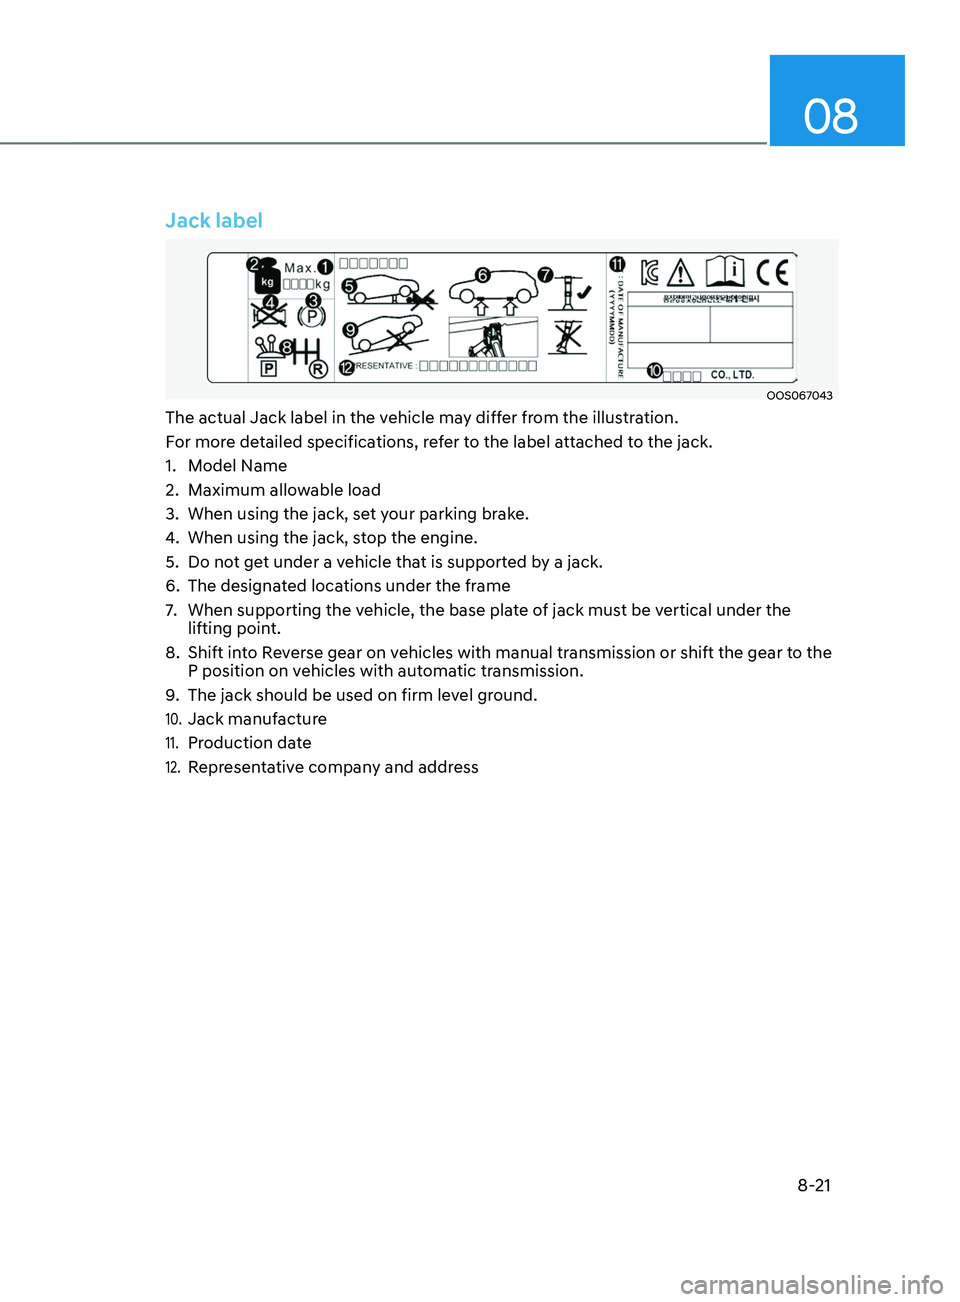
Jack label
OOS067043
The actual Jack label in the vehicle may differ from the illustration.
For more detailed specifications, refer to the label attached to the jack.
1.
Model Name
2.
Maximum allow
able load
3.
When using the jack, set y
our parking brake.
4.
When using the jack, st
op the engine.
5.
Do not ge
t under a vehicle that is supported by a jack.
6.
The designat
ed locations under the frame
7.
When supporting the vehicle, the base pla
te of jack must be vertical under the
lifting point.
8.
Shift int
o Reverse gear on vehicles with manual transmission or shift the gear to the
P position on vehicles with automatic transmission.
9.
The jack should be used on firm lev
el ground.
10. Jack manufacture
11. Production date
12. Representative company and address
Page 541 of 636
08
8-23
WARNING
Do not use the TMK if a tire is severely
damaged by driving run flat or with
insufficient air pressure.
Only punctured areas located within the
tread region of the tire can be sealed
using the TMK.
Notes on the safe use of the Tire
Mobility Kit
• Park your car at the side of the road
so that you can work with the Tire
Mobility Kit away from moving traffic.
• To be sure your vehicle will not move,
even when you’re on fairly level
ground, always set your parking brake.
• Only use the Tire Mobility Kit for
sealing/inflation passenger car tires.
Only punctured areas located within
the tread region of the tire can be
sealed using the tire mobility kit.
• Do not use on motorcycles, bicycles
or any other type of tires.
• When the tire and wheel are
damaged, do not use Tire Mobility Kit
for your safety.
• Use of the Tire Mobility Kit may not be
effective for tire damage larger than
approximately 4 mm (16 inch).
Please contact the nearest HYUNDAI
dealer if the tire cannot be made
roadworthy with the Tire Mobility Kit. •
Do not use the Tire Mobility Kit if a tire
is severely damaged by driving run flat
or with insufficient air pressure.
• Do not remove any foreign objects
such as nails or screws that have
penetrated the tire.
• Provided the car is outdoors, leave the
engine running. Otherwise operating
the compressor may eventually drain
the car battery.
• Never leave the Tire Mobility Kit
unattended while it is being used.
• Do not leave the compressor running
for more than 10 minutes at a time or
it may overheat.
• Do not use the Tire Mobility Kit if the
ambient temperature is below -22°F
(30°C).
• In case of skin contact with the
sealant, wash the area thoroughly
with plenty of water. If the irritation
persists, seek medical attention.
• In case of eye contact with the
sealant, flush your eyes for at least 15
minutes. If the irritation persists, seek
medical attention.
• In case of swallowing the sealant,
rinse the mouth and drink plenty of
water. However, never give anything
to an unconscious person and seek
medical attention immediately.
• Long time exposure to the sealant
may cause damage to bodily tissue
such as kidney, etc.
Page 549 of 636
08
8-31
When towing your vehicle in an
emergency without wheel dollies:
• Vehicle without EPB
1.
Place the ignition swit
ch in the ACC
position.
2.
Place the shift lev
er/button in N
(Neutral).
3.
Release the parking br
ake.
• Vehicle with EPB
1.
Release EPB be
fore turning off the
engine.
2.
Place the ignition swit
ch to the OFF
position.
3.
Change the gear to N (N
eutral) while
pressing the brake pedal.
4.
Place the ignition swit
ch to the ACC
position.
CAUTION
Failure to shift the gear to N (Neutral)
may cause internal damage to the
transmission.
Page 551 of 636
Maintenance
9. Maintenance
Engine compartment ........................................................................\
................9-3
Main tenance services
........................................................................\
............... 9-4
Owner’s responsibility ........................................................................\
........................ 9-4
Owner maint enance precautions........................................................................\
....... 9-4
Owner maintenance ........................................................................\
................. 9-5Owner maintenance schedule ........................................................................\
...........9-6
Scheduled maintenance services .....................................................................9 -7Normal maintenance schedule ........................................................................\
.......... 9-8
Maint enance under severe usage conditions .......................................................... 9-
12
Explanation of scheduled maintenance items ..............................................9-14Fuel filter (for gasoline engine) ........................................................................\
......... 9-14
P arking brake ........................................................................\
..................................... .9-15
Engine oil ........................................................................\
.................................. 9-16Checking the engine oil level ........................................................................\
............9-16
Checking the engine oil and filt er ........................................................................\
...... 9-
17
Engine coolant /liquid-cooled intercooler coolant .......................................9-18Checking the coolant level ........................................................................\
................ 9-18
Changing coolan t ........................................................................\
.............................. 9-
20
Brake fluid ........................................................................\
................................9-21Checking the brake fluid level ........................................................................\
...........9-21
Washer fluid ........................................................................\
............................ 9-22Checking the washer fluid level ........................................................................\
........9-22
Air cleaner ........................................................................\
............................... 9-23Filter replacement ........................................................................\
..............................9-23
Cabin air filter ........................................................................\
..........................9-2 4Filter inspection ........................................................................\
..................................9-2 4
Filter replacement ........................................................................\
.............................. 9
-24
Wiper blades ........................................................................\
...........................9-25Blade inspection ........................................................................\
................................. 9-25
Blade r eplacement ........................................................................\
............................. 9-
25
Battery ........................................................................\
.....................................9-28For best battery service ........................................................................\
.....................9-29
Ba ttery capacity label ........................................................................\
....................... 9-
30
Battery recharging
........................................................................\
............................ 9-
30
Reset items
........................................................................\
......................................... 9-
31
9