2021 HONDA CLARITY FUEL CELL service
[x] Cancel search: servicePage 459 of 555
457
uuMaintenance MinderTMuTo Use Maintenance MinderTM
Continued
Maintenance
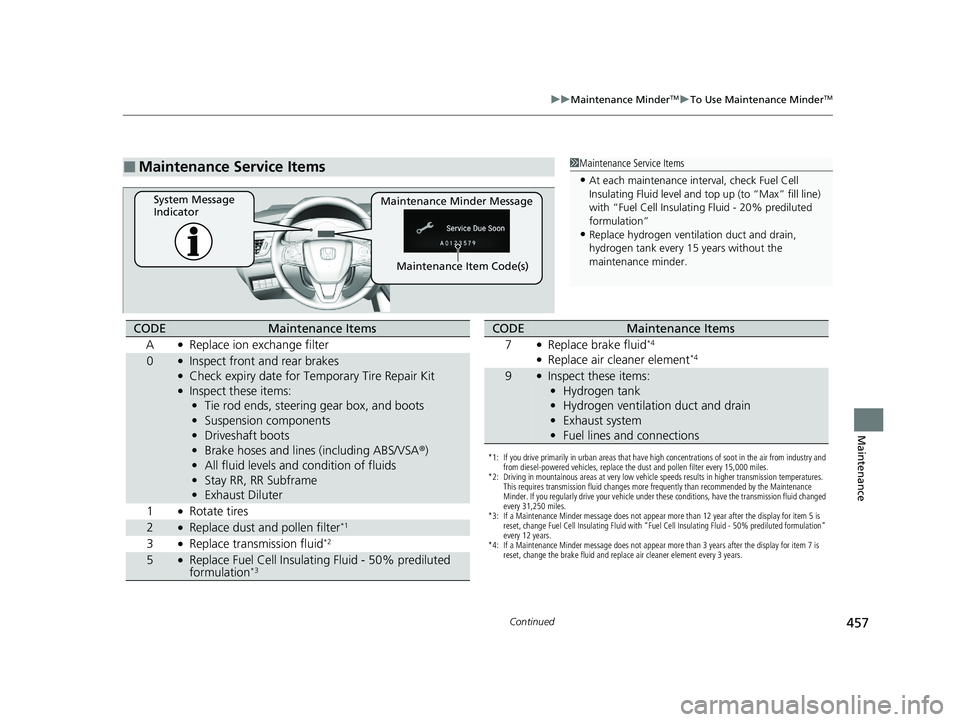
■Maintenance Service Items1Maintenance Service Items
•At each maintenance interval, check Fuel Cell
Insulating Fluid level and top up (to “Max” fill line)
with “Fuel Cell Insulating Fluid - 20% prediluted
formulation”
•Replace hydrogen ventil ation duct and drain,
hydrogen tank every 15 years without the
maintenance minder.
Maintenance Minder Message
System Message
Indicator
Maintenance Item Code(s)
CODEMaintenance Items
A
●Replace ion exchange filter
0●Inspect front and rear brakes●Check expiry date for Temporary Tire Repair Kit●Inspect these items: • Tie rod ends, steering gear box, and boots
• Suspension components
• Driveshaft boots
• Brake hoses and lines (including ABS/VSA ®)
• All fluid levels and condition of fluids
• Stay RR, RR Subframe
• Exhaust Diluter
1
●Rotate tires
2●Replace dust and pollen filter*1
3●Replace transmission fluid*2
5●Replace Fuel Cell Insulati ng Fluid - 50% prediluted
formulation*3
*1: If you drive primarily in urban areas that have high concentrations of soot in the air from industry and
from diesel-powered vehicles, replace the dust and pollen filter every 15,000 miles.
*2: Driving in mountainous areas at very low vehicle speeds results in higher transmission temperatures. This requires transmission fluid changes more frequently than recommended by the Maintenance
Minder. If you regularly drive your vehicle under these conditions, have the transmission fluid changed
every 31,250 miles.
*3: If a Maintenance Minder message does not appear more than 12 year after the display for item 5 is reset, change Fuel Cell Insulating Fluid with “Fuel Cell Insulating Fluid - 50% prediluted formulation”
every 12 years.
*4: If a Maintenance Minder message does not appear more than 3 years after the display for item 7 is reset, change the brake fluid and replace air cleaner element every 3 years.
CODEMaintenance Items
7
●Replace brake fluid*4
●Replace air cleaner element*4
9●Inspect these items: • Hydrogen tank
• Hydrogen ventilation duct and drain
• Exhaust system
• Fuel lines and connections
21 CLARITY FCV CSS-31TRT6400_02.book 457 ページ 2020年9月25日 金曜日 午 後3時15分
Page 460 of 555
uuMaintenance MinderTMuTo Use Maintenance MinderTM
458
Maintenance
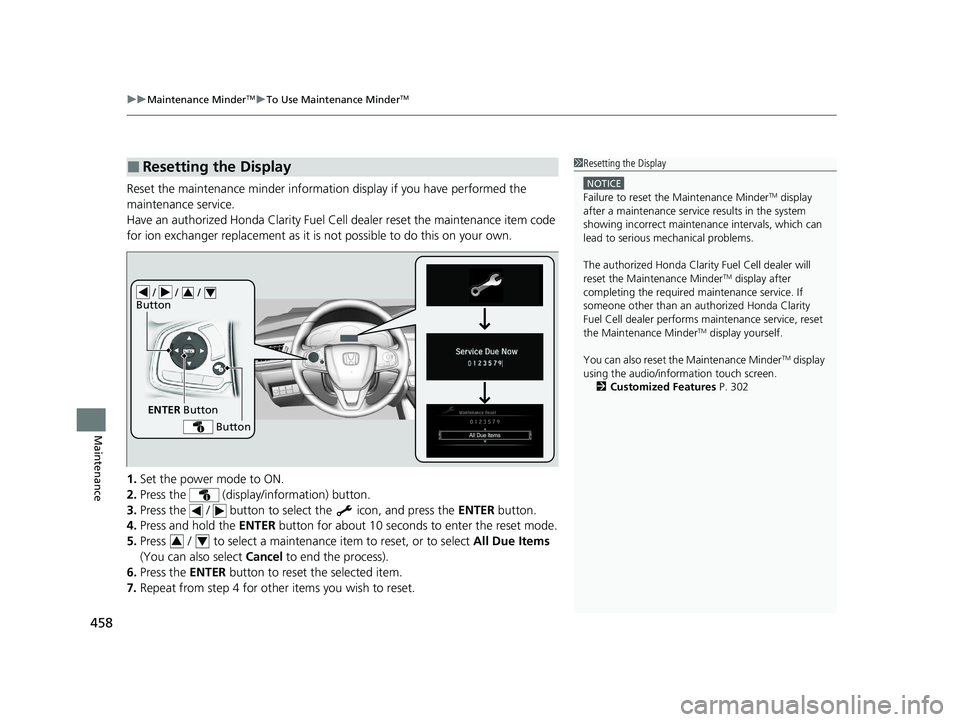
Reset the maintenance minder informati on display if you have performed the
maintenance service.
Have an authorized Honda Clarity Fuel Ce ll dealer reset the maintenance item code
for ion exchanger replacement as it is not possible to do this on your own.
1. Set the power mode to ON.
2. Press the (display/information) button.
3. Press the / button to sele ct the icon, and press the ENTER button.
4. Press and hold the ENTER button for about 10 seconds to enter the reset mode.
5. Press / to select a maintenance item to reset, or to select All Due Items
(You can also select Cancel to end the process).
6. Press the ENTER button to reset the selected item.
7. Repeat from step 4 for other items you wish to reset.
■Resetting the Display1Resetting the Display
NOTICE
Failure to reset the Maintenance MinderTM display
after a maintenance servic e results in the system
showing incorrect maintena nce intervals, which can
lead to serious mechanical problems.
The authorized Honda Clarity Fuel Cell dealer will
reset the Maintenance Minder
TM display after
completing the required ma intenance service. If
someone other than an authorized Honda Clarity
Fuel Cell dealer performs maintenance service, reset
the Maintenance Minder
TM display yourself.
You can also reset the Maintenance Minder
TM display
using the audio/information touch screen.
2 Customized Features P. 302
/ / /
Button34
ENTER Button
Button
34
21 CLARITY FCV CSS-31TRT6400_02.book 458 ページ 2020年9月25日 金曜日 午 後3時15分
Page 475 of 555
473
uuChecking and Maintaining Tires uDOT Tire Quality Grading (U.S. Vehicles)
Continued
Maintenance
DOT Tire Quality Grading (U.S. Vehicles)
The tires on your vehicle m eet all U.S. Federal Safety
Requirements. All tires are also graded for treadwear, traction,
and temperature performance according to Department of
Transportation (DOT) standards. The following explains these
gradings.
Quality grades can be found where applicable on th e tire sidewall
between tread shoulder and maximum section width.
The treadwear grade is a comparative rating based on the wear
rate of the tire when tested un der controlled conditions on a
specified government test course. For example, a tire graded 150
would wear one and one-half (1 1/2) times as well on the
government course as a tire graded 100. The relative performance
of tires depends upon the actual conditions of their use, however,
and may depart significantly from the norm due to variations in
driving habits, service practi ces and differences in road
characteristics and climate.
■Uniform Tire Quality Grading
■Treadwear
1 Uniform Tire Quality Grading
For example:
Treadwear 200
Traction AA
Temperature A
All passenger car tires must conform
to Federal Safety Requirements in
addition to these grades.
21 CLARITY FCV CSS-31TRT6400_02.book 473 ページ 2020年9月25日 金曜日 午 後3時15分
Page 477 of 555
475
uuChecking and Maintaining Tires uWear Indicators
Maintenance
Wear Indicators
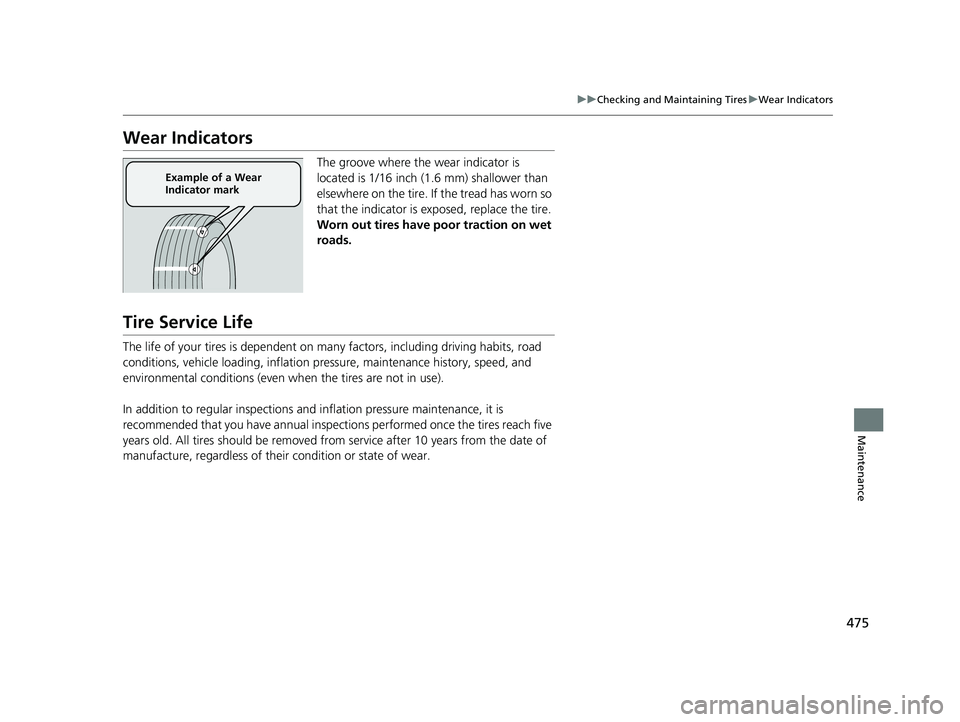
The groove where the wear indicator is
located is 1/16 inch (1.6 mm) shallower than
elsewhere on the tire. If the tread has worn so
that the indicator is ex posed, replace the tire.
Worn out tires have po or traction on wet
roads.
Tire Service Life
The life of your tires is dependent on many factors, including driving habits, road
conditions, vehicle loading, inflation pressure, maintenance history, speed, and
environmental conditions (even wh en the tires are not in use).
In addition to regular inspections and inflation pressure maintenance, it is
recommended that you have annual inspections performed once the tires reach five
years old. All tires should be removed fro m service after 10 years from the date of
manufacture, regardless of their condition or state of wear.
Example of a Wear
Indicator mark
21 CLARITY FCV CSS-31TRT6400_02.book 475 ページ 2020年9月25日 金曜日 午 後3時15分
Page 484 of 555
482
Maintenance
Climate Control System Maintenance
Air Conditioning
To ensure proper and safe operation, th e Society of Automotive Engineers (SAE
J2845) recommends that the refrigerant sy stem only be serviced by trained and
certified technicians.
Never repair or replace the air conditioning evaporator (cooling coil) with one
removed from a used or salvaged vehicle.
New replacement mobile air conditioning evaporators must be certified (and
labeled) as meeting SAE Standard J2842.
Dust and Pollen Filter
The climate control system is equipped wi th a dust and pollen filter that collects
pollen, dust, and other debris in the air. The Maintenance MinderTM messages will let
you know when to replace the filter.
We recommend that you replace the dust and pollen filter sooner when using your
vehicle in areas with high concentrations of dust.
1Climate Control System Maintenance
NOTICE
Vented refrigerant is harmful to the environment.
To avoid refrigerant from venting, never replace the
evaporator with one re moved from a used or
salvaged vehicle.
Refrigerant in your vehicle’ s air conditioning system is
flammable and can be igni ted during servicing if
proper procedures are not followed.
The air conditioner labe l is found under the hood:
2 Safety Labels P. 85
2 Specifications P. 532
1Dust and Pollen Filter
Using an air freshener may reduce the deodorizing
effect of the dust and pollen filter, and may reduce its
life.
If the airflow from the climate control system
deteriorates noticeably, and the windows fog up
easily, the filter may need to be replaced. Please
contact an authorized Honda Clarity Fuel Cell dealer
for replacement.
The allerfree hi gh retention deodor ization filter
collects pollen and dust, has allergen treatment
ability and reduces exhaus t gas odor that may be
present in the air.
21 CLARITY FCV CSS-31TRT6400_02.book 482 ページ 2020年9月25日 金曜日 午 後3時15分
Page 494 of 555
492
Handling the Unexpected
If a Tire Goes Flat
Temporarily Repairing a Flat Tire
If the tire has a large cut or is otherwise severely damaged, you will need to have the
vehicle towed. If the tire only has a smal l puncture, from a nail for instance, you can
use the temporary tire repair kit so that you can drive to the nearest service station
for a more permanent repair.
If a tire goes flat while driving, grasp the steering wheel firmly, and brake gradually
to reduce speed. Then stop in a safe place.
1. Park the vehicle on a firm, level, and non-slippery surface and apply the parking
brake.
2. Change the gear position to
(P.
3. Turn on the hazard warning lights an d set the power mode to VEHICLE OFF
(LOCK).
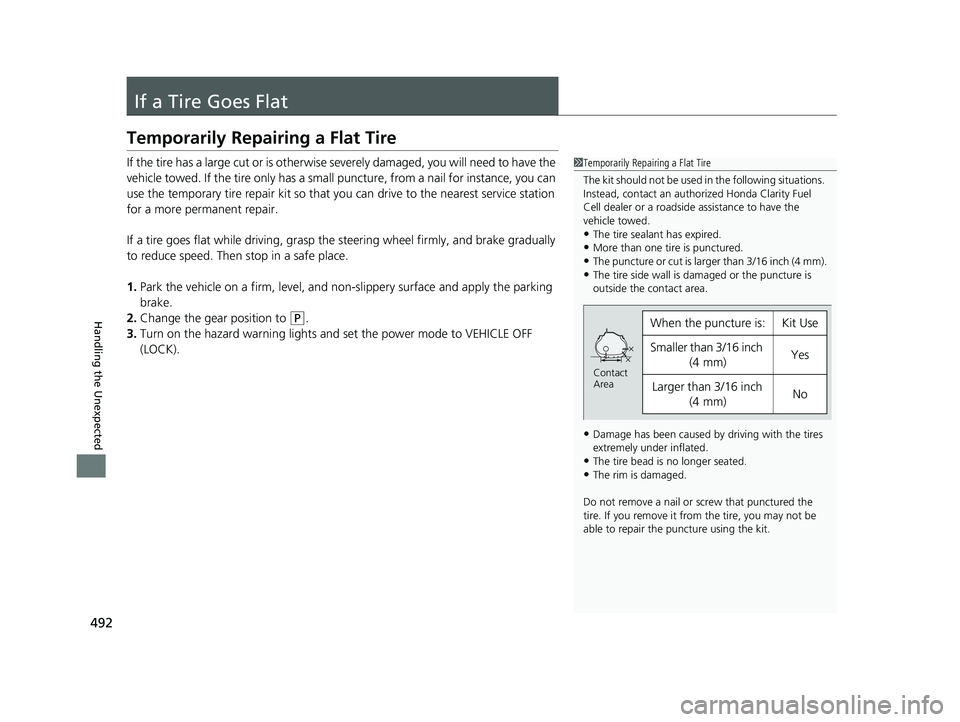
1 Temporarily Repairing a Flat Tire
The kit should not be used in the following situations.
Instead, contact an authorized Honda Clarity Fuel
Cell dealer or a roadside assistance to have the
vehicle towed.
•The tire sealant has expired.•More than one tire is punctured.
•The puncture or cut is larger than 3/16 inch (4 mm).
•The tire side wall is da maged or the puncture is
outside the contact area.
•Damage has been caused by driving with the tires
extremely under inflated.
•The tire bead is no longer seated.•The rim is damaged.
Do not remove a nail or screw that punctured the
tire. If you remove it from the tire, you may not be
able to repair the puncture using the kit.
When the puncture is:Kit Use
Smaller than 3/16 inch (4 mm)Yes
Larger than 3/16 inch
(4 mm)No
Contact
Area
21 CLARITY FCV CSS-31TRT6400_02.book 492 ページ 2020年9月25日 金曜日 午 後3時15分
Page 501 of 555
499
uuIf a Tire Goes Flat uTemporarily Repairing a Flat Tire
Continued
Handling the Unexpected
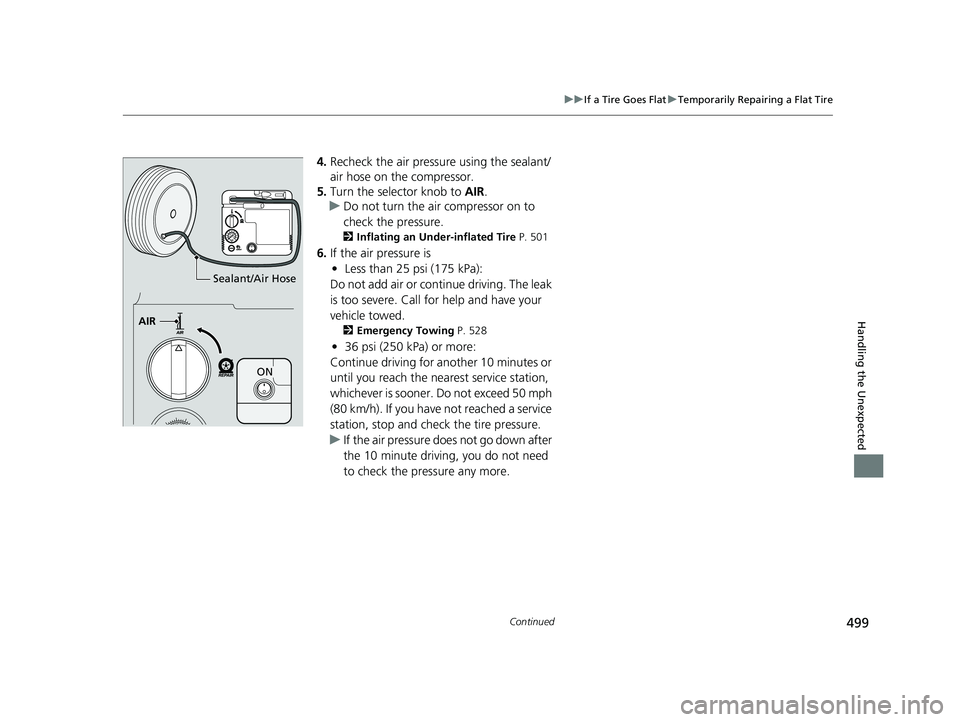
4. Recheck the air pressure using the sealant/
air hose on the compressor.
5. Turn the selector knob to AIR.
u Do not turn the air compressor on to
check the pressure.
2 Inflating an Under-inflated Tire P. 501
6.If the air pressure is
• Less than 25 psi (175 kPa):
Do not add air or continue driving. The leak
is too severe. Call for help and have your
vehicle towed.
2 Emergency Towing P. 528
•36 psi (250 kPa) or more:
Continue driving for another 10 minutes or
until you reach the nearest service station,
whichever is sooner. Do not exceed 50 mph
(80 km/h). If you have not reached a service
station, stop and check the tire pressure.
u If the air pressure do es not go down after
the 10 minute driving, you do not need
to check the pressure any more.
Sealant/Air Hose
AIR
ON
21 CLARITY FCV CSS-31TRT6400_02.book 499 ページ 2020年9月25日 金曜日 午 後3時15分
Page 502 of 555
uuIf a Tire Goes Flat uTemporarily Repairing a Flat Tire
500
Handling the Unexpected
• Greater than 25 psi (175 kPa), but less
than 36 psi (250 kPa):
Turn the air compressor on to inflate the
tire until the tire pressure reaches 36 psi
(250 kPa).
2 Inflating an Under-inflated Tire P. 501
Then drive carefully for 10 more minutes or
until you reach the nearest service station,
whichever is sooner. Do not exceed 50 mph
(80 km/h). If you have not reached a service
station, stop and check the tire pressure.
u You should repeat this procedure as long
as the air pressure is within this range.
7. Unscrew the sealant/ai r hose from the tire
valve stem. Reinstall the valve cap.
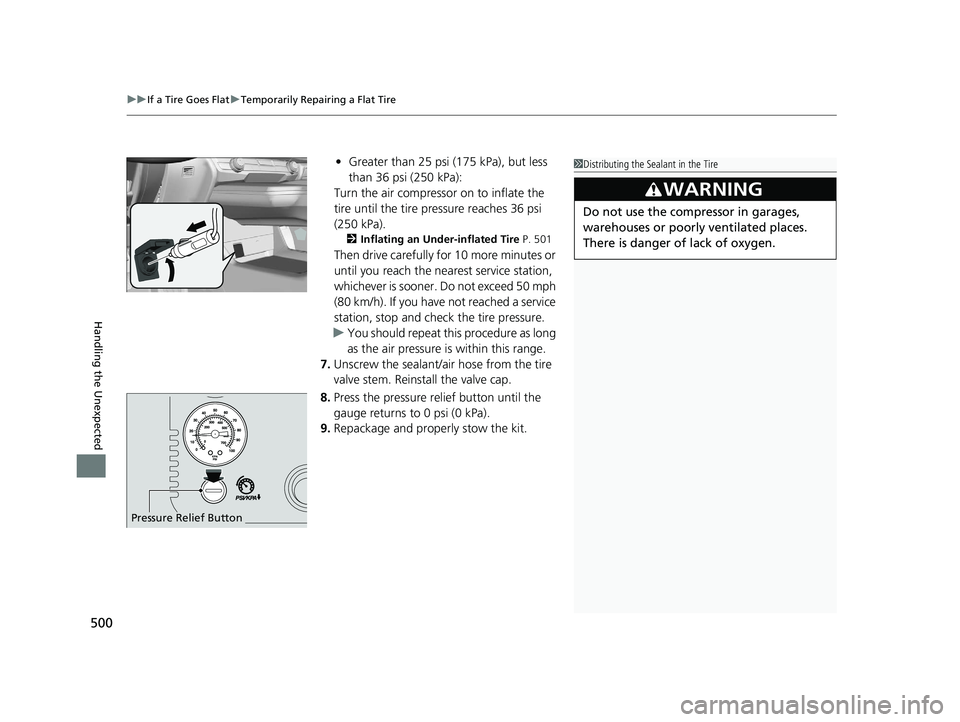
8. Press the pressure relief button until the
gauge returns to 0 psi (0 kPa).
9. Repackage and properly stow the kit.
Pressure Relief Button
1Distributing the Sealant in the Tire
3WARNING
Do not use the compressor in garages,
warehouses or poorly ventilated places.
There is danger of lack of oxygen.
21 CLARITY FCV CSS-31TRT6400_02.book 500 ページ 2020年9月25日 金曜日 午 後3時15分