2021 FORD F-150 lock
[x] Cancel search: lockPage 444 of 796

•
When using hitches that raise the hitch
ball more than 4 in (10 cm), lower the
hitch ball by more than 6 in (16 cm) or
extend the hitch ball away from the
vehicle more than
12 in (30 cm).
• When using objects taller than
8 in
(20 cm), such as large blocks, under
the jack stand.
• When you park the trailer on surfaces
that are similar in color to the trailer
coupler and hitch ball.
•A black coupler or hitch ball over a
dark asphalt surface.
• A light color coupler or hitch ball
over a light concrete surface.
• When there are low or no light sources,
such as at night.
SWITCHING TRAILER
HITCHING ASSISTANCE ON
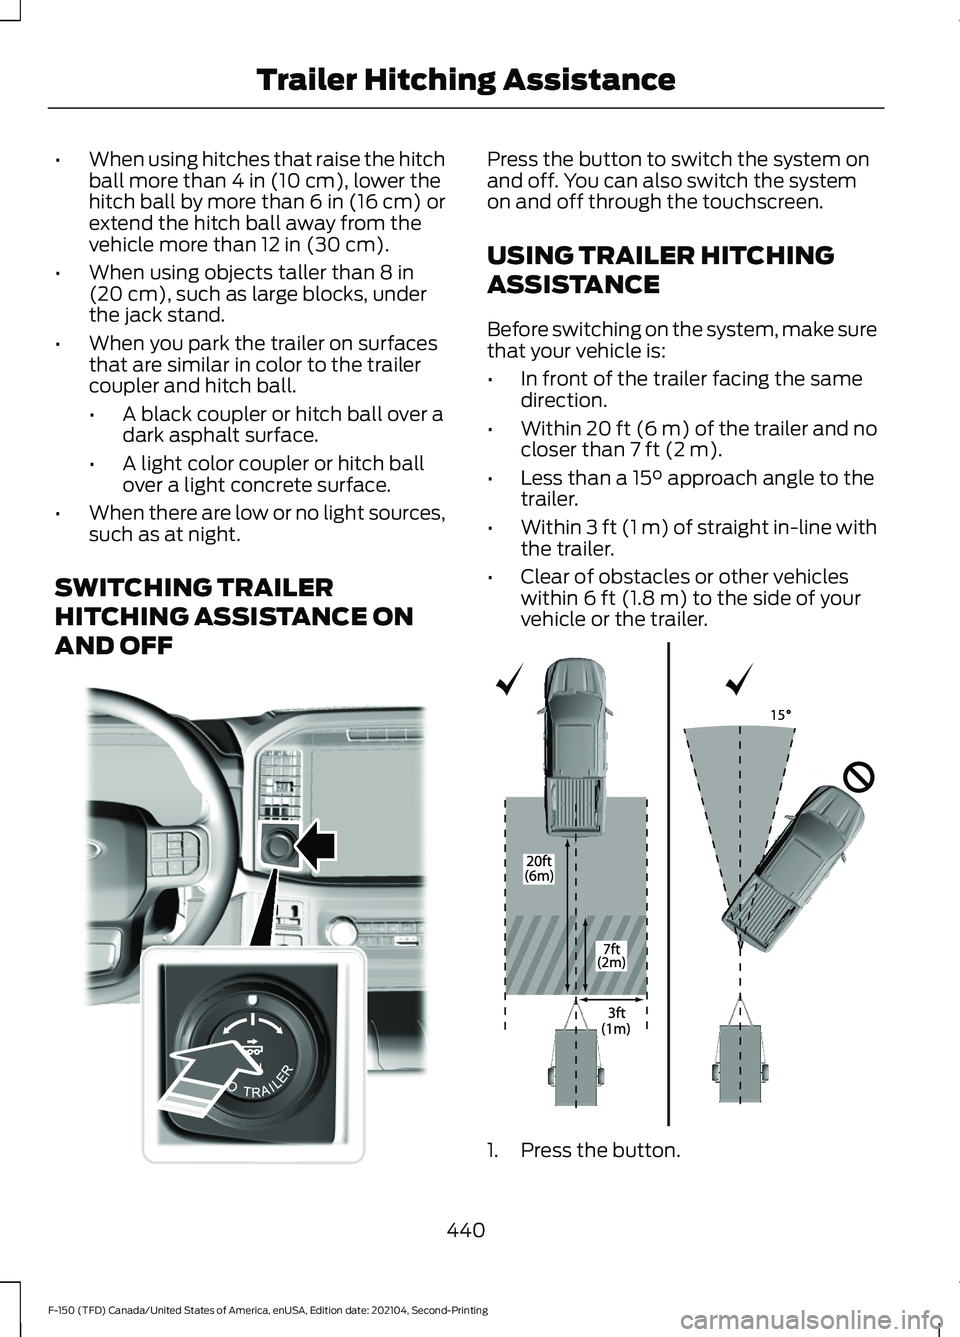
AND OFF Press the button to switch the system on
and off. You can also switch the system
on and off through the touchscreen.
USING TRAILER HITCHING
ASSISTANCE
Before switching on the system, make sure
that your vehicle is:
•
In front of the trailer facing the same
direction.
• Within
20 ft (6 m) of the trailer and no
closer than 7 ft (2 m).
• Less than a
15° approach angle to the
trailer.
• Within
3 ft (1 m) of straight in-line with
the trailer.
• Clear of obstacles or other vehicles
within
6 ft (1.8 m) to the side of your
vehicle or the trailer. 1. Press the button.
440
F-150 (TFD) Canada/United States of America, enUSA, Edition date: 202104, Second-Printing Trailer Hitching AssistanceE310335 E348940
Page 454 of 796

Note:
The touchscreen shows if you are
going too slow or fast. Calibration pauses if
the speed is outside the required range of
2 –9 mph (4– 15 km/h).
Note: You need to complete at least a 90°
turn, and longer trailers could require a 180°
turn. Camera trailer tracking requires the
system to locate the hitch ball as well as
determine the trailer length. Some trailers
could require you to drive straight then turn
multiple times before calibration completes.
The touchscreen provides instructions and
notifies you when calibration completes.
Note: For best results, do not calibrate the
system at night when calibrating the system
with the sticker.
SWITCHING TRAILER BACKUP
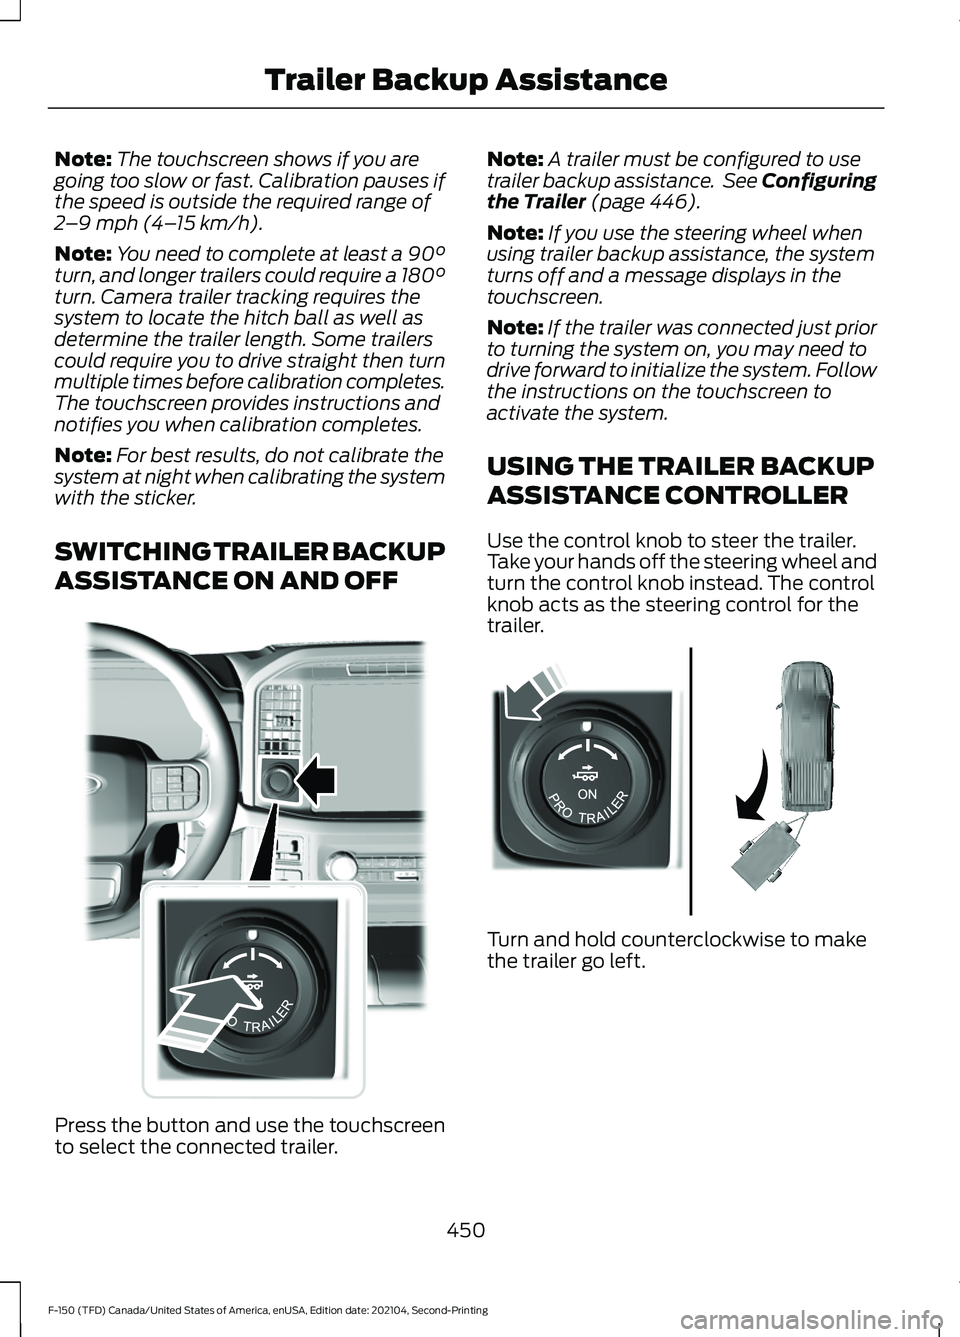
ASSISTANCE ON AND OFF Press the button and use the touchscreen
to select the connected trailer. Note:
A trailer must be configured to use
trailer backup assistance. See Configuring
the Trailer (page 446).
Note: If you use the steering wheel when
using trailer backup assistance, the system
turns off and a message displays in the
touchscreen.
Note: If the trailer was connected just prior
to turning the system on, you may need to
drive forward to initialize the system. Follow
the instructions on the touchscreen to
activate the system.
USING THE TRAILER BACKUP
ASSISTANCE CONTROLLER
Use the control knob to steer the trailer.
Take your hands off the steering wheel and
turn the control knob instead. The control
knob acts as the steering control for the
trailer. Turn and hold counterclockwise to make
the trailer go left.
450
F-150 (TFD) Canada/United States of America, enUSA, Edition date: 202104, Second-Printing Trailer Backup AssistanceE310335 E313025
Page 455 of 796

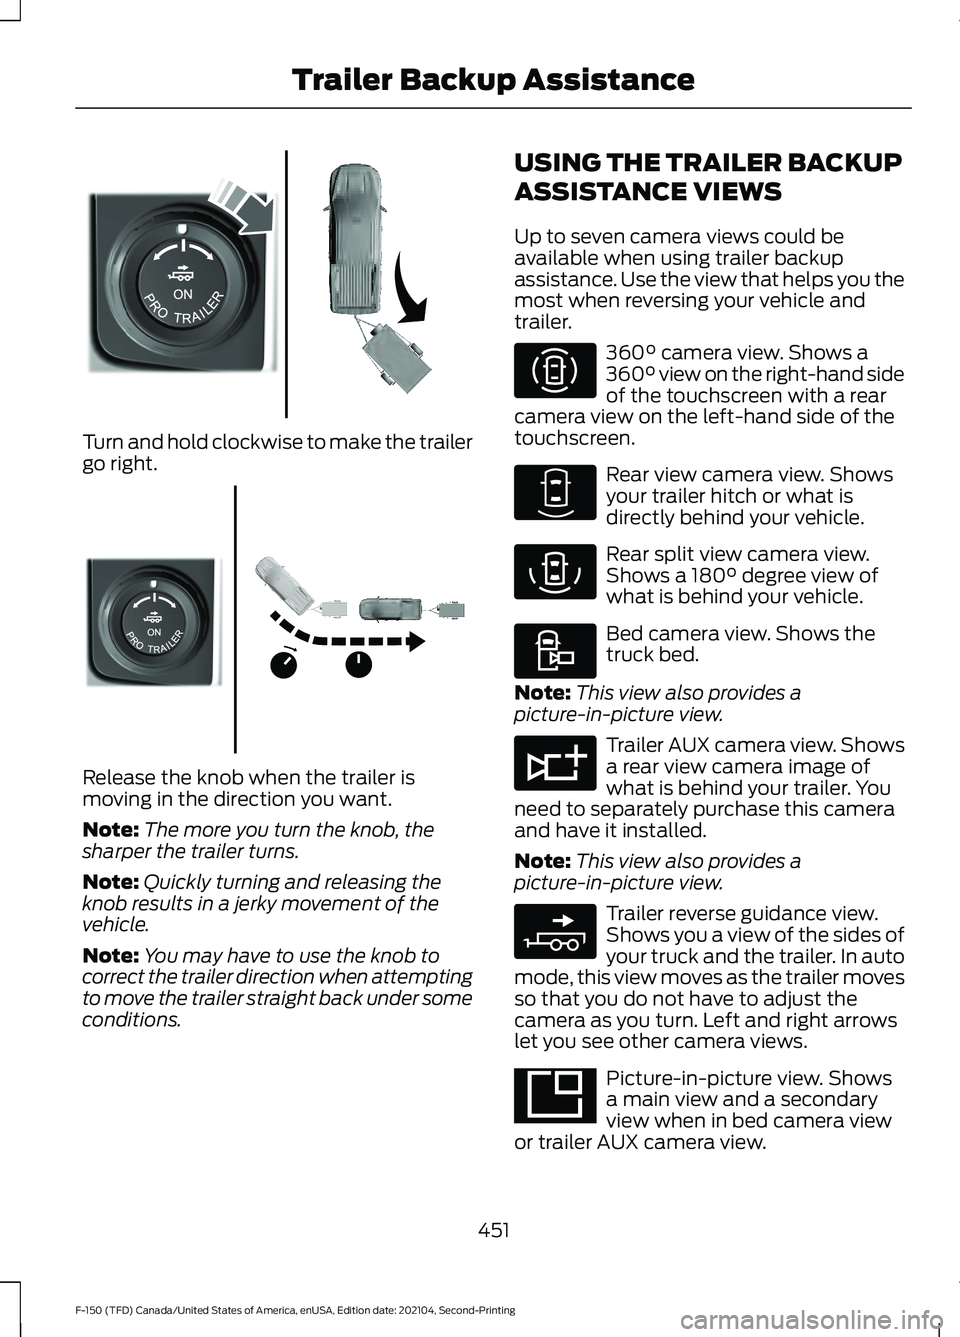
Turn and hold clockwise to make the trailer
go right.
Release the knob when the trailer is
moving in the direction you want.
Note:
The more you turn the knob, the
sharper the trailer turns.
Note: Quickly turning and releasing the
knob results in a jerky movement of the
vehicle.
Note: You may have to use the knob to
correct the trailer direction when attempting
to move the trailer straight back under some
conditions. USING THE TRAILER BACKUP
ASSISTANCE VIEWS
Up to seven camera views could be
available when using trailer backup
assistance. Use the view that helps you the
most when reversing your vehicle and
trailer. 360° camera view. Shows a
360° view on the right-hand side
of the touchscreen with a rear
camera view on the left-hand side of the
touchscreen. Rear view camera view. Shows
your trailer hitch or what is
directly behind your vehicle.
Rear split view camera view.
Shows a
180° degree view of
what is behind your vehicle. Bed camera view. Shows the
truck bed.
Note: This view also provides a
picture-in-picture view. Trailer AUX camera view. Shows
a rear view camera image of
what is behind your trailer. You
need to separately purchase this camera
and have it installed.
Note: This view also provides a
picture-in-picture view. Trailer reverse guidance view.
Shows you a view of the sides of
your truck and the trailer. In auto
mode, this view moves as the trailer moves
so that you do not have to adjust the
camera as you turn. Left and right arrows
let you see other camera views. Picture-in-picture view. Shows
a main view and a secondary
view when in bed camera view
or trailer AUX camera view.
451
F-150 (TFD) Canada/United States of America, enUSA, Edition date: 202104, Second-Printing Trailer Backup AssistanceE313026 E313027 E310996 E310967 E310974 E310995 E311776 E310965 E351663
Page 460 of 796

TRAILER BACKUP ASSISTANCE
– FREQUENTLY ASKED
QUESTIONS
Why does the trailer not reverse
straight?
Verify the sensor is correctly installed.
Other factors such as the hitch
connection, road camber, road slope
and trailer suspension could influence
how straight the system can reverse
the trailer when the control knob is not
turned. You can compensate for the
trailer drifting to the right or left by
slowly turning the knob until the trailer
is following your desired path and then
holding the knob in that position.
Why does the system not detect a
sensor? There could be an issue with the
connection, the wiring harness could
be damaged, you could have multiple
sensors connected or the sensor could
be incorrectly installed. Check that the
12-way connector is fully inserted into
the 12-way socket. The red rubber seal
is not visible when the connector is
fully inserted. Also check that the
wiring harness sensor connection is
fully inserted at the trailer sensor, and
check for damaged wiring between
the 12-way connector and the trailer
sensor. Also, check that the sensor is
installed on a vertical surface with the
arrows pointing straight up. What does it mean if the system
remains on one message for an
extended time during calibration when
setting up the system with the sticker?
The camera could need to be cleaned,
the sticker could be blocked, the
drawbar could be outside the allowed
range of 4–19 in (10–48 cm) or you
could need to move to a different area
to change the lighting and background.
Verify the sticker is in the proper
location. See
Applying the Trailer
Reversing Aid Sticker (page 448).
You can move to a different area or
change the direction you are driving or
setup the system at a different time
of day. Some trailers are not
compatible with the sticker and
camera system. If the issue persists
with the sticker setup, you may choose
to setup the trailer with a sensor.
What does it mean if the system pauses
during calibration? There could be steering input or trailer
movement during the straight drive
portion of the calibration process.
What does it mean if the system
remains on one message for an
extended time during calibration when
setting up the system with the sensor? The sensor could be incorrectly
installed, the trailer length could be
outside the allowed range or the road
surface could be too rough or bumpy.
What does it mean if the system
displays hold steering steady during
turn? Part of the calibration process for the
sticker setup requires a steady turn. If
you are continually moving the
steering wheel during the turn, this
delays the calibration process. To
enable the calibration process, hold
the steering wheel at the same
position when turning.
456
F-150 (TFD) Canada/United States of America, enUSA, Edition date: 202104, Second-Printing Trailer Backup Assistance
Page 471 of 796

TRAILER REVERSE GUIDANCE –
FREQUENTLY ASKED QUESTIONS
Why does the trailer not reverse
straight?
Verify the sensor is correctly installed.
Other factors such as the hitch
connection, road camber, road slope
and trailer suspension could influence
how straight the system can reverse
the trailer when the control knob is not
turned. You can compensate for the
trailer drifting to the right or left by
slowly turning the knob until the trailer
is following your desired path and then
holding the knob in that position.
Why does the system not detect a
sensor? There could be an issue with the
connection, the wiring harness could
be damaged, you could have multiple
sensors connected or the sensor could
be incorrectly installed. Check that the
12-way connector is fully inserted into
the 12-way socket. The red rubber seal
is not visible when the connector is
fully inserted. Also check that the
wiring harness sensor connection is
fully inserted at the trailer sensor, and
check for damaged wiring between
the 12-way connector and the trailer
sensor. Also, check that the sensor is
installed on a vertical surface with the
arrows pointing straight up. What does it mean if the system
remains on one message for an
extended time during calibration when
setting up the system with the sticker?
The camera could need to be cleaned,
the sticker could be blocked, the
drawbar could be outside the allowed
range of 4–19 in (10–48 cm) or you
could need to move to a different area
to change the lighting and background.
Verify the sticker is in the proper
location. See
Applying the Trailer
Reverse Aid Sticker (page 461). You
can move to a different area or change
the direction you are driving or setup
the system at a different time of day.
Some trailers are not compatible with
the sticker and camera system. If the
issue persists with the sticker setup,
you may choose to setup the trailer
with a sensor.
What does it mean if the system pauses
during calibration? There could be steering input or trailer
movement during the straight drive
portion of the calibration process.
What does it mean if the system
remains on one message for an
extended time during calibration when
setting up the system with the sensor? The sensor could be incorrectly
installed, the trailer length could be
outside the allowed range or the road
surface could be too rough or bumpy.
What does it mean if the system
displays hold steering steady during
turn? Part of the calibration process for the
sticker setup requires a steady turn. If
you are continually moving the
steering wheel during the turn, this
delays the calibration process. To
enable the calibration process, hold
the steering wheel at the same
position when turning.
467
F-150 (TFD) Canada/United States of America, enUSA, Edition date: 202104, Second-Printing Trailer Reverse Guidance
Page 478 of 796

DRIVING THROUGH WATER
LIMITATIONS - RAPTOR
Maximum Wading
Depth
Model
32 in (810 mm)
All.
When you are driving though water do not
exceed 4 mph (7 km/h).
WATER WADING WARNING:
Do not attempt to
cross a deep, fast flowing body of water.
Failure to follow this instruction could
result in the loss of control of your
vehicle, personal injury or death.
As the water depth increases, you must
reduce your vehicle speed to avoid
potential vehicle damage. •
Always determine the depth before
attempting a water crossing. Never
drive through water that is higher than
the bottom of the wheel hubs.
• Slowly proceed and avoid splashing
water any more than is necessary. •
Be aware that obstacles and debris
may be beneath the water ’s surface.
• Keep the doors fully closed during the
water crossing.
• After driving through water and as soon
as it is safe to do so check the brakes,
horn, lights, and steering wheel to
confirm those systems are functioning
properly.
Note: Engine damage can occur if water
enters the air filter.
OFF-ROAD DRIVING AIDS -
RAPTOR
Selecting an Off-Road Drive Mode
Using the appropriate drive mode increases
your vehicle's control. See
Drive Mode
Control (page 371).
Using Four-Wheel Drive
Your vehicle has a four-wheel drive system
that offers various modes to help you
optimize traction on any off-road surface.
See
Four-Wheel Drive (page 291).
Using the Cameras Off-Road
Use the 360 degree camera to enhance
your off-road experience. See 360 Degree
Camera
(page 342).
Using the Rear Differential Lock
When engaged, the rear differential lock
provides additional traction to your vehicle
by forcing the two rear wheels to turn at
the same speed.
Note: Rear differential lock is only available
when the vehicle is in 4H or 4L. See
Electronic Locking Differential (page 301).
474
F-150 (TFD) Canada/United States of America, enUSA, Edition date: 202104, Second-Printing Driving HintsE310941
Page 480 of 796

WARNING: Always re-inflate tires
to recommended tire pressures before
the vehicle is operated on-road. The
recommended pressure is located on the
tire label or safety certification label,
located on the B-pillar, inside the driver's
door.
Driving off-road places more stress on your
vehicle than most on-road driving. After
driving off-road check for damage to your
vehicle and, if necessary, have your vehicle
fixed as soon as possible.
Inspect the underbody of your vehicle by
checking tires, body structure, steering,
suspension, and exhaust system for
damage.
Check the radiator for mud and debris and
clean as needed.
Remove accumulations of plants or brush.
These things could be a fire hazard or hide
damage to the fuel lines, brake hoses, and
propeller shafts.
After extended operation in mud, sand,
water, or similar dirty conditions, inspect
the underbody and clean your vehicle as
soon as possible.
If you experience unusual vibration after
driving in mud, slush or similar conditions,
check the wheels for impacted material.
Impacted material can cause vibrations
while driving and wheel imbalance.
Remove the material to resolve the
problem.
COLD WEATHER
PRECAUTIONS
The functional operation of some
components and systems can be affected
at temperatures below approximately
-13°F (-25°C)
. DRIVING ON SNOW AND ICE WARNING:
If you are driving in
slippery conditions that require tire
chains or cables, then it is critical that
you drive cautiously. Keep speeds down,
allow for longer stopping distances and
avoid aggressive steering to reduce the
chances of a loss of vehicle control
which can lead to serious injury or death.
If the rear end of your vehicle slides while
cornering, steer in the direction of the
slide until you regain control of your
vehicle.
On ice and snow, you should drive more
slowly than usual. Your vehicle has a four
wheel anti-lock brake system, do not pump
the brake pedal.
See Anti-Lock Braking
System Limitations (page 308).
BREAKING-IN
Your vehicle requires a break-in period. For
the first 1,000 mi (1,600 km), avoid driving
at high speeds, heavy braking, aggressive
shifting or using your vehicle to tow. During
this time, your vehicle may exhibit some
unusual driving characteristics.
DRIVING ECONOMICALLY
The following helps to improve fuel
consumption:
• There is no need to wait for your engine
to warm up. The vehicle is ready to
drive immediately after starting.
• Your fuel consumption should improve
throughout your hybrid's break-in
period.
• Accelerate and slow down in a smooth,
moderate fashion.
476
F-150 (TFD) Canada/United States of America, enUSA, Edition date: 202104, Second-Printing Driving Hints
Page 482 of 796

WARNING: Secure the floor mat
to both retention devices so that it
cannot slip out of position and interfere
with the pedals. Failure to follow this
instruction could result in the loss of
control of your vehicle, personal injury or
death. WARNING: Do not place additional
floor mats or any other covering on top
of the original floor mats. This could
result in the floor mat interfering with the
operation of the pedals. Failure to follow
this instruction could result in the loss of
control of your vehicle, personal injury or
death. WARNING:
Always make sure that
objects cannot fall into the driver foot
well while your vehicle is moving. Objects
that are loose can become trapped
under the pedals causing a loss of
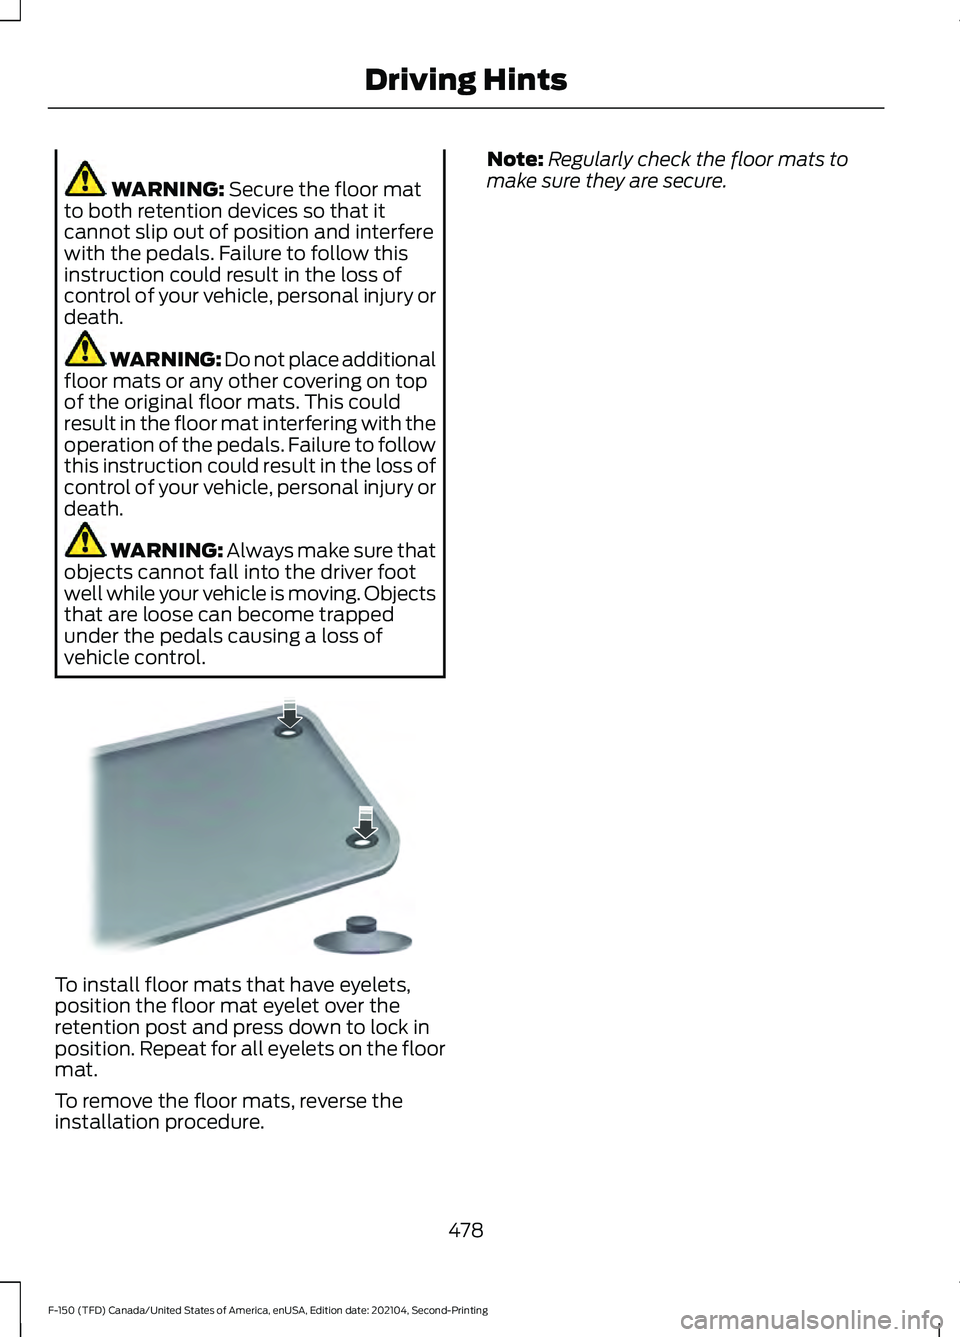
vehicle control. To install floor mats that have eyelets,
position the floor mat eyelet over the
retention post and press down to lock in
position. Repeat for all eyelets on the floor
mat.
To remove the floor mats, reverse the
installation procedure. Note:
Regularly check the floor mats to
make sure they are secure.
478
F-150 (TFD) Canada/United States of America, enUSA, Edition date: 202104, Second-Printing Driving HintsE142666