Page 525 of 796

Note:
To calibrate the steering angle
sensor, drive the vehicle above 30 mph
(50 km/h) for a minimum of 1.2 mi (2 km).
Make sure to drive straight ahead for a
minimum of 30 seconds. Several vehicle
functions are disabled and a warning light
could appear until the sensor is calibrated.
Battery Management System
The battery management system monitors
battery conditions and takes actions to
extend battery life. If excessive battery
drain is detected, the system temporarily
disables some of the following features:
• Heated rear window.
• Heated seats.
• Climate control.
• Heated steering wheel.
• Audio unit.
• Navigation system.
A message may appear in the information
display to alert you that battery protection
actions are active.
After battery replacement, or in some
cases after charging the battery with an
external charger, the battery management
system requires eight hours of vehicle sleep
time to relearn the battery state of charge.
During this time your vehicle must remain
fully locked with the ignition off.
Note: If you add electrical accessories or
components to the vehicle, it may adversely
affect battery performance and durability.
This may also affect the performance of
other electrical systems in the vehicle.
Battery Disposal Make sure that you dispose of
old batteries in an
environmentally friendly way.
Seek advice from your local authority
about recycling old batteries. ADJUSTING THE HEADLAMPS
Vertical Aim Adjustment
The headlamps on your vehicle are
properly aimed at the assembly plant. If
your vehicle has been in an accident,
contact an authorized dealer to check and
realign your headlamps.
Headlamp Aiming Target
8 feet (2.4 m).
A
Center height of lamp to ground.
B
25 feet (7.6 m).
C
Horizontal reference line.
D
1. Park your vehicle directly in front of a wall or screen on a level surface,
approximately
25 ft (7.6 m) away.
2. Measure the height from the center of your headlamp, indicated by a 3
millimeter circle on the lens, to the
ground and mark an
8 ft (2.4 m)
horizontal reference line on the vertical
wall or screen at this height, a piece of
masking tape works well.
3. Switch on the low beam headlamps to
illuminate the wall or screen and open
the hood. Cover one of the headlamps
so no light hits the wall.
521
F-150 (TFD) Canada/United States of America, enUSA, Edition date: 202104, Second-Printing MaintenanceE107998 E142592
Page 526 of 796

4. On the wall or screen, observe a light
pattern with a distinct horizontal edge
toward the right. If this edge is not at
the horizontal reference line, adjust the
beam so the edge is at the same height
as the horizontal reference line. 5. Locate the vertical adjuster on each
headlamp. Use a #2 Phillips
screwdriver to turn the adjuster either
counterclockwise or clockwise in order
to adjust the vertical aim of the
headlamp.
6. Repeat Steps 3 through 7 to adjust the
other headlamp.
7. Close the hood and turn off the lamps.
Horizontal Aim Adjustment
Horizontal aim is not required for this
vehicle and is not adjustable.
EXTERIOR BULBS
EXTERIOR BULB SPECIFICATION
CHART
Replacement bulbs are specified in the
chart below. Headlamp bulbs must be
marked with an authorized D.O.T. marking
for North America to make sure they have
the proper lamp performance, light
brightness, light pattern and safe visibility.
The correct bulbs will not damage the
lamp assembly or void the lamp assembly
warranty and will provide quality bulb
illumination time. Power (Watt)
Specification
Lamp
16
912
Central high mounted stop lamp.
LED
LED
Central high mounted cargo lamp.
Vehicles with cargo box.
LED
LED
Daytime running lamp (XLT optional,
Lariat, Platinum, King Ranch, Limited).
55
H11
Daytime running lamp (XLT optional,
XL).
522
F-150 (TFD) Canada/United States of America, enUSA, Edition date: 202104, Second-Printing MaintenanceE167358 E163806
Page 529 of 796
Replacing the Halogen High Beam
and Low Beam Bulbs
Low beam headlamp bulb.
A.
Turn signal lamp bulb.
B.
High beam headlamp bulb.
C. 1. Make sure the headlamps are off.
2.
For the high beam and low beam bulbs,
remove the rubber cap to access the
bulbs.
3. Remove the bulb holder from the lamp
assembly by turning it
counterclockwise and pulling it straight
out.
4. Disconnect the bulb from the electrical
connector.
5. To install, reverse the removal procedure.
Note: Handle a halogen headlamp bulb
carefully and keep out of children ’s reach.
Grasp the bulb only by its plastic base and
do not touch the glass. The oil from your
hand could cause the bulb to break the next
time the headlamps are operated.
525
F-150 (TFD) Canada/United States of America, enUSA, Edition date: 202104, Second-Printing Maintenance E183500 E183763
Page 531 of 796
1. Make sure the headlamps are off.
2.
Remove the bulb holder from the lamp
assembly by turning it
counterclockwise and pulling it straight
out.
3. Disconnect the bulb from the electrical
connector.
4. To install, reverse the removal procedure.
CHANGING A FRONT SIDE
MARKER LAMP BULB
1. Rotate the steering wheel to the opposite side of the bulb needing
replacement. 2.
Remove the screws and push pins from
the front of the wheel liner.
3. Pull the wheel liner back toward the tire to gain access to the bulb.
527
F-150 (TFD) Canada/United States of America, enUSA, Edition date: 202104, Second-Printing MaintenanceE183763 E183762
Page 532 of 796
4.
Remove the bulb holder from the lamp
assembly by turning it
counterclockwise and pulling it straight
out.
5. Disconnect the bulb from the electrical
connector.
6. To install, reverse the removal procedure.
CHANGING A FRONT FOG LAMP
BULB 1. Make sure the fog lamps are off. 2. Disconnect the electrical connector
from the fog lamp bulb.
3. Turn the bulb counterclockwise and remove it from the fog lamp.
4. To install, reverse the removal procedure.
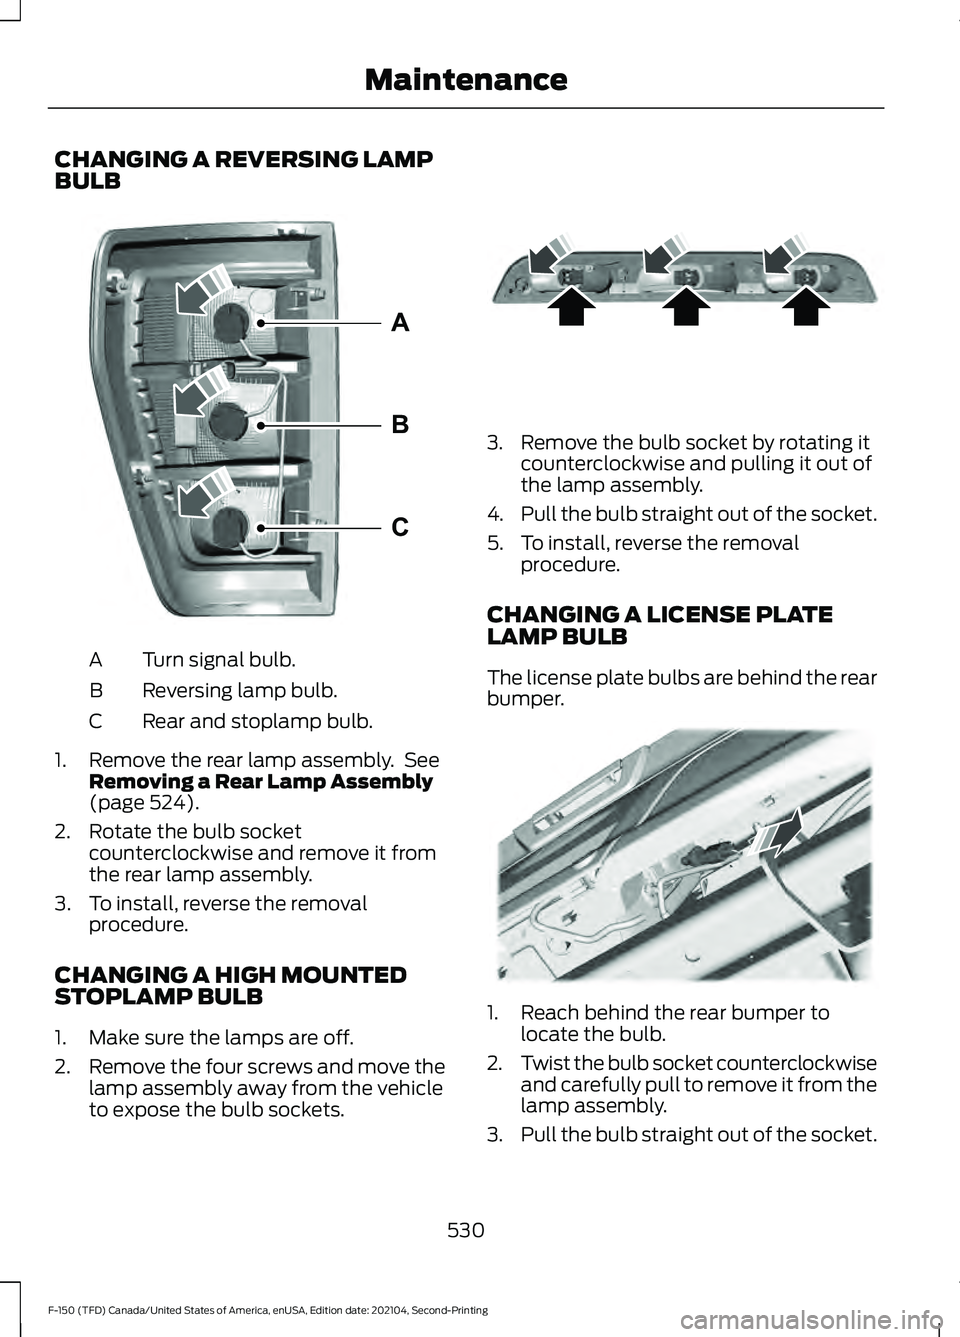
CHANGING A REAR LAMP BULB Turn signal bulb.
A
Reversing lamp bulb.
B
Rear and stoplamp bulb.
C
1. Remove the rear lamp assembly.
2. Rotate the bulb socket counterclockwise and remove it from
the rear lamp assembly.
3. To install, reverse the removal procedure.
528
F-150 (TFD) Canada/United States of America, enUSA, Edition date: 202104, Second-Printing MaintenanceE338050 E163826 A
B
CE358899
Page 533 of 796
CHANGING A STOPLAMP BULB
Turn signal bulb.
A
Reversing lamp bulb.
B
Rear and stoplamp bulb.
C
1. Remove the rear lamp assembly. See Removing a Rear Lamp Assembly
(page 524).
2. Rotate the bulb socket counterclockwise and remove it from
the rear lamp assembly.
3. To install, reverse the removal procedure. CHANGING A REAR TURN SIGNAL
LAMP BULB
Turn signal bulb.
A
Reversing lamp bulb.
B
Rear and stoplamp bulb.
C
1. Remove the rear lamp assembly. See Removing a Rear Lamp Assembly
(page 524).
2. Rotate the bulb socket counterclockwise and remove it from
the rear lamp assembly.
3. To install, reverse the removal procedure.
529
F-150 (TFD) Canada/United States of America, enUSA, Edition date: 202104, Second-Printing MaintenanceA
B
CE358899 A
B
CE358899
Page 534 of 796

CHANGING A REVERSING LAMP
BULB
Turn signal bulb.
A
Reversing lamp bulb.
B
Rear and stoplamp bulb.
C
1. Remove the rear lamp assembly. See Removing a Rear Lamp Assembly
(page 524).
2. Rotate the bulb socket counterclockwise and remove it from
the rear lamp assembly.
3. To install, reverse the removal procedure.
CHANGING A HIGH MOUNTED
STOPLAMP BULB
1. Make sure the lamps are off.
2. Remove the four screws and move the
lamp assembly away from the vehicle
to expose the bulb sockets. 3. Remove the bulb socket by rotating it
counterclockwise and pulling it out of
the lamp assembly.
4. Pull the bulb straight out of the socket.
5. To install, reverse the removal procedure.
CHANGING A LICENSE PLATE
LAMP BULB
The license plate bulbs are behind the rear
bumper. 1. Reach behind the rear bumper to
locate the bulb.
2. Twist the bulb socket counterclockwise
and carefully pull to remove it from the
lamp assembly.
3. Pull the bulb straight out of the socket.
530
F-150 (TFD) Canada/United States of America, enUSA, Edition date: 202104, Second-Printing MaintenanceA
B
CE358899 E187290 E187794
Page 557 of 796

USING BEAD-LOCK WHEELS -
RAPTOR
Your vehicle comes with unique wheels
matched to the tires. To avoid damage to
your wheels:
•
Maintain proper tire pressure.
• Due to extreme tire and wheel width,
do not take your vehicle through an
automatic car wash that uses
mechanical tracks, as wheel damage
may result.
• When installing wheels, always torque
lug nuts to specification with a torque
wrench.
• Inspect your wheels for damage on a
regular basis. If you have a damaged
wheel, replace it immediately.
• If you encounter an abnormally harsh
impact, inspect the outside tire wall of
your wheels, both inside and out, for
damage.
Note: Ford Performance only recommends
using bead-lock rings from Ford
Performance Parts, in conjunction with the
original equipment manufacturer (OEM)
tire. Any other combination using this wheel
could result in air loss or tire failure.
Note: Converting the bead-lock compatible
wheel to true bead-locks is for off-road use
only. We do not approve of the use of true
bead-locks for on-road driving.
If your vehicles equipped with the optional
bead lock compatible wheel, you can
convert this wheel to use a true bead-lock
ring, which allows operation at low tire
pressures when off-road to minimize the
risk of de-beading the tire. See your local
Ford Performance Parts Dealer for more
information. Tire Care WARNING: Always re-inflate tires
to recommended tire pressures before
the vehicle is operated on-road. The
recommended pressure is located on the
tire label or safety certification label,
located on the B-pillar, inside the driver's
door. WARNING:
After off-road use,
before returning to the road, check the
wheels and tires for damage. Off-road
use may cause damage to your wheels
and tires that can lead to tire failure, loss
of vehicle control, serious injury or death. WARNING:
Replace the wheels
and tires with the exact original brand,
size and construction that came
originally on your vehicle. Use of any
other wheel or tire combinations, even
with identical size ratings, may result in
insufficient running clearances, tire
rubbing and eventual puncture. Failure
to follow tire replacement
recommendations can lead to tire failure,
loss of vehicle control, serious injury or
death.
Note: If you have reduced your tire pressure
for off-road use, the tire pressure monitoring
system (TPMS) warning light then activates
in the instrument panel as a reminder to
re-inflate the tires before returning to the
road.
553
F-150 (TFD) Canada/United States of America, enUSA, Edition date: 202104, Second-Printing Wheel and Tire Information