Page 65 of 260
 63
Lighting and visibility
4Daytime running lamps /
Sidelamps
The front lamps light up automatically when the
engine starts.
They provide the following functions:
–
Daytime running lamps (lig")
63
Lighting and visibility
4Daytime running lamps /
Sidelamps
The front lamps light up automatically when the
engine starts.
They provide the following functions:
–
Daytime running lamps (lighting control stalk in
the "
AUTO" position with adequate light level).
–
Sidelamps (lighting control stalk in the " AUT
O"
position with low light levels or "Sidelamps only”
or "Dipped/main beam headlamps").
The LEDs are brighter when operating as daytime running lamps.
Parking lamps
Side markers for the vehicle by illumination of
the sidelamps on the traffic side only.
►
Depending on version, within one minute of
switching off the ignition, operate the lighting
control stalk up or down depending on the traffic
side (for example: when parking on the left; lighting control stalk upwards; the right-hand
sidelamps come on).
This is confirmed by an audible signal and
illumination of the corresponding direction
indicator lamp in the instrument panel.
T
o switch off the parking lamps, return the
lighting control stalk to the central position.
Guide-me-home lighting
Manual
Switching on/off
► With the ignition off, "flash" the headlamps
using the lighting control stalk to switch the
function on or off.
Manual guide-me-home lighting goes off
automatically at the end of a given period of
time.
Automatic
With the ring in the "AUTO" position, when the
light is poor, the dipped beam headlamps come
on automatically when the ignition is switched
off.
The activation, deactivation and duration of guide-me-
home lighting are set in the vehicle configuration
menu.
Automatic exterior welcome lighting
With the "Automatic headlamp illumination"
function activated, when the light is poor, the
sidelamps and dipped beam headlamps come
on automatically when the vehicle is unlocked.
Activation, deactivation and
the duration of the exterior
welcome lighting are set in the vehicle
configuration menu.
Automatic headlamp dipping
This system automatically changes between
dipped and main beam headlamps according to
the brightness and driving conditions, using a
camera located at the top of the windscreen.
This system is a driving aid.
The driver remains responsible for
the vehicle's lighting, its correct use for the
Page 66 of 260
 64
Lighting and visibility
Do not allow snow to accumulate on the
bonnet or roof of the vehicle as this could
obstruct the detection camera.
Headlamp beam height
adjustment
To avoid inconvenien")
64
Lighting and visibility
Do not allow snow to accumulate on the
bonnet or roof of the vehicle as this could
obstruct the detection camera.
Headlamp beam height
adjustment
To avoid inconvenience to other road users,
the height of the halogen headlamps should be
adjusted according to the load in the vehicle.
0Unladen.
1 Partial load.
2 Medium load.
3 Maximum authorised load.
4 5 6 Not used.
The initial setting is position 0.
prevailing conditions of light, visibility and
traffic, and for observation of driving and
vehicle regulations.
The system will be operational as soon
as you exceed 16 mph (25 km/h).
If the speed drops below 9 mph (15
km/h), the
system no longer operates.
Activation/Deactivation
Activation and deactivation are done via the vehicle
configuration menu.
When deactivated, the lighting system changes
to "automatic illumination of headlamps" mode.
The state of the system stays in the memory
when switching off the ignition.
Operation
If the ambient light level is sufficient and/or the
traffic conditions do not allow the main beam
headlamps to be lit:
– The dipped beam headlamps
remain lit. These indicator lamps
come on on the instrument panel.
If the ambient light level is very low and traffic
conditions permit:
– The main beam headlamps
come on automatically . These
indicator lamps come on on the instrument
panel.
The function is deactivated if the fog lamps are
switched on or the system detects dense fog.
When the fog lamps are switched off or the
vehicle leaves the area of dense fog, the function
is automatically reactivated.
This indicator lamp goes out when the function is deactivated.
Pause
If the situation requires a change of headlamp
beam, the driver can take over at any time.
► A "headlamp flash" pauses the
function and the system changes to
"automatic illumination of headlamps" mode:
–
if the "AUT
O" and "Dipped beam" indicator
lamps were on, the system changes to main
beam,
– if the "AUT O" and "Main beam" indicator
lamps were on, the system changes to dipped
beam.
To reactivate the system, flash the headlamps
again.
The system may suffer interference or not work correctly:
–
under conditions of poor visibility (snow
,
heavy rain, etc.),
–
if the windscreen in front of the camera is
dirty
, misted or obscured (for example, by a
sticker, etc.),
–
if the vehicle is facing highly reflective
signs.
When the system detects thick fog, it
temporarily deactivates the function.
The system is not able to detect:
–
road users that do not have their own
lighting, such as pedestrians,
–
vehicles whose lighting is obscured (for
example: vehicles running behind a safety
barrier on a motorway),
–
vehicles at the top or bottom of a steep
slope, on winding roads, on crossroads.
Clean the windscreen regularly,
particularly the area in front of the
camera.
The internal surface of the windscreen can
also become misted around the camera.
In humid and cold weather, demist the
windscreen regularly.
Page 67 of 260
 65
Lighting and visibility
4Do not allow snow to accumulate on the
bonnet or roof of the vehicle as this could
obstruct the detection camera.
Headlamp beam height
adjustment
To avoid inconvenie")
65
Lighting and visibility
4Do not allow snow to accumulate on the
bonnet or roof of the vehicle as this could
obstruct the detection camera.
Headlamp beam height
adjustment
To avoid inconvenience to other road users,
the height of the halogen headlamps should be
adjusted according to the load in the vehicle.
0Unladen.
1 Partial load.
2 Medium load.
3 Maximum
authorised load.
4 5 6 Not used.
The initial setting is position 0.
Wiper control stalk
Programming
Your vehicle may also include some functions
that can be activated/deactivated:
–
automatic windscreen wipers,
–
rear wiping on engaging reverse gear
.
In wintry conditions, remove snow, ice or
frost present on the windscreen, around
the wiper arms and blades and the
windscreen seal, before operating the wipers.
Do not operate the wipers on a dry
windscreen. Under extremely hot or cold
conditions, ensure that the wiper blades are
not stuck to the windscreen before operating
the wipers.
Manual controls
The wipers are controlled directly by the driver.
With manual wiping (intermittent)
With AUTO wiping
Windscreen wipers
► To select the wiping speed: raise or lower the
stalk to the desired position.
Fast wiping (heavy rain)
Normal wiping (moderate rain)
Intermittent wiping (proportional to the
vehicle’s speed)
Off
or
Automatic wiping (press down, then release).
Single wipe (pull the stalk briefly towards you).
Page 68 of 260
 66
Lighting and visibility
After refitting a windscreen wiper blade
► To return the wiper blades to their initial
position, switch on the ignition and operate the
wiper control stalk.
Changing a w")
66
Lighting and visibility
After refitting a windscreen wiper blade
► To return the wiper blades to their initial
position, switch on the ignition and operate the
wiper control stalk.
Changing a wiper blade
Removing/refitting at the front
► Carry out these wiper blade replacement
operations from the driver's side.
► Starting with the wiper blade farthest from
you, hold each arm by the rigid section and raise
it as far as possible.
Take care not to hold the arms at the jet locations.
Do not touch the wiper blades. Risk of
irreparable deformation.
Do not release them while moving them. Risk
of damaging the windscreen!
Windscreen wash
► Pull the wiper control stalk towards you and
hold.
The screenwash and windscreen wipers operate
for as long as the control stalk is pulled.
A
final wiping cycle is performed when
screenwashing ends.
On vehicles fitted with automatic air
conditioning, any action on the
screenwash control temporarily closes the air
intake, to avoid odours inside the passenger
compartment.
The windscreen wash jets are incorporated into the tip of each wiper
arm.
Screenwash fluid is sprayed along the length
of the wiper blade. This improves visibility and
reduces screenwash fluid consumption.
In some cases, depending on the contents
or colour of the fluid and on the exterior
brightness, the liquid spray may be barely
noticeable.
To avoid damaging the wiper blades, do not operate the windscreen washer if the
windscreen washer reservoir is empty.
Only operate the windscreen washer if
there is no risk of the fluid freezing on the
windscreen and hindering visibility. Always
use windscreen washer fluid suitable for low
temperatures during the winter period.
Never top up with water.
Rear wiper
Rear wiper selection ring:
Off.
Intermittent wiping (proportional to the
speed of the vehicle).
Wash-wipe (set duration).
Reverse gear
When reverse gear is engaged, the rear wiper
will come into operation automatically if the
windscreen wipers are operating.
Activation/Deactivation
Activation or deactivation is set via the vehicle
configuration menu.
This system is activated by default.
If a significant accumulation of snow or
ice is present, or when using a bicycle
carrier on the boot, deactivate the automatic
rear wiper.
Special position of the
windscreen wipers
This maintenance position is used while cleaning
or replacing the wiper blades. It can also be
useful, in winter (ice, snow), to release the wiper
blades from the windscreen.
To maintain the effectiveness of the flat wiper blades, it is advisable to:
–
handle them with care,
–
clean them regularly using soapy water
,
–
avoid using them to retain cardboard on the
windscreen,
–
replace them at the first signs of wear
.
Before removing a windscreen wiper blade
► Actuating the wiper control stalk within one
minute of switching off the ignition will position
the wiper blades vertically
.
►
Proceed with the desired operation or replace
the wiper blades.
Page 69 of 260
 67
Lighting and visibility
4After refitting a windscreen wiper blade
► To return the wiper blades to their initial
position, switch on the ignition and operate the
wiper control stalk.
Changing a")
67
Lighting and visibility
4After refitting a windscreen wiper blade
► To return the wiper blades to their initial
position, switch on the ignition and operate the
wiper control stalk.
Changing a wiper blade
Removing/refitting at the front
► Carry out these wiper blade replacement
operations from the driver's side.
►
Starting with the wiper blade farthest from
you, hold each arm by the rigid section and raise
it as far as possible.
Take care not to hold the arms at the jet locations.
Do not touch the wiper blades. Risk of
irreparable deformation.
Do not release them while moving them. Risk
of damaging the windscreen!
► Clean the windscreen using screenwash
fluid.
Do not apply "Rain X" type water-
repellent products.
►
Unclip the worn wiper blade closest to you
and remove it.
►
Install the new wiper blade and clip it to the
arm.
►
Repeat the procedure for the other wiper
blade.
►
Starting with the wiper blade closest to you,
once again hold each arm by the rigid section,
then guide it carefully onto the windscreen.
Removing/refitting at the rear
► Hold the arm by the rigid section and raise it
as far as possible.
►
Clean the rear screen using screenwash
fluid.
►
Unclip the worn wiper blade and remove it.
►
Install the new wiper blade and clip it to the
arm.
►
Once again hold the arm by the rigid section,
then guide it carefully onto the rear screen.
Automatic windscreen wipers
The windscreen wipers operate automatically
once rain is detected (sensor behind the rear
view mirror), adapting their speed to the intensity
of the rain without any action on the part of the
driver.
Switching on
Briefly push the control stalk downwards.
A wiping cycle confirms that the instruction has
been accepted.
Depending on version, this symbol
appears in the display screen or
this indicator lamp comes on on the instrument
panel and a message is displayed.
Off
Give the control stalk another brief push
downwards or place the control stalk in
another position (Int, 1 or 2).
This indicator lamp goes off on the instrument
panel and a message is displayed.
If the ignition has been off for more than
one minute, the automatic wipers must
Page 70 of 260
68
Lighting and visibility
be reactivated by pushing the control stalk
downwards.
Operating fault
If a fault occurs with the automatic windscreen
wipers, the wipers will operate in intermittent
mode.
Have it checked by a CITROËN dealer or a
qualified workshop.
Do not cover the rain sensor, located at
the top of the windscreen behind the rear
view mirror (depending on equipment); the
associated functions would no longer be
controlled.
Switch off the automatic windscreen wipers
when using an automatic car wash.
In winter, it is advisable to wait until the
windscreen is completely clear of ice before
activating the automatic rain sensitive wipers.
Page 71 of 260
 69
Safety
5General safety
recommendations
Do not remove the labels attached in
different places on your vehicle. They
include safety warnings as well as
identification information for the vehicle.")
69
Safety
5General safety
recommendations
Do not remove the labels attached in
different places on your vehicle. They
include safety warnings as well as
identification information for the vehicle.
For all work on your vehicle, use a
qualified workshop that has the technical
information, skills and equipment required, all
of which a CITROËN dealer is able to
provide.
Depending on country regulations,
certain safety equipment may be
mandatory: high visibility safety vests,
warning triangles, breathalysers, spare bulbs,
spare fuses, fire extinguisher, first aid kit, mud
flaps at the rear of the vehicle, etc.
Installing electrical accessories:
– The fitting of electrical equipment or
accessories not approved by CITROËN may
cause excessive current consumption and
faults and failures with the electrical system
of your vehicle. Contact a CITROËN dealer
for information on the range of approved
accessories.
* In accordance with the general conditions of use of the service, available from dealers an\
d subject to technological and technical limitations.
– As a safety measure, access to the
diagnostic socket, used for the vehicle's
electronic systems, is reserved strictly for
CITROËN dealers or qualified workshops,
equipped with the special tools required (risk
of malfunctions of the vehicle's electronic
systems that could cause breakdowns or
serious accidents).
The Manufacturer cannot
be held responsible if this advice is not
followed.
–
Any modification or adaptation not intended
or authorised by CITROËN or carried out
without meeting the technical requirements
defined by the Manufacturer will result in the
suspension of the commercial warranty
.
Installation of accessory radio
communication transmitters
Before installing a radio communication
transmitter with an external aerial, you must
without fail contact a CITROËN dealer for
the specification of transmitters which can
be fitted (frequency, maximum power, aerial
position, specific installation requirements),
in line with the Vehicle Electromagnetic
Compatibility Directive (2004/104/EC).
Declarations of conformity for radio
equipment
The relevant certificates are available on the
http://service.citroen.com/ACddb/ website.
Emergency or assistance
call (type 1)
Localised Emergency Call
► In an emergency , press button 1 for more
than 2 seconds.
The lighting of the indicator lamp and a voice
message confirm that the call has been made to
the “Localised Emergency Call” call centre.*.
►
Pressing again immediately cancels the
request.
The lamp remains lit until the call is ended.
"Localised Emergency Call" immediately
geolocates your vehicle and contacts you in your
Page 72 of 260
 70
Safety
‘Localised Emergency Call’ immediately locates
your vehicle and puts you in contact with the
appropriate emergency services*.
► Pressing again immediately cancels the
request.
The i")
70
Safety
‘Localised Emergency Call’ immediately locates
your vehicle and puts you in contact with the
appropriate emergency services*.
► Pressing again immediately cancels the
request.
The indicator lamp flashes when the vehicle
data is sent, and then remains lit when
communication is established.
If an impact is detected by the airbag
control unit, an emergency call is made
automatically, independently of the
deployment of any airbags.
‘Localised Emergency Call’ is a service
that can be accessed free of charge.
System operation
– Upon switching on the ignition, if the indicator
lamp lights up red, then green, and then goes
out: the system is operating correctly.
– If the indicator lamp is fixed red: system
malfunction
– If the indicator lamp flashes red: replace the
emergency battery.
In the latter two cases, emergency and
assistance call services may not work.
Contact a dealer or a qualified repairer as soon
as possible.
* In areas covered by ‘Localised Emergency Call’ and ‘Localised Assistance Call’.
The list of countries covered and telematic services provided is availab\
le from dealers or on the website for your country.
language*, and - if necessary - requests that
relevant emergency services be dispatched**.
In countries where the service is not available,
or when the geolocation service has been
expressly declined, the call is routed directly to
the emergency services (112) without the vehicle
location information.
If an impact is detected by the airbag
control unit, an emergency call is made
automatically, independently of the
deployment of any airbags.
Operation of the system
– Indicator lamp on (for 3 seconds) upon
switching on the ignition: the system is operating
correctly
.
–
Fixed red indicator lamp: system malfunction.
–
Flashing red indicator lamp: replace the
back-up battery
.
In the last 2 cases, the emergency and
assistance call services may not work.
Contact a qualified repairer as soon as possible.
* According to the geographic coverage of ‘Localised Emergency Call’, ‘Localised Assistance Call’ and the official national language chosen by the owner
of the vehicle.
The list of countries covered and telematic services provided is availab\
le from dealers or on the website for your country
.
**
According to the geographic coverage of ‘Localised Emergency Call’, ‘Localised Assistance Call’ and the official national language chosen by the owner
of the vehicle.
The list of countries covered and telematic services provided is availab\
le from dealers or on the website for your country.
***
In accordance w
ith the general conditions of use of the service, available from dealers\
and subject to technological and technical limitations.
The system fault does not prevent the vehicle from being driven.
Localised Assistance Call
► If the vehicle breaks down, press button 2
for more than 2 seconds to request assistance
(confirmed by a voice message**).
►
Pressing again immediately cancels the
request.
Geolocation
► Deactivate/reactivate geolocation by
simultaneously pressing buttons 1
and 2 and
then pressing button 2 to confirm.
If you benefit from the Citroën Connect
Box offer with the SOS and Assistance
Pack included, there are additional services
available to you in your personal space, via
the website for your country.
For information about the SOS and
Assistance Pack, please refer to the general
conditions for these services.
Emergency or assistance
call (type 2)
Localised Emergency Call
(PE112)
► In an emergency , press button 1 for more
than 2 seconds.
The lighting of the indicator lamp and a voice
message confirm that the call has been made to
the emergency services***.
 1
1 2
2 3
3 4
4 5
5 6
6 7
7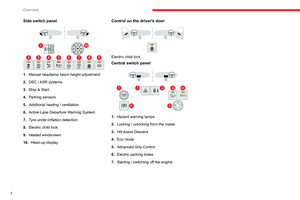 8
8 9
9 10
10 11
11 12
12 13
13 14
14 15
15 16
16 17
17 18
18 19
19 20
20 21
21 22
22 23
23 24
24 25
25 26
26 27
27 28
28 29
29 30
30 31
31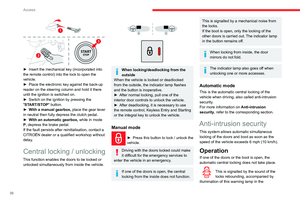 32
32 33
33 34
34 35
35 36
36 37
37 38
38 39
39 40
40 41
41 42
42 43
43 44
44 45
45 46
46 47
47 48
48 49
49 50
50 51
51 52
52 53
53 54
54 55
55 56
56 57
57 58
58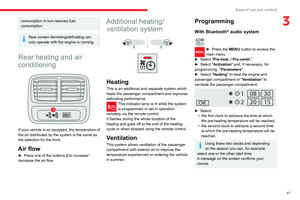 59
59 60
60 61
61 62
62 63
63 64
64 65
65 66
66 67
67 68
68 69
69 70
70 71
71 72
72 73
73 74
74 75
75 76
76 77
77 78
78 79
79 80
80 81
81 82
82 83
83 84
84 85
85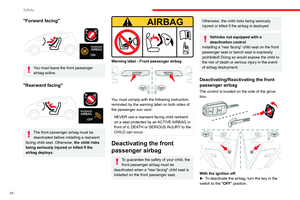 86
86 87
87 88
88 89
89 90
90 91
91 92
92 93
93 94
94 95
95 96
96 97
97 98
98 99
99 100
100 101
101 102
102 103
103 104
104 105
105 106
106 107
107 108
108 109
109 110
110 111
111 112
112 113
113 114
114 115
115 116
116 117
117 118
118 119
119 120
120 121
121 122
122 123
123 124
124 125
125 126
126 127
127 128
128 129
129 130
130 131
131 132
132 133
133 134
134 135
135 136
136 137
137 138
138 139
139 140
140 141
141 142
142 143
143 144
144 145
145 146
146 147
147 148
148 149
149 150
150 151
151 152
152 153
153 154
154 155
155 156
156 157
157 158
158 159
159 160
160 161
161 162
162 163
163 164
164 165
165 166
166 167
167 168
168 169
169 170
170 171
171 172
172 173
173 174
174 175
175 176
176 177
177 178
178 179
179 180
180 181
181 182
182 183
183 184
184 185
185 186
186 187
187 188
188 189
189 190
190 191
191 192
192 193
193 194
194 195
195 196
196 197
197 198
198 199
199 200
200 201
201 202
202 203
203 204
204 205
205 206
206 207
207 208
208 209
209 210
210 211
211 212
212 213
213 214
214 215
215 216
216 217
217 218
218 219
219 220
220 221
221 222
222 223
223 224
224 225
225 226
226 227
227 228
228 229
229 230
230 231
231 232
232 233
233 234
234 235
235 236
236 237
237 238
238 239
239 240
240 241
241 242
242 243
243 244
244 245
245 246
246 247
247 248
248 249
249 250
250 251
251 252
252 253
253 254
254 255
255 256
256 257
257 258
258 259
259 68
Lighting and visibility
be reactivated by pushing the control stalk
downwards.
Operating fault
If a fault occurs with the automatic windscreen
wipers, the wipers will operate in intermittent
mod")