Page 49 of 260
 47
Ease of use and comfort
3 12 V accessory socket(s)
► Plug in a 12 V accessory (with a maximum
rated power of 120 W) using a suitable adapter.
Observe the maximum power rating to
avoid dam")
47
Ease of use and comfort
3 12 V accessory socket(s)
► Plug in a 12 V accessory (with a maximum
rated power of 120 W) using a suitable adapter.
Observe the maximum power rating to
avoid damaging your accessory.
The connection of an electrical device not approved by CITROËN, such as a
USB charger, may adversely affect the
operation of vehicle electrical systems,
causing faults such as poor radio reception or
interference with displays in the screens.
USB port(s)
Ports 1 and 2 can be used to charge a portable
device.
Port
1 also enables audio files sent to your audio
system to be played via the vehicle's speakers.
When the USB port is used, the portable
device charges automatically.
A message is displayed if the power drawn
by the portable device exceeds the current
supplied by the vehicle.
For more information on how to use this
equipment, refer to the Audio equipment
and telematics section .
Port 1 also allows a
smartphone to be connected by MirrorLink
TM, Android Auto® or
CarPlay®, enabling certain smartphone
applications to be used on the touch screen.
For best results, use a cable made or approved
by the device manufacturer.
These applications can be managed using the
steering mounted controls or the audio system
controls.
220 V/50 Hz socket
AC 220V
50Hz 120W
It is located on the side of the central storage
compartment.
This socket (max. power: 150
W) operates with
the engine running, and with the Stop & Start
system in STOP mode.
►
Lift the protective cover
.
►
Check that the green indicator lamp is on.
►
Connect your multimedia or other electrical
device (telephone charger
, laptop computer,
CD-DVD player, bottle warmer, etc.).
In the event of a malfunction, the
green
indicator lamp flashes.
Have the socket checked by a CITROËN dealer
or a qualified workshop.
Page 50 of 260
 48
Ease of use and comfort
If the problem persists, have the system checked
by a CITROËN dealer or a qualified workshop.
Floor boxes
There are two boxes located under the rear
passenger footwell")
48
Ease of use and comfort
If the problem persists, have the system checked
by a CITROËN dealer or a qualified workshop.
Floor boxes
There are two boxes located under the rear
passenger footwells.
► To open them, slide your fingers into the
notch and lift the cover.
Aircraft style tables
► To put the table back in place, pull it upwards.
As a safety precaution, the aircraft style table
unhooks itself if excessive pressure is applied.
Connect only one device at a time to the
socket (do not use extension leads or
multi-socket adapters).
Connect only devices with class II insulation
(shown on the device).
Do not use metal-cased devices (e.g. electric
shaver, etc.).
As a safety measure, if power consumption is high and power is
required by the vehicle's electrical system
(due to severe weather conditions, electrical
overload, etc.), power to the socket may be
cut off, in which case the green indicator lamp
goes off.
Wireless smartphone
charger
It allows wireless charging of a portable device
such as a smartphone, using the magnetic
induction principle, in accordance with the Qi 1.1
standard.
The portable device to be charged must be
compatible with the Qi standard, either by design
or by using a compatible holder or shell.
The charging area is identified by the Qi symbol.
The charger works with the engine running and
with the Stop & Start system in STOP mode.
Charging is managed by the smartphone.
With Keyless Entry and Starting, the charger’s
operation may be briefly disrupted when a door
is opened or the ignition is switched off.
Charging
► With the charging area clear , place a device
in its centre.
When the portable device is detected, the
charger’s indicator lamp lights up green. It
remains lit for the whole time that the battery is
being charged.
The system is not designed to charge multiple devices simultaneously.
Do not leave any metal objects (coins,
keys, vehicle remote control, etc.) in the
charging area while a device is being
charged, due to the risk of overheating or
interrupting the charging process.
Operating check
The state of the indicator lamp allows the
operation of the charger to be monitored.
State of the
indicator lamp Meaning
Off Engine switched off.
No compatible devices
detected.
Charging finished.
Fixed green Compatible device detected.
Charging.
Flashing orange Foreign object detected in the charging zone.
Device not well centred in
the charging zone.
Fixed orange Fault with the device's battery meter.
Device battery
temperature too high.
Charger malfunction.
If the indicator lamp is lit orange:
– remove the device, then place it back in the
centre of the charging zone.
or
–
remove the device and try again in a quarter
of an hour
.
Page 51 of 260
 49
Ease of use and comfort
3If the problem persists, have the system checked
by a CITROËN dealer or a qualified workshop.
Floor boxes
There are two boxes located under the rear
passenger footwel")
49
Ease of use and comfort
3If the problem persists, have the system checked
by a CITROËN dealer or a qualified workshop.
Floor boxes
There are two boxes located under the rear
passenger footwells.
►
T
o open them, slide your fingers into the
notch and lift the cover.
Aircraft style tables
► To put the table back in place, pull it upwards.
As a safety precaution, the aircraft style table
unhooks itself if excessive pressure is applied.
► To store the table, pull it downwards.
Do not place hard or heavy objects on
the table. Such objects could become
projectiles in the event of sudden
deceleration.
Side blinds
They are fitted to the windows of the sliding side
doors (depending on version).
► To raise or lower the blind, pull it by the tab.
To avoid damaging the blind: – Guide it slowly , using the tab, while
raising or lowering it.
–
Make sure the tab is securely fastened
before opening the door
.
High load retaining net
This net, hooked onto the upper mountings and
the lower rings or lugs, enables the use of the full
loading volume, up to the roof:
–
Behind the front seats (row 1) when the rear
seats are folded.
–
Behind the rear seats (row 2).
When positioning the net, check that the
strap loops are visible from the boot; this
will make slackening or tightening them
easier.
Remove the luggage cover shelf or roller
(depending on version).
Page 52 of 260
 50
Ease of use and comfort
low position, you can store it folded by sliding it
towards the backrests of the rear seats.
► To deploy it from the boot, grasp it and unfold
it to the boot pillars.
Th")
50
Ease of use and comfort
low position, you can store it folded by sliding it
towards the backrests of the rear seats.
► To deploy it from the boot, grasp it and unfold
it to the boot pillars.
The maximum authorised weight on the luggage cover shelf is 25 kg.
Luggage cover
XL
XL
In the 5-seat configuration, it is installed behind
the second row seats, with the third row seats
stored folded away.
In the 7-seat configuration, it is stored behind the
third row seats.
In the event of sudden deceleration,
objects placed on the load space cover
can turn into projectiles.
Installation behind row 1
► Open the covers on the upper mountings 1 .
► Unroll the high load retaining net.
►
Position one end of the net's metal bar in the
corresponding upper mounting 1
, then do the
same with the other end.
►
Fully extend the straps.
► Wind each strap around bar 3 located under
the front seat cushion (row 1), then secure each spring hook to the ring on the corresponding
strap.
►
Fold down the rear seats.
►
T
ighten the straps without raising the bench
seat.
►
Check that the net is hooked and tightened
correctly
.
Installation behind row 2
► Fold or remove the luggage cover
.
► Open the covers on the upper mountings 2
.
►
Unroll the high load retaining net.
►
Position one end of the net's metal bar in the
corresponding upper mounting 2
, then do the
same with the other end.
►
Attach the hook on each of the net's straps
to the corresponding stowing ring 4
(located on
the floor).
►
T
ighten the straps.
►
Check that the net is hooked and tightened
correctly
.
Never use the ISOFIX ring, which is for
fixing the strap of a child seat with Top
Tether.
Two-position luggage cover
shelf (removable)
M
M
It can be installed in two different positions: high
and low.
It consists of two sections which can be folded
back on each other.
►
T
o fold it from the boot, grasp it and fold it
back on itself up to the rear seats. From the
Page 53 of 260
 51
Ease of use and comfort
3low position, you can store it folded by sliding it
towards the backrests of the rear seats.
►
T
o deploy it from the boot, grasp it and unfold
it to the boot pillars")
51
Ease of use and comfort
3low position, you can store it folded by sliding it
towards the backrests of the rear seats.
►
T
o deploy it from the boot, grasp it and unfold
it to the boot pillars.
The maximum authorised weight on the luggage cover shelf is 25 kg.
Luggage cover
XL
XL
In the 5-seat configuration, it is installed behind
the second row seats, with the third row seats
stored folded away.
In the 7-seat configuration, it is stored behind the
third row seats.
In the event of sudden deceleration,
objects placed on the load space cover
can turn into projectiles.
Installation
► Position the left and right ends of the roller in
the cut-outs A.
►
Pull out the roller until it reaches the boot
pillars.
►
Insert the roller guides into the rails in the
pillars B
.
► Depending on version, you can access the
boot by opening the rear screen in the tailgate
and attaching the roller guides into the rails in
the pillars C
.
► The roller can be stored behind row 2 or 3.
Removal
► Remove the roller guides from the rails in
pillars B
.
►
Guide the roller as it reels in.
►
Unlock the roller by pressing one of the
handles located at the ends of the roller bracket.
Stowing rings
Use the stowing rings on the rear floor to secure
loads.
Page 54 of 260
 52
Ease of use and comfort
Stop & Start
The heating and air conditioning systems
only operate when the engine is running.
Temporarily deactivate the Stop & Start
system to maintain a comfortable tem")
52
Ease of use and comfort
Stop & Start
The heating and air conditioning systems
only operate when the engine is running.
Temporarily deactivate the Stop & Start
system to maintain a comfortable temperature
in the passenger compartment.
For more information on the Stop & Start,
refer to the corresponding section.
Heating
Manual air conditioning
The air conditioning system only operates with the engine running.
1. Temperature.
2. Air flow.
3. Air distribution.
4. Interior air recirculation.
5. Air conditioning on/off.
As a safety precaution in case of sharp braking,
we recommend placing heavy objects as far
forwards as possible (i.e. near the cab)K
We recommend using the stowing rings on the
floor to firmly secure the load.
When washing your vehicle, never clean
the inside directly using a water jet.
Warning triangle
As a safety precaution, before leaving your
vehicle to set up and install the triangle, always
switch on the hazard warning lamps and put on
your high visibility vest.
Storage compartment
There is a compartment in the interior trim of the
boot in which to store a warning triangle.
Heating and Ventilation
Advice
Using the ventilation and air
conditioning system
►
T
o ensure that air is distributed evenly,
keep the external air intake grilles at the base
of the windscreen, the nozzles, the vents, the
air outlets and the air extractor in the boot
free from obstructions.
►
Do not cover the sunshine sensor located
on the dashboard; this sensor is used to
regulate the automatic air conditioning
system.
►
Operate the air conditioning system for at
least 5 to 10 minutes once or twice a month to
keep it in perfect working order
.
►
If the system does not produce cold air
,
switch it off and contact a CITROËN dealer or
a qualified workshop.
When towing the maximum load on a steep
gradient in high temperatures, switching off
the air conditioning increases the available
engine power, enhancing the towing capacity.
Avoid driving for too long with the ventilation off or with prolonged operation
of interior air recirculation. Risk of misting and
deterioration of the air quality!
If the interior temperature is very high
after the vehicle has stood for a long
time in the sunshine, air the passenger
compartment for a few moments.
Put the air flow control at a setting high
enough to quickly change the air in the
passenger compartment.
Condensation created by the air
conditioning results in a discharge of
water underneath the vehicle. This is perfectly
normal.
Servicing the ventilation and air
conditioning system
►
Ensure that the passenger compartment
filter is in good condition and have the filter
elements replaced regularly
.
We recommend using a composite passenger
compartment filter. Thanks to its special active
additive, this type of filter helps to purify the
air breathed by the occupants and keep the
passenger compartment clean (by reducing
allergic symptoms, unpleasant odours and
greasy deposits).
►
T
o ensure correct operation of the
air conditioning system, have it checked
according to the recommendations in the
Maintenance and Warranty Guide.
Page 55 of 260
 53
Ease of use and comfort
3Stop & Start
The heating and air conditioning systems
only operate when the engine is running.
Temporarily deactivate the Stop & Start
system to maintain a comfortable te")
53
Ease of use and comfort
3Stop & Start
The heating and air conditioning systems
only operate when the engine is running.
Temporarily deactivate the Stop & Start
system to maintain a comfortable temperature
in the passenger compartment.
For more information on the Stop & Start,
refer to the corresponding section.
Heating
Manual air conditioning
The air conditioning system only operates with the engine running.
1. Temperature.
2. Air flow.
3. Air distribution.
4. Interior air recirculation.
5. Air conditioning on/off.
Air flow
► Turn the thumbwheel 2 to obtain a
comfortable air flow.
If you set the air flow control to the
minimum position (off), the temperature
in the vehicle will no longer be controlled. A
slight air flow can still be felt however,
resulting from the forward movement of the
vehicle.
Temperature
► Turn the thumbwheel 1 from "LO" (cold)
to "HI" (hot) to adjust the temperature to your
requirements.
Air distribution
Windscreen and side windows.
Central and side air vents.
Footwells.
The air distribution can be adapted by combining
the corresponding buttons.
Air conditioning
With the engine running, the air conditioning is
designed to operate effectively in all seasons,
with the windows closed.
It enables you to:
–
lower the temperature in summer
,
– enhance the effectiveness of the demisting
function in winter , above 3°C.
On/Off
► Press button 5 to activate/deactivate the air
conditioning system.
When the air conditioning is in operation, to
cool the air more quickly, you can use interior
air recirculation for a few moments by pressing
button 4. Then restore the intake of exterior air.
The air conditioning does not operate when the air flow adjustment is set to off.
Switching the system off could result in
discomfort (humidity, misting).
Dual-zone automatic air
conditioning
1. Temperature.
2. Air flow.
3. Air distribution.
4. Recirculation of interior air.
5. Air conditioning on/off.
6. Automatic comfort mode.
Page 56 of 260
 54
Ease of use and comfort
► Press the “AUTO” button 6 to return to the
automatic comfort programme.
Air conditioning
With the engine running, the air conditioning is
designed to operate effec")
54
Ease of use and comfort
► Press the “AUTO” button 6 to return to the
automatic comfort programme.
Air conditioning
With the engine running, the air conditioning is
designed to operate effectively in all seasons,
with the windows closed.
It enables you to:
– lower the temperature in summer,
– enhance the effectiveness of the demisting
function in winter, above 3°C.
On/Off
► Press button 5 to activate/deactivate the air
conditioning system.
When the air conditioning is in operation, to
cool the air more quickly, you can use interior
air recirculation for a few moments by pressing
button 4. Then restore the intake of exterior air.
The air conditioning does not operate when the air flow adjustment is set to off.
Switching the system off could result in
discomfort (humidity, misting).
Air distribution
► Pressing button 3 successively directs the air
flow towards:
– windscreen, side windows and footwells,
– footwells,
– central vents, side vents and footwells,
7. Visibility programme.
8. "Mono" function.
Automatic comfort mode
► Press the " AUTO" button 6 to toggle the
mode.
The active mode appears in the display screen,
as described below:
Ensures soft, quiet operation by limiting
air flow.
Offers the best compromise between a
comfortable temperature and quiet
operation.
Provides dynamic, effective air flow.
When the engine is cold, the air flow will
only increase to its optimum level
gradually, to avoid distributing too much cold
air.
In cold weather, it prioritises the distribution of
warm air to the windscreen, the side windows
and the footwells only.
Manual mode
If you wish, you can make a different choice from
that suggested by the system, by changing a
setting. The other functions will still be controlled
automatically.
The "AUTO" symbol disappears if you change
a setting.
Deactivating the system
► Press button 2 "-" until the fan symbol
disappears.
This disables all functions of the dual-zone
automatic air conditioning system.
The temperature is no longer regulated. A slight
flow of air can still be felt, due to the forward
movement of the vehicle.
►
Press button
2 "+" to switch the system on
again.
Temperature
The driver and front passenger can each set the
temperature to suit their preferences.
The value shown on the display is a level
of comfort, not a temperature in Celsius or
Fahrenheit.
►
Push button
1 down to decrease the value or
up to increase it.
A setting of around 21 provides optimum comfort. Depending on your
requirements, a setting between 18 and 24 is
normal.
In addition, we recommend avoiding left/right
setting differences of more than 3.
On entering the vehicle, if the interior
temperature is significantly colder or
warmer than the comfort value setting, there
is no need to alter the value displayed in
order to reach the required level of comfort.
The system compensates automatically and
corrects the temperature difference as quickly
as possible.
For maximum cooling or heating of the
passenger compartment, it is possible to
exceed the minimum value 14 or the
maximum value 28.
►
Push button
1 down until "LO" is
displayed or up until "HI" is displayed.
"Mono" function
The comfort setting for the passenger side
can be indexed to the driver's comfort setting
(mono-zone).
►
Press the corresponding button 8
to activate/
deactivate the function.
The indicator lamp in the button comes on when
the function is activated.
The function is deactivated automatically if a
passenger uses the temperature control.
Visibility programme
► Press the “ visibility” button 7 to demist or
defrost the windscreen and side windows as
quickly as possible.
The system automatically manages the air
conditioning, air flow and air intake, and provides
optimum distribution towards the windscreen and
side windows.
►
Press the “
visibility” button 8 again to stop
the programme.
Or
 1
1 2
2 3
3 4
4 5
5 6
6 7
7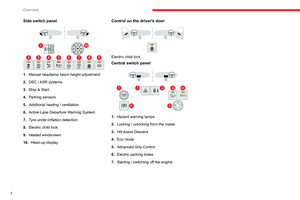 8
8 9
9 10
10 11
11 12
12 13
13 14
14 15
15 16
16 17
17 18
18 19
19 20
20 21
21 22
22 23
23 24
24 25
25 26
26 27
27 28
28 29
29 30
30 31
31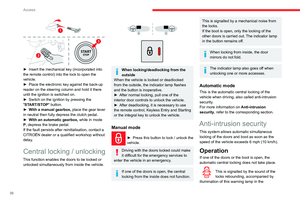 32
32 33
33 34
34 35
35 36
36 37
37 38
38 39
39 40
40 41
41 42
42 43
43 44
44 45
45 46
46 47
47 48
48 49
49 50
50 51
51 52
52 53
53 54
54 55
55 56
56 57
57 58
58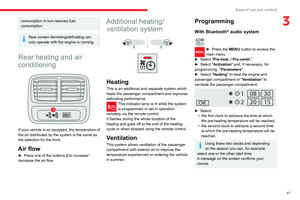 59
59 60
60 61
61 62
62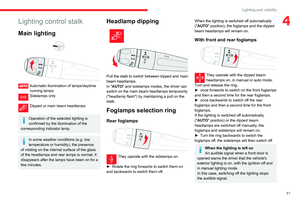 63
63 64
64 65
65 66
66 67
67 68
68 69
69 70
70 71
71 72
72 73
73 74
74 75
75 76
76 77
77 78
78 79
79 80
80 81
81 82
82 83
83 84
84 85
85 86
86 87
87 88
88 89
89 90
90 91
91 92
92 93
93 94
94 95
95 96
96 97
97 98
98 99
99 100
100 101
101 102
102 103
103 104
104 105
105 106
106 107
107 108
108 109
109 110
110 111
111 112
112 113
113 114
114 115
115 116
116 117
117 118
118 119
119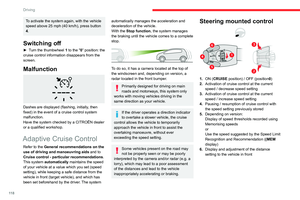 120
120 121
121 122
122 123
123 124
124 125
125 126
126 127
127 128
128 129
129 130
130 131
131 132
132 133
133 134
134 135
135 136
136 137
137 138
138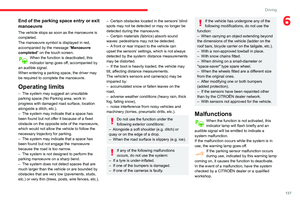 139
139 140
140 141
141 142
142 143
143 144
144 145
145 146
146 147
147 148
148 149
149 150
150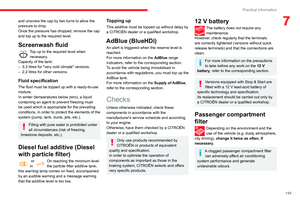 151
151 152
152 153
153 154
154 155
155 156
156 157
157 158
158 159
159 160
160 161
161 162
162 163
163 164
164 165
165 166
166 167
167 168
168 169
169 170
170 171
171 172
172 173
173 174
174 175
175 176
176 177
177 178
178 179
179 180
180 181
181 182
182 183
183 184
184 185
185 186
186 187
187 188
188 189
189 190
190 191
191 192
192 193
193 194
194 195
195 196
196 197
197 198
198 199
199 200
200 201
201 202
202 203
203 204
204 205
205 206
206 207
207 208
208 209
209 210
210 211
211 212
212 213
213 214
214 215
215 216
216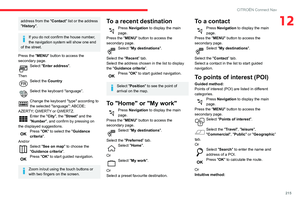 217
217 218
218 219
219 220
220 221
221 222
222 223
223 224
224 225
225 226
226 227
227 228
228 229
229 230
230 231
231 232
232 233
233 234
234 235
235 236
236 237
237 238
238 239
239 240
240 241
241 242
242 243
243 244
244 245
245 246
246 247
247 248
248 249
249 250
250 251
251 252
252 253
253 254
254 255
255 256
256 257
257 258
258 259
259