2021 CHEVROLET SILVERADO 2500HD Four wheel
[x] Cancel search: Four wheelPage 272 of 433
Chevrolet Silverado 2500 HD/3500 HD Owner Manual (GMNA-Localizing-U.
S./Canada/Mexico-14632154) - 2021 - CRC - 11/20/20
Driving and Operating 271
When parking your vehicle and your trailer
on a hill:1. Press the brake pedal, but do not shift into P (Park) yet. Turn the wheels into
the curb if facing downhill or into traffic
if facing uphill.
2. Have someone place chocks under the trailer wheels.
3. Gradually release the brake pedal to allow the chocks to absorb the load of
the trailer.
4. Reapply the brake pedal. Then apply the parking brake and shift into P (Park).
5. Release the brake pedal.
Leaving After Parking on a Hill
1. Apply and hold the brake pedal.
.Start the engine.
.Shift into a gear.
.Release the parking brake.
2. Let up on the brake pedal.
3. Drive slowly until the trailer is clear of the chocks.
4. Stop and have someone pick up and store the chocks.
Launching and Retrieving a Boat
Backing the Trailer into the Water
{Warning
.Have all passengers get out of the
vehicle before backing onto the sloped
part of the ramp. Lower the driver and
passenger side windows before
backing onto the ramp. This will
provide a means of escape in the
unlikely event the vehicle slides into
the water.
.If the boat launch surface is slippery,
have the driver remain in the vehicle
with the brake pedal applied while the
boat is being launched. The boat
launch can be especially slippery at
low tide when part of the ramp was
previously submerged at high tide. Do
not back onto the ramp to launch the
boat if you are not sure the vehicle
can maintain traction.
.Do not move the vehicle if someone is
in the path of the trailer. Some parts
of the trailer might be underwater and
not visible to people who are assisting
in launching the boat. Disconnect the wiring to the trailer before
backing the trailer into the water to prevent
damage to the electrical circuits on the
trailer. Reconnect the wiring to the trailer
after removing the trailer from the water.
If the trailer has electric brakes that can
function when the trailer is submerged, it
might help to leave the electrical trailer
connector attached to maintain trailer brake
functionality while on the boat ramp.
To back the trailer into the water:
1. If equipped, place the vehicle in four-wheel-drive high.
2. Slowly back down the boat ramp until the boat is floating, but no further than
necessary.
3. Press and hold the brake pedal, but do not shift into P (Park) yet.
4. Have someone place chocks under the front wheels of the vehicle.
5. Gradually release the brake pedal to allow the chocks to absorb the load of
the trailer.
6. Reapply the brake pedal. Then apply the parking brake and shift into P (Park).
7. Release the brake pedal.
Page 273 of 433
Chevrolet Silverado 2500 HD/3500 HD Owner Manual (GMNA-Localizing-U.
S./Canada/Mexico-14632154) - 2021 - CRC - 11/20/20
272 Driving and Operating
Pulling the Trailer from the Water
To pull the trailer out of the water:1. Press and hold the brake pedal.
2. Start the engine and shift into gear.
3. Release the parking brake.
4. Let up on the brake pedal.
5. Drive slowly until the tires are clear of the chocks.
6. Stop and have someone pick up and store the chocks.
7. Slowly pull the trailer from the water.
8. Once the vehicle and trailer have been driven from the sloped part of the boat
ramp, the vehicle can be shifted from
four-wheel-drive high. Shift into the drive
mode that is appropriate for the road
conditions.
Caution
If the vehicle tires begin to spin and the
vehicle begins to slide toward the water,
remove your foot from the accelerator
pedal and apply the brake pedal. Seek
help to have the vehicle towed up
the ramp.
Maintenance when Trailer Towing
The vehicle needs service more often when
used to tow trailers. See Maintenance
Schedule 0384. It is especially important to
check the engine oil, axle lubricant, belts,
cooling system, and brake system before
and during each trip.
Check periodically to see that all nuts and
bolts on the trailer hitch are tight.
Engine Cooling When Trailer Towing
The cooling system may temporarily
overheat during severe operating conditions.
See Engine Overheating 0312.
Trailer Towing
If equipped with a diesel engine, see the
Duramax diesel supplement.
Caution
Towing a trailer improperly can damage
the vehicle and result in costly repairs
not covered by the vehicle warranty. To
tow a trailer correctly, follow the
directions in this section and see your
dealer for important information about
towing a trailer with the vehicle. Trailering is different than just driving the
vehicle by itself. Trailering means changes in
handling, acceleration, braking, durability,
and fuel economy. Successful, safe trailering
takes correct equipment, and it has to be
used properly.
The following information has many
time-tested, important trailering tips and
safety rules. Many of these are important
for your safety and that of your passengers.
Read this section carefully before pulling a
trailer.
Trailer Weight
{Warning
Never exceed the towing capacity for
your vehicle.
Safe trailering requires monitoring the
weight, speed, altitude, road grades, outside
temperature, and how frequently the vehicle
is used to tow a trailer.
Trailer Weight Ratings
When towing a trailer, the combined weight
of the vehicle, vehicle contents, trailer, and
trailer contents must be below all of the
maximum weight ratings for the vehicle,
including:
Page 281 of 433
Chevrolet Silverado 2500 HD/3500 HD Owner Manual (GMNA-Localizing-U.
S./Canada/Mexico-14632154) - 2021 - CRC - 11/20/20
280 Driving and Operating
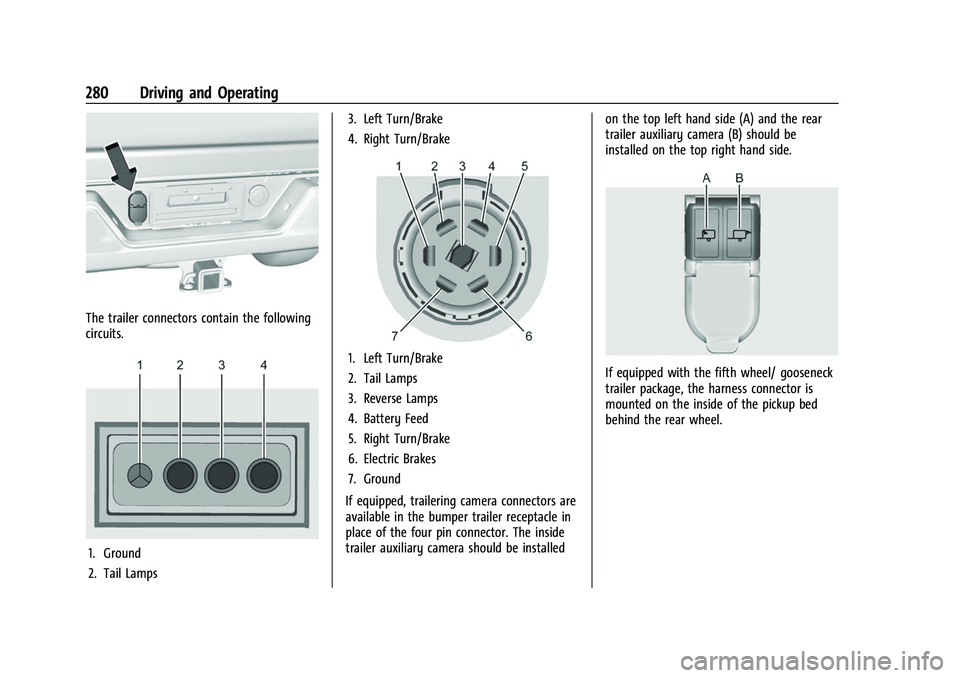
The trailer connectors contain the following
circuits.
1. Ground
2. Tail Lamps3. Left Turn/Brake
4. Right Turn/Brake
1. Left Turn/Brake
2. Tail Lamps
3. Reverse Lamps
4. Battery Feed
5. Right Turn/Brake
6. Electric Brakes
7. Ground
If equipped, trailering camera connectors are
available in the bumper trailer receptacle in
place of the four pin connector. The inside
trailer auxiliary camera should be installed on the top left hand side (A) and the rear
trailer auxiliary camera (B) should be
installed on the top right hand side.If equipped with the fifth wheel/ gooseneck
trailer package, the harness connector is
mounted on the inside of the pickup bed
behind the rear wheel.
Page 301 of 433

Chevrolet Silverado 2500 HD/3500 HD Owner Manual (GMNA-Localizing-U.
S./Canada/Mexico-14632154) - 2021 - CRC - 11/20/20
300 Vehicle Care
Vehicle Care
General Information
General Information . . . . . . . . . . . . . . . . . . . 301
California Proposition 65 Warning . . . . . 301
California Perchlorate MaterialsRequirements . . . . . . . . . . . . . . . . . . . . . . . . 301
Accessories and Modifications . . . . . . . . . 302
Vehicle Checks
Doing Your Own Service Work . . . . . . . . 302
Hood . . . . . . . . . . . . . . . . . . . . . . . . . . . . . . . . . . 302
Engine Compartment Overview . . . . . . . 304
Engine Oil . . . . . . . . . . . . . . . . . . . . . . . . . . . . . 305
Engine Oil Life System . . . . . . . . . . . . . . . . 307
Automatic Transmission Fluid . . . . . . . . . 308
Engine Air Filter Life System . . . . . . . . . . 308
Engine Air Cleaner/Filter . . . . . . . . . . . . . . 309
Cooling System . . . . . . . . . . . . . . . . . . . . . . . . 310
Engine Overheating . . . . . . . . . . . . . . . . . . . . 312
Overheated Engine Protection Operating Mode . . . . . . . . . . . . . . . . . . . . . 314
Engine Fan . . . . . . . . . . . . . . . . . . . . . . . . . . . . 314
Power Steering Fluid . . . . . . . . . . . . . . . . . . . 314
Washer Fluid . . . . . . . . . . . . . . . . . . . . . . . . . . 315
Brakes . . . . . . . . . . . . . . . . . . . . . . . . . . . . . . . . . 316
Brake Pad Life System . . . . . . . . . . . . . . . . . 316
Brake Fluid . . . . . . . . . . . . . . . . . . . . . . . . . . . . . 317
Battery - North America . . . . . . . . . . . . . . . 318
Four-Wheel Drive . . . . . . . . . . . . . . . . . . . . . . 320 Front Axle . . . . . . . . . . . . . . . . . . . . . . . . . . . . . 320
Rear Axle . . . . . . . . . . . . . . . . . . . . . . . . . . . . . . 320
Noise Control System . . . . . . . . . . . . . . . . . 320
Starter Switch Check . . . . . . . . . . . . . . . . . . . 321
Automatic Transmission Shift Lock
Control Function Check . . . . . . . . . . . . . . 322
Ignition Transmission Lock Check . . . . . . 322
Park Brake and P (Park) Mechanism Check . . . . . . . . . . . . . . . . . . . . . . . . . . . . . . . . 322
Wiper Blade Replacement . . . . . . . . . . . . . 322
Glass Replacement . . . . . . . . . . . . . . . . . . . . . 323
Windshield Replacement . . . . . . . . . . . . . . . 323
Gas Strut(s) . . . . . . . . . . . . . . . . . . . . . . . . . . . . 323
Headlamp Aiming
Front Headlamp Aiming . . . . . . . . . . . . . . . 324
Bulb Replacement
Bulb Replacement . . . . . . . . . . . . . . . . . . . . . 324
Halogen Bulbs . . . . . . . . . . . . . . . . . . . . . . . . . 325
LED Lighting . . . . . . . . . . . . . . . . . . . . . . . . . . . 325
Headlamps, Front Turn Signal, Sidemarker, and Parking Lamps . . . . . . 325
Taillamps, Turn Signal, Stoplamps, and Back-Up Lamps . . . . . . . . . . . . . . . . . . . . . . 326
Center High-Mounted Stoplamp (CHMSL) and Cargo Lamp . . . . . . . . . . . . 327
License Plate Lamp . . . . . . . . . . . . . . . . . . . . 328
Electrical System
Electrical System Overload . . . . . . . . . . . . 328 Fuses and Circuit Breakers . . . . . . . . . . . . . 329
Engine Compartment Fuse Block . . . . . . 329
Instrument Panel Fuse Block (Left) . . . . . 332
Instrument Panel Fuse Block (Right) . . . 334
Wheels and Tires
Tires . . . . . . . . . . . . . . . . . . . . . . . . . . . . . . . . . . 336
All-Season Tires . . . . . . . . . . . . . . . . . . . . . . . . 337
Winter Tires . . . . . . . . . . . . . . . . . . . . . . . . . . . 337
All-Terrain Tires . . . . . . . . . . . . . . . . . . . . . . . . 337
Tire Sidewall Labeling . . . . . . . . . . . . . . . . . 338
Tire Designations . . . . . . . . . . . . . . . . . . . . . . 339
Tire Terminology and Definitions . . . . . . 339
Tire Pressure . . . . . . . . . . . . . . . . . . . . . . . . . . . 341
Tire Pressure Monitor System . . . . . . . . . 342
Tire Pressure Monitor Operation . . . . . . 343
Tire Inspection . . . . . . . . . . . . . . . . . . . . . . . . 348
Tire Rotation . . . . . . . . . . . . . . . . . . . . . . . . . . 348
When It Is Time for New Tires . . . . . . . . 350
Buying New Tires . . . . . . . . . . . . . . . . . . . . . . 351
Different Size Tires and Wheels . . . . . . . . 352
Uniform Tire Quality Grading . . . . . . . . . . 352
Wheel Alignment and Tire Balance . . . . 354
Wheel Replacement . . . . . . . . . . . . . . . . . . . 354
Tire Chains . . . . . . . . . . . . . . . . . . . . . . . . . . . . 354
If a Tire Goes Flat . . . . . . . . . . . . . . . . . . . . . 355
Tire Changing . . . . . . . . . . . . . . . . . . . . . . . . . 356
Full-Size Spare Tire . . . . . . . . . . . . . . . . . . . . 366
Jump Starting
Jump Starting - North America . . . . . . . . 367
Page 321 of 433
Chevrolet Silverado 2500 HD/3500 HD Owner Manual (GMNA-Localizing-U.
S./Canada/Mexico-14632154) - 2021 - CRC - 11/20/20
320 Vehicle Care
Four-Wheel Drive
Transfer Case
When to Check Lubricant
Refer toMaintenance Schedule 0384 to
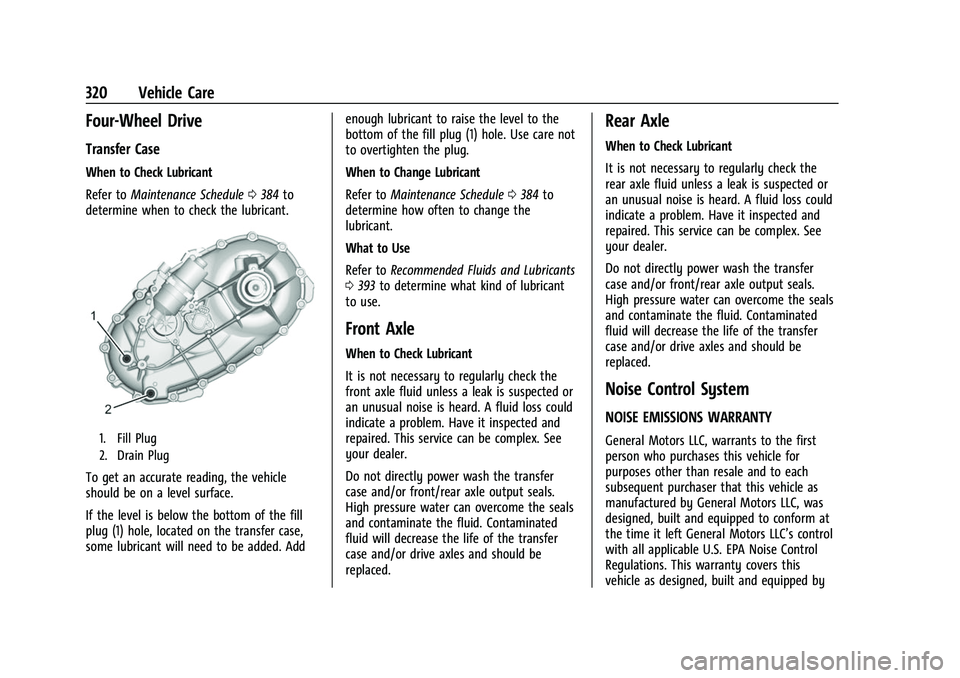
determine when to check the lubricant.
1. Fill Plug
2. Drain Plug
To get an accurate reading, the vehicle
should be on a level surface.
If the level is below the bottom of the fill
plug (1) hole, located on the transfer case,
some lubricant will need to be added. Add enough lubricant to raise the level to the
bottom of the fill plug (1) hole. Use care not
to overtighten the plug.
When to Change Lubricant
Refer to
Maintenance Schedule 0384 to
determine how often to change the
lubricant.
What to Use
Refer to Recommended Fluids and Lubricants
0 393 to determine what kind of lubricant
to use.
Front Axle
When to Check Lubricant
It is not necessary to regularly check the
front axle fluid unless a leak is suspected or
an unusual noise is heard. A fluid loss could
indicate a problem. Have it inspected and
repaired. This service can be complex. See
your dealer.
Do not directly power wash the transfer
case and/or front/rear axle output seals.
High pressure water can overcome the seals
and contaminate the fluid. Contaminated
fluid will decrease the life of the transfer
case and/or drive axles and should be
replaced.
Rear Axle
When to Check Lubricant
It is not necessary to regularly check the
rear axle fluid unless a leak is suspected or
an unusual noise is heard. A fluid loss could
indicate a problem. Have it inspected and
repaired. This service can be complex. See
your dealer.
Do not directly power wash the transfer
case and/or front/rear axle output seals.
High pressure water can overcome the seals
and contaminate the fluid. Contaminated
fluid will decrease the life of the transfer
case and/or drive axles and should be
replaced.
Noise Control System
NOISE EMISSIONS WARRANTY
General Motors LLC, warrants to the first
person who purchases this vehicle for
purposes other than resale and to each
subsequent purchaser that this vehicle as
manufactured by General Motors LLC, was
designed, built and equipped to conform at
the time it left General Motors LLC’s control
with all applicable U.S. EPA Noise Control
Regulations. This warranty covers this
vehicle as designed, built and equipped by
Page 338 of 433
Chevrolet Silverado 2500 HD/3500 HD Owner Manual (GMNA-Localizing-U.
S./Canada/Mexico-14632154) - 2021 - CRC - 11/20/20
Vehicle Care 337
Warning (Continued)
.Worn or old tires can cause a
crash. If the tread is badly worn,
replace them.
.Replace any tires that have been
damaged by impacts with
potholes, curbs, etc.
.Improperly repaired tires can cause
a crash. Only the dealer or an
authorized tire service center
should repair, replace, dismount,
and mount the tires.
.Do not spin the tires in excess of
56 km/h (35 mph) on slippery
surfaces such as snow, mud, ice,
etc. Excessive spinning may cause
the tires to explode.
All-Season Tires
This vehicle may come with all-season tires.
These tires are designed to provide good
overall performance on most road surfaces
and weather conditions. Original equipment
tires designed to GM's specific tire
performance criteria have a TPC specification
code molded onto the sidewall. Originalequipment all-season tires can be identified
by the last two characters of this TPC code,
which will be
“MS.”
Consider installing winter tires on the
vehicle if frequent driving on snow or
ice-covered roads is expected. All-season tires
provide adequate performance for most
winter driving conditions, but they may not
offer the same level of traction or
performance as winter tires on snow or
ice-covered roads. See Winter Tires0337.
Winter Tires
This vehicle was not originally equipped
with winter tires. Winter tires are designed
for increased traction on snow and
ice-covered roads. Consider installing winter
tires on the vehicle if frequent driving on ice
or snow covered roads is expected. See your
dealer for details regarding winter tire
availability and proper tire selection. Also,
see Buying New Tires 0351.
With winter tires, there may be decreased
dry road traction, increased road noise, and
shorter tread life. After changing to winter
tires, be alert for changes in vehicle
handling and braking.
If using winter tires:
.Use tires of the same brand and tread
type on all four wheel positions.
.Use only radial ply tires of the same size,
load range, and speed rating as the
original equipment tires.
Winter tires with the same speed rating as
the original equipment tires may not be
available for H, V, W, Y, and ZR speed rated
tires. If winter tires with a lower speed
rating are chosen, never exceed the tire's
maximum speed capability.
All-Terrain Tires
This vehicle may have all-terrain or
mud-terrain tires. These tires provide good
performance on most road surfaces, weather
conditions, and for off-road driving. See
Off-Road Driving 0211.
The tread pattern on these tires may wear
more unevenly than other tires. Consider
rotating the tires more frequently than at
12 000 km (7,500 mi) intervals if irregular
wear is noted when the tires are inspected.
See Tire Inspection 0348.
Page 347 of 433

Chevrolet Silverado 2500 HD/3500 HD Owner Manual (GMNA-Localizing-U.
S./Canada/Mexico-14632154) - 2021 - CRC - 11/20/20
346 Vehicle Care
A TPMS relearn tool can also be purchased.
See Tire Pressure Monitor Sensor Activation
Tool at www.gmtoolsandequipment.com or
call 1-800-GM TOOLS (1-800-468-6657).
There are two minutes to match the first
tire/wheel position, and five minutes overall
to match all four tire/wheel positions. If it
takes longer, the matching process stops
and must be restarted.
The TPMS sensor matching process is:1. Set the parking brake.
2. Turn the ignition on without starting the vehicle.
3. Uplevel DIC Only: Make sure the Tire Pressure info page option is turned on.
The info pages on the DIC can be turned
on and off through the Options menu.
See Driver Information Center (DIC) (Base
Level) 0119 or
Driver Information Center (DIC) (Midlevel
and Uplevel) 0120.
4. If the vehicle has an uplevel DIC, use the DIC controls on the right side of the
steering wheel to scroll to the Tire
Pressure screen under the DIC info page.
If the vehicle has a base level DIC, use
the trip odometer reset stem to scroll to
the Tire Pressure screen. 5. If the vehicle has an uplevel DIC, press
and hold the thumbwheel located in the
center of the DIC controls on the right
side of the steering wheel.
If the vehicle has a base level DIC, press
and hold the trip odometer reset stem
for about five seconds. A message asking
if the process should begin should
appear. Select yes and press the trip
odometer reset stem to confirm the
selection.
The horn sounds twice to signal the
receiver is in relearn mode and the TIRE
LEARNING ACTIVE message displays on
the DIC screen.
6. Start with the driver side front tire.
7. Place the relearn tool against the tire sidewall, near the valve stem. Then press
the button to activate the TPMS sensor.
A horn chirp confirms that the sensor
identification code has been matched to
this tire and wheel position.
8. Proceed to the passenger side front tire, and repeat the procedure in Step 7.
9. Proceed to the passenger side rear tire, and repeat the procedure in Step 7. 10. Proceed to the driver side rear tire, and
repeat the procedure in Step 7. The horn
sounds two times to indicate the sensor
identification code has been matched to
the driver side rear tire, and the TPMS
sensor matching process is no longer
active. The TIRE LEARNING ACTIVE
message on the DIC display screen
goes off.
11. Turn the vehicle off.
12. Set all four tires to the recommended air pressure level as indicated on the Tire
and Loading Information label.
Trailer Tire Pressure Monitoring
Operation
If equipped, the Trailer Tire Pressure
Monitoring System (TTPMS) is designed to
monitor the pressure of the trailer tires and
warn the driver when a low pressure
condition exists. TTPMS sensors for four tires
are provided. The system can accommodate
a trailer with up to six tires if additional
sensors are purchased from the dealer. Also,
the system can be paired with up to five
individual trailers.
Prior to use, the vehicle must learn the
sensors by following the learning process.
SeeTrailering App 0286.
Page 352 of 433
Chevrolet Silverado 2500 HD/3500 HD Owner Manual (GMNA-Localizing-U.
S./Canada/Mexico-14632154) - 2021 - CRC - 11/20/20
Vehicle Care 351
four digits of the DOT Tire Identification
Number (TIN) molded into one side of the
tire sidewall. The last four digits of the TIN
indicate the tire manufactured date. The
first two digits represent the week and the
last two digits, the year. For example, the
third week of the year 2020 would have a
4-digit DOT date of 0320. Week 01 is the
first full week (Sunday through Saturday) of
each year.
Vehicle Storage
Tires age when stored normally mounted on
a parked vehicle. Park a vehicle that will be
stored for at least a month in a cool, dry,
clean area away from direct sunlight to slow
aging. This area should be free of grease,
gasoline, or other substances that can
deteriorate rubber.
Parking for an extended period can cause
flat spots on the tires that may result in
vibrations while driving. When storing a
vehicle for at least a month, remove the
tires or raise the vehicle to reduce the
weight from the tires.
Buying New Tires
GM has developed and matched specific
tires for the vehicle. The original
equipment tires installed were designed
to meet General Motors Tire
Performance Criteria Specification (TPC
Spec) system rating. When replacement
tires are needed, GM strongly
recommends buying tires with the same
TPC Spec rating.
GM's exclusive TPC Spec system
considers over a dozen critical
specifications that impact the overall
performance of the vehicle, including
brake system performance, ride and
handling, traction control, and tire
pressure monitoring performance. GM's
TPC Spec number is molded onto the
tire's sidewall near the tire size. If the
tires have an all-season tread design,
the TPC Spec number will be followed
by MS for mud and snow. SeeTire
Sidewall Labeling 0338 for additional
information. GM recommends replacing worn tires in
complete sets of four (six for dual rear
wheels). Uniform tread depth on all
tires will help to maintain the
performance of the vehicle. Braking and
handling performance may be adversely
affected if all the tires are not replaced
at the same time. If proper rotation and
maintenance have been done, all four
tires (six for dual rear wheels) should
wear out at about the same time.
However, if it is necessary to replace
only one axle set of worn tires, place
the new tires on the rear axle (two for
single rear wheels, four for dual rear
wheels). See
Tire Rotation 0348.
{Warning
Tires could explode during improper
service. Attempting to mount or
dismount a tire could cause injury or
death. Only your dealer or authorized
tire service center should mount or
dismount the tires.