2021 ALFA ROMEO STELVIO steering
[x] Cancel search: steeringPage 176 of 280
SAFETY
174
(Continued)
compartment. The Side Air Bags may deploy
during angled or offset frontal collisions where
the front air bags deploy.
Side Air Bags are a supplement to the seat belt
restraint system. Side Air Bags deploy in less
time than it takes to blink your eyes.
NOTE:
Air bag covers may not be obvious in the inte-
rior trim, but they will open during air bag
deployment.
Rollover Events
Side Air Bags and seat belt pretensioners are
designed to activate in certain rollover events.
The Occupant Restraint Controller (ORC)
determines whether deployment in a partic -
ular rollover event is appropriate, based on the
severity and type of collision. Vehicle damage
by itself is not a good indicator of whether or
not Side Air Bags and seat belt pretensioners
should have deployed.
The Side Air Bags and seat belt pretensioners
will not deploy in all rollover events. The roll -
over sensing system determines if a rollover
event may be in progress and whether deploy -
ment is appropriate. In the event the vehicle
experiences a rollover or near rollover event, and deployment is appropriate, the rollover
sensing system will deploy the side air bags
and seat belt pretensioners on both sides of
the vehicle.
The SABICs may help reduce the risk of partial
or complete ejection of vehicle occupants
through side windows in certain rollover or
side impact events.
Air Bag System Components
NOTE:
The Occupant Restraint Controller (ORC) moni
-
tors the internal circuits and interconnecting
wiring associated with electrical Air Bag
System Components listed below:
Occupant Restraint Controller (ORC)
Air Bag Warning Light
Steering Wheel and Column
Instrument Panel
Knee Impact Bolsters
Driver and Front Passenger Air Bags
Seat Belt Buckle Switch
Supplemental Side Air Bags
Supplemental Knee Air Bags
Front and Side Impact Sensors
Seat Belt Pretensioners
Seat Track Position Sensors
WARNING!
Occupants, including children, who are up
against or very close to Side Air Bags can
be seriously injured or killed. Occupants,
including children, should never lean on or
sleep against the door, side windows, or
area where the side air bags inflate, even
if they are in an infant or child restraint.
Seat belts (and child restraints where appro -
priate) are necessary for your protection in
all collisions. They also help keep you in
position, away from an inflating Side Air Bag.
To get the best protection from the Side Air
Bags, occupants must wear their seat belts
properly and sit upright with their backs
against the seats. Children must be properly
restrained in a child restraint or booster seat
that is appropriate for the size of the child.
WARNING!
Side Air Bags need room to inflate. Do not
lean against the door or window. Sit
upright in the center of the seat.
Being too close to the Side Air Bags during
deployment could cause you to be
severely injured or killed.
Relying on the Side Air Bags alone could
lead to more severe injuries in a collision.
The Side Air Bags work with your seat belt
to restrain you properly. In some colli -
sions, Side Air Bags won’t deploy at all.
Always wear your seat belt even though
you have Side Air Bags.
WARNING! (Continued)
21_GU_OM_EN_USC_t.book Page 174
Page 177 of 280
175
If A Deployment Occurs
The front air bags are designed to deflate
immediately after deployment.
NOTE:
Front and/or side air bags will not deploy in all
collisions. This does not mean something is
wrong with the air bag system.
If you do have a collision which deploys the air
bags, any or all of the following may occur:
The air bag material may sometimes cause
abrasions and/or skin reddening to the
occupants as the air bags deploy and
unfold. The abrasions are similar to friction
rope burns or those you might get sliding
along a carpet or gymnasium floor. They are
not caused by contact with chemicals. They
are not permanent and normally heal
quickly. However, if you haven’t healed
significantly within a few days, or if you have
any blistering, see your doctor immediately.
As the air bags deflate, you may see some
smoke-like particles. The particles are a
normal by-product of the process that
generates the non-toxic gas used for air bag
inflation. These airborne particles may irri-
tate the skin, eyes, nose, or throat. If you
have skin or eye irritation, rinse the area
with cool water. For nose or throat irritation,
move to fresh air. If the irritation continues,
see your doctor. If these particles settle on
your clothing, follow the garment manufac -
turer’s instructions for cleaning. Do not drive your vehicle after the air bags
have deployed. If you are involved in another
collision, the air bags will not be in place to
protect you.
NOTE:
Air bag covers may not be obvious in the
interior trim, but they will open during air
bag deployment.
After any collision, the vehicle should be
taken to an authorized dealer immediately.
Enhanced Accident Response System
In the event of an impact, if the communica
-
tion network remains intact, and the power
remains intact, depending on the nature of the
event, the Occupant Restraint Controller (ORC)
will determine whether to have the Enhanced
Accident Response System perform the
following functions:
Cut off fuel to the engine (if equipped)
Cut off battery power to the electric motor (if
equipped)
Flash hazard lights as long as the battery
has power
Turn on the interior lights, which remain on
as long as the battery has power or for
15 minutes from the intervention of the
Enhanced Accident Response System
Unlock the power door locks
Your vehicle may also be designed to perform
any of these other functions in response to the
Enhanced Accident Response System:
Turn off the Fuel Filter Heater, Turn off the
HVAC Blower Motor, Close the HVAC Circula -
tion Door
Cut off battery power to the:
• Engine
• Electric Motor (if equipped)
• Electric power steering
• Brake booster
• Electric park brake
• Automatic transmission gear selector
• Horn
• Front wiper
• Headlamp washer pump
WARNING!
Deployed air bags and seat belt
pretensioners cannot protect you in another
collision. Have the air bags, seat belt
pretensioners, and the seat belt retractor
assemblies replaced by an authorized
dealer immediately. Also, have the
Occupant Restraint Controller System
serviced as well.
21_GU_OM_EN_USC_t.book Page 175
Page 179 of 280
177
(Continued)
(Continued)
If a reset procedure step is not completed within 60 seconds, then the turn signal lights will blink and the reset procedure must be performed again
in order to be successful.
Maintaining Your Air Bag System
9. Turn left turn signal switch ON. Right turn light is ON SOLID.
Left turn light is ON SOLID.
10. Turn left turn signal switch OFF. (Turn Signal Switch Must
be placed in Neutral State). Right turn light is OFF.
Left turn light is OFF.
11. Turn ignition OFF.
12. Turn ignition ACC. (Entire sequence needs to be completed
within one minute or sequence will need to be repeated). System is now reset and the engine may be started.
Turn hazard flashers OFF (Manually).
Customer Action
NOTE:
Each step MUST BE held for at least two secondsCustomer Will See
WARNING!
Modifications to any part of the air bag
system could cause it to fail when you
need it. You could be injured if the air bag
system is not there to protect you. Do not
modify the components or wiring,
including adding any kind of badges or
stickers to the steering wheel hub trim
cover or the upper passenger side of the
instrument panel. Do not modify the front
fascia/bumper, vehicle body structure, or
add aftermarket side steps or running
boards.
It is dangerous to try to repair any part of
the air bag system yourself. Be sure to tell
anyone who works on your vehicle that it
has an air bag system.
WARNING! (Continued)
Do not attempt to modify any part of your
air bag system. The air bag may inflate
accidentally or may not function properly if
modifications are made. Take your vehicle
to an authorized dealer for any air bag
system service. If your seat, including your
trim cover and cushion, needs to be
serviced in any way (including removal or
loosening/tightening of seat attachment
bolts), take the vehicle to an authorized
dealer. Only manufacturer approved seat
accessories may be used. If it is necessary
to modify the air bag system for persons
with disabilities, contact an authorized
dealer.
WARNING! (Continued)
21_GU_OM_EN_USC_t.book Page 177
Page 203 of 280
201
11. Apply the adhesive label from the sealantbottle where it can be easily seen by the
driver as a reminder that the tire has been
treated with a Tire Service Kit, as well as
not to exceed the speed restriction for the
treated tire.
NOTE:
Only use original sealant cartridges, which can
be purchased at an authorized dealer.
Checking And Restoring Tire Pressure
The compressor can also be used to check
and, if necessary, restore the tire pressure.
Proceed as follows:
1. Make sure that the power switch is in the
O (off) position.
2. Connect the hose directly to the valve on the tire to be inflated.
3. Insert the plug into the socket in the passenger compartment or in the cargo
area and start the engine.
4. Start the compressor by putting the power switch to I (on). As soon as the correct
pressure is reached, put the power switch
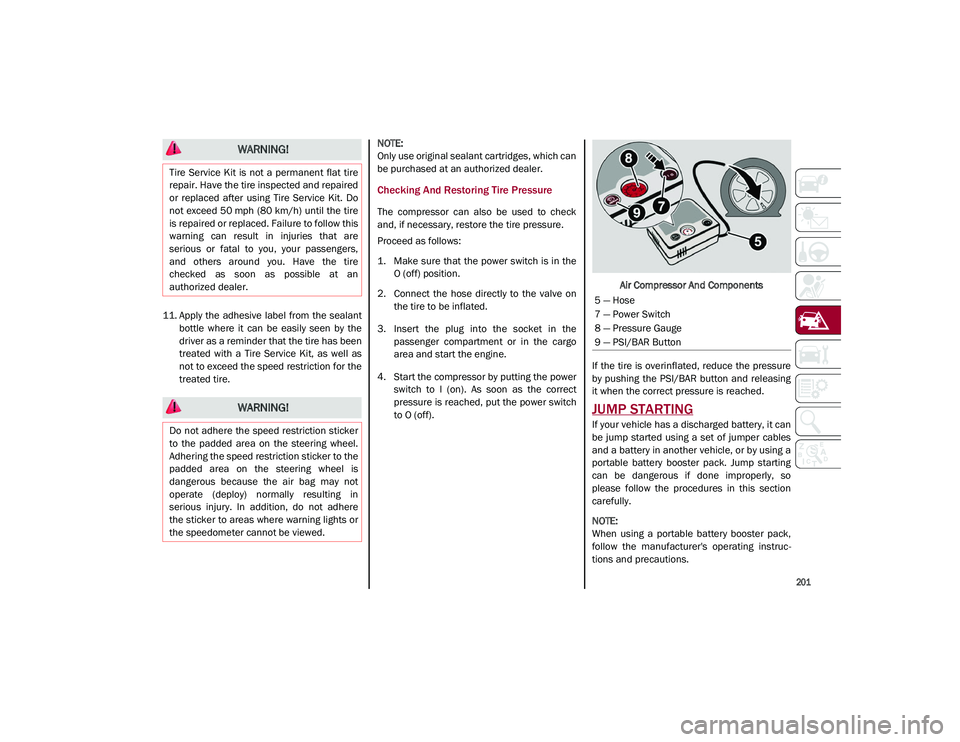
to O (off). Air Compressor And Components
If the tire is overinflated, reduce the pressure
by pushing the PSI/BAR button and releasing
it when the correct pressure is reached.
JUMP STARTING
If your vehicle has a discharged battery, it can
be jump started using a set of jumper cables
and a battery in another vehicle, or by using a
portable battery booster pack. Jump starting
can be dangerous if done improperly, so
please follow the procedures in this section
carefully.
NOTE:
When using a portable battery booster pack,
follow the manufacturer's operating instruc -
tions and precautions.
WARNING!
Tire Service Kit is not a permanent flat tire
repair. Have the tire inspected and repaired
or replaced after using Tire Service Kit. Do
not exceed 50 mph (80 km/h) until the tire
is repaired or replaced. Failure to follow this
warning can result in injuries that are
serious or fatal to you, your passengers,
and others around you. Have the tire
checked as soon as possible at an
authorized dealer.
WARNING!
Do not adhere the speed restriction sticker
to the padded area on the steering wheel.
Adhering the speed restriction sticker to the
padded area on the steering wheel is
dangerous because the air bag may not
operate (deploy) normally resulting in
serious injury. In addition, do not adhere
the sticker to areas where warning lights or
the speedometer cannot be viewed.
5 — Hose
7 — Power Switch
8 — Pressure Gauge
9 — PSI/BAR Button
21_GU_OM_EN_USC_t.book Page 201
Page 219 of 280
217
Washer Fluid For Windshield/Headlights
The windshield and headlight (if equipped)
washer fluid reservoir is equipped with a tele-
scopic filler neck.
If the level is too low, remove reservoir cap and
lift the filler neck. Then, add the fluid
described
Ú
page 263. After filling the reser -
voir, lower the filler neck and install the reser -
voir cap until you hear it click.
NOTE:
The headlight washers are activated every 10
activations of the windshield washer.
note:
The headlight washing system will not work if
the liquid level is low (situation indicated by
the symbol on the instrument cluster display
Ú
page 69). The windshield washer will keep
working.
On vehicles equipped with headlight washers,
there is a reference notch on the dipstick:
ONLY the windshield/rear window washer
operates with the level below this reference.
Brake Fluid
Check that the fluid is at the maximum level. If
the fluid level in the tank is low, contact an
authorized dealer to have the system checked.
Automatic Transmission Activation System
Oil
The transmission control oil level should only
be checked at an authorized dealer.
Useful Advice For Extending The Life Of
Your Battery
To avoid draining your battery and make it last
longer, observe the following instructions:
When you park the vehicle, ensure that the
doors and liftgate are closed properly to
prevent any lights from remaining on inside
the passenger's compartment.
Do not keep accessories (e.g. radio, hazard
warning lights, etc.) switched on for a long
time when the engine is not running.
Before performing any operation on the
electrical system, disconnect the negative
battery cable.
If you wish to install electrical accessories
after purchasing the vehicle that require
permanent electrical supply (e.g. alarm, etc.),
or accessories which influence the electrical
supply requirements, contact an authorized
dealer, who’s qualified staff will evaluate the
overall electrical consumption.
NOTE:
After the battery is disconnected, the steering
must be initialized. The warning light on the
instrument cluster display switches on to indi
-
cate this. To carry out this procedure, simply
turn the steering wheel all the way from one
end to the other, and then turn it back to the
central position.Battery
The battery does not require the electrolyte to
be topped up with distilled water. A periodic
check carried out at an authorized dealer,
however, is necessary to check efficiency.
Follow the battery manufacturer's instructions
for maintenance.
CAUTION!
If the charge level remains under 50% for a
long time, the battery may be damaged by
sulfation, reducing its capacity and
efficiency during the vehicle start. The
battery is also more prone to the risk of
freezing (at temperatures as high as 14°F
(-10°C).
21_GU_OM_EN_USC_t.book Page 217
Page 228 of 280
SERVICING AND MAINTENANCE
226
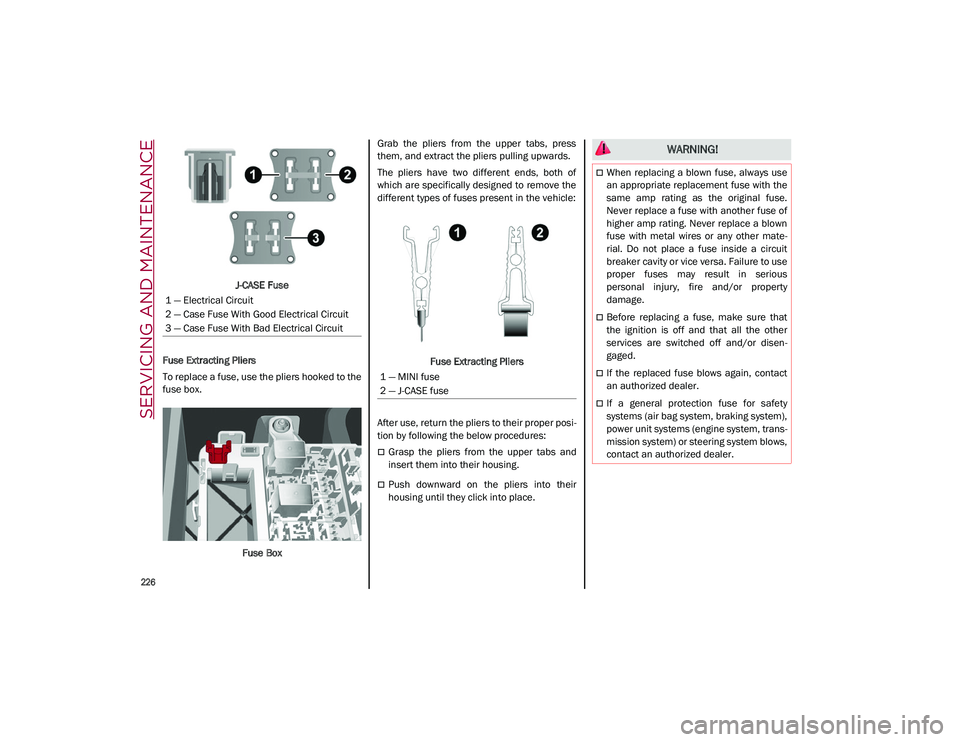
J-CASE Fuse
Fuse Extracting Pliers
To replace a fuse, use the pliers hooked to the
fuse box.
Fuse Box Grab the pliers from the upper tabs, press
them, and extract the pliers pulling upwards.
The pliers have two different ends, both of
which are specifically designed to remove the
different types of fuses present in the vehicle:
Fuse Extracting Pliers
After use, return the pliers to their proper posi -
tion by following the below procedures:
Grasp the pliers from the upper tabs and
insert them into their housing.
Push downward on the pliers into their
housing until they click into place.
1 — Electrical Circuit
2 — Case Fuse With Good Electrical Circuit
3 — Case Fuse With Bad Electrical Circuit
1 — MINI fuse
2 — J-CASE fuse
WARNING!
When replacing a blown fuse, always use
an appropriate replacement fuse with the
same amp rating as the original fuse.
Never replace a fuse with another fuse of
higher amp rating. Never replace a blown
fuse with metal wires or any other mate
-
rial. Do not place a fuse inside a circuit
breaker cavity or vice versa. Failure to use
proper fuses may result in serious
personal injury, fire and/or property
damage.
Before replacing a fuse, make sure that
the ignition is off and that all the other
services are switched off and/or disen -
gaged.
If the replaced fuse blows again, contact
an authorized dealer.
If a general protection fuse for safety
systems (air bag system, braking system),
power unit systems (engine system, trans -
mission system) or steering system blows,
contact an authorized dealer.
21_GU_OM_EN_USC_t.book Page 226
Page 241 of 280
239
(Continued)
(Conti n
ued)
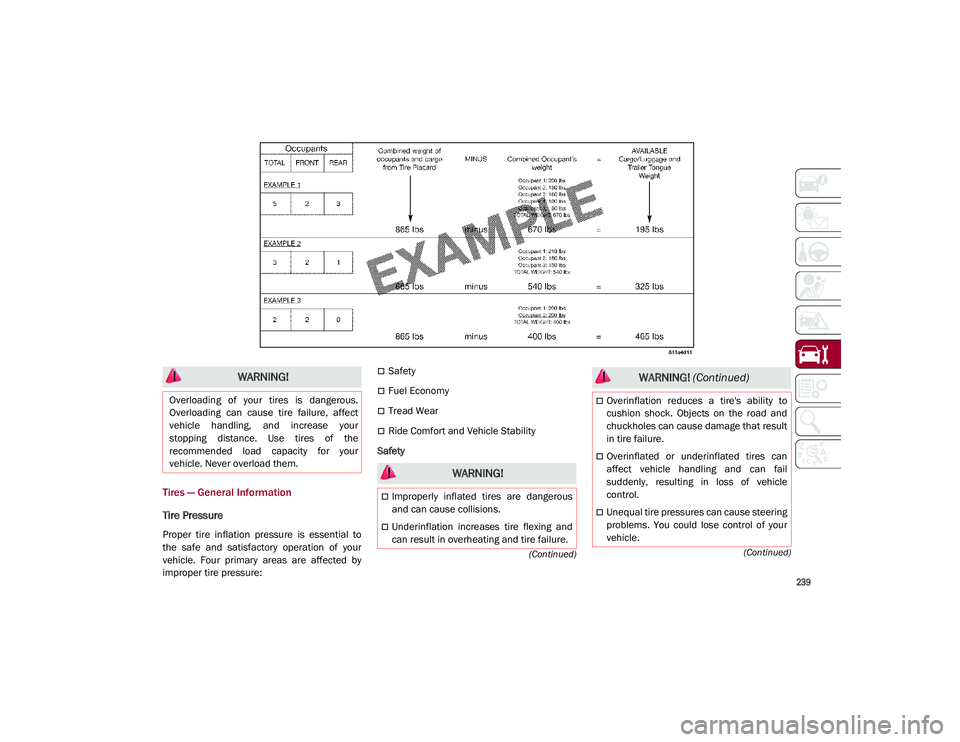
Tires — General Information
Tire Pressure
Proper tire inflation pressure is essential to
the safe and satisfactory operation of your
vehicle. Four primary areas are affected by
improper tire pressure:
Safety
Fuel Economy
Tread Wear
Ride Comfort and Vehicle Stability
Safety
WARNING!
Overloading of your tires is dangerous.
Overloading can cause tire failure, affect
vehicle handling, and increase your
stopping distance. Use tires of the
recommended load capacity for your
vehicle. Never overload them.
WARNING!
Improperly inflated tires are dangerous
and can cause collisions.
Underinflation increases tire flexing and
can result in overheating and tire failure.
Overinflation reduces a tire's ability to
cushion shock. Objects on the road and
chuckholes can cause damage that result
in tire failure.
Overinflated or underinflated tires can
affect vehicle handling and can fail
suddenly, resulting in loss of vehicle
control.
Unequal tire pressures can cause steering
problems. You could lose control of your
vehicle.
WARNING! (Continued)
21_GU_OM_EN_USC_t.book Page 239
Page 242 of 280
SERVICING AND MAINTENANCE
240
Both underinflation and overinflation affect
the stability of the vehicle and can produce a
feeling of sluggish response or over respon-
siveness in the steering.
NOTE:
Unequal tire pressures from side to side
may cause erratic and unpredictable
steering response.
Unequal tire pressure from side to side may
cause the vehicle to drift left or right.
Fuel Economy
Underinflated tires will increase tire rolling
resistance resulting in higher fuel consump -
tion.
Tread Wear
Improper cold tire inflation pressures can
cause abnormal wear patterns and reduced
tread life, resulting in the need for earlier tire
replacement. Ride Comfort And Vehicle Stability
Proper tire inflation contributes to a comfort
-
able ride. Overinflation produces a jarring and
uncomfortable ride.
Tire Inflation Pressures
The proper cold tire inflation pressure is listed
on the driver's side B-pillar or rear edge of the
driver's side door.
At least once a month:
Check and adjust tire pressure with a good
quality pocket-type pressure gauge. Do not
make a visual judgement when determining
proper inflation. Tires may look properly
inflated even when they are underinflated.
Inspect tires for signs of tire wear or visible
damage.
Inflation pressures specified on the placard
are always “cold tire inflation pressure”. Cold
tire inflation pressure is defined as the tire
pressure after the vehicle has not been driven
for at least three hours, or driven less than
1 mile (1.6 km) after sitting for a minimum of
three hours. The cold tire inflation pressure must not exceed the maximum inflation pres
-
sure molded into the tire sidewall.
Check tire pressures more often if subject to a
wide range of outdoor temperatures, as tire
pressures vary with temperature changes.
Tire pressures change by approximately 1 psi
(7 kPa) per 12°F (7°C) of air temperature
change. Keep this in mind when checking tire
pressure inside a garage, especially in the
Winter.
Example: If garage temperature = 68°F
(20°C) and the outside temperature = 32°F
(0°C) then the cold tire inflation pressure
should be increased by 3 psi (21 kPa), which
equals 1 psi (7 kPa) for every 12°F (7°C) for
this outside temperature condition.
Tire pressure may increase from 2 to 6 psi
(13 to 40 kPa) during operation. DO NOT
reduce this normal pressure build up or your
tire pressure will be too low.
Tire Pressures For High Speed Operation
The manufacturer advocates driving at safe
speeds and within posted speed limits. Where
speed limits or conditions are such that the
vehicle can be driven at high speeds, main -
taining correct tire inflation pressure is very
important. Increased tire pressure and
reduced vehicle loading may be required for
high-speed vehicle operation. Refer to an
authorized tire dealer or original equipment
vehicle dealer for recommended safe oper -
ating speeds, loading and cold tire inflation
pressures.
Unequal tire pressures from one side of
the vehicle to the other can cause the
vehicle to drift to the right or left.
Always drive with each tire inflated to the
recommended cold tire inflation pressure.
WARNING! (Continued)
CAUTION!
After inspecting or adjusting the tire
pressure, always reinstall the valve stem
cap. This will prevent moisture and dirt from
entering the valve stem, which could
damage the valve stem.
21_GU_OM_EN_USC_t.book Page 240