2021 ALFA ROMEO STELVIO lights
[x] Cancel search: lightsPage 219 of 280
217
Washer Fluid For Windshield/Headlights
The windshield and headlight (if equipped)
washer fluid reservoir is equipped with a tele-
scopic filler neck.
If the level is too low, remove reservoir cap and
lift the filler neck. Then, add the fluid
described
Ú
page 263. After filling the reser -
voir, lower the filler neck and install the reser -
voir cap until you hear it click.
NOTE:
The headlight washers are activated every 10
activations of the windshield washer.
note:
The headlight washing system will not work if
the liquid level is low (situation indicated by
the symbol on the instrument cluster display
Ú
page 69). The windshield washer will keep
working.
On vehicles equipped with headlight washers,
there is a reference notch on the dipstick:
ONLY the windshield/rear window washer
operates with the level below this reference.
Brake Fluid
Check that the fluid is at the maximum level. If
the fluid level in the tank is low, contact an
authorized dealer to have the system checked.
Automatic Transmission Activation System
Oil
The transmission control oil level should only
be checked at an authorized dealer.
Useful Advice For Extending The Life Of
Your Battery
To avoid draining your battery and make it last
longer, observe the following instructions:
When you park the vehicle, ensure that the
doors and liftgate are closed properly to
prevent any lights from remaining on inside
the passenger's compartment.
Do not keep accessories (e.g. radio, hazard
warning lights, etc.) switched on for a long
time when the engine is not running.
Before performing any operation on the
electrical system, disconnect the negative
battery cable.
If you wish to install electrical accessories
after purchasing the vehicle that require
permanent electrical supply (e.g. alarm, etc.),
or accessories which influence the electrical
supply requirements, contact an authorized
dealer, who’s qualified staff will evaluate the
overall electrical consumption.
NOTE:
After the battery is disconnected, the steering
must be initialized. The warning light on the
instrument cluster display switches on to indi
-
cate this. To carry out this procedure, simply
turn the steering wheel all the way from one
end to the other, and then turn it back to the
central position.Battery
The battery does not require the electrolyte to
be topped up with distilled water. A periodic
check carried out at an authorized dealer,
however, is necessary to check efficiency.
Follow the battery manufacturer's instructions
for maintenance.
CAUTION!
If the charge level remains under 50% for a
long time, the battery may be damaged by
sulfation, reducing its capacity and
efficiency during the vehicle start. The
battery is also more prone to the risk of
freezing (at temperatures as high as 14°F
(-10°C).
21_GU_OM_EN_USC_t.book Page 217
Page 231 of 280
229
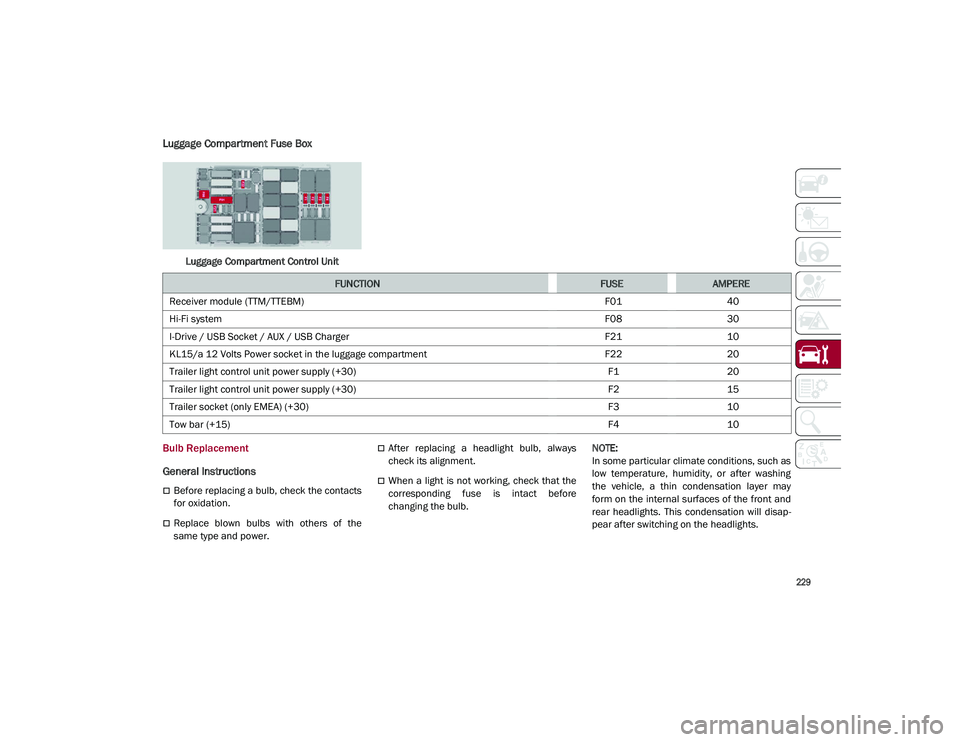
Luggage Compartment Fuse Box
Luggage Compartment Control Unit
Bulb Replacement
General Instructions
Before replacing a bulb, check the contacts
for oxidation.
Replace blown bulbs with others of the
same type and power.
After replacing a headlight bulb, always
check its alignment.
When a light is not working, check that the
corresponding fuse is intact before
changing the bulb.
NOTE:
In some particular climate conditions, such as
low temperature, humidity, or after washing
the vehicle, a thin condensation layer may
form on the internal surfaces of the front and
rear headlights. This condensation will disap
-
pear after switching on the headlights.
FUNCTIONFUSEAMPERE
Receiver module (TTM/TTEBM) F0140
Hi-Fi system F0830
I-Drive / USB Socket / AUX / USB Charger F2110
KL15/a 12 Volts Power socket in the luggage compartment F2220
Trailer light control unit power supply (+30) F120
Trailer light control unit power supply (+30) F215
Trailer socket (only EMEA) (+30) F310
Tow bar (+15) F410
21_GU_OM_EN_USC_t.book Page 229
Page 232 of 280
SERVICING AND MAINTENANCE
230
Types Of Bulbs
Replacement Bulbs
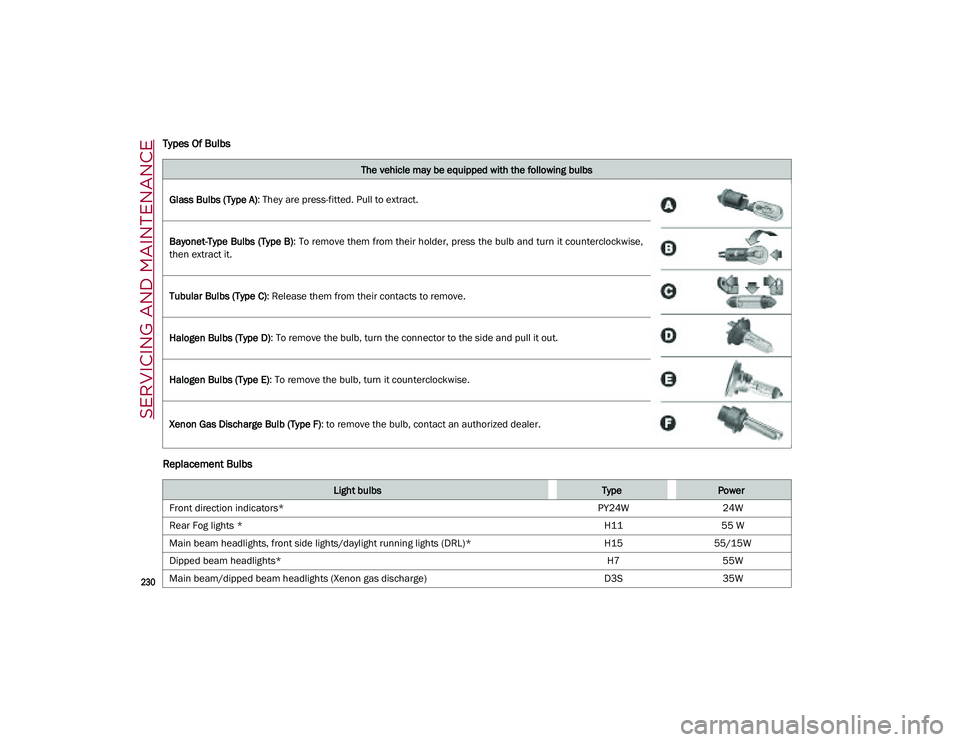
The vehicle may be equipped with the following bulbs
Glass Bulbs (Type A) : They are press-fitted. Pull to extract.
Bayonet-Type Bulbs (Type B) : To remove them from their holder, press the bulb and turn it counterclockwise,
then extract it.
Tubular Bulbs (Type C) : Release them from their contacts to remove.
Halogen Bulbs (Type D) : To remove the bulb, turn the connector to the side and pull it out.
Halogen Bulbs (Type E) : To remove the bulb, turn it counterclockwise.
Xenon Gas Discharge Bulb (Type F) : to remove the bulb, contact an authorized dealer.
Light bulbsTypePower
Front direction indicators* PY24W24W
Rear Fog lights * H1155 W
Main beam headlights, front side lights/daylight running lights (DRL)* H1555/15W
Dipped beam headlights* H755W
Main beam/dipped beam headlights (Xenon gas discharge) D3S35W
21_GU_OM_EN_USC_t.book Page 230
Page 233 of 280
231
*Only for basic version headlight with halogen main beam/dipped beam headlights
Replacing Exterior Bulbs
NOTE:
Only replace bulbs when the engine is off. Also
ensure that the engine is cold, to prevent the
risk of burns.
Front Light Cluster
Direction Indicators
Proceed with the directions below to change
bulbs:
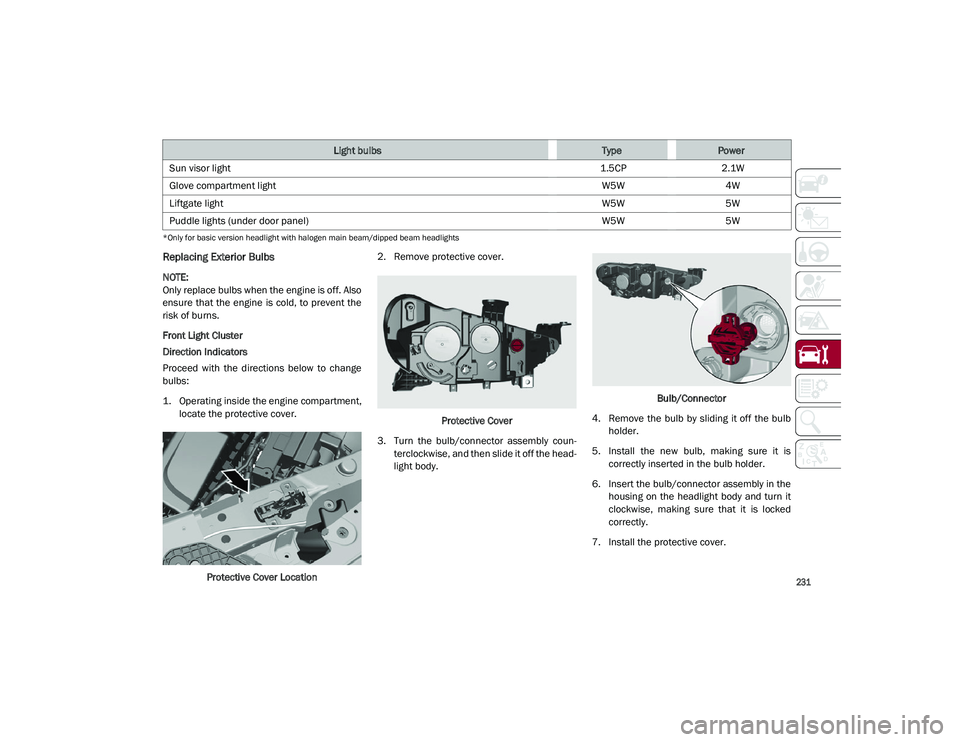
1. Operating inside the engine compartment,locate the protective cover.
Protective Cover Location 2. Remove protective cover.
Protective Cover
3. Turn the bulb/connector assembly coun -
terclockwise, and then slide it off the head -
light body. Bulb/Connector
4. Remove the bulb by sliding it off the bulb holder.
5. Install the new bulb, making sure it is correctly inserted in the bulb holder.
6. Insert the bulb/connector assembly in the housing on the headlight body and turn it
clockwise, making sure that it is locked
correctly.
7. Install the protective cover.
Sun visor light
1.5CP2.1W
Glove compartment light W5W4W
Liftgate light W5W5W
Puddle lights (under door panel) W5W5W
Light bulbsTypePower
21_GU_OM_EN_USC_t.book Page 231
Page 234 of 280
SERVICING AND MAINTENANCE
232
Front Light Cluster With Main Beam Xenon
Gas Discharge Headlights
To replace the bulbs of the main beam head-
lights, contact an authorized dealer.
Replacing Interior Bulbs
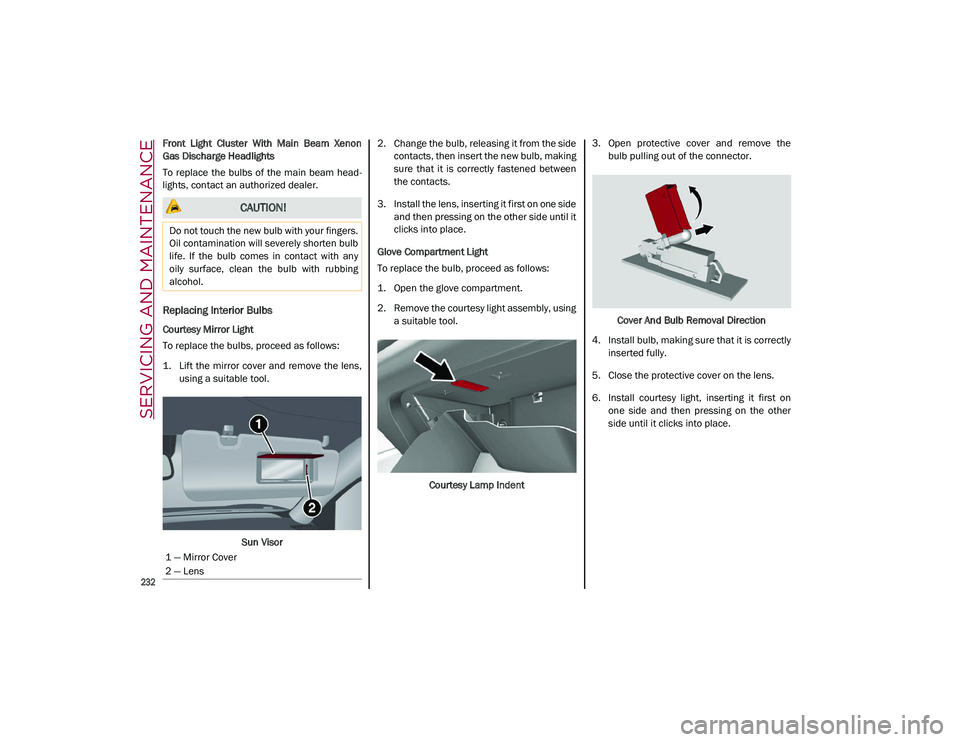
Courtesy Mirror Light
To replace the bulbs, proceed as follows:
1. Lift the mirror cover and remove the lens, using a suitable tool.
Sun Visor 2. Change the bulb, releasing it from the side
contacts, then insert the new bulb, making
sure that it is correctly fastened between
the contacts.
3. Install the lens, inserting it first on one side and then pressing on the other side until it
clicks into place.
Glove Compartment Light
To replace the bulb, proceed as follows:
1. Open the glove compartment.
2. Remove the courtesy light assembly, using a suitable tool.
Courtesy Lamp Indent 3. Open protective cover and remove the
bulb pulling out of the connector.
Cover And Bulb Removal Direction
4. Install bulb, making sure that it is correctly inserted fully.
5. Close the protective cover on the lens.
6. Install courtesy light, inserting it first on one side and then pressing on the other
side until it clicks into place.
CAUTION!
Do not touch the new bulb with your fingers.
Oil contamination will severely shorten bulb
life. If the bulb comes in contact with any
oily surface, clean the bulb with rubbing
alcohol.
1 — Mirror Cover
2 — Lens
21_GU_OM_EN_USC_t.book Page 232
Page 235 of 280
233
Luggage Compartment Courtesy Lights
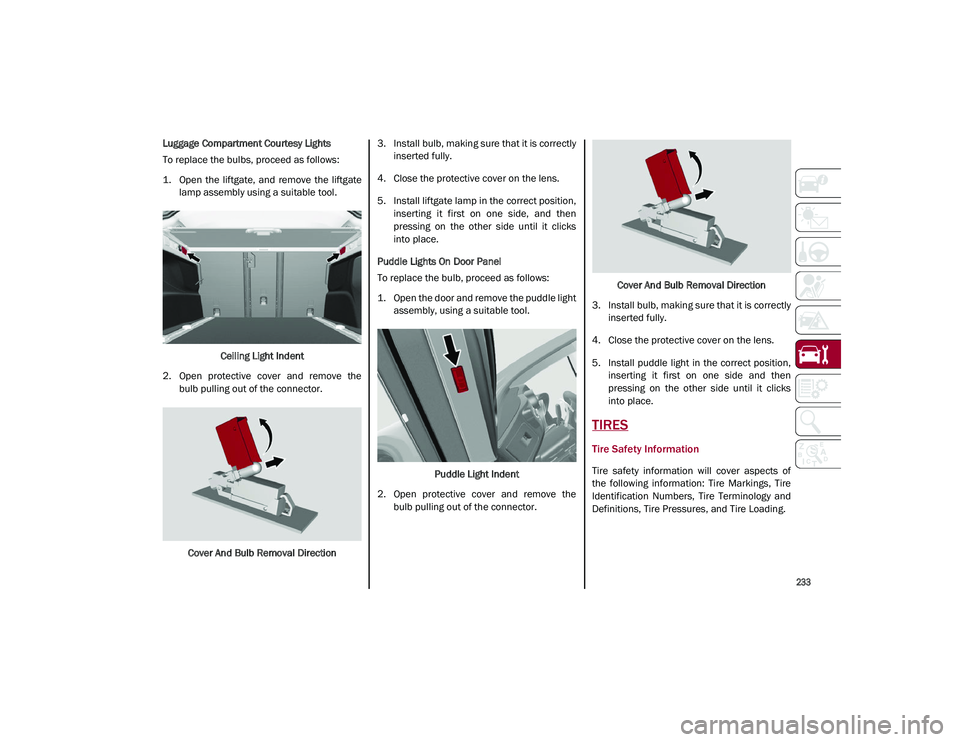
To replace the bulbs, proceed as follows:
1. Open the liftgate, and remove the liftgatelamp assembly using a suitable tool.
Ceiling Light Indent
2. Open protective cover and remove the bulb pulling out of the connector.
Cover And Bulb Removal Direction 3. Install bulb, making sure that it is correctly
inserted fully.
4. Close the protective cover on the lens.
5. Install liftgate lamp in the correct position, inserting it first on one side, and then
pressing on the other side until it clicks
into place.
Puddle Lights On Door Panel
To replace the bulb, proceed as follows:
1. Open the door and remove the puddle light assembly, using a suitable tool.
Puddle Light Indent
2. Open protective cover and remove the bulb pulling out of the connector. Cover And Bulb Removal Direction
3. Install bulb, making sure that it is correctly inserted fully.
4. Close the protective cover on the lens.
5. Install puddle light in the correct position, inserting it first on one side and then
pressing on the other side until it clicks
into place.
TIRES
Tire Safety Information
Tire safety information will cover aspects of
the following information: Tire Markings, Tire
Identification Numbers, Tire Terminology and
Definitions, Tire Pressures, and Tire Loading.
21_GU_OM_EN_USC_t.book Page 233
Page 252 of 280
SERVICING AND MAINTENANCE
250
Use of “open” boxed sections to prevent
condensation and pockets of moisture
which could favor the formation of rust
inside.
Use of special films to protect against abra-
sion in exposed areas (e.g. rear wing, doors,
etc.).
Corrosion Warranty
Your vehicle is covered by Corrosion Warranty
against perforation due to rust of any original
element of the structure or bodywork. For the
general terms of this warranty, refer to the
Warranty Booklet.
Preserving The Bodywork
Paint
Touch up abrasions and scratches immedi -
ately to prevent the formation of rust.
Maintenance of paintwork consists of washing
the vehicle: the frequency depends on the
conditions and environment where the vehicle
is used. For example, it is advisable to wash
the vehicle more often in areas with high levels
of atmospheric pollution or salted roads.
Some parts of the vehicle may be covered with
a matte paint which, in order to be maintained
intact, requires special care.
To correctly wash the vehicle, follow these
instructions:
If high pressure jets or cleaners are used to
wash the vehicle, keep a distance of at least 15 inches (40 cm) from the bodywork to
avoid damage or alteration. Build up of
water could cause damage to the vehicle in
the long term.
To make it easier to remove any dirt
deposits in the area where the blades are
normally located it is recommended to posi
-
tion the windshield wipers vertically (service
position)
Ú
page 219.
Wash the bodywork using a low pressure jet
of water if possible.
Wipe a sponge with a slightly soapy solution
over the bodywork, frequently rinsing the
sponge.
Rinse well with water and dry with a leather
chamois.
Dry the less visible parts (e.g. door frames,
hood, headlight frames, etc.) with special care,
as water may stagnate more easily in these
areas. Do not wash the vehicle after it has
been left in the sun or with the hood hot: this
may alter the shine of the paintwork.
NOTE:
Avoid parking under trees; the resin dropped
by trees makes the paintwork go opaque and
increases the possibility of corrosion.
Exterior plastic parts must be cleaned in the
same way as the rest of the vehicle. If washing the vehicle in a service that moves
the vehicle, for vehicles with automatic trans
-
missions, proceed with the following direc -
tions:
Ensure that the vehicle is on a flat surface.
Disable the automatic engagement of the
parking brake
Ú
page 90.
With the vehicle stationary, the gear in
NEUTRAL (N) and the brake pedal pressed,
push the START button.
NOTE:
The vehicle will remain in NEUTRAL (N) for
15 minutes before PARK (P) will be engaged
automatically.
Windows
Use specific detergents and clean cloths to
prevent scratching or altering the transpar -
ency.
Front Headlights
Use a soft cloth soaked in water and detergent
for washing vehicles.
CAUTION!
Wipe the rear window inside gently with a
cloth following the direction of the filaments
to avoid damaging the heating device.
21_GU_OM_EN_USC_t.book Page 250
Page 253 of 280
251
NOTE:
Never use aromatic substances (e.g. gaso-
line) or ketones (e.g. acetone) for cleaning
the plastic lenses of the headlights.
When cleaning with a pressure washer,
keep the pressure washer at least eight
inches (20 cm) away from the headlights.
Engine Compartment
At the end of every Winter, wash the engine
compartment thoroughly, taking care not to
aim the jet of water directly at the electronic
control units or at the windshield wiper
motors. Have this operation performed at a
specialized workshop
Ú
page 218.
NOTE:
The washing should take place with the engine
cold and the ignition device in the STOP posi -
tion. After the washing operation, make sure
that the various protections (e.g. rubber caps
and guards) have not been removed or
damaged.
INTERIORS
Periodically check the cleanliness of the inte -
rior, beneath the mats, which could cause
oxidation of the sheet metal.
Seats And Fabric Parts
Remove dust with a soft brush or a vacuum
cleaner. It is advised to use a moist brush on
velvet upholstery. Rub the seats with a sponge
moistened with a solution of water and neutral
detergent. Cleaning heat press images on seats — if
equipped:
Due to the color, opacity and wear-resistant
protection with which the heat press images
on some seats are made, they may be subject
to temporary scratching if they are touched by
finger nails, keys, or other hard objects. In
such cases, the visible signs do not impair the
profiled images, and can easily be removed by
wiping the affected area with a microfiber
cloth moistened with water (not dry) to restore
the seat to its original condition. The micro
-
fiber cloth must not have been previously
soaked in other substances or detergents.
Leather Seats
Remove the dry dirt with a chamois or slightly
damp cloth, without exerting too much pres -
sure.
Remove any liquid or grease stains using an
absorbent dry cloth, without rubbing. Then
clean with a soft cloth or buckskin cloth damp -
ened with water and mild soap. If the stain
persists, use specific products and observe
the instructions carefully.
NOTE:
Never use alcohol. Make sure that the
cleaning products used contain no alcohol or
alcohol derivatives, even in small quantities.
Plastic And Coated Parts
Clean interior plastic parts with a damp cloth (if
possible made from microfiber), and a solution
of water and neutral, non-abrasive detergent. To clean oily or persistent stains, use specific
products free from solvents and designed to
maintain the original appearance and color of
the components.
Remove any dust using a microfiber cloth, if
necessary moistened with water. The use of
paper tissues is not recommended as these
may leave residues.
Alcantara Parts — If Equipped
Alcantara parts maintenance procedure:
Treat the surface with a microfiber cloth
moistened with mild marseille soap and
water, taking care to apply a uniform light
pressure over the entire area (do not rub
vigorously).
Rinse and wring out the microfiber cloth,
and pass it over the entire area again.
Let it dry, and then brush gently with a soft
brush.
Genuine Leather Parts
Use only water and mild soap to clean these
parts. Never use alcohol or alcohol-based
products.
CAUTION!
Precautions have been taken to safeguard
all parts and connections however, the
pressures generated by these machines is
such that complete protection against
water ingress cannot be guaranteed.
21_GU_OM_EN_USC_t.book Page 251