2021 ALFA ROMEO STELVIO low beam
[x] Cancel search: low beamPage 192 of 280
SAFETY
190
(Continued)
(Continued)
Periodic Safety Checks You Should Make
Outside The Vehicle
Tires
Examine tires for excessive tread wear and
uneven wear patterns. Check for stones, nails,
glass, or other objects lodged in the tread or
sidewall. Inspect the tread for cuts and cracks.
Inspect sidewalls for cuts, cracks, and bulges.
Check the wheel nuts for tightness. Check the
tires (including spare) for proper cold inflation
pressure.
Lights
Have someone observe the operation of brake
lights and exterior lights while you work the controls. Check turn signal and high beam
indicator lights on the instrument panel.
Door Latches
Check for proper closing, latching, and locking.
Fluid Leaks
Check area under the vehicle after overnight
parking for fuel, coolant, oil, or other fluid
leaks. Also, if gasoline fumes are detected or if
fuel, or brake fluid leaks are suspected, the
cause should be located and corrected imme
-
diately.
Exhaust Gas
ONLY use the driver’s side floor mat on the
driver’s side floor area. To check for inter -
ference, with the vehicle properly parked
with the engine off, fully depress the
accelerator, the brake, and the clutch
pedal (if present) to check for interfer -
ence. If your floor mat interferes with the
operation of any pedal, or is not secure to
the floor, remove the floor mat from the
vehicle and place the floor mat in your
trunk.
ONLY use the passenger’s side floor mat
on the passenger’s side floor area.
ALWAYS make sure objects cannot fall or
slide into the driver’s side floor area when
the vehicle is moving. Objects can become
trapped under accelerator, brake, or
clutch pedals and could cause a loss of
vehicle control.
NEVER place any objects under the floor
mat (e.g., towels, keys, etc.). These
objects could change the position of the
floor mat and may cause interference with
the accelerator, brake, or clutch pedals.
WARNING! (Continued)
If the vehicle carpet has been removed
and re-installed, always properly attach
carpet to the floor and check the floor mat
fasteners are secure to the vehicle carpet.
Fully depress each pedal to check for
interference with the accelerator, brake,
or clutch pedals then re-install the floor
mats.
It is recommended to only use mild soap
and water to clean your floor mats. After
cleaning, always check your floor mat has
been properly installed and is secured to
your vehicle using the floor mat fasteners
by lightly pulling mat.
WARNING! (Continued)
WARNING!
Exhaust gases can injure or kill. They
contain carbon monoxide (CO), which is
colorless and odorless. Breathing it can
make you unconscious and can eventually
poison you. To avoid breathing (CO), follow
these safety tips:
Do not run the engine in a closed garage
or in confined areas any longer than
needed to move your vehicle in or out of
the area.
If you are required to drive with the trunk/lift -
gate/rear doors open, make sure that all
windows are closed and the climate control
BLOWER switch is set at high speed. DO NOT
use the recirculation mode.
21_GU_OM_EN_USC_t.book Page 190
Page 232 of 280
SERVICING AND MAINTENANCE
230
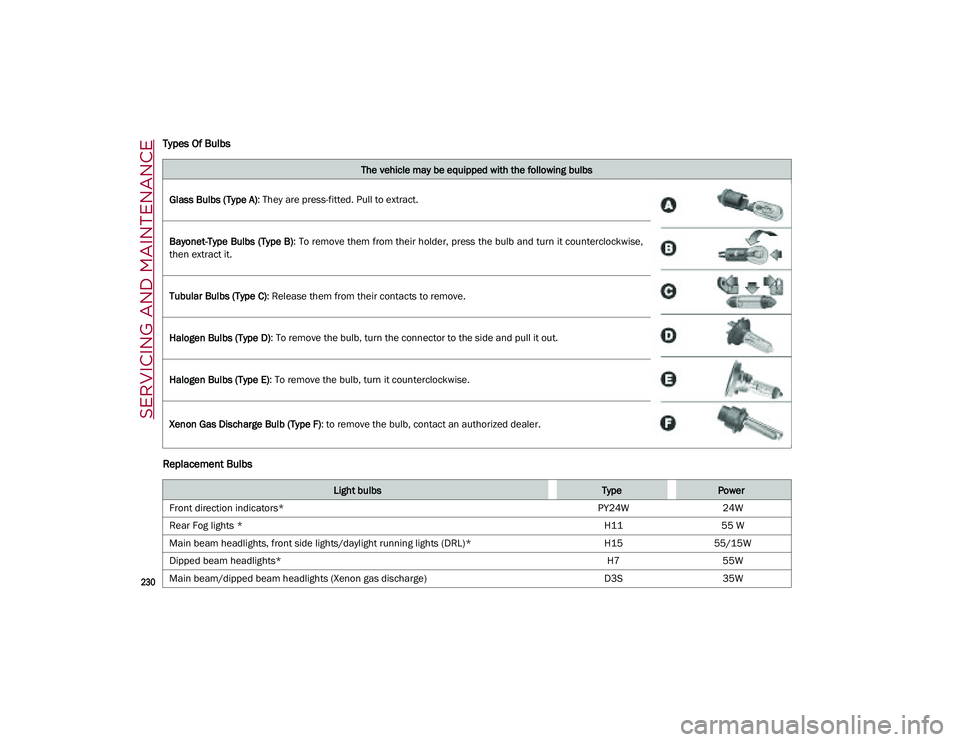
Types Of Bulbs
Replacement Bulbs
The vehicle may be equipped with the following bulbs
Glass Bulbs (Type A) : They are press-fitted. Pull to extract.
Bayonet-Type Bulbs (Type B) : To remove them from their holder, press the bulb and turn it counterclockwise,
then extract it.
Tubular Bulbs (Type C) : Release them from their contacts to remove.
Halogen Bulbs (Type D) : To remove the bulb, turn the connector to the side and pull it out.
Halogen Bulbs (Type E) : To remove the bulb, turn it counterclockwise.
Xenon Gas Discharge Bulb (Type F) : to remove the bulb, contact an authorized dealer.
Light bulbsTypePower
Front direction indicators* PY24W24W
Rear Fog lights * H1155 W
Main beam headlights, front side lights/daylight running lights (DRL)* H1555/15W
Dipped beam headlights* H755W
Main beam/dipped beam headlights (Xenon gas discharge) D3S35W
21_GU_OM_EN_USC_t.book Page 230
Page 233 of 280
231
*Only for basic version headlight with halogen main beam/dipped beam headlights
Replacing Exterior Bulbs
NOTE:
Only replace bulbs when the engine is off. Also
ensure that the engine is cold, to prevent the
risk of burns.
Front Light Cluster
Direction Indicators
Proceed with the directions below to change
bulbs:
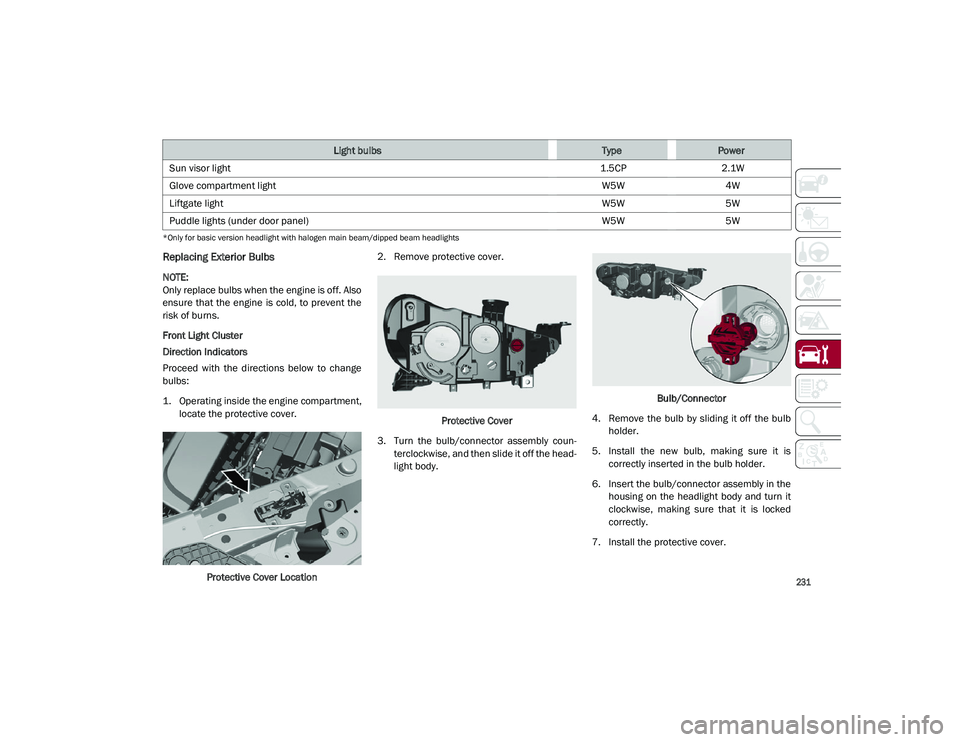
1. Operating inside the engine compartment,locate the protective cover.
Protective Cover Location 2. Remove protective cover.
Protective Cover
3. Turn the bulb/connector assembly coun -
terclockwise, and then slide it off the head -
light body. Bulb/Connector
4. Remove the bulb by sliding it off the bulb holder.
5. Install the new bulb, making sure it is correctly inserted in the bulb holder.
6. Insert the bulb/connector assembly in the housing on the headlight body and turn it
clockwise, making sure that it is locked
correctly.
7. Install the protective cover.
Sun visor light
1.5CP2.1W
Glove compartment light W5W4W
Liftgate light W5W5W
Puddle lights (under door panel) W5W5W
Light bulbsTypePower
21_GU_OM_EN_USC_t.book Page 231
Page 234 of 280
SERVICING AND MAINTENANCE
232
Front Light Cluster With Main Beam Xenon
Gas Discharge Headlights
To replace the bulbs of the main beam head-
lights, contact an authorized dealer.
Replacing Interior Bulbs
Courtesy Mirror Light
To replace the bulbs, proceed as follows:
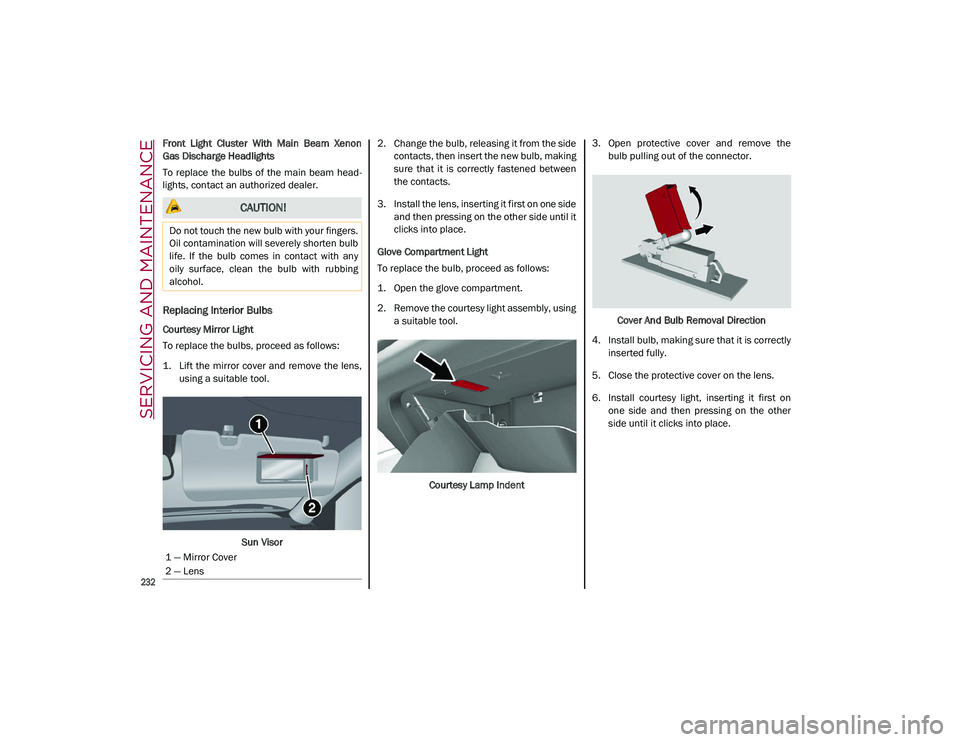
1. Lift the mirror cover and remove the lens, using a suitable tool.
Sun Visor 2. Change the bulb, releasing it from the side
contacts, then insert the new bulb, making
sure that it is correctly fastened between
the contacts.
3. Install the lens, inserting it first on one side and then pressing on the other side until it
clicks into place.
Glove Compartment Light
To replace the bulb, proceed as follows:
1. Open the glove compartment.
2. Remove the courtesy light assembly, using a suitable tool.
Courtesy Lamp Indent 3. Open protective cover and remove the
bulb pulling out of the connector.
Cover And Bulb Removal Direction
4. Install bulb, making sure that it is correctly inserted fully.
5. Close the protective cover on the lens.
6. Install courtesy light, inserting it first on one side and then pressing on the other
side until it clicks into place.
CAUTION!
Do not touch the new bulb with your fingers.
Oil contamination will severely shorten bulb
life. If the bulb comes in contact with any
oily surface, clean the bulb with rubbing
alcohol.
1 — Mirror Cover
2 — Lens
21_GU_OM_EN_USC_t.book Page 232
Page 273 of 280
271
J
Jump Starting ............................................. 201
K
Keyless Enter-N-Go ...................................... 25Passive Entry ............................................ 25
Keys .............................................................. 18
L
Lane Change And Turn Signals ................... 44
LaneSense ..................................................126
Lap/Shoulder Belts ....................................164
Latches .......................................................190
Leaks, Fluid ................................................190
Life Of Tires.................................................243
Liftgate .......................................................... 62
Light Bulbs ..................................................190 Types Of Bulbs ....................................... 230
Lights .......................................................... 190 Air Bag ...........................................169, 189
Automatic Headlights .............................. 43
Brake Warning .................................. 74, 75Courtesy/Reading ............................. 45, 46Daytime Running ..................................... 42
Electronic Stability Program(ESP) Indicator ............................................... 79
Exterior ................................................... 190
Fog ............................................................ 44
Headlight Switch ............................... 42, 43 Headlights ......................................... 42, 43
High Beam ................................................ 43
Instrument Cluster ............................ 42, 43Intensity Control ....................................... 46
Interior ............................................... 45, 46
Low Fuel ................................................... 80 Malfunction Indicator (Check Engine).... 77
Map .......................................................... 45
Park ....................................................44, 78
Reading .................................................... 45
Seat Belt Reminder ................................. 75
Turn Signals ..............................44, 78, 190
Warning Instrument Cluster
Descriptions ...................................78, 79
Loading Vehicle .......................................... 135 Tires ........................................................ 237
Locks Automatic Door ........................................ 27
Child Protection ....................................... 27
M
Maintenance ................................................ 61
Malfunction Indicator Light
(Check Engine) .......................................77, 85
Manual Service.................................................... 268
Memory Feature (Memory Seats) ............... 30
Memory Seat ................................................ 30
Methanol .................................................... 260
Mirrors .......................................................... 37 Automatic Dimming ................................. 37
Electric Powered ...................................... 38
Electric Remote ....................................... 38
Heated...................................................... 39
O
Occupant Restraints .................................. 163
Oil Pressure Light ......................................... 79
Oil, Engine Capacity.................................................. 262
Pressure Warning Light ........................... 79 Recommendation.................................. 262
Viscosity ................................................. 262
Opener, Garage Door (Homelink) ................39
Operator Manual Owner's Manual..................................... 268
Outlet Power ........................................................ 56
Overheating, Engine .................................. 204
P
Paintwork (Cleaning And Maintenance) .. 250
Panic Brake Assist (PBA) System ............. 149
Park Assist ................................................. 123
ParkSense System .................................... 123
Passive Entry ................................................25
Pets ............................................................ 189
Placard, Tire And Loading Information .... 237
Power Mirrors.......................................................38Outlet (Auxiliary Electrical Outlet)............56
Seats .........................................................33
Sunroof .....................................................59
Power Seats Forward .............................................. 31, 33
Rearward ........................................... 31, 33
Recline ............................................... 31, 33
Power Supply ............................................. 255
Pregnant Women And Seat Belts ............. 167
Pretensioners Seat Belts .............................................. 167
Prolonged Vehicle Inactivity ...................... 249
R
Radial Ply Tires .......................................... 242
Radio Transmitters And Mobile Phones ....... 5
21_GU_OM_EN_USC_t.book Page 271