2020 VOLKSWAGEN TRANSPORTER ignition
[x] Cancel search: ignitionPage 267 of 486
• Reduce your speed.
• Push the selector lever from position D to the right into the Tiptronic gate 266.
• Gently push the selector lever to the rear to change down gear.
Stopping the vehicle and pulling away when driving uphill
The steeper the incline, the lower the gear that is required.
If you wish to stop the vehicle or pull away when driving uphill, you should use the Hill Hold Assist function 282.
Vehicles without Hill Hold Assist: when the vehi-cle is stopped on an incline and remains in gear, the vehicle must always be prevented from rolling by depressing the brake pedal or by applying the handbrake. The brake pedal or the handbrake should not be released until you start to pull away
Kickdown
The kickdown mechanism enables maximum ac-celeration in the selector lever positions D and S, or in the Tiptronic position.
If the accelerator pedal is depressed fully, the gear-box will automatically shift to a lower gear, depend-ing on the speed and engine revs. This will make use of the full vehicle acceleration &.
The gearbox does not shift up to the next gear until the engine reaches the maximum engine speed for the gear.
Freewheel driving with 7-speed dual clutch gearbox DSG®
In coasting mode, the momentum of the vehicle can be used to save fuel in conjunction with a fore-sighted driving style. The engine is declutched and no longer brakes the vehicle -the vehicle can roll out over a longer distance.
Switch-on condition: the selector lever must be in position D.
Fault in the DSG® dual clutch gearbox
r-f"'n First read and observe the introductory l-J::,JJ information and safety warnings & on page 260.
Emergency programme
There is a fault in the system if all the displays on the instrument cluster for the selector lever posi-tions have a light background. The automatic gear-
Triggering coasting
• Remove foot from accelerator pedal. The en-gine will be disengaged and run in freewheel mode. The vehicle rolls without the braking effect of the engine.
Cancelling coasting mode
• Depress the brake pedal briefly.
Coasting can be switched on and off in the Set-tings menu of the Volkswagen Information sys-tem 24.
A WARNING
Rapid acceleration can cause loss of traction and skidding, particularly on slippery roads. This can cause you to lose control of the ve-hicle, which can lead to accidents and seri-ous injuries.
• Always adjust your driving style in ac-cordance with the flow of traffic.
• Only use kickdown or fast acceleration if visibility, weather, road and traffic conditions permit, and other road users are not put at risk due to the acceleration and the driving style.
• You should never endanger other road users through the acceleration of your vehi-cle or through your driving style.
CD
• If you stop the vehicle on an incline, do not attempt to stop it from rolling back by depress-Ing the accelerator while a position is still se-lected. The automatic gearbox could overheat and be damaged.
• Never allow the vehicle to roll in position N, particularly if the ignition is switched off. The automatic gearbox will not be lubricated and could be damaged. <1
box is running in an emergency programme. The vehicle can still be driven in the emergency pro-gramme, but only at reduced speed and not in all gears.
In vehicles with a DSG® dual clutch gearbox, you may no longer be able to select reverse gear. The gearbox should be checked by a qualified workshop as soon as possible. .,..
Starting the engine, changing gear and parking 267
Page 270 of 486
Warning and indicator lamps
[Q First read and observe the Introductory information and safety warnings & on page 269.
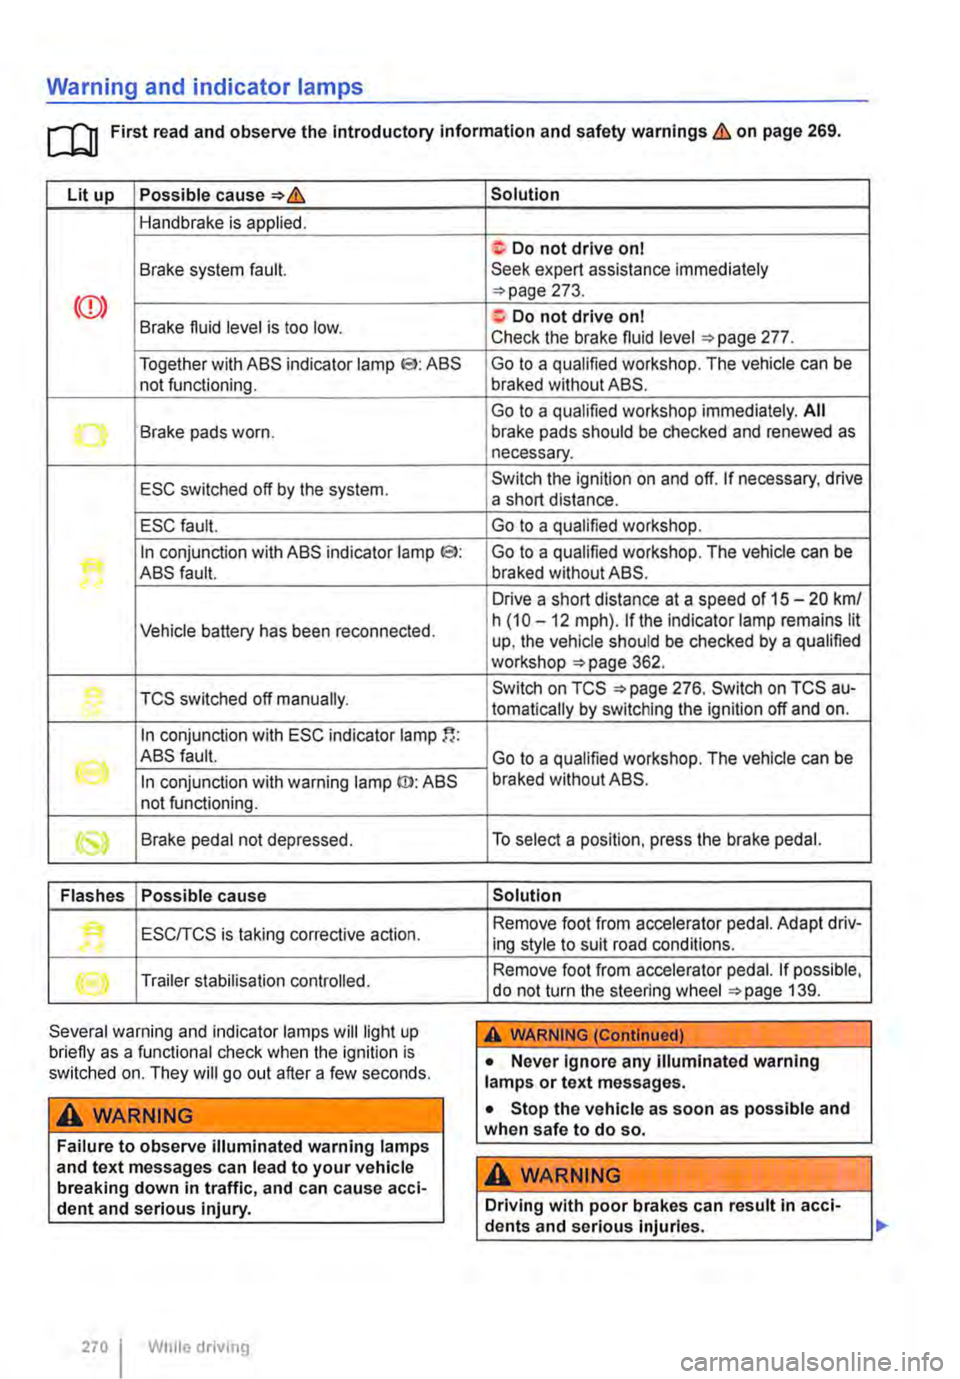
Lit up Possible cause=>&
Handbrake is applied.
Brake system fault.
Together with ABS indicator lamp El: ABS not functioning.
-...-Brake pads worn .
ESC switched off by the system.
ESC fault.
In conjunction with ABS indicator lamp CS>: ABS fault.
Vehicle battery has been reconnected.
TCS switched off manually.
In conjunction with ESC indicator lamp
((oil ABS fault.
In conjunction with warning lamp ID: ABS not functioning.
Brake pedal not depressed.
Flashes Possible cause
'• ESCITCS is taking corrective action.
Trailer stabilisation controlled.
Several warning and indicator lamps will light up briefly as a functional check when the ignition is switched on. They will go out after a few seconds.
A WARNING
Failure to observe illuminated warning lamps and text messages can lead to your vehicle breaking down in traffic, and can cause acci-dent and serious injury.
270 I While driving
Solution
f; Do not drive on I Seek expert assistance immediately =>page 273.
a:. Do not drive on I Check the brake fluid level =>page 277.
Go to a qualified workshop. The vehicle can be braked without ABS.
Go to a qualified workshop immediately. All brake pads should be checked and renewed as necessary.
Switch the ignition on and off. If necessary, drive a short distance.
Go to a qualified workshop.
Go to a qualified workshop. The vehicle can be braked without ABS.
Drive a short distance at a speed of 15 -20 km/ h (10 -12 mph). if the indicator lamp remains lit up, the vehicle should be checked by a qualified workshop =>page 362.
Switch on TCS =>page 276. Switch on TCS au-tomatically by switching the ignition off and on.
Go to a qualified workshop. The vehicle can be braked without ABS.
To select a position, press the brake pedal.
Solution
Remove foot from accelerator pedal. Adapt driv-ing style to suit road conditions.
Remove foot from accelerator pedal. If possible, do not turn the steering wheel =>page 139.
A WARNING (Continued)
• Never ignore any illuminated warning lamps or text messages.
• Stop the vehicle as soon as possible and when safe to do so.
A WARNING
Driving with poor brakes can result in acci-dents and serious injuries.
Page 272 of 486
Parking
r--f"n First read and observe the Introductory L-J.:.lJ information and safety warnings & on page 269.
Please adhere to relevant legislation when stop-ping and parking your vehicle.
Stopping the vehicle
The steps should only be carried out in the speci-fied order.
• Stop the vehicle on a suitable surface &.
• Depress and hold the brake pedal until the en-gine has stopped.
• Apply the handbrake.
• With a DSG® dual clutch gearbox, move the se-lector lever to position P.
• Switch off the engine and take your foot off the brake pedal.
• Remove the vehicle key from the ignition lock.
• Turn the steering wheel slightly if necessary to engage the steering lock mechanism.
• With a manual gearbox, select the first gear for flat ground and uphill inclines, or the reverse gear for downhill inclines, and then release the clutch pedal 263.
• Please ensure that all occupants, in particular children, leave the vehicle.
• Take all vehicle keys with you when you leave the vehicle.
• Lock the vehicle.
Additional points for ascending and descending inclines
Before switching off the engine, turn the steering wheel so that the front wheels will roll against the kerb if the parked vehicle starts to move.
• When facing downhill, turn the wheels so that they face the kerb.
• When facing uphill, turn the wheels so that they face the centre of the road.
Information on the brakes
r--f"n First read and observe the Introductory L-J.:.lJ information and safety warnings & on page 269.
New brake pads cannot generate the full braking effect during the first 200 to 300 km and must first be "run in" &. However, you can compensate for
2721 While driv1ng
A WARNING
The components of the exhaust system be-come very hot. This can cause fires and seri-ous Injuries.
• Never park the vehicle where parts of the exhaust system can come Into contact with any Inflammable material underneath the ve-hicle, e.g. undergrowth, leaves, dry grass, split fuel.
CD
• To avoid unintentional movement when parking the vehicle, first apply the handbrake firmly and then remove your foot from the brake pedal.
• Always take care when driving in car parks with protruding kerbstones or bollards. Objects that protrude from the ground can damage the bumper and other components when parking the vehicle. In order to avoid any damage, stop the vehicle before the wheels can touch the bollards or kerbs.
• Drive carefully through dips in the road, over driveways, ramps, kerbstones and other objects. Low-lying vehicle components such as the bumper, spoiler and parts of the running gear, engine or exhaust system could be dam-aged.
• If the handbrake Is not applied fully when the vehicle Is stationary and the brake pedal Is released when then selector lever Is in posi-tion P, the vehicle may move a few centimetres forwards or backwards.
Page 282 of 486

Driver assist systems
Pull-away assist systems
cr:n Introduction
This chapter contains information on the following subjects:
Warning and indicator lamps . . . . . . . . . . . . . . 282
Start/stop system . . . . . . . . . . . . . . . . • . . . . . . . 283
Hill Hold Assist . . . . . . . . . . . . . . . . . . . . . . . . . . 284
Hill Descent Assist . . . . . . . . . . . . . . . . . . . . . . . 285
Rear axle differential lock . . . . . . . . . . . . . . . . . 286
Additional information and warnings:
• Volkswagen information system =>page 24
• Braking, stopping and parking =>page 269
• Battery =>page 362
• Wheels and tyres =>page 367
• Accessories, modifications, repairs and renewal of parts =>page 394
• Jump starting =>page 443
Warning and indicator lamps
A WARNING
The intelligent technology of the pull-away assist systems cannot overcome the laws of physics or system-related vehicle limitations. Never let the extra convenience afforded by pull-away assist systems tempt you into tak-ing any risks when driving-this can cause accidents.
• Unintentional vehicle movements can cause serious Injury.
• The pull-away assist systems cannot re-place the driver's full concentration.
• Always adapt your speed and driving style to suit visibility, weather, road and traffic con-ditions.
• Pull-away assist systems cannot hold the vehicle in all hill start situations or brake it sufficiently on all slopes going downhill (e.g. if the ground is slippery or icy).
Lit up Possible cause
Rear axle differential lock switched on . ...
Hill Descent Assist switched on.
(A) The start/stop system is available, automat-ic engine stop is active.
ex;
The start/stop system is not available. OR: the start/stop system has switched off the engine automatically.
Flashes Possible cause
The rear axle differential lock cannot be .... switched on .
Hill Descent Assist is regulating.
Several warning and indicator lamps will light up briefly as a functional check when the ignition is switched on. They will go out after a few seconds. .,..
282 I While drivmg
Solution
=>page 286
=>page 285
=>page 283
Check whether all technical requirements have been fulfilled. If necessary, make sure that all technical requirements are fulfilled =>page 283.
Solution
=>page 286
=>page 285
Page 283 of 486
A WARNING
Failure to observe illuminated warning lamps and text messages can lead to your vehicle breaking down in traffic, and can cause acci-dent and serious injury.
• Never ignore any illuminated warning lamps or text messages.
Start/stop system
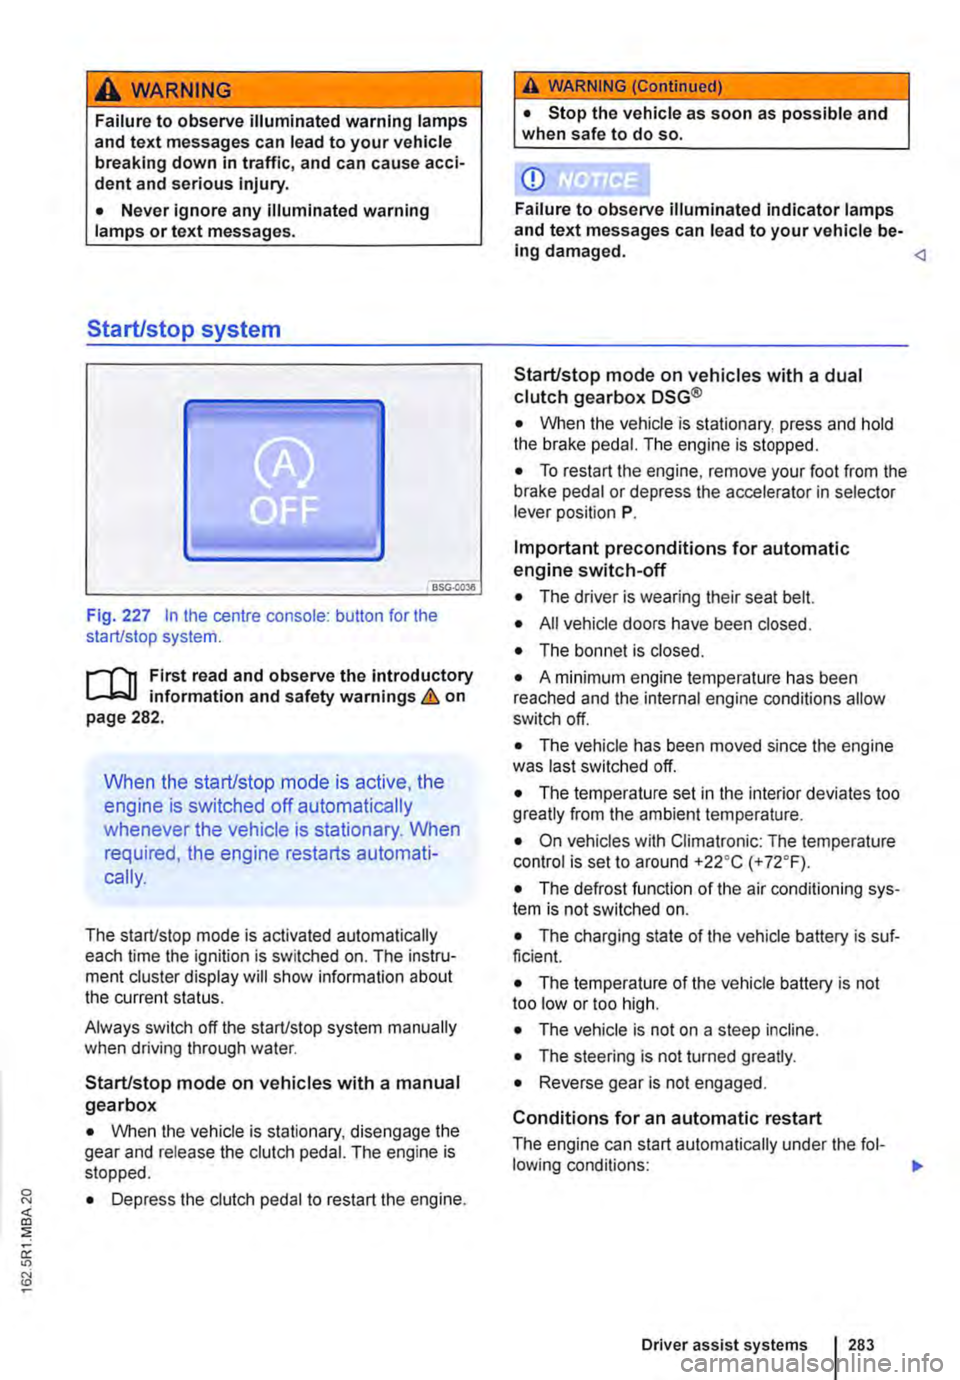
Fig. 227 In the centre console: button for the start/stop system.
r--flt First read and observe the introductory l-J,::JJ information and safety warnings & on page 282.
When the start/stop mode is active, the
engine is switched off automatically
whenever the vehicle is stationary. When
required, the engine restarts automati-
cally.
The start/stop mode is activated automatically each time the ignition is switched on. The instru-ment cluster display will show information about the current status.
Always switch off the start/stop system manually when driving through water.
Start/stop mode on vehicles with a manual gearbox
• When the vehicle is stationary, disengage the gear and release the clutch pedal. The engine is stopped.
• Depress the clutch pedal to restart the engine.
A WARNING (Continued)
• Stop the vehicle as soon as possible and when safe to do so.
CD
Failure to observe illuminated indicator lamps and text messages can lead to your vehicle be-ing damaged.
• When the vehicle is stationary, press and hold the brake pedal. The engine is stopped.
• To restart the engine, remove your foot from the brake pedal or depress the accelerator in selector lever position P.
Important preconditions for automatic engine switch-off
• The driver is wearing their seat belt.
• All vehicle doors have been closed.
• The bonnet is closed.
• A minimum engine temperature has been reached and the internal engine conditions allow switch off.
• The vehicle has been moved since the engine was last switched off.
• The temperature set in the interior deviates too greatly from the ambient temperature.
• On vehicles with Climatronic: The temperature control is set to around +22oC (+ 72°F).
• The defrost function of the air conditioning sys-tem is not switched on.
• The charging state of the vehicle battery is suf-ficient.
• The temperature of the vehicle battery is not too low or too high.
• The vehicle is not on a steep incline.
• The steering is not turned greatly.
• Reverse gear is not engaged.
Conditions for an automatic restart
The engine can start automatically under the fol-lowing conditions: IIJ>
Driver assist systems 283
Page 288 of 486

CD
• In some cases water and ice on the ultra-sound sensors could be registered as an ob-struction.
• Any equipment that has been retrofitted to the vehicle, e.g. bicycle carriers or number plate holders, can prevent the ParkPIIot from fu nctlonlng properly.
m Volkswagen Commercial Vehicles recom-L!J mends that drivers practise using the ParkPi-lot in a traffic-calmed area or car park to allow them to familiarise themselves with the system and its functions.
ParkPilot only at rear
,....-m First read and observe the introductory L-J.:.I.I Information and safety warnings & on page 287.
Switching ParkPilot on and off
m If an ultrasound sensor fails, the correspond-L!J ing area of the ultrasound sensor cluster is switched off and cannot be reactivated until the fault has been rectified (depending on the equip-ment level). Consult a qualified workshop in the event of a system fault. Volkswagen Commercial Vehicles recommends using a Volkswagen Com-mercial Vehicles dealership for this purpose.
Function What to do when the Ignition Is switched on
Switching on the ParkPilot:
Switching off the ParkPilot:
Switching off the ParkPilot display manually (sound output remains active)
Switching to the rear view camera system picture as required
Select reverse gear or move the selector lever to position R.
Deselect the reverse gear or selector lever position R. If the ParkPilot screen display is activated, the ParkPilot is switched off approximately 10 seconds after the reverse gear has been disengaged or the selector lever has been moved out of the R position.
OR: (depending on the equipment level) immediately after shifting out of re-verse gear, or selector lever position R, with an inactive ParkPilot screen dis-play.
OR: accelerate forwards to a speed greater than approximately 1 0-15 km/ h (6-9 mph).
Press a button, e.g.(RADIOl. on the factory-fitted radio or navigation system.
OR: touch the 0 function button.
Select reverse gear or move the selector lever to position R.
OR: touch the button.
Special features of ParkPilot • No acoustic signal is given in vehicles with a dual clutch gearbox DSG® if the selector lever is in position P. • In some cases, the ParkPilot registers water and ice on the ultrasound sensors as an obstacle.
• The acoustic warning will become quieter after a few seconds if the distance remains the same. The volume will remain constant if the signal tone is continuous.
• The intermittent signal tone switches off auto-matically as soon as the vehicle moves away from an obstacle again. If the vehicle approaches the obstacle again, the acoustic warning is switched on automatically.
288 I While driving
• The ParkPilot ultrasound sensors cannot be switched on if the factory-fitted towing bracket is electrically connected to the trailer.
• A Volkswagen Commercial Vehicles dealership can adjust the volume of the acoustic warning sig-
Page 289 of 486

m If there is a function fault in the ParkPilot, an W acoustic warning is emitted for approximately 3 seconds when switched on for the first time. The ParkPilot should be checked by a qualified work-shop immediately.
Fig. 230 In the centre console: button for switch-ing the ParkPilot on and off Fig. 231 In the front bumper: ParkPilot sensors.
r'l'11 First read and observe the Introductory Information and safety warnings & on page 287.
The Park Pilot uses ultrasound sensors to deter-mine the distance from the front or rear bumpers to an obstacle. There are 4 ultrasound sensors for the ParkPilot located in both the front and rear B bumpers.
Switching ParkPilot on and off
Function What to do when the Ignition is switched on
Switching on the ParkPilot Press button once. manually
Switching off the ParkPilot Press button again. manually
Switching off the ParkPilot Press a button, e.g. (RADIO!, on the factory-fitted radio or navigation system. display manually (sound OR: touch the 0 function button. output remains active)
Switching on the ParkPilot Select reverse gear or move the selector lever to position R. automatically
Switching off the ParkPilot Accelerate forwards to a speed greater than approximately 10-15 kmlh automatically (6-9 mph).
Temporarily muting ParkPi-lot (applies to certain Touch the@) function button. equipment levels):
Switching to the rear view Select reverse gear or move the selector lever to position R. camera system picture as OR: touch function button. required
The indicator lamp in the =:o Fig. 230 lights up while the function is active.
Driver assist systems 1289
Page 292 of 486
A WARNING (Continued)
• The camera lens enlarges and distorts the field of vision and the objects on the screen will not be depicted as precisely and accu-rately as they are In reality.
• Certain objects, for example narrow posts or railings, may be difficult or Impossible to see on the screen because of its low resolu-tion or poor light conditions.
• The rear view camera system has blind spots within which obstacles and people can-not be detected.
• Keep the camera lens clean, free of snow and Ice and do not cover it.
A WARNING
The Intelligent rear view camera system tech-nology cannot overcome the laws of physics, and functions only within the limits of the system. Careless or unintentional use of the rear view camera system can cause accl· dents and lead to serious Injury. The system is not a substitute for the full concentration of the driver.
• Always adapt your speed and driving style to suit visibility, weather, road and traffic con· ditions.
General information
r'""'('n First read and observe the Introductory L-J,::.U information and safety warnings & on page 291.
Requirements for parking and manoeuvring while using the rear view camera system
Checklist
./ The tailgate must be closed.
./ The camera must give a clear and accurate image, i.e. there must be good visibility and the camera lens must be clean =:o Fig. 233.
./ There must be a clear and unobstructed view of the area behind the vehicle.
./ The rear of the vehicle must not be heavily loaded.
2921 While driving
A WARNING (ConUnued)
• Keep looking In the direction In which you are parking and at the relevant area sur-rounding the vehicle. The front of the vehicle swings out more than the rear of the vehicle.
• Do not allow the Images shown on the screen to distract you from the traffic around you.
• Always monitor the area around the vehi· cle as small children, animals and objects will not always be detected by the rear view cam-era system.
• The rear view camera system may not be able to display all areas clearly.
• The rear view camera system should only be used when the tallgate is fully closed.
CD
• The rear view camera system shows only two-dimensional images on the screen. The lack of depth of field means that potholes and protruding objects on the ground may only be detected with difficulty, or may not be detected at all.
• The rear view camera system may notal· ways be able to detect objects such as thin rails, fences, posts, trees etc. This could result In damage to your vehicle.
./ The vehicle must be undamaged. The rear view camera system must be checked by a qualified workshop if the position or angle of the camera has changed, e.g. following a rear impact.
Volkswagen Commercial Vehicles recommends that you practise parking with the reversing camera in a traffic-calmed area or car park with good visi-bility and weather conditions, so that you can famil· iarise yourself with the system, orientation lines and guiding functions in a safer environment.
Rear view camera system settings
Various settings, including brightness, contrast and colour, can be by touching the relevant function buttons 1j or G. or by moving the corre-sponding slider.
• Stop the vehicle in a safe place.
• Apply the handbrake firmly.
• Switch on the ignition.