2020 VOLKSWAGEN TRANSPORTER ignition
[x] Cancel search: ignitionPage 320 of 486
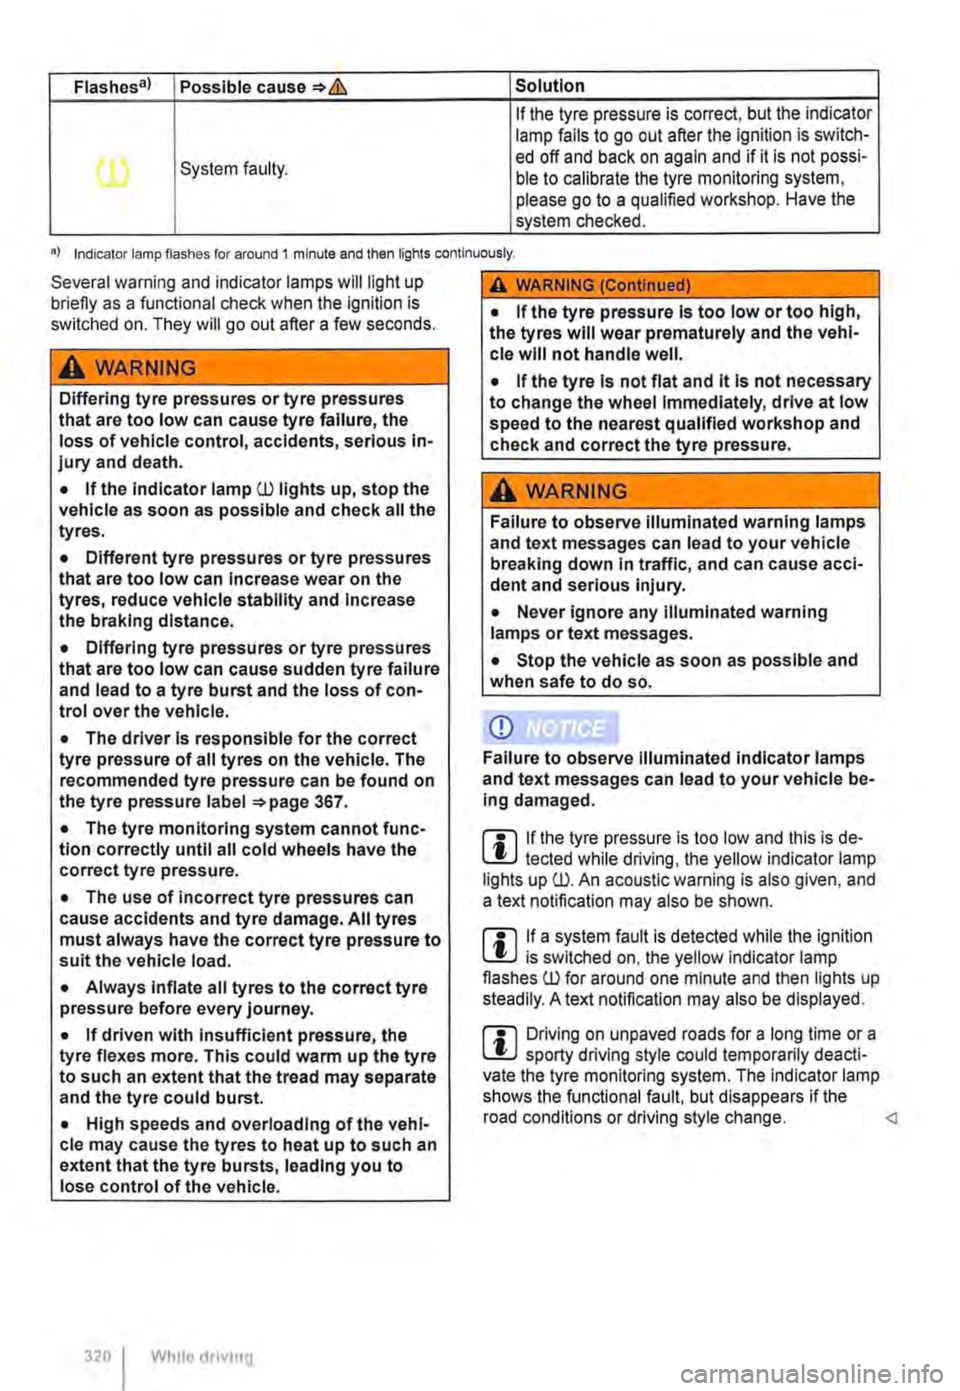
Flashes a) Possible cause*& Solution
If the tyre pressure is correct, but the indicator lamp fails to go out after the ignilion is switch-
(l) System faulty. ed off and back on again and if it is not possi-ble to calibrate the tyre monitoring system, please go to a qualified workshop. Have the system checked.
•I Indicator lamp flashes for around 1 minute and then lights continuously.
Several warning and indicator lamps will light up briefly as a functional check when the lgnilion is switched on. They will go out after a few seconds.
A WARNING
Differing tyre pressures or tyre pressures that are too low can cause tyre failure, the loss of vehicle control, accidents, serious in-jury and death.
• If the Indicator lamp (l) lights up, stop the vehicle as soon as possible and check all the tyres.
• Different tyre pressures or tyre pressures that are too low can Increase wear on the tyres, reduce vehicle stability and Increase the braking distance.
• Differing tyre pressures or tyre pressures that are too low can cause sudden tyre failure and lead to a tyre burst and the loss of con-trol over the vehicle.
• The driver Is responsible for the correct tyre pressure of all tyres on the vehicle. The recommended tyre pressure can be found on the tyre pressure label 367.
• The tyre monitoring system cannot func-tion correctly until all cold wheels have the correct tyre pressure.
• The use of Incorrect tyre pressures can cause accidents and tyre damage. All tyres must always have the correct tyre pressure to suit the vehicle load.
• Always Inflate all tyres to the correct tyre pressure before every journey.
• If driven with Insufficient pressure, the tyre flexes more. This could warm up the tyre to such an extent that the tread may separate and the tyre could burst.
• High speeds and overloading of the vehi-cle may cause the tyres to heat up to such an extent that the tyre bursts, leading you to lose control of the vehicle.
320 I Whllo drivmg
A WARNING (Continued)
• If the tyre pressure Is too low or too high, the tyres will wear prematurely and the vehl-cle will not handle well.
• If the tyre Is not flat and it Is not necessary to change the wheel immediately, drive at low speed to the nearest qualified workshop and check and correct the tyre pressure.
A WARNING
Failure to observe illuminated warning lamps and text messages can lead to your vehicle breaking down In traffic, and can cause acci-dent and serious injury.
• Never ignore any illuminated warning lamps or text messages.
• Stop the vehicle as soon as possible and when safe to do so.
CD
Failure to observe Illuminated Indicator lamps and text messages can lead to your vehicle be-Ing damaged.
m If the tyre pressure is too low and this is de-L!..) tected while driving, the yellow indicator lamp lights up (l). An acoustic warning is also given, and a text notification may also be shown.
m If a system fault is detected while the ignition L!..J is switched on, the yellow Indicator lamp flashes (l) for around one minute and then lights up steadily. A text notification may also be displayed.
m Driving on unpaved roads for a long time or a L!..J sporty driving style could temporarily deacti-vate the tyre monitoring system. The Indicator lamp shows the functional fault, but disappears if the road conditions or driving style change.
Page 321 of 486

Function and control
Fig. 253 In the stowage compartment on the front passenger side: button for the tyre monitoring sys-tem.
l"'"""f'n First read and observe the Introductory l.-J,.:,LL Information and safety warnings & on page 318.
The tyre monitoring system uses data from the ASS sensors and other functions to check the speed of rotation and the rolling circumference of the individual wheels. The rolling circumference of the wheels changes, if the tyre pressure is too low. This is then shown by the tyre monitoring sys-tem ill in the instrument cluster.
The operation of the tyre monitoring system is im-paired:
• If the tyre pressure has been changed manual-ly.
• If the tyre has structural damage.
• If the vehicle Is loaded more heavily on one side.
• If the wheels on one axle are loaded more heavily, e.g. high load level.
• If snow chains have been fitted.
• If one wheel per axle has been changed.
• When driving with a heavy trailer attached.
• If you are driving under winter conditions or on unsurfaced roads.
• When driving fast with hard acceleration and braking manoeuvres.
Synchronising the tyre monitoring system
The tyre monitoring system will have to be re-synchronised after changing the tyre pressure, or after changing one or more wheels. This also ap-plies for changing the wheels, e.g. from the front to the rear, and for changing from summer tyres to winter tyres.
The saved values must be reset before the system can be resynchronised.
• Switch on the ignition, and while the vehicle is stationary
• Press and hold the =>Fig. 253 button until an acoustic confirmation signal is emitted.
• OR: with some vehicle equipment options, you can open menu option Tyre pressure in the in-strument cluster display and save the new tyre pressures there =>page 24.
Once the saved values have been reset, the sys-tem calibrates itself independently to the fitted tyres and the tyre pressures filled by the driver dur-ing normal vehicle operation. The calibrated values are adopted and monitored after a long journey at various speeds.
If the wheels are loaded more heavily than normal, e.g. if the vehicle is carrying heavy payload, the tyre pressure must be raised to the recommended full-load tyre pressure before synchronisation =>page 367.
m The tyre monitoring system stops working if l!.J there is a fault in the ESC or ASS =>page 269.
m When using snow chains, an incorrect dis-l!.J play may be shown as the snow chains in-crease the tyre circumference =>page 367.
Page 326 of 486
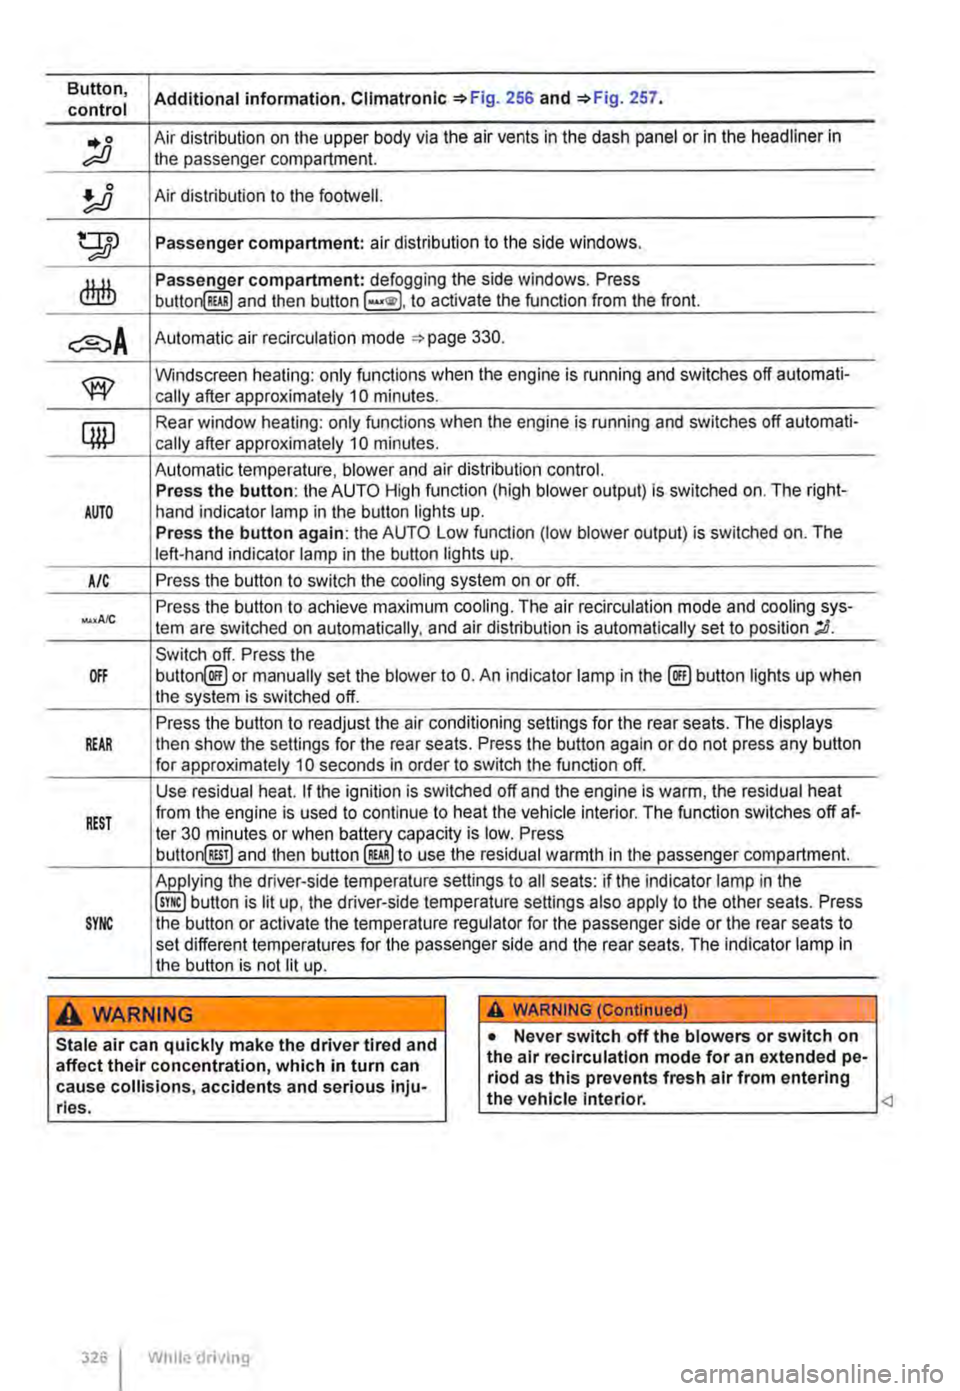
Button, Additional information. Climatronlc 256 and 257. control
.. 0 Air distribution on the upper body via the air vents in the dash panel or in the headliner in ;;;o the passenger compartment.
!J Air distribution to the footwetl.
tTIJ Passenger compartment: air distribution to the side windows.
dlrlb compartment: defogging the side windows. Press button RWI and then button to activate the function from the front.
Automatic air recirculation mode 330.
w Windscreen heating: only functions when the engine is running and switches off automati-cally after approximately 10 minutes.
qw Rear window heating: only functions when the engine is running and switches off automati-cally after approximately 10 minutes.
Automatic temperature, blower and air distribution control. Press the button: the AUTO High function (high blower output) is switched on. The right-AUTO hand indicator lamp in the button lights up. Press the button again: the AUTO Low function (low blower output) is switched on. The left-hand indicator lamp in the button lights up.
A/C Press the button to switch the cooling system on or off.
Press the button to achieve maximum cooling. The air recirculation mode and cooling sys-tern are switched on automatically, and air distribution is automatically set to position ;D.
Switch off. Press the OFF button@ or manually set the blower to 0. An indicator lamp in the@) button lights up when the system is switched off.
Press the button to readjust the air conditioning settings for the rear seats. The displays REAR then show the settings for the rear seats. Press the button again or do not press any button for approximately 10 seconds in order to switch the function off.
Use residual heat. If the ignition is switched off and the engine is warm, the residual heat
REST from the engine is used to continue to heat the vehicle interior. The function switches off at-ter 30 minutes or when capacity is low. Press button@!] and then button RWI to use the residual warmth in the passenger compartment.
the driver-side temperature settings to all seats: if the indicator lamp in the button is lit up, the driver-side temperature settings also apply to the other seats. Press SYNC the button or activate the temperature regulator for the passenger side or the rear seats to set different temperatures for the passenger side and the rear seats. The indicator lamp in the button is not lit up.
A wARNING A WARNING (Continued)
Stale air can quickly make the driver tired and affect their concentration, which in turn can cause collisions, accidents and serious inju-ries.
326 I While driving
• Never switch off the blowers or switch on the air recirculatlon mode for an extended pe-riod as this prevents fresh air from entering the vehicle interior.
Page 331 of 486
Windscreen heating
1111 First read and observe the introductory L.-J,::.U information and safety warnings & on page 322.
Windscreen heating helps to de-ice the
windscreen and only works when the en-
gine is running.
Switching on and off
Press the button ®in the centre console or the Climatronic to switch the windscreen heating on and off.
Roof ventilator
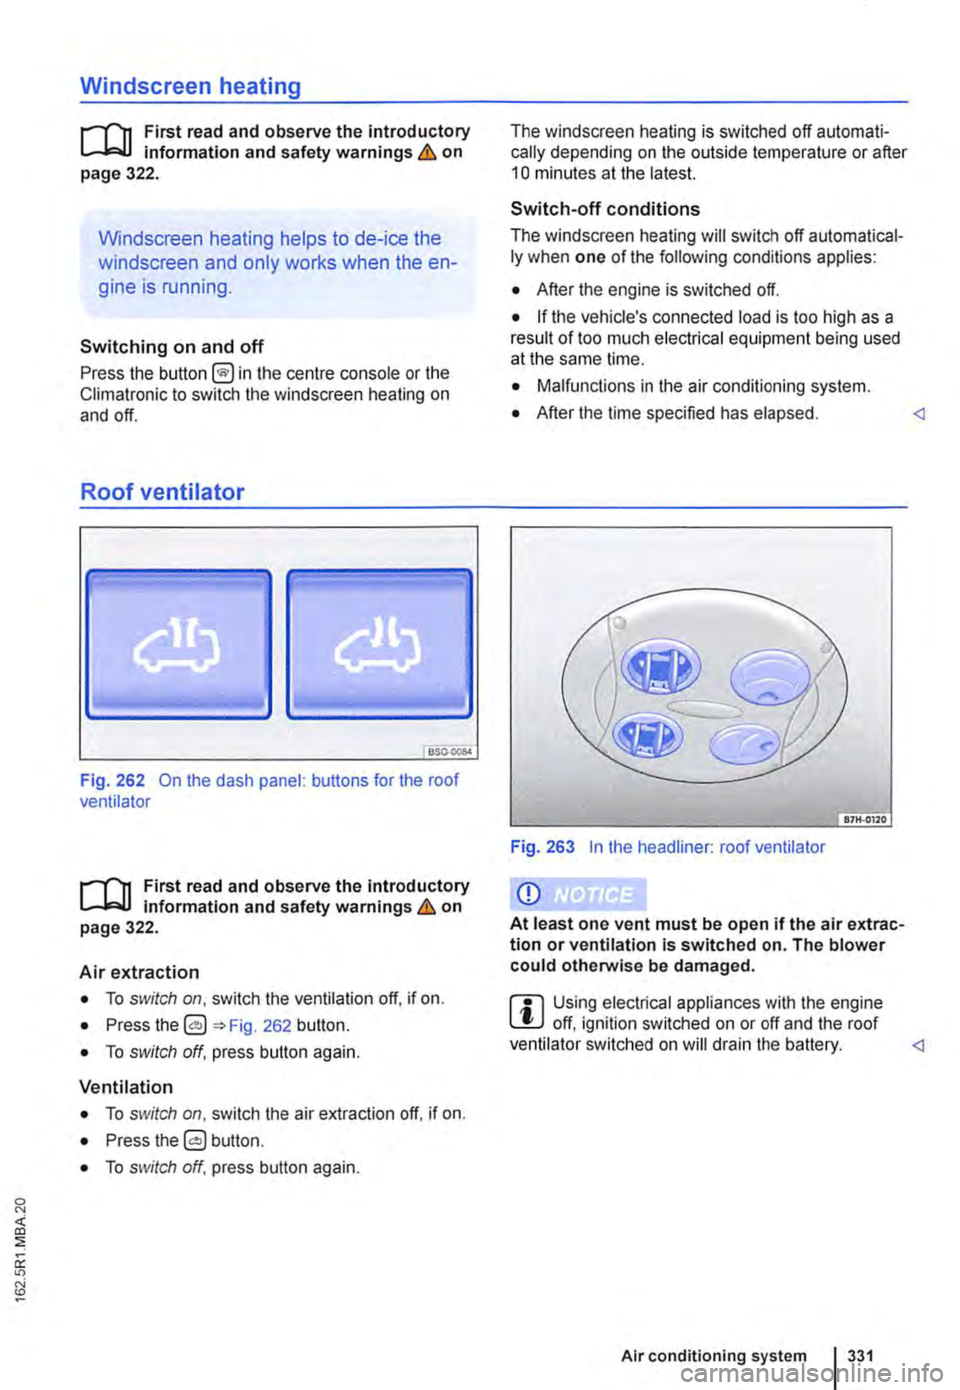
BS0-000<
Fig. 262 On the dash panel: buttons for the roof ventilator
1111 First read and observe the introductory L.-J,::.U Information and safety warnings & on page 322.
Air extraction
• To switch on, switch the ventilation off, if on.
• Press the 0 262 button.
• To switch off, press button again.
Ventilation
• To switch on, switch the air extraction off. if on.
• Press the 0 button.
• To switch off, press button again.
The windscreen heating is switched off automati-cally depending on the outside temperature or after 10 minutes at the latest.
Switch-off conditions
The windscreen heating will switch off automatical-ly when one of the following conditions applies:
• After the engine is switched off.
• If the vehicle's connected load is too high as a result of too much electrical equipment being used at the same lime.
• Malfunctions in the air conditioning system.
• After the time specified has elapsed.
Q)
At least one vent must be open if the air extrac-tion or ventilation Is switched on. The blower could otherwise be damaged.
ffi Using electrical appliances with the engine L!J off, ignition switched on or off and the roof ventilator switched on will drain the battery.
Page 334 of 486
Switching the supplementary heating system on and off
r-Y'n First read and observe the introductory L-J.:.I.I information and safety warnings & on page 332.
In vehicles with camping equipment (California), the supplementary heater is controlled via the cen-tral control panel =>page 192.
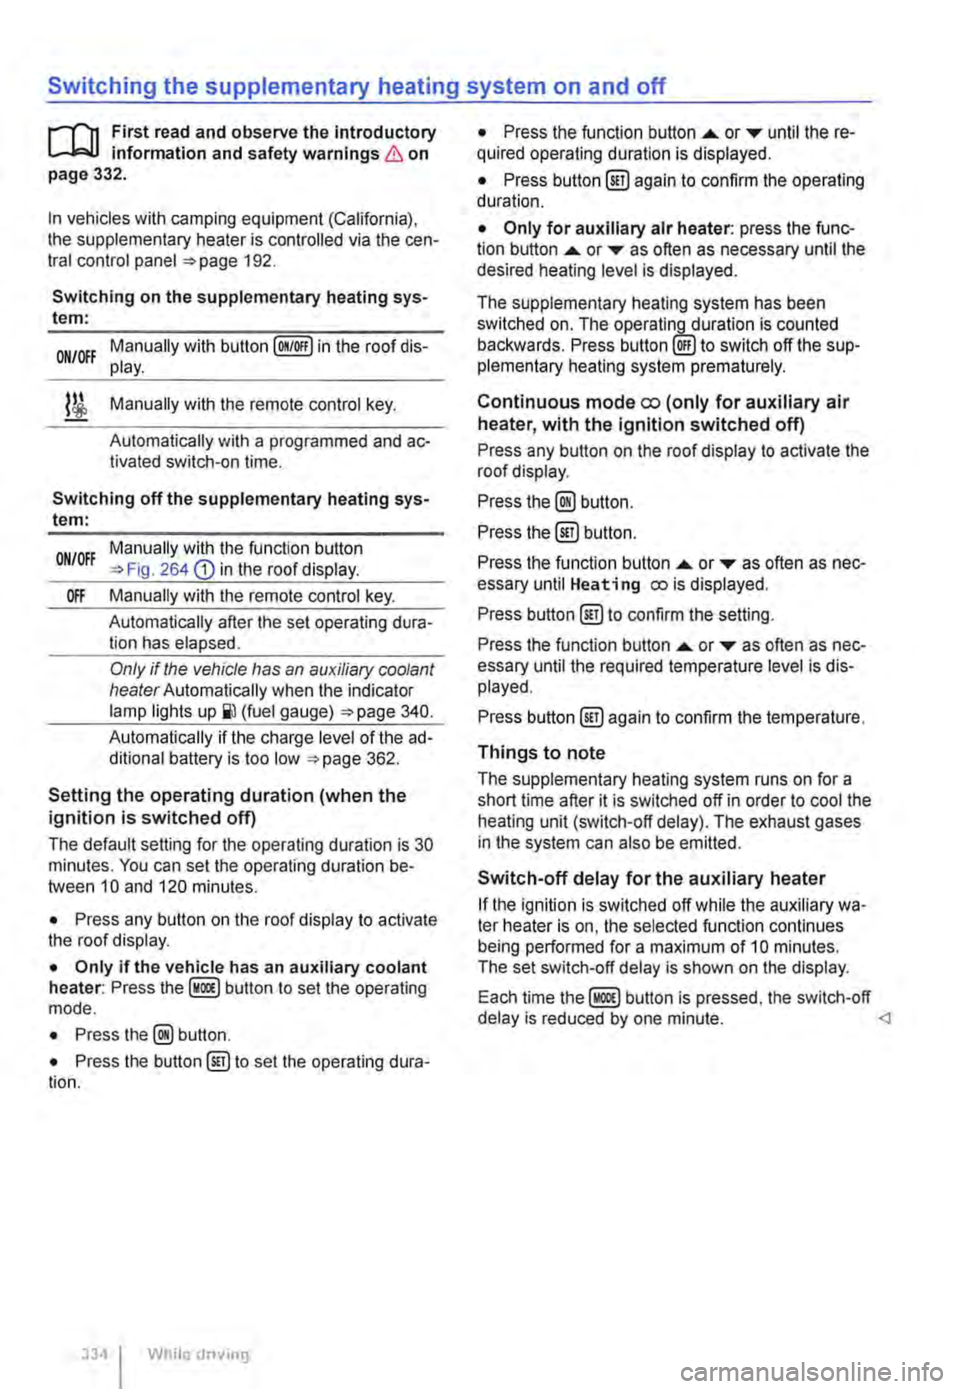
Switching on the supplementary heating sys-tem:
Manually with button [011/0IF) in the roof dis-ON/OFF play.
l/i Manually with the remote control key.
Automatically with a programmed and ac-tivated switch-on time.
Switching off the supplementary heating sys-tem:
ON/OFF Manually with the function button =>Fig. 264 CD in the roof display.
Off Manually with the remote control key.
Automatically after the set operating dura-tion has elapsed.
Only if the vehicle has an auxiliary coolant heater Automatically when the indicator lamp lights (fuel gauge) =>page 340.
Automatically if the charge level of the ad-ditional battery is too low =>page 362.
Setting the operating duration (when the ignition is switched off)
The default setting for the operating duration is 30 minutes. You can set the operating duration be-tween 10 and 120 minutes.
• Press any button on the roof display to activate the roof display.
• Only if the vehicle has an auxiliary coolant heater: Press the button to set the operating mode.
• Press the@ button.
• Press the button@) to set the operating dura-tion.
334 I While driv1ng
• Press the function button ....,. or T until the re-quired operating duration is displayed.
• Press button@) again to confirm the operating duration.
• Only for auxiliary air heater: press the func-tion button ....,. or ... as often as necessary until the desired heating level is displayed.
The supplementary heating system has been switched on. The operatin_lLduration is counted backwards. Press to switch off the sup-plementary heating system prematurely.
Continuous mode eo (only for auxiliary air heater, with the ignition switched off)
Press any button on the roof display to activate the roof display.
Press the@) button.
Press the @) button.
Press the function button ....,. or ... as often as nec-essary until Heating eo is displayed.
Press button @)to confirm the setting.
Press the function button ....,. or T as often as nec-essary until the required temperature level is dis-played.
Press button @)again to confirm the temperature.
Things to note
The supplementary heating system runs on for a short time after it is switched off in order to cool the heating unit (switch-off delay). The exhaust gases in the system can also be emitted.
Switch-off delay for the auxiliary heater
If the ignition is switched off while the auxiliary wa-ter heater is on, the selected function continues being performed for a maximum of 10 minutes. The set switch-off delay is shown on the display.
Each time button is pressed, the switch-off delay is reduced by one minute.
Page 339 of 486
Switching the childproof lock on and off
B7f·0201
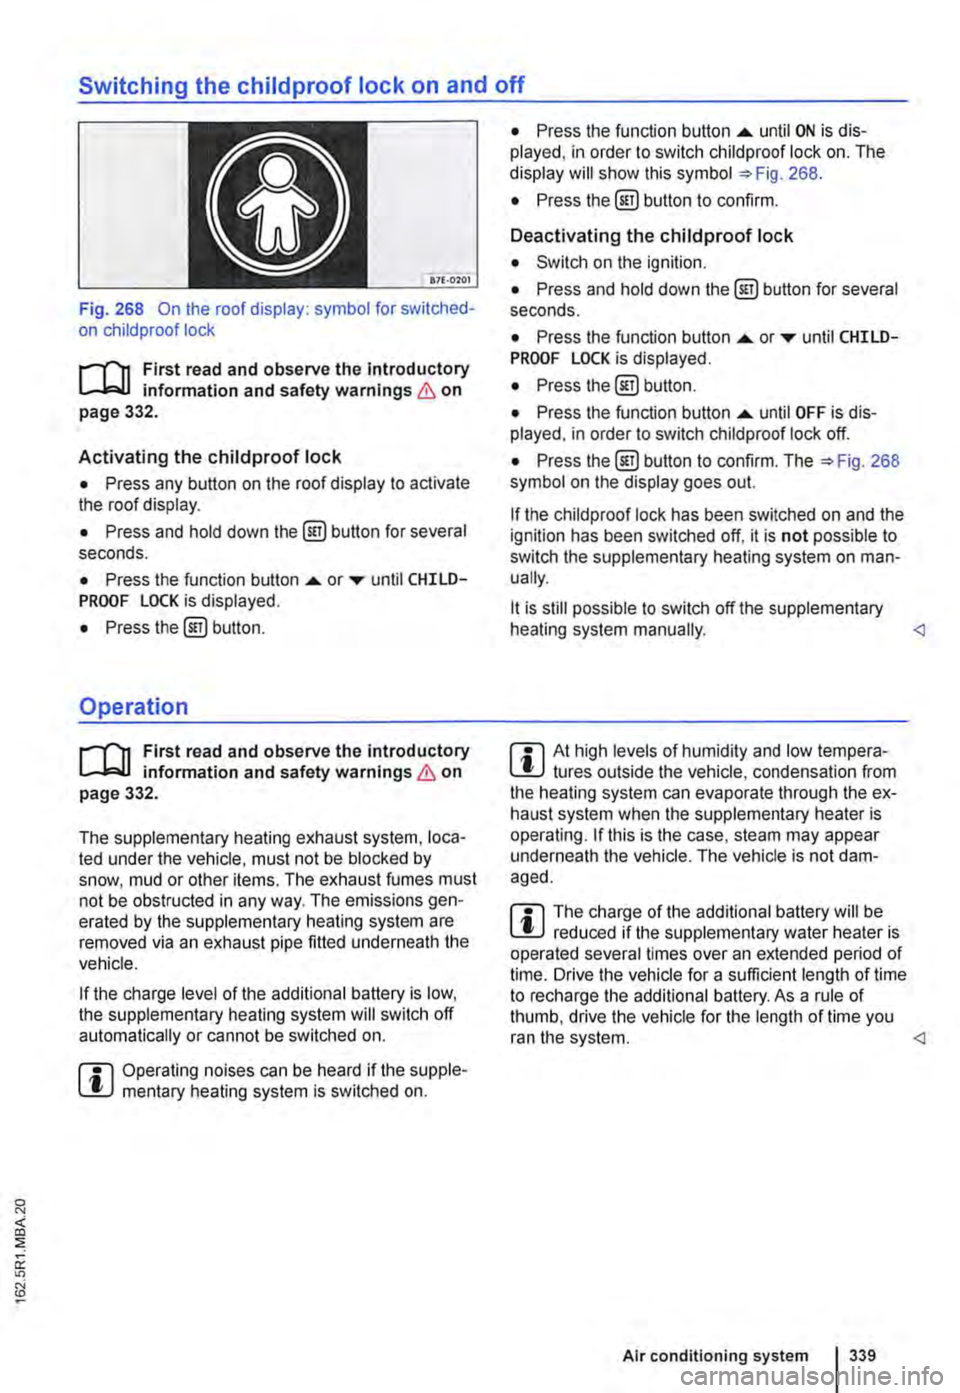
Fig. 268 On the roof display: symbol for switched-on child proof lock
r-T'n First read and observe the introductory L-.bU information and safety warnings & on page 332.
Activating the childproof lock
• Press any button on the roof display to activate the roof display.
• Press and hold down the @) button for several seconds.
• Press the function button .... or ..-until CHILD-PROOF LOCK is displayed.
• Press the@) button.
Operation
r-T'n First read and observe the introductory L-.bU information and safety warnings & on page 332.
The supplementary heating exhaust system, loca-ted under the vehicle, must not be blocked by snow, mud or other items. The exhaust fumes must not be obstructed in any way. The emissions gen-erated by the supplementary heating system are removed via an exhaust pipe fitted underneath the vehicle.
If the charge level of the additional battery is low, the supplementary heating system will switch off automatically or cannot be switched on.
m Operating noises can be heard if the supple-l!J mentary heating system is switched on.
• Press the function button .... until ON is dis-played, in order to switch child proof lock on. The display will show this symbol =>Fig. 268.
• Press the @] button to confirm.
Deactivating the childproof lock
• Switch on the ignition.
• Press and hold down the@] button for several seconds.
• Press the function button....._ or..-until CHILD-PROOF LOCK is displayed.
• Press the@) button.
• Press the function button .... until OFF is dis-played. in order to switch child proof lock off.
• Press the@) button to confirm. The =>Fig. 268 symbol on the display goes out.
If the child proof lock has been switched on and the ignition has been switched off, it is not possible to switch the supplementary heating system on man-ually.
lt is still possible to switch off the supplementary heating system manually.
r::l The charge of the additional battery will be W reduced if the supplementary water heater is operated several times over an extended period of time. Drive the vehicle for a sufficient length of time to recharge the additional battery. As a rule of thumb, drive the vehicle for the length of time you ran the system.
Page 340 of 486
At the filling station
Filling the tank
o:n Introduction
This chapter contains information on the following subjects:
Indicator lamps and fuel gauge . . . . . . . . . . . . 341
Filling the tank with petrol or diesel . . . . . . . . . 342
Capacities . . . . . . . . . . . 343
Checks when filling the tank . . . . . . . . . . . . . . . 343
The fuel cap is located at the left-hand side of the vehicle.
Additional information and warnings:
• Exterior views 5
• Fuel 343
• Preparation for working in the engine ccmpart-ment page 350
A WARNING
Filling the tank incorrectly and incorrect han-dling of fuel can cause explosions, fire, seri-ous burns and other injuries.
• Always ensure that the tank cap is proper-ly closed, to prevent the evaporation and spillage of fuel.
• Fuel is highly explosive and inflammable and can cause serious burns and other inju-ries.
• Fuel can spill out if the engine is not switched off or the filler nozzle is not fully in-serted into the fuel filler neck when filling the tank. This could cause fire, explosions, seri-ous burns and other Injuries.
• When refilling with fuel, the engine , sup-plementary heating system(=> page 332) and the ignition must be switched off for security reasons.
• When filling the tank, always switch off your mobile telephone and two-way radio or any other radio equipment. Electromagnetic radiation can generate sparks which can in turn start a fire.
• Never get back into the vehicle while fill-ing the tank. If in exceptional cases you have to enter the vehicle, close the door and touch a metal object before touching the filler noz-zle again. This will remove any electrostatic
340 I While driving
A WARNING (Continued)
charge from you. Failure to do so could gen-erate a spark. Sparks can cause a fire when filling the tank.
• Never refuel or fill a spare canister near open flames, sparks or smouldering Items, e.g. cigarettes.
• Electrostatic discharge and electromag-netic radiation must be avoided when filling the tank.
• Follow all applicable safety information provided by the filling station when filling the tank.
• Never spill fuel in the vehicle or In the lug-gage compartment
A WARNING
For safety reasons, Volkswagen Commercial Vehicles does not recommend carrying a spare fuel canister In the vehicle. Fuel can spill out of the full or empty canister and catch fire, especially In the event of an acci-dent. This could cause explosions, fire and injuries.
• If, In exceptional circumstances, you have to transport a spare fuel canister, please note the following:
-When refilling never place the canister In or on top of the vehicle, for example In the luggage compartment or on the tall-gate. There may be an electrostatic charge during refilling causing the fuel fumes to Ignite.
-Always place the spare fuel canister on the ground.
-When filling a spare fuel canister, place the filler nozzle as far as possible Into the filler opening.
-If the spare fuel canister Is made of met-al, the filler nozzle must have constant contact with the canister In order to avoid static charging.
-Please follow all legislation concerning the use, stowage and transport of a spare fuel canister.
Page 341 of 486

A WARNING (Continued)
CD
-Please ensure that the spare fuel can is· ter corresponds with the Industry stand· ard, for example AN SI or ASTM F852-86.
• Remove split fuel from all vehicle compo· nents as quickly as possible In order to avoid damage to the wheel housing, tyres and vehicle paint.
• • Filling up with petrol in a vehicle fitted with a diesel engine or refilling with diesel in vehicle equipped with a petrol engine can cause seri· ous ands expensive engine damage and dam· age to the fuel system that is not covered by
Indicator lamps and fuel gauge
Fig. 269 In the instrument cluster: fuel gauge for petrol and diesel.
CD
any Volkswagen Commercial Vehicles guaran· tee. Do not start the engine under any circum-stances if you have refilled using the Incorrect fuel. Seek expert assistance. The substances In these fuels can cause serious damage to the fuel system and to the engine itself if it Is switched on.
• Vehicles with a diesel engine should under no circumstances be filled and driven with pet· rol, kerosene, heating oil or any other fuels that have not been expressly approved for diesel engines. Other fuels could cause extensive and expensive engine damage and damage to the fuel system which will not be covered by any Volkswagen Commercial Vehicles guarantee.
r.:Gh Fuels can pollute the environment. Any spilt W service fluids must be cleaned up and dis· posed of properly.
Lit up Needle position Possible cause & Solution 269
b Red marking (arrow) Fuel tank almost empty. Fill the tank as soon as possible Reserve is used up 343.
Several warning and indicator lamps will light up briefly as a functional check when the ignition is switched on. They will go out after a few seconds.
When the Indicator lamp Blllghts up, the supple-mentary heating system and fuel-powered supple-mentary heater switch off automatically.
A WARNING
Driving the vehicle when the fuel level is too low could lead to your vehicle breaking down In traffic, accidents and serious injuries.
• When the fuel level is too low, the fuel supply to the engine could be Irregular, espe-cially when driving up or down hills and in-clines. .,..
At the filling station 341