2020 VOLKSWAGEN TRANSPORTER ignition
[x] Cancel search: ignitionPage 114 of 486

Interior and reading lights
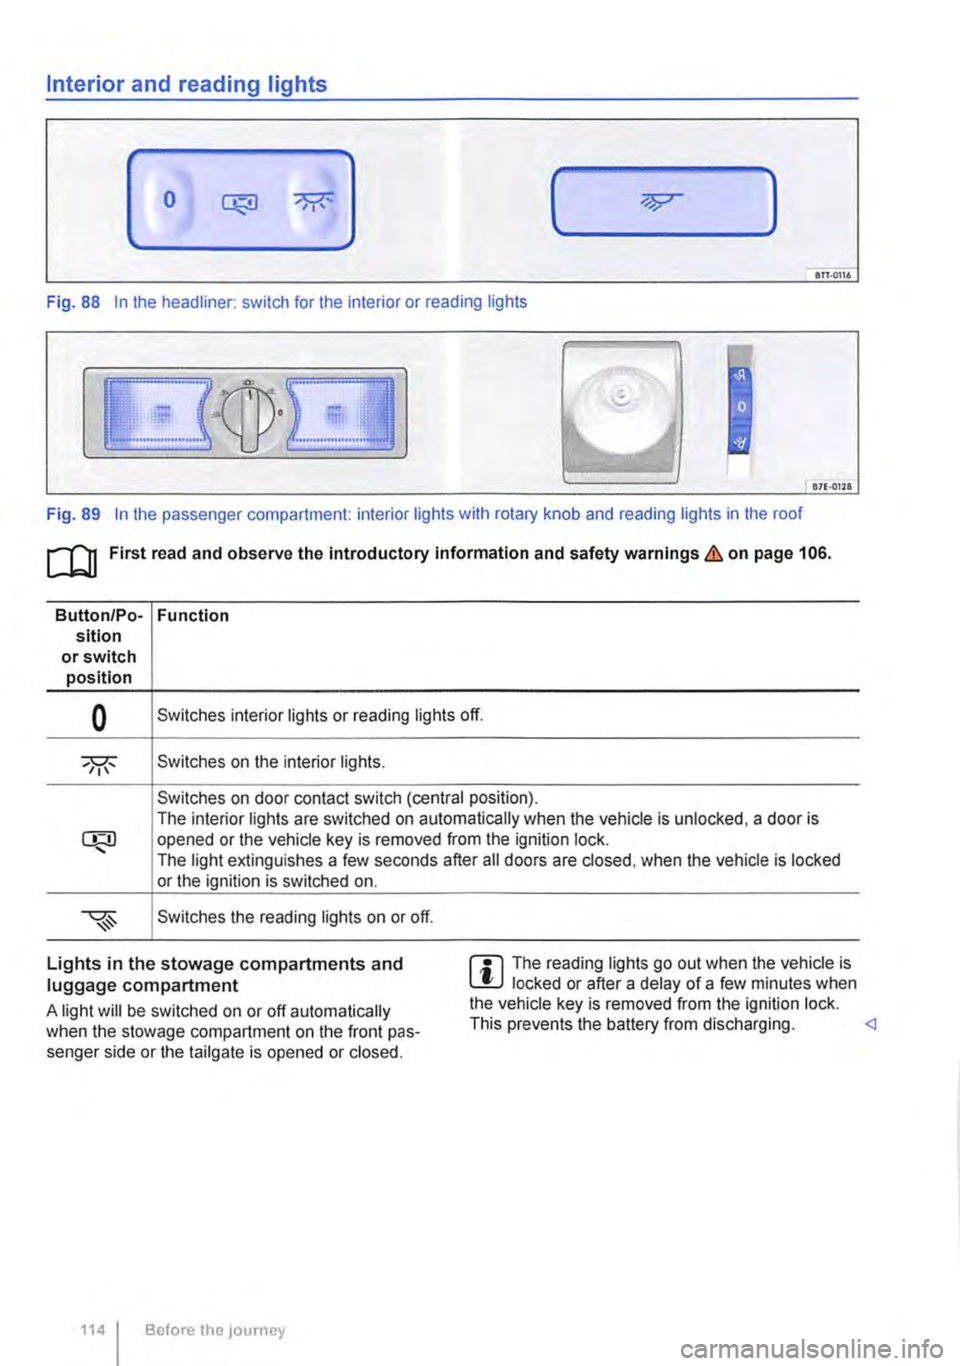
0 ( )
ITT·0116
Fig. 88 In the headliner: switch for the interior or reading lights
871·01ll
Fig. 89 In the passenger compartment: interior lights with rotary knob and reading lights in the roof
[Q] First read and observe the Introductory information and safety warnings&. on page 106.
Button/Po-Function sition or switch position
0 Switches interior lights or reading lights off.
Switches on the interior lights.
Switches on door contact switch (central position). The interior lights are switched on automatically when the vehicle is unlocked, a door is opened or the vehicle key is removed from the ignition lock. The light extinguishes a few seconds after all doors are closed, when the vehicle is locked or the ignition is switched on.
Switches the reading lights on or off.
Lights in the stowage compartments and luggage compartment
A light will be switched on or off automatically when the stowage compartment on the front pas-senger side or the tailgate is opened or closed.
1141 Before the journey
m The reading lights go out when the vehicle is W locked or after a delay of a few minutes when the vehicle key is removed from the ignition lock. This prevents the battery from discharging.
Page 117 of 486

A WARNING
Worn or dirty wiper blades reduce visibility and increase the risk of accidents and severe injuries.
• Wiper blades should therefore always be changed if they are damaged or worn and no longer clean the windscreen properly.
Indicator lamp
Q)
In icy conditions, always check that the wiper blades are not frozen to the glass before using the wipers. When parking the vehicle in cold weather, it may be helpful to leave the front windscreen wipers in the service position 119.
Lit up Possible cause
Windscreen washer fluid level too low.
Several warning and indicator lamps will light up briefly as a functional check when the ignition is switched on. They will go out after a few seconds.
Wiper lever
Fig. 92 Next to the steering wheel: wiper lever for operating the front wipers.
Solution
Fill up the washer fluid reservoir as soon as possible =>page 120.
Q)
Failure to observe illuminated indicator lamps and text messages can lead to your vehicle be-ing damaged.
[QJ First read and observe the introductory information and safety warnings & on page 116.
Move the lever into the required position
® Off Switches off the wipers.
Interval wipe for the windscreen.
® LOW Slow wipe.
@ IOOH Fast wipe.
Lights and vision 117
Page 118 of 486

Move the lever into the required position
0 lx Flick wipe -wipes briefly. Push and hold the lever down for longer to wipe more quickly.
® ,··.··· \X:) Pulling the lever aclivates the wash and wipe system for cleaning the windscreen.
® CQ Interval wipe for the rear window. The wiper will wipe the window approximately every 6 seconds .
0 ........ Pushing the lever activates the wash and wipe system for cleaning the rear window.
Q)
If the ignition is switched off while the wipers are still switched on, the wipers will continue to wipe on the same setting when the ignition Is switched on again. If there Is frost, snow or other obstructions on the windscreen or rear window, the wipers and wiper motor could be-come damaged.
• Remove any snow and ice from the wipers before setting off.
Wiper functions
Q)
Do not switch on the wipers when the window is dry. Using the wipers when the windscreen Is dry can damage the windscreen.
m The wipers will only function when the igni-W lion is switched on and the bonnet and tail-gate are closed.
m The rear window wiper is switched on auto-W matically if the front wipers are switched on and reverse gear is engaged.
Wiper response in various situations:
When the vehicle is stationary. When switched on, the wipers will temporarily be switched to the next setting down.
While the wash and wipe system is run-ning.
The Climatronic will switch to air recirculation mode for approxi-mately 30 seconds to prevent the smell of the windscreen wash-er fluid from entering the vehicle interior.
When the interval wipe is switched on. The wiper intervals vary according to the vehicle speed. The faster the vehicle is travelling, the shorter the interval.
Headlight washer system
The headlight washer system cleans the lenses on the headlights.
Once the ignition has been switched on, the head-lights will be washed the first time the windscreen washer system is used, and every fifth time there-after. To do this, pull the wiper lever towards the steering wheel when the dipped beam headlights or main beam are switched on. Clean off stubborn dirt (insects, etc.) from the headlights at regular in-tervals, for instance when filling the tank.
118 Before the journey
In winter, you should remove any snow from the headlight washer nozzles in the bumper to keep the headlight washer system in working order. Re-move any ice with a de-icer spray.
m The wipers will try to wipe away any obsta-W cles that are on the windscreen. The wipers will stop moving if the obstacle blocks their path. Remove the obstacle and switch the wipers back on again.
Page 119 of 486

Service position for the front wipers
Fig. 94 Wiper blades in service position.
r--('n First read and observe the introductory L-J,::.IJ information and safety warnings & on page 116.
The wiper arms can be lifted off the windscreen when in the service position 94. Carry out the following steps to move the wipers to the serv-ice position:
Rain sensor
CD
®
Fig. 95 Next to the steering wheel: adjusting rain sensor® in wiper lever.
r--('n First read and observe the introductory L-J,::.U information and safety warnings & on page 116.
When the rain sensor is activated, it automatically controls the frequency of the wiper intervals, de-pending on the amount of rain &. The sensitivity of the rain sensor can be adjusted manually. Man-ual wipe 117.
• The bonnet must be closed 350.
• Switch the ignition on and then off again.
• Briefly press down the wiper lever 92 @).
Place the wiper arms back onto the windscreen before driving away. Briefly press the wiper lever down to bring the wiper arms back to the original position.
Lifting the front wipers
• Move the wiper arms to the service position be-fore lifting
• When lifting the wiper arm hold it only by the wiper blade mounting.
CD
• In order to prevent damage to the bonnet and the wiper arms, the wiper arms should only be lifted when in the service position.
• Always return the wiper arms to the wind-screen before starting your journey.
Push the lever to the desired position 95:
@ Deactivates the rain sensor.
CD Rain sensor is active -automatic wipe when necessary.
® Adjusting the sensitivity of the rain sensor:
-Switch to the right-high sensitivity.
-Switch to the left -low sensitivity.
Lights and vision 119
Page 120 of 486

The rain sensor will remain active after the ignition is switched off and back on again and will function again if the wiper lever is in position G) and if the vehicle is travelling at speeds higher than approxi-mately 16 km/h (10 mph).
Changes to the functioning of the rain sensor
Possible causes for faults and misinterpretations concerning the sensitive surface 96 of the rain sensor include:
• Damaged wiper blades: a film of water or smears caused by damaged wiper blades can in-crease the time the wipers are switched on, can shorten the length of the intervals between wipes or cause the wipers to run continuously.
• Insects: insects hitting the surface can cause the wipers to be activated.
• Salt deposits: in winter, salt deposits can cause the wipers to continue to wipe the windscreen when it is almost dry.
• Soiling: dry dust, wax, windscreen coatings (lo-tus effect) or detergent deposits (automatic car wash) can cause the rain sensor to become less sensitive and react too slowly or even not at all.
• Crack in the windscreen: when the windscreen is impacted by a stone, a wash cycle is triggered if the rain sensor is on. The rain sensor will then reg-
ister the reduction in sensitivity of the surface and adjust accordingly. The size of the crack could af-fect the way in which the sensor activates the wip-ers.
A WARNING
The rain sensor will not always detect every rain shower and activate the wipers.
• If necessary, switch on the wipers manual-ly if the water on the windscreen restricts the field of vision.
m At regular intervals, clean the sensitive sur-L!...J face of the rain sensor and check the wiper blades for damage 96 (arrow).
m We recommend that you use an alcohoi-W based glass cleaner to remove wax and pol-ish.
Checking and refilling the windscreen washer fluid level
Fig. 97 In the engine compartment: cap of washer fluid reservoir.
r--T'n First read and observe the introductory L-J,:,JJ information and safety warnings & on page 116.
The windscreen washer fluid level should be checked regularly and topped up as necessary.
120 I Before the journey
A filter can be found in the feed throat of the wash-er fluid reservoir. The filter keeps large dirt particles away from the washer jets when refilling. The filter should only be removed for cleaning. if the filter is damaged or cannot be found when refilling, these dirt particles will reach the system and will block the washer jets.
• Open the bonnet & 350.
• The washer fluid reservoir is identified by the $ symbol on the cap 97.
• Check whether there is enough windscreen washer fluid in the reservoir.
• To top up, mix clean water (not distilled water) with a washer fluid recommended by Volkswagen Commercial Vehicles Observe the dilution in-structions on the packaging.
• At low temperatures, add a special anti-freeze agent so that the fluid cannot freeze &.
Page 122 of 486

A WARNING (Continued)
asthma or similar illnesses. Immediately en-sure that there is a sufficient supply of fresh air and get out of the vehicle. If this is not possible, open all of the windows and doors.
• If the electrolyte fluid gets into the eyes or onto the skin, immediately wash the area with plenty of water for at least 15 minutes and consult a doctor.
• If the electrolyte fluid gets onto shoes or clothing, wash immediately with plenty of wa-ter for at least 15 minutes. Clean shoes and clothes thoroughly before wearing them again.
Interior mirror
A WARNING (Continued)
• If the electrolyte fluid is swallowed, imme-diately rinse the mouth with plenty of water for at least 15 minutes. Do not induce vomit-ing unless instructed to do so by a doctor. Seek medical assistance immediately.
CD
If the glass of an automatic anti-dazzle mirror is broken, electrolyte fluid can leak from the mir-ror. This fluid corrodes plastic surfaces. Re-move the fluid as soon as possible, e.g. using a wet sponge.
BSG-0101.
Fig. 99 On the windscreen: manual anti-dazzle in-terior mirror.
1"'111 First read and observe the introductory L-lo::JJ information and safety warnings & on page 121.
The driver must adjust the interior mirror so that they can see clearly through the rear window.
1221 Before the journey
The driver's rear view may be restricted or com-pletely obscured by objects such as a sun blind on the rear window, items of clothing stowed on the luggage compartment cover, or a rear window that is covered in ice, snow or dirt.
Automatic anti-dazzle interior mirror
When the ignition is switched on, the interior mirror will darken automatically according to the amount of light it receives.
Key to Fig. 98:
G) Sensor for detemnining light incidence from the rear.
® Sensor for detemnining light incidence from the front.
If the light on the sensors is hindered or interrup-ted, e.g. by a sunblind, the automatic anti-dazzle interior mirror will not function or will not function correctly.
The automatic anti-dazzle function is deactivated when the reverse gear is selected. .,..
Page 163 of 486

Emptying the removable ashtray
• Lift the removable ashtray out of the drink hold-er.
• Open the removable ashtray and empty the cooled ashes into a suitable waste container.
• Once it has been emptied, place the removable ashtray back into the drink holder from above.
r-1'11 First read and observe the introductory L-J.::.IJ information and safety warnings & on page 161.
Depending on the vehicle equipment, a cigarette lighter may be fitted in the drink holder or in the stowage compartment in the dash panel.
• With the ignition switched on, press in the knob on the cigarette lighter.
• Wait for the lighter to pop out.
• Pull out the cigarette lighter and light the tobac-co product on the glowing
• Insert the cigarette lighter back into the socket.
Electrical sockets
c:r:n Introduction
This chapter contains information on the following subjects:
Sockets in the vehicle .......... . 164
Electrical equipment can be connected to the sock-ets in the vehicle.
The connected devices must be in good condition. Do not use faulty devices.
Additional information and warnings:
• Cigarette lighter 161
• Accessories, modifications, repairs and renewal of parts 394
• Consumer information 404
A WARNING
Improper use of the sockets and electrical ac-cessories can cause fires and severe injuries.
A WARNING
Improper use of the cigarette lighter can cause fires, burns and other serious injuries.
• Always use the cigarette lighter properly, and only use it to light tobacco products.
• Never leave children in the vehicle unat-tended. The cigarette lighter can be used when the ignition is switched on.
m The cigarette lighter can also be used as a L!..J 12-volt socket 163.
• Never leave children in the vehicle unat-tended. Sockets and the devices connected to them can be used when the ignition is switched on.
• If the electrical device gets too hot, switch off the device immediately and disconnect it from the socket.
CD
• In order to prevent damage to the electrical system, never connect equipment that gener-ates electricity, such as solar panels or battery chargers for charging the vehicle battery, to the 12-voit socket.
• Only use accessories that have been ap-proved in accordance with current guidelines concerning electromagnetic compatibility. .,..
Practical equipment 163
Page 164 of 486

CD
• In order to avoid damage due to voltage fluctuation, always switch any electrical con-sumers connected to the 12-volt sockets off be-fore switching the ignition or the engine on or off. When the start/stop system automatically switches off and restarts the engine, it Is not necessary to switch off any connected electri-cal consumers.
• Never connect electrical devices requiring more electrical power to a 12-volt socket. The vehicle's electrical system can be damaged If the maximum power output Is exceeded.
• Never feed electricity Into the socket.
Sockets in the vehicle
rT'n First read and observe the Introductory L-lo:J.I information and safety warnings&. on page 163.
There are two separate power circuits in the vehi-cle depending on the equipment:
• 12-volt DC circuit
• 230-volt AC circuit
Maximum power rating
Electrical Maximum power rating socket
12-volt 120 watts
230-volt 2500 watts
Do not exceed the maximum power rating. This al-so applies to the total power consumption of all connected devices if you connect several devices at the same time Introduction on page 163. The power rating of each device is stated on its type plate.
12-volt socket
Electrical equipment can be connected to the 12-volt sockets in the vehicle.
Using electrical appliances with the engine switch-ed off and the ignition switched on will drain the battery. Electrical consumers should therefore only be plugged into the sockets when the engine is running.
To prevent damage due to voltage fluctuation, switch off any connected devices before switching the ignition or engine on or off.
In the vehicle, there are 12-volt sockets in the fol-lowing locations, among others:
164 I Before the journey
Do not leave the engine running when the ve-l?1S hicle is stationary.
m Using electrical appliances with the engine L!..J switched off and the ignition switched on will drain the battery.
m Unshielded devices can cause interference L!..J with radio reception and vehicle electronics.
m Functional problems may occur with some L!..J devices when they are connected to the 230-volt socket due to the lower power output (wat-tage).
• In the stowage compartment on the dash panel under a small cover.
• In the stowage compartment in the dash panel.
• In the side trim panels in the passenger com-partment
• In the luggage compartment.
• In the roof frame of the pop-up roof.
230-volt grounded safety socket
The 230-volt grounded safety socket is supplied via electrical feed from the external socket 192.
The following electrical consumers are supplied from the 230-volt power supply via the external socket:
• Battery charger
• Depending on the vehicle equipment, the 230-volt grounded safety socket is located in the side trim panel behind the left front seat or on the side of the kitchen unit 192.
230-volt Euro socket
The 230-volt Euro socket is supplied via additional batteries or via an inverter and is located in the side trim panel behind the left front seat 192.
A DANGER !
High voltage In the electrical system!
• Never pour any liquid over the socket.
• Do not Insert any Items which will conduct electricity, such as knitting needles, Into the contacts of the 230-volt socket. .,.