Page 361 of 553

IN CASE OF EMERGENCY359
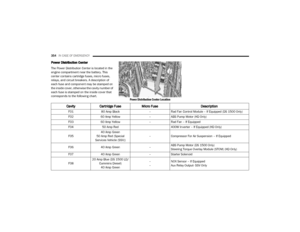
F68 –10 Amp Red AEB RACAM HTR – If Equipped (HD Only)
F69 –15 Amp Blue SCR Module – If Equipped (HD Only)
F70 –30 Amp GreenFuel Pump Motor / K09 RLY Coil Feed (Cummins Diesel) –
If Equipped
F71 –25 Amp ClearAmplifier / Active Noise Cancelation – If Equipped (HD
Only)
F72 –10 Amp RedPCM / DC/DC Converter Voltage– If Equipped (DS 1500
Only)
F73 –20 Amp Yellow Fuel Transfer Pump (Rear Tank) – If Equipped (HD Only)
F74 –20 Amp Yellow Brake Vacuum Pump Gas/Diesel – If Equipped (DS 1500
Only)
F74 –10 Amp Red Backup Alarm – If Equipped (HD Only)
F75 –10 Amp RedATMM / Coil-SCR Module RLY– If Equipped (HD Only)
Coolant Temperature Valve – If Equipped (DS 1500 Only)
F76 –10 Amp RedElectronic Stability Control (HD Only)
Brake System Module / Stop Lamp Switch / Electric Park
Brake / Clutch Pedal Switch (DS 1500 Only)
F77 –10 Amp RedDrivetrain Control Module / Front Axle Disconnect Module
/ TCM/ STOM (HD Only)
Drivetrain Control Module / ELSD / Front Axle Disconnect
Module / Transmission Control Relay / RDM / Power Take
Off Unit – If Equipped (DS 1500 Only)
Cavity
Cartridge Fuse Micro Fuse Description
6
20_DJD2_OM_EN_USC_t.book Page 359
Page 362 of 553

360IN CASE OF EMERGENCY
F78 –10 Amp RedEngine Control Module / Powertrain Control Module /
Electric Power Steering (DS 1500 Only)
F78 –15 Amp BlueEngine Control Module / Powertrain Control Module / AEB
RACM MOD / Feed To AUX PDC Relay Coils/ HRLS (HD
Only)
F79 –15 Amp Blue ID / Clearance Lights
F80 –10 Amp RedUniversal Garage Door Opener / Compass / Anti-Intrusion
Module (DS 1500 Only)
ASSY Overhead Console / SW Assist / SW 911 – If
Equipped (HD Only)
F81 –20 Amp Yellow Trailer Tow Right Turn / Stop Lights - If Equipped
F82 –10 Amp Red Steering Column Control Module / Cruise Control
F83 ––No Connection
F84 –15 Amp Blue ASBM / HVAC / ICS / Rear Heated Seat Switches
F85 –10 Amp Red Airbag Module
F86 –10 Amp Red Airbag Module
F87 –10 Amp RedAir Suspension / ITBM / Steering Column Control Module
/ MOD Gateway CAN-C Trailer TPM (HD Only)
Air Suspension / Trailer Tow / DC/DC Converter (Voltage
Stabilizer) / Steering Column Control Module / Occupant
Classification Sensor (DS 1500 Only)
F88 –15 Amp Blue Instrument Panel Cluster
CavityCartridge Fuse Micro Fuse Description
20_DJD2_OM_EN_USC_t.book Page 360
Page 363 of 553

IN CASE OF EMERGENCY361
F90/F91 –20 Amp Yellow IGN or BATT Customer Selectable – If Equipped (HD Only)
Power Outlet (Rear Seats) Customer Selectable (DS 1500
Only)
F93 –20 Amp Yellow Cigar Lighter - If Equipped
F94 –10 Amp RedShift-By-Wire / Transfer Case Switch (DS 1500 Only)
Shift-By-Wire / Transfer Case Switch / Module TPM Trailer
(HD Only) / Module Gateway Can-C Trailer TPM (HD Only)
F95 –10 Amp RedRearview Camera / Park Assist / CHMSL Camera / Blind
Spot Sensor / Surround View Camera (HD Only)
Rear Camera / Park Assist / Blind Spot Sensor / Compass
(DS 1500 Only)
F96 –10 Amp RedRear Seat Heater Switch / Trunk Lamp With Flashlamp
Charger / Truck Lamp - If Equipped (DS 1500 Only)
Trailer Camera – If Equipped (HD Only)
F97 –25 Amp ClearRear Heated Seats And Heated Steering Wheel – If
Equipped (DS 1500 Only)
F97 –20 Amp Yellow Front Heated Seat Passenger – If Equipped (HD Only)
F98 –25 Amp Clear Front Heated Seats – If Equipped (DS 1500 Only)
F98 –20 Amp Yellow Front Heated Seat Driver – If Equipped (HD Only)
F99 –10 Amp RedHVAC / DASM (DS 1500 Only)
HVAC / In-Car Temperature Sensor / CSG MOD (HD Only)
F100 –10 Amp Red Upfitters – If Equipped (HD Only)
F101 –15 Amp Blue SSV Only
CavityCartridge Fuse Micro Fuse Description
6
20_DJD2_OM_EN_USC_t.book Page 361
Page 364 of 553

362IN CASE OF EMERGENCY
JUMP STARTING
If your vehicle has a discharged battery, it can
be jump started using a set of jumper cables
and a battery in another vehicle, or by using a
portable battery booster pack. Jump starting
can be dangerous if done improperly, so please
follow the procedures in this section carefully.
NOTE:
When using a portable battery booster pack,
follow the manufacturer's operating instruc-
tions and precautions.
F101
–20 Amp Yellow Rear Heated Seat Right (HD Only)
F102 –20 Amp Yellow Rear Heated Seat Left / Run RLY #3 Coil (HD Only)
F103 –10 Amp Red HeadLamp AFLS (HD Only)
F104 –20 Amp Yellow Power Outlets (Instrument Panel / Center Console) / Trunk
– If Equipped (DS 1500 Only)
UCI Port / USB Rear (HD Only)
Cavity
Cartridge Fuse Micro Fuse Description
CAUTION!
When installing the power distribution
center cover, it is important to ensure the
cover is properly positioned and fully
latched. Failure to do so may allow water to
get into the power distribution center and
possibly result in an electrical system
failure.
When replacing a blown fuse, it is important
to use only a fuse having the correct
amperage rating. The use of a fuse with a
rating other than indicated may result in a
dangerous electrical system overload. If a
properly rated fuse continues to blow, it
indicates a problem in the circuit that must
be corrected.WARNING!
Do not attempt jump starting if the battery is
frozen. It could rupture or explode and cause
personal injury.
CAUTION!
Do not use a portable battery booster pack or
any other booster source with a system
voltage greater than 12 Volts or damage to
the battery, starter motor, alternator or
electrical system may occur.
20_DJD2_OM_EN_USC_t.book Page 362
Page 365 of 553

IN CASE OF EMERGENCY363
Preparations For Jump Start
The battery in your vehicle is located in the front
of the engine compartment, behind the driver
side headlight assembly.
NOTE:
If you have a diesel engine, you may have two
batteries, however jump start off the driver
side battery.
The positive battery post may be covered with
a protective cap if equipped. Lift up on the
cap to gain access to the positive battery
post. Do not jump off fuses. Only jump
directly off positive post which has a positive
(+) symbol on or around the post.
Positive Battery Post
1. Apply the parking brake, shift the auto
-
matic transmission into PARK and turn the
ignition OFF.
2. Turn off the heater, radio, and all unneces -
sary electrical accessories.
3. If using another vehicle to jump start the battery, park the vehicle within the jumper
cables’ reach, apply the parking brake and
make sure the ignition is OFF.
Jump Starting Procedure
Connecting The Jumper Cables
WARNING!
Take care to avoid the radiator cooling fan
whenever the hood is raised. It can start
anytime the ignition switch is ON. You can
be injured by moving fan blades.
Remove any metal jewelry such as rings,
watch bands and bracelets that could
make an inadvertent electrical contact. You
could be seriously injured.
Batteries contain sulfuric acid that can
burn your skin or eyes and generate
hydrogen gas which is flammable and
explosive. Keep open flames or sparks
away from the battery.
WARNING!
Do not allow vehicles to touch each other as
this could establish a ground connection and
personal injury could result.
WARNING!
Failure to follow this jump starting procedure
could result in personal injury or property
damage due to battery explosion.
CAUTION!
Failure to follow these procedures could
result in damage to the charging system of
the booster vehicle or the discharged vehicle.
6
20_DJD2_OM_EN_USC_t.book Page 363
Page 366 of 553

364IN CASE OF EMERGENCY
1. Connect the positive
(+) end of the jumper
cable to the positive (+)
post of the
discharged vehicle.
NOTE:
Do not jump off fuses. Only jump directly off
positive post.
2. Connect the opposite end of the positive (+)
jumper cable to the positive (+) post of the
booster battery.
3. Connect the negative (-) end of the jumper
cable to the negative (-) post of the booster
battery.
4. Connect the opposite end of the negative (-)
jumper cable to a good engine ground
(exposed metal part of the discharged vehicle’s engine) away from the battery and
the fuel injection system.
5. Start the engine in the vehicle that has the booster battery, let the engine idle a few
minutes, and then start the engine in the
vehicle with the discharged battery.
6. Once the engine is started, remove the jumper cables in the reverse sequence. Disconnecting The Jumper Cables
1. Disconnect the negative
(-)
end of the
jumper cable from the engine ground of
the vehicle with the discharged battery.
2. Disconnect the opposite end of the negative (-) jumper cable from the negative (-) post of
the booster battery.
3. Disconnect the positive (+) end of the
jumper cable from the positive (+) post of
the booster battery.
4. Disconnect the opposite end of the positive (+) jumper cable from the positive (+) post
of the vehicle with the discharged battery.
If frequent jump starting is required to start your
vehicle you should have the battery and
charging system inspected at an authorized
dealer.
WARNING!
Do not connect the jumper cable to the
negative (-) post of the discharged battery.
The resulting electrical spark could cause the
battery to explode and could result in
personal injury. Only use the specific ground
point, do not use any other exposed metal
parts.
CAUTION!
Do not connect jumper cable to any of the
fuses on the positive battery terminal. The
resulting electrical current will blow the fuse.
20_DJD2_OM_EN_USC_t.book Page 364
Page 367 of 553

IN CASE OF EMERGENCY365
GEAR SELECTOR OVERRIDE — 6–SPEED
TRANSMISSION
If a malfunction occurs and the gear selector
cannot be moved out of the PARK position, you
can use the following procedure to temporarily
move the gear selector:
1. Turn the engine OFF.
2. Firmly apply the parking brake.
3. Tilt the steering wheel to the full up position.
4. Press and maintain firm pressure on the
brake pedal. 5. Insert a screwdriver or similar tool into the
access port (ringed circle) on the bottom of
the steering column, and push and hold the
override release lever up.
Gear Selector Override Access Port Location Gear Selector Override Access Port Engaging The Access Port
6. Move the gear selector to the NEUTRAL position.
7. The vehicle may then be started in NEUTRAL.
CAUTION!
Accessories plugged into the vehicle power
outlets draw power from the vehicle’s battery,
even when not in use (i.e., cellular devices,
etc.). Eventually, if plugged in long enough
without engine operation, the vehicle’s
battery will discharge sufficiently to degrade
battery life and/or prevent the engine from
starting.
6
20_DJD2_OM_EN_USC_t.book Page 365
Page 368 of 553

366IN CASE OF EMERGENCY
MANUAL PARK RELEASE — 8 – SPEED
TRANSMISSION
To push or tow the vehicle in cases where the
transmission will not shift out of PARK (such as
a depleted battery), a Manual Park Release is
available.
Manual Park Release Panel Cover
Manual Park Release Pull Strap
Follow these steps to activate the Manual Park
Release:
1. Firmly apply the parking brake.
2. Using a small screwdriver or similar tool,
remove the Manual Park Release access
cover, which is just above the parking brake
release handle, below and to the left of the
steering column.
3. Press and maintain firm pressure on the brake pedal.
4. Using the screwdriver or similar tool, push the Manual Park Release lever locking tab
(just below the middle of the lever) to the
right.
5. While holding the locking tab in the disen -
gaged position, pull the tether strap to
rotate the lever rearward, until it locks in
place pointing towards the driver's seat.
Release the locking tab and verify that the
Manual Park Release lever is locked in the
released position.
6. The vehicle is now out of PARK and can be towed. Release the parking brake only when
the vehicle is securely connected to a tow
vehicle.
WARNING!
Always secure your vehicle by fully applying
the parking brake before activating the
Manual Park Release. In addition, you should
be seated in the driver’s seat with your foot
firmly on the brake pedal when activating the
Manual Park Release. Activating the Manual
Park Release will allow your vehicle to roll
away if it is not secured by the parking brake,
or by proper connection to a tow vehicle.
Activating the Manual Park Release on an
unsecured vehicle could lead to serious injury
or death for those in or around the vehicle.
20_DJD2_OM_EN_USC_t.book Page 366