2020 PEUGEOT PARTNER TEPEE fold seats
[x] Cancel search: fold seatsPage 40 of 216
38
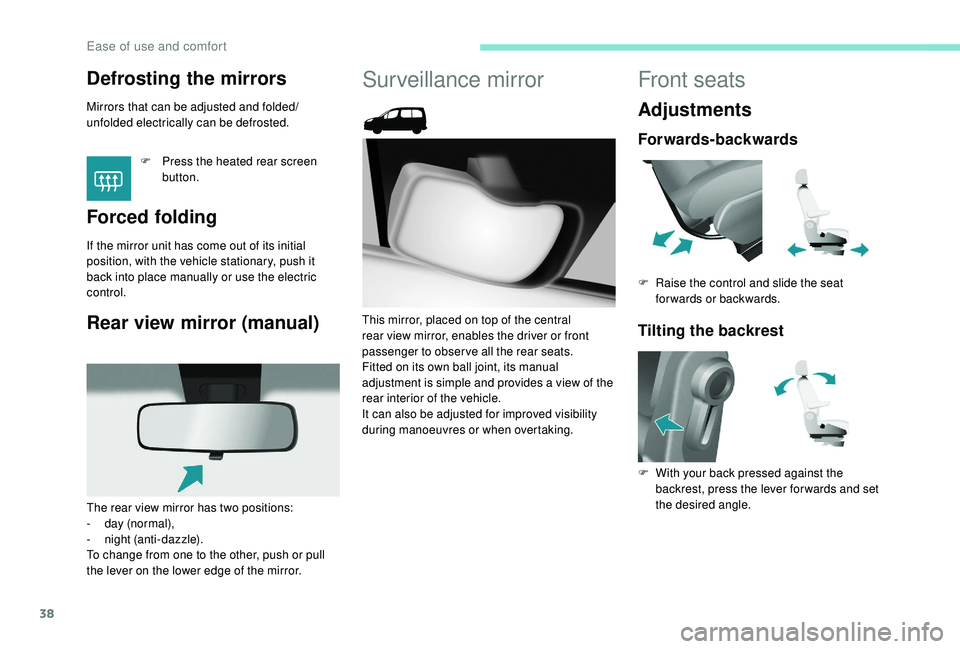
Defrosting the mirrors
Mirrors that can be adjusted and folded/
unfolded electrically can be defrosted.F
P
ress the heated rear screen
button.
Forced folding
If the mirror unit has come out of its initial
position, with the vehicle stationary, push it
back into place manually or use the electric
control.
Rear view mirror (manual)
Surveillance mirror
This mirror, placed on top of the central
rear view mirror, enables the driver or front
passenger to observe all the rear seats.
Fitted on its own ball joint, its manual
adjustment is simple and provides a view of the
rear interior of the vehicle.
It can also be adjusted for improved visibility
during manoeuvres or when overtaking.
The rear view mirror has two positions:
-
d
ay (normal),
-
n
ight (anti-dazzle).
To change from one to the other, push or pull
the lever on the lower edge of the mirror.
Front seats
Adjustments
Forwards-backwards
F Raise the control and slide the seat forwards or backwards.
Tilting the backrest
F With your back pressed against the backrest, press the lever for wards and set
the desired angle.
Ease of use and comfort
Page 41 of 216
39
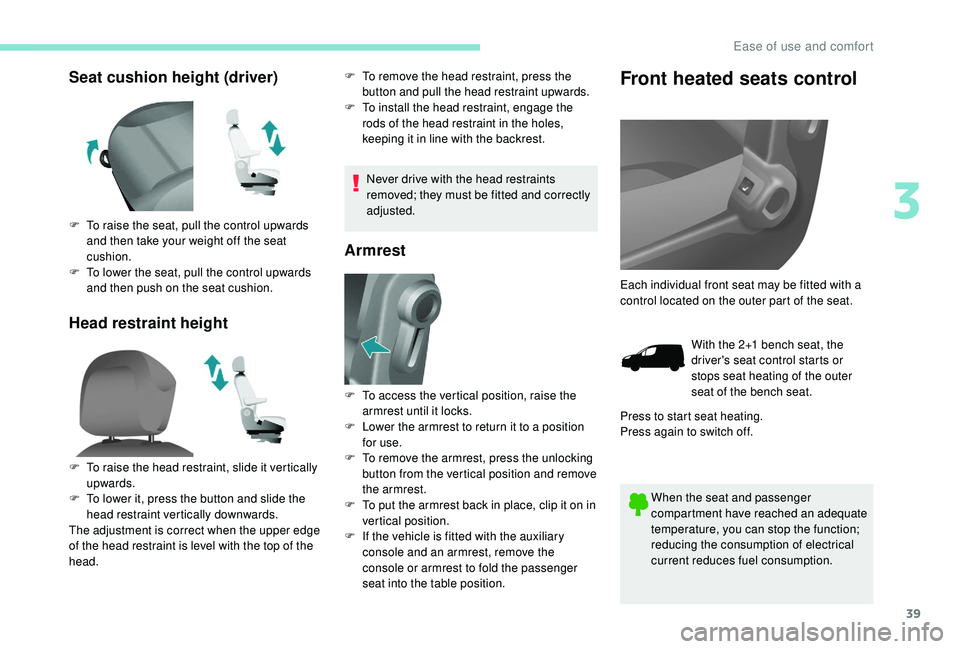
Seat cushion height (driver)
Head restraint heightF To remove the head restraint, press the button and pull the head restraint upwards.
F
T
o install the head restraint, engage the
rods of the head restraint in the holes,
keeping it in line with the backrest.
Never drive with the head restraints
removed; they must be fitted and correctly
adjusted.
Armrest
Front heated seats control
When the seat and passenger
compartment have reached an adequate
temperature, you can stop the function;
reducing the consumption of electrical
current reduces fuel consumption.
F
T
o raise the seat, pull the control upwards
and then take your weight off the seat
cushion.
F
T
o lower the seat, pull the control upwards
and then push on the seat cushion.
F
T
o raise the head restraint, slide it vertically
upwards.
F
T
o lower it, press the button and slide the
head restraint vertically downwards.
The adjustment is correct when the upper edge
of the head restraint is level with the top of the
head. F
T
o access the vertical position, raise the
armrest until it locks.
F
L
ower the armrest to return it to a position
for use.
F
T
o remove the armrest, press the unlocking
button from the vertical position and remove
the armrest.
F
T
o put the armrest back in place, clip it on in
vertical position.
F
I
f the vehicle is fitted with the auxiliary
console and an armrest, remove the
console or armrest to fold the passenger
seat into the table position. Each individual front seat may be fitted with a
control located on the outer part of the seat.
With the 2+1 bench seat, the
driver's seat control starts or
stops seat heating of the outer
seat of the bench seat.
Press to start seat heating.
Press again to switch off.
3
Ease of use and comfort
Page 42 of 216
40
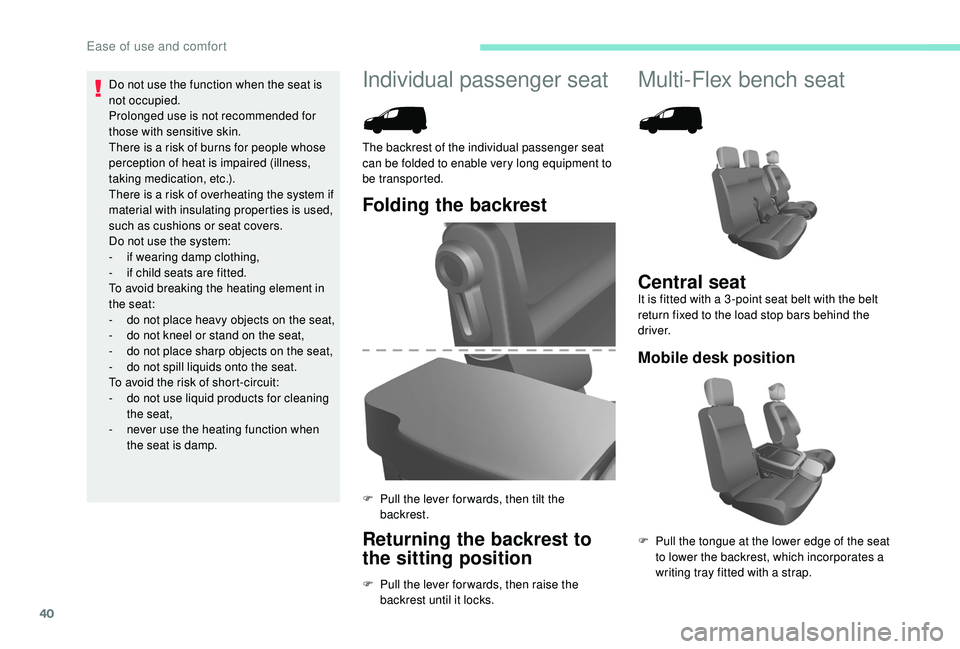
Individual passenger seat Multi-Flex bench seat
Folding the backrest
Returning the backrest to
the sitting position
F Pull the lever for wards, then raise the backrest until it locks.
The backrest of the individual passenger seat
can be folded to enable very long equipment to
be transported.
F
P
ull the lever for wards, then tilt the
backrest.
Central seatIt is fitted with a 3 -point seat belt with the belt
return fixed to the load stop bars behind the
driver.
Mobile desk position
F Pull the tongue at the lower edge of the seat to lower the backrest, which incorporates a
writing tray fitted with a strap.
Do not use the function when the seat is
not occupied.
Prolonged use is not recommended for
those with sensitive skin.
There is a risk of burns for people whose
perception of heat is impaired (illness,
taking medication, etc.).
There is a risk of overheating the system if
material with insulating properties is used,
such as cushions or seat covers.
Do not use the system:
-
i
f wearing damp clothing,
-
i
f child seats are fitted.
To avoid breaking the heating element in
the seat:
-
d
o not place heavy objects on the seat,
-
d
o not kneel or stand on the seat,
-
d
o not place sharp objects on the seat,
-
d
o not spill liquids onto the seat.
To avoid the risk of short-circuit:
-
d
o not use liquid products for cleaning
the seat,
-
n
ever use the heating function when
the seat is damp.
Ease of use and comfort
Page 44 of 216
42
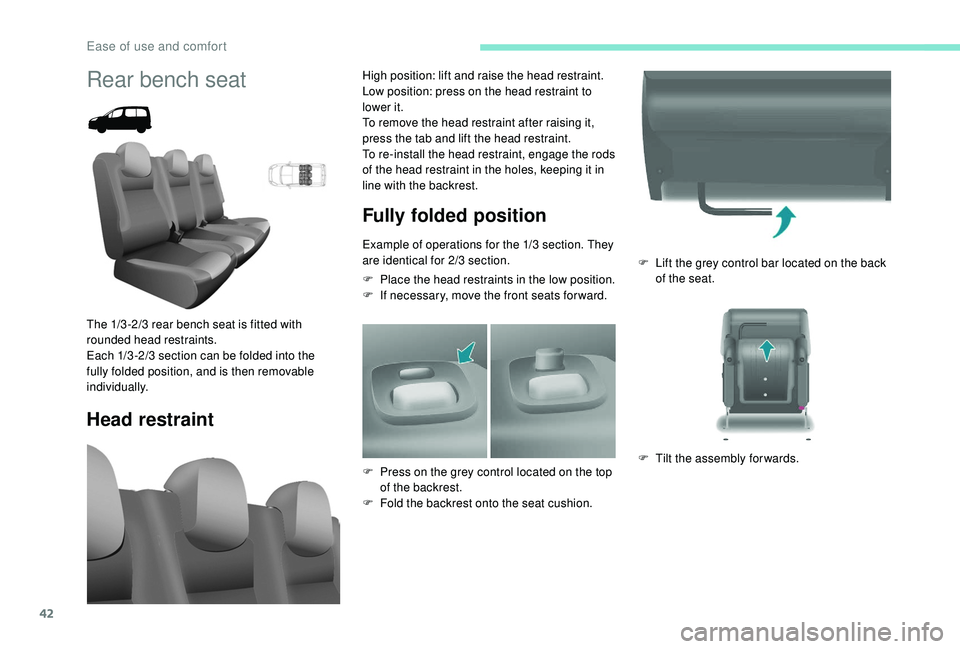
F Lift the grey control bar located on the back of the seat.
F
T
ilt the assembly forwards.
Rear bench seat
Head restraint Fully folded position
Example of operations for the 1/3 section. They
are identical for 2/3 section.
F
P
lace the head restraints in the low position.
F
I
f necessary, move the front seats for ward.
The 1/3 -2/3 rear bench seat is fitted with
rounded head restraints.
Each 1/3 -2/3 section can be folded into the
fully folded position, and is then removable
individually. High position: lift and raise the head restraint.
Low position: press on the head restraint to
lower it.
To remove the head restraint after raising it,
press the tab and lift the head restraint.
To re-install the head restraint, engage the rods
of the head restraint in the holes, keeping it in
line with the backrest.
F
P
ress on the grey control located on the top
of the backrest.
F
F
old the backrest onto the seat cushion.
Ease of use and comfort
Page 45 of 216
43
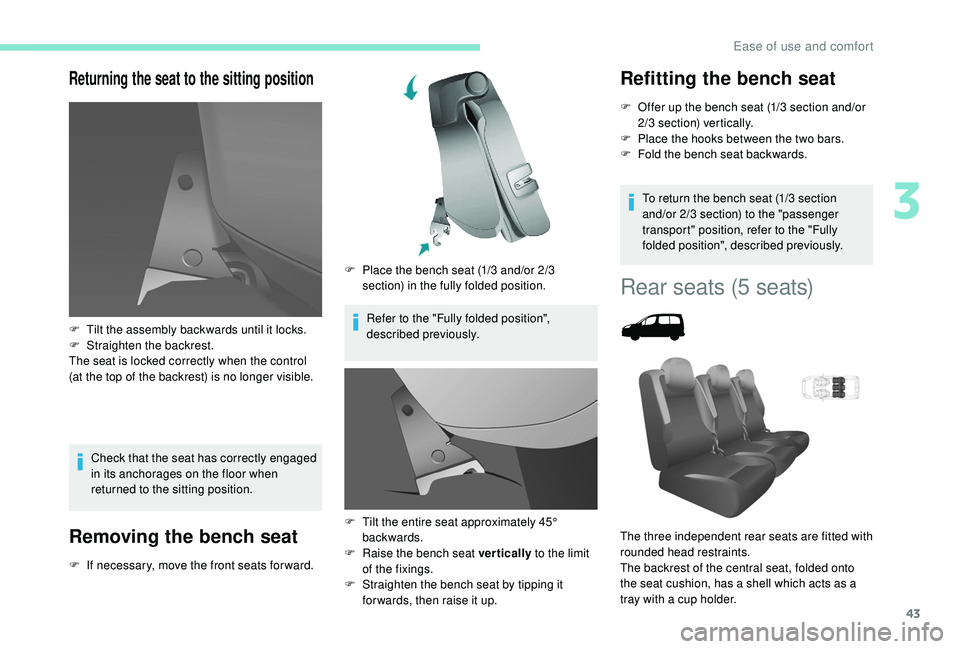
Returning the seat to the sitting position
Check that the seat has correctly engaged
in its anchorages on the floor when
returned to the sitting position.
Removing the bench seat
F If necessary, move the front seats for ward.F
P
lace the bench seat (1/3 and/or 2/3
section) in the fully folded position.
Refer to the "Fully folded position",
described previously.
F
T
ilt the assembly backwards until it locks.
F
S
traighten the backrest.
The seat is locked correctly when the control
(at the top of the backrest) is no longer visible.
F
T
ilt the entire seat approximately 45°
backwards.
F Ra ise the bench seat vertically
to the limit
of the fixings.
F
S
traighten the bench seat by tipping it
for wards, then raise it up.
Refitting the bench seat
F Offer up the bench seat (1/3 section and/or 2/3 section) vertically.
F
P
lace the hooks between the two bars.
F
F
old the bench seat backwards.
To return the bench seat (1/3 section
and/or 2/3 section) to the "passenger
transport" position, refer to the "Fully
folded position", described previously.
Rear seats (5 seats)
The three independent rear seats are fitted with
rounded head restraints.
The backrest of the central seat, folded onto
the seat cushion, has a shell which acts as a
tray with a cup holder.
3
Ease of use and comfort
Page 47 of 216
45
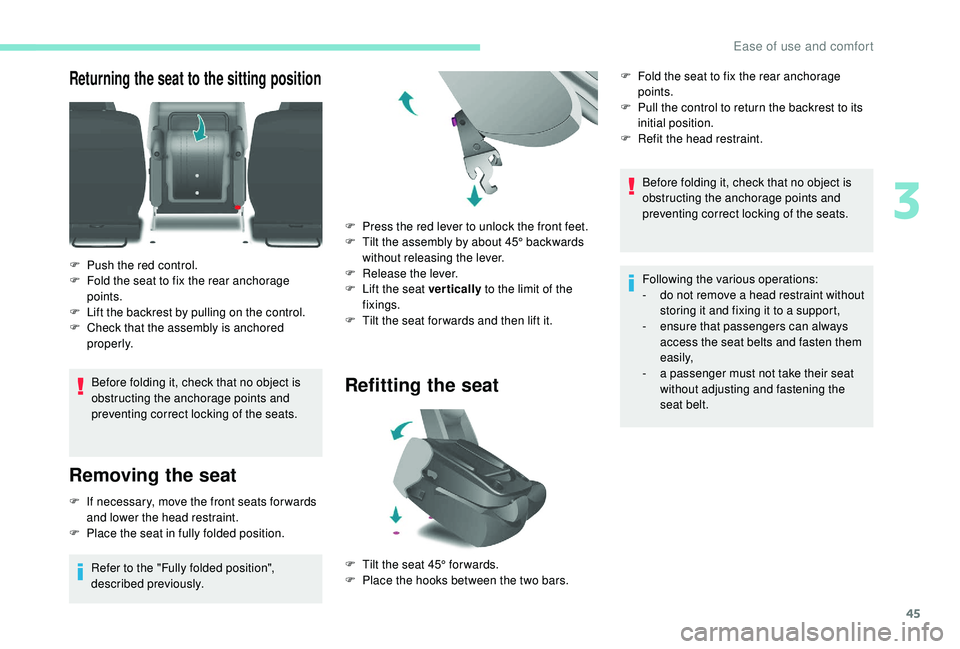
Returning the seat to the sitting position
Before folding it, check that no object is
obstructing the anchorage points and
preventing correct locking of the seats.
Removing the seat
F If necessary, move the front seats for wards and lower the head restraint.
F
P
lace the seat in fully folded position.
Refer to the "Fully folded position",
described previously. F
P
ress the red lever to unlock the front feet.
F
T
ilt the assembly by about 45° backwards
without releasing the lever.
F
R
elease the lever.
F
L
ift the seat vertically
to the limit of the
fixings.
F
T
ilt the seat for wards and then lift it.
Refitting the seat
F Push the red control.
F
F old the seat to fix the rear anchorage
points.
F
L
ift the backrest by pulling on the control.
F
C
heck that the assembly is anchored
properly.
F
T
ilt the seat 45° for wards.
F
P
lace the hooks between the two bars.Before folding it, check that no object is
obstructing the anchorage points and
preventing correct locking of the seats.
Following the various operations:
-
d
o not remove a head restraint without
storing it and fixing it to a support,
-
e
nsure that passengers can always
access the seat belts and fasten them
easily,
-
a p
assenger must not take their seat
without adjusting and fastening the
seat belt.
F
F
old the seat to fix the rear anchorage
points.
F
P
ull the control to return the backrest to its
initial position.
F
R
efit the head restraint.
3
Ease of use and comfort
Page 48 of 216
46
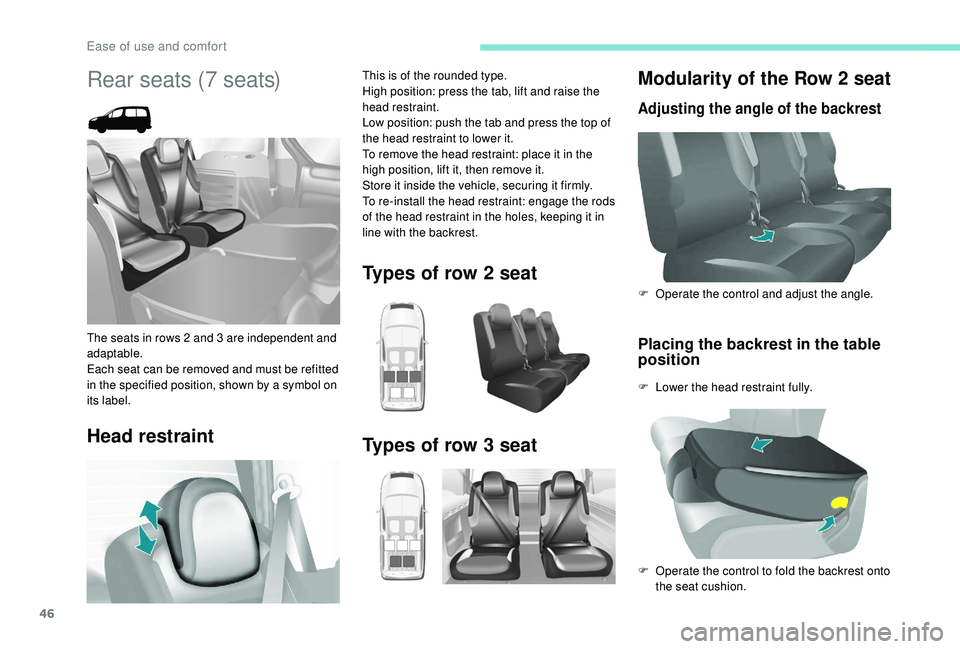
Modularity of the Row 2 seat
Adjusting the angle of the backrest
Placing the backrest in the table
position
F Lower the head restraint fully. F
O
perate the control and adjust the angle.
F
O
perate the control to fold the backrest onto
the seat cushion.
Rear seats (7 seats)
The seats in rows 2 and 3 are independent and
adaptable.
Each seat can be removed and must be refitted
in the specified position, shown by a symbol on
its label.
Head restraint
This is of the rounded type.
High position: press the tab, lift and raise the
head restraint.
Low position: push the tab and press the top of
the head restraint to lower it.
To remove the head restraint: place it in the
high position, lift it, then remove it.
Store it inside the vehicle, securing it firmly.
To re-install the head restraint: engage the rods
of the head restraint in the holes, keeping it in
line with the backrest.
Types of row 2 seat
Types of row 3 seat
Ease of use and comfort
Page 51 of 216
49
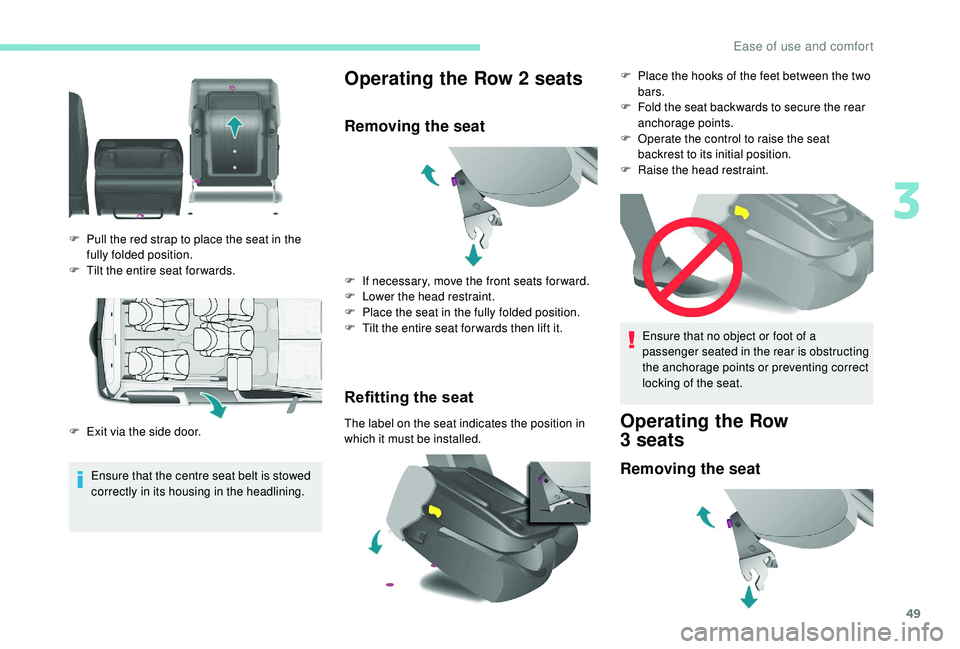
Ensure that the centre seat belt is stowed
correctly in its housing in the headlining.
Operating the Row 2 seats
Removing the seat
Refitting the seat
The label on the seat indicates the position in
which it must be installed.
F
P
ull the red strap to place the seat in the
fully folded position.
F
T
ilt the entire seat for wards.
F
E
xit via the side door. F
I
f necessary, move the front seats for ward.
F
L
ower the head restraint.
F
P
lace the seat in the fully folded position.
F
T
ilt the entire seat for wards then lift it.
Ensure that no object or foot of a
passenger seated in the rear is obstructing
the anchorage points or preventing correct
locking of the seat.Operating the Row
3 seats
Removing the seat
F Place the hooks of the feet between the two
bars.
F
F
old the seat backwards to secure the rear
anchorage points.
F
O
perate the control to raise the seat
backrest to its initial position.
F
Ra
ise the head restraint.
3
Ease of use and comfort