2020 PEUGEOT PARTNER TEPEE fold seats
[x] Cancel search: fold seatsPage 52 of 216
50
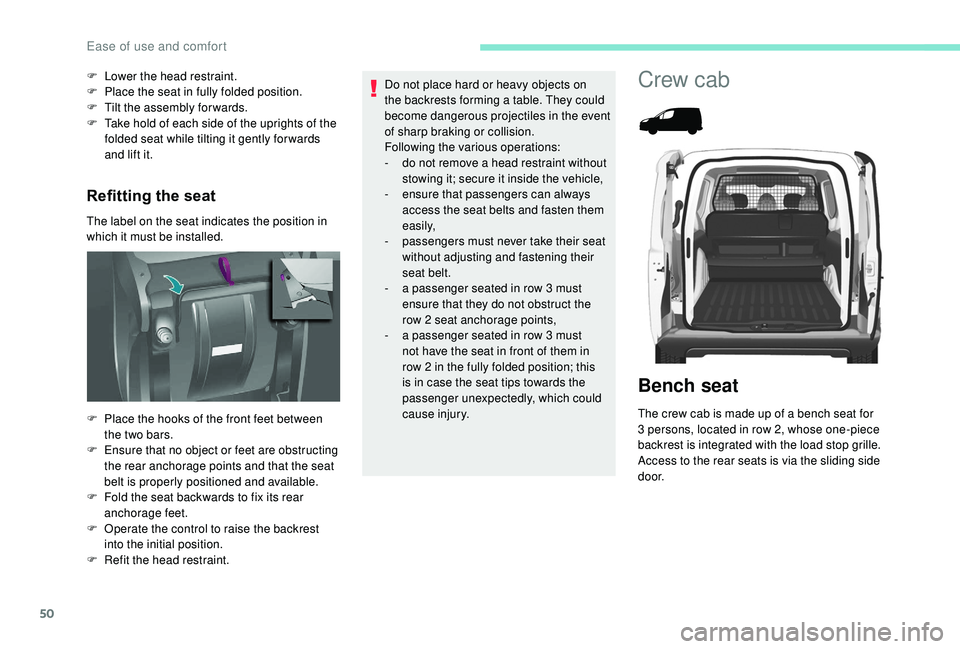
Refitting the seat
The label on the seat indicates the position in
which it must be installed. F
L
ower the head restraint.
F
P
lace the seat in fully folded position.
F
T
ilt the assembly forwards.
F
T
ake hold of each side of the uprights of the
folded seat while tilting it gently for wards
and lift it.
F
P
lace the hooks of the front feet between
the two bars.
F
E
nsure that no object or feet are obstructing
the rear anchorage points and that the seat
belt is properly positioned and available.
F
F
old the seat backwards to fix its rear
anchorage feet.
F
O
perate the control to raise the backrest
into the initial position.
F
R
efit the head restraint. Do not place hard or heavy objects on
the backrests forming a table. They could
become dangerous projectiles in the event
of sharp braking or collision.
Following the various operations:
-
d
o not remove a head restraint without
stowing it; secure it inside the vehicle,
-
e
nsure that passengers can always
access the seat belts and fasten them
easily,
-
p
assengers must never take their seat
without adjusting and fastening their
seat belt.
-
a p
assenger seated in row 3 must
ensure that they do not obstruct the
row 2 seat anchorage points,
-
a p
assenger seated in row 3 must
not have the seat in front of them in
row 2 in the fully folded position; this
is in case the seat tips towards the
passenger unexpectedly, which could
cause injury.
Crew cab
Bench seat
The crew cab is made up of a bench seat for
3 persons, located in row 2, whose one-piece
backrest is integrated with the load stop grille.
Access to the rear seats is via the sliding side
d o o r.
Ease of use and comfort
Page 53 of 216
51
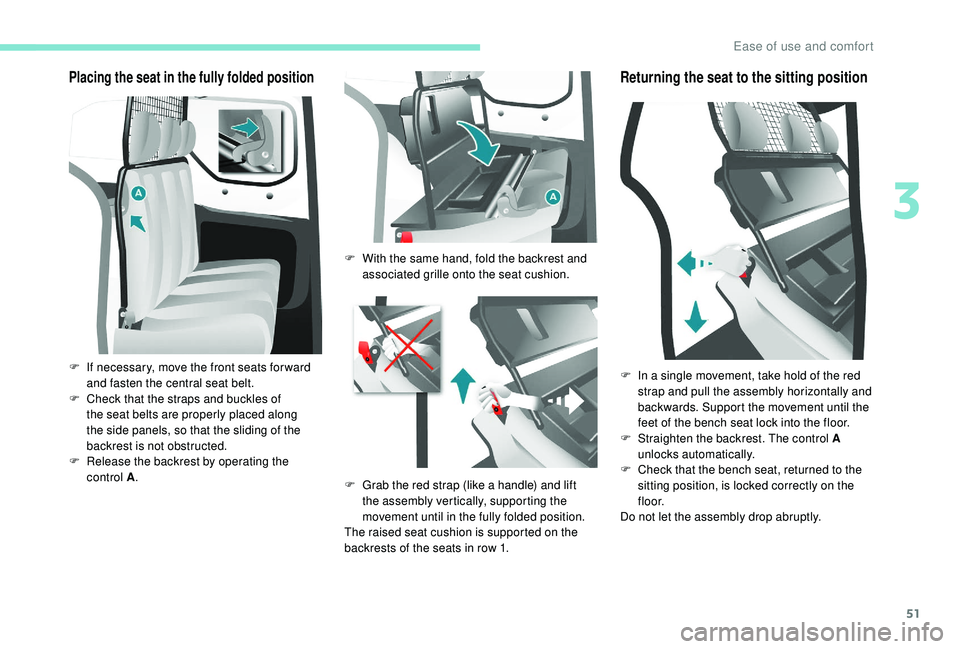
Placing the seat in the fully folded position
F If necessary, move the front seats for ward and fasten the central seat belt.
F
C
heck that the straps and buckles of
the seat belts are properly placed along
the side panels, so that the sliding of the
backrest is not obstructed.
F
R
elease the backrest by operating the
control
A. F
W
ith the same hand, fold the backrest and
associated grille onto the seat cushion.
F
G
rab the red strap (like a handle) and lift
the assembly vertically, supporting the
movement until in the fully folded position.
The raised seat cushion is supported on the
backrests of the seats in row 1.
Returning the seat to the sitting position
F In a single movement, take hold of the red strap and pull the assembly horizontally and
backwards. Support the movement until the
feet of the bench seat lock into the floor.
F
S
traighten the backrest. The control A
unlocks automatically.
F
C
heck that the bench seat, returned to the
sitting position, is locked correctly on the
f l o o r.
Do not let the assembly drop abruptly.
3
Ease of use and comfort
Page 57 of 216
55
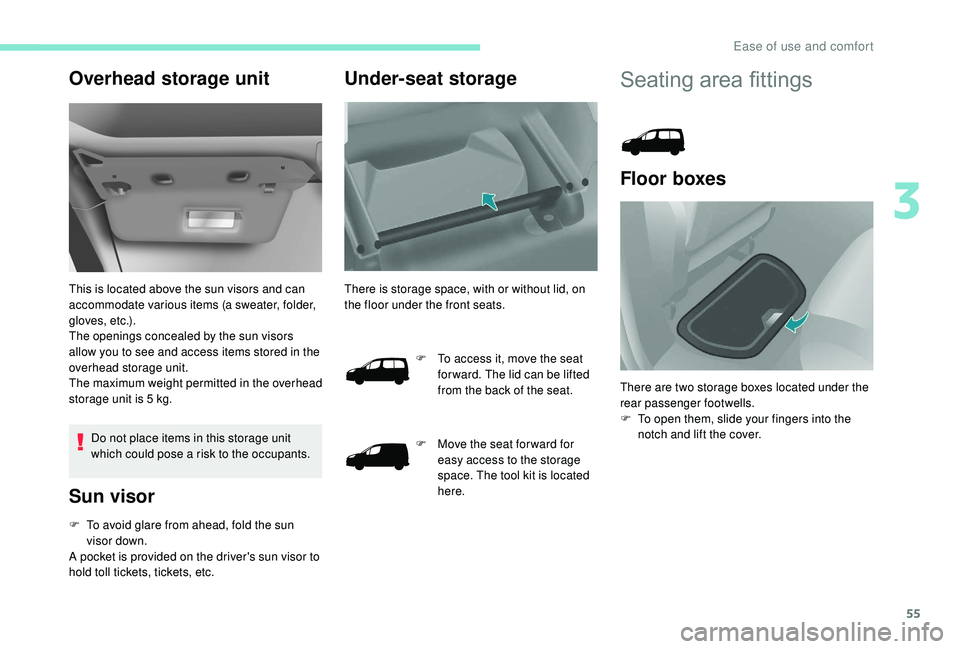
Overhead storage unit
This is located above the sun visors and can
accommodate various items (a sweater, folder,
gloves, etc.).
The openings concealed by the sun visors
allow you to see and access items stored in the
overhead storage unit.
The maximum weight permitted in the overhead
storage unit is 5 kg.
Do not place items in this storage unit
which could pose a risk to the occupants.
Sun visor
F To avoid glare from ahead, fold the sun visor down.
A pocket is provided on the driver's sun visor to
hold toll tickets, tickets, etc.
Under-seat storage
There is storage space, with or without lid, on
the floor under the front seats.
F
T
o access it, move the seat
for ward. The lid can be lifted
from the back of the seat.
F
M
ove the seat for ward for
easy access to the storage
space. The tool kit is located
here.
Seating area fittings
Floor boxes
There are two storage boxes located under the
rear passenger footwells.
F
T
o open them, slide your fingers into the
notch and lift the cover.
3
Ease of use and comfort
Page 62 of 216
60
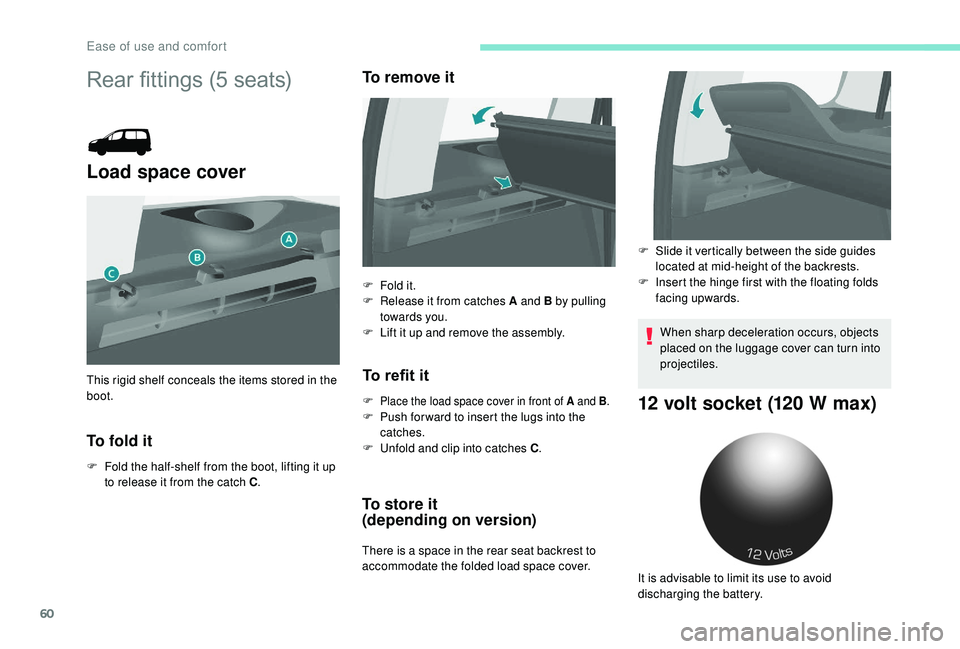
Rear fittings (5 seats)
Load space cover
To fold it
F Fold the half-shelf from the boot, lifting it up to release it from the catch C .
To remove it
To refit it
F Place the load space cover in front of A and B .F Push for ward to insert the lugs into the
catches.
F
U
nfold and clip into catches C .
To store it
(depending on version)
There is a space in the rear seat backrest to
accommodate the folded load space cover.
This rigid shelf conceals the items stored in the
boot.
F
F
old it.
F
R
elease it from catches A and B by pulling
towards you.
F
L
ift it up and remove the assembly.
When sharp deceleration occurs, objects
placed on the luggage cover can turn into
projectiles.
12 volt socket (120 W max)
F Slide it vertically between the side guides
located at mid-height of the backrests.
F
I
nsert the hinge first with the floating folds
facing upwards.
It is advisable to limit its use to avoid
discharging the battery.
Ease of use and comfort
Page 64 of 216
62
It is recommended that the load be
secured firmly using the stowing rings on
t h e f l o o r.
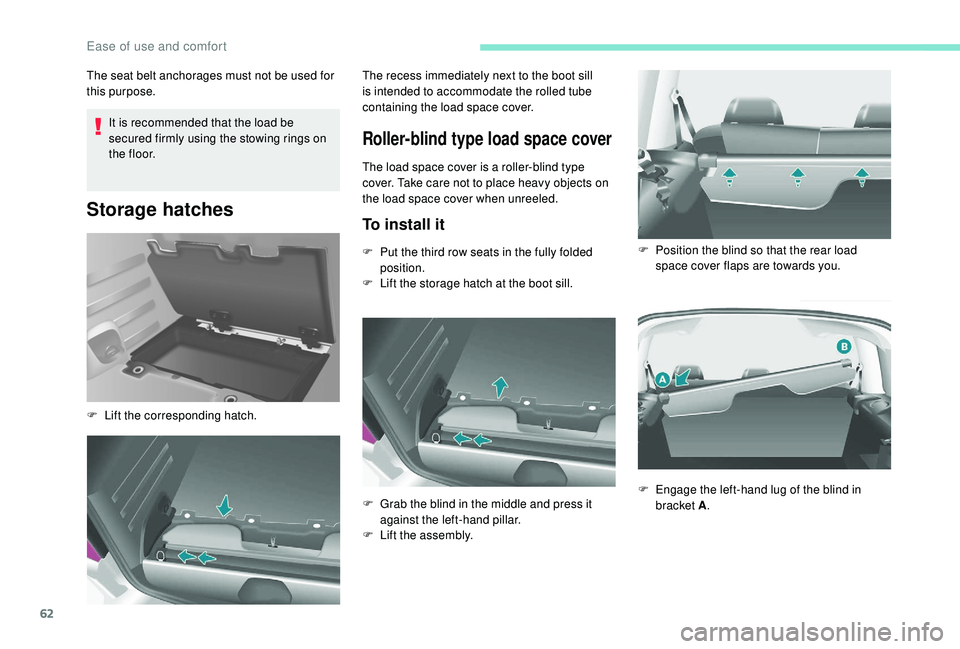
Storage hatches
The seat belt anchorages must not be used for
this purpose.
Roller-blind type load space cover
The load space cover is a roller-blind type
cover. Take care not to place heavy objects on
the load space cover when unreeled.
To install it
F Lift the corresponding hatch.The recess immediately next to the boot sill
is intended to accommodate the rolled tube
containing the load space cover.
F
P
ut the third row seats in the fully folded
position.
F
L
ift the storage hatch at the boot sill.
F
G
rab the blind in the middle and press it
against the left-hand pillar.
F
L
ift the assembly.F
P
osition the blind so that the rear load
space cover flaps are towards you.
F
E
ngage the left-hand lug of the blind in
bracket A .
Ease of use and comfort
Page 84 of 216
82
Rear seat belts (5 seat
version)
The rear seats are fitted with
three-point inertia reel seat belts.
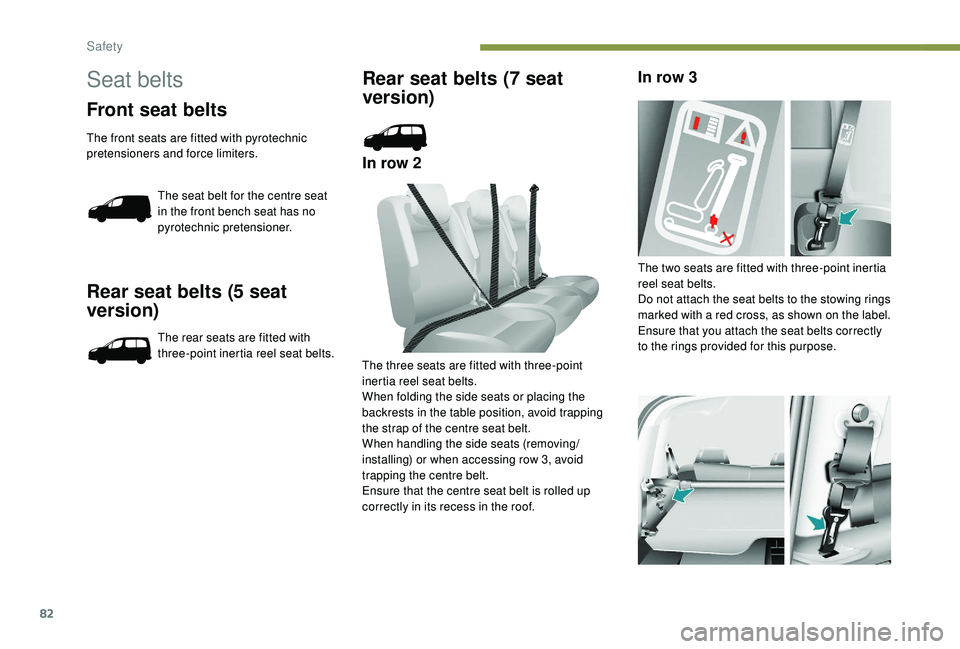
Rear seat belts (7 seat
version)
In row 2In row 3
The three seats are fitted with three-point
inertia reel seat belts.
When folding the side seats or placing the
backrests in the table position, avoid trapping
the strap of the centre seat belt.
When handling the side seats (removing/
installing) or when accessing row 3, avoid
trapping the centre belt.
Ensure that the centre seat belt is rolled up
correctly in its recess in the roof. The two seats are fitted with three-point inertia
reel seat belts.
Do not attach the seat belts to the stowing rings
marked with a red cross, as shown on the label.
Ensure that you attach the seat belts correctly
to the rings provided for this purpose.
Seat belts
Front seat belts
The front seats are fitted with pyrotechnic
pretensioners and force limiters.
The seat belt for the centre seat
in the front bench seat has no
pyrotechnic pretensioner.
Safety
Page 86 of 216

84
Advice
The driver must ensure that passengers use
the seat belts correctly and that they are all
fastened before setting off.
Wherever you are seated in the vehicle,
always fasten your seat belt, even for short
journeys.
Do not interchange the seat belt buckles as
they will not fulfil their role fully.
The seat belts are fitted with an inertia reel
permitting automatic adjustment of the length
of the strap to your size. The seat belt is
stowed automatically when not in use.
Before and after use, ensure that the seat belt
is reeled in correctly.
The lower part of the strap must be positioned
as low as possible on the pelvis.
The upper part must be positioned in the
hollow of the shoulder.
The inertia reels have a device for automatic
locking in the event of a collision, sudden
braking or if the vehicle turns over. You can
release the device by pulling the strap firmly
and then releasing it so that it reels in slightly.In order to be effective, a seat belt must:
-
b e tightened as close to the body as
possible,
-
b
e pulled in front of you with a smooth
movement, checking that it does not twist,
-
b
e used to restrain only one person,
-
n
ot show any signs of cuts or fraying,
-
n
ot be converted or modified to avoid
affecting its performance.
In accordance with current safety regulations,
for all repairs on your vehicle's seat belts, go
to a qualified workshop with the skills and
equipment needed, which a PEUGEOT dealer
is able to provide.
Have your seat belts checked regularly by a
PEUGEOT dealer or a qualified workshop,
particularly if the straps show signs of
damage.
Clean the seat belt straps with soapy water or
a textile cleaning product, sold by PEUGEOT
dealers.
After folding or moving a seat or rear bench
seat, ensure that the seat belt is positioned
and reeled in correctly. Recommendations for children
Use a suitable child seat if the passenger is
less than 12
years old or shorter than one and
a half metres.
Never use the same seat belt to secure more
than one person.
Never allow a child to travel on your lap.
For more information on Child seats , refer to
the corresponding section.
In the event of an impact
Depending on the nature and seriousness
of the impact , the pyrotechnic device may
be deployed before and independently of the
airbags. Deployment of the pretensioners
is accompanied by a slight discharge of
harmless smoke and a noise, due to the
activation of the pyrotechnic cartridge
incorporated in the system.
In all cases, the airbag warning lamp comes
on.
Following an impact, have the seat belts
system checked and, if necessary, replaced,
by a PEUGEOT dealer or a qualified
workshop.
Safety
Page 100 of 216
98
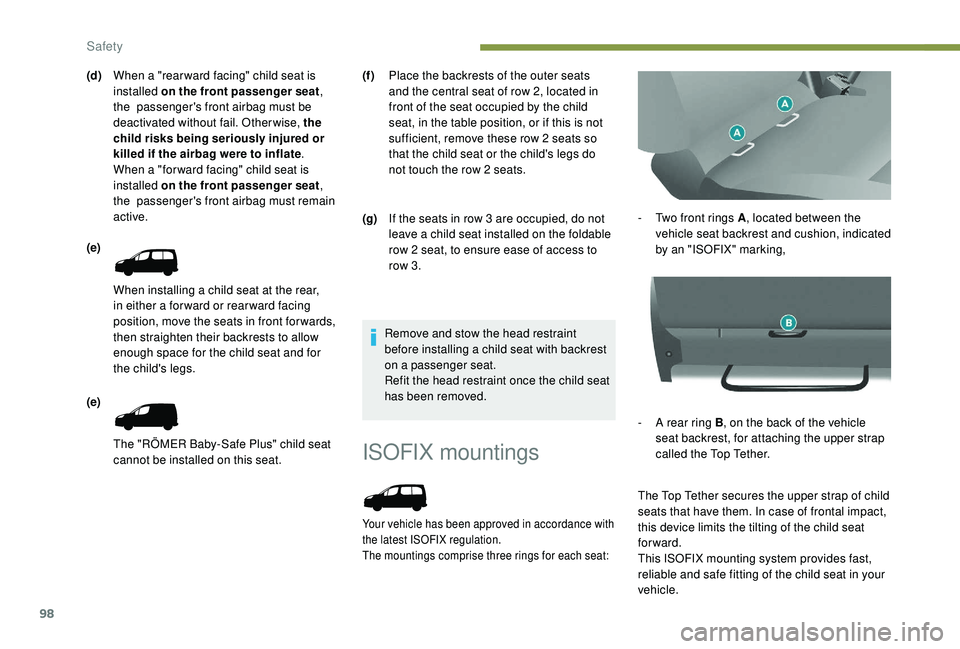
ISOFIX mountings
Your vehicle has been approved in accordance with
the latest ISOFIX regulation.
The mountings comprise three rings for each seat:
- Two front rings A, located between the
vehicle seat backrest and cushion, indicated
by an "ISOFIX" marking,
-
A r
ear ring B , on the back of the vehicle
seat backrest, for attaching the upper strap
called the Top Tether.
The Top Tether secures the upper strap of child
seats that have them. In case of frontal impact,
this device limits the tilting of the child seat
forward.
This ISOFIX mounting system provides fast,
reliable and safe fitting of the child seat in your
vehicle.
Remove and stow the head restraint
before installing a child seat with backrest
on a passenger seat.
Refit the head restraint once the child seat
has been removed.
(d)
When a "rear ward facing" child seat is
installed on the front passenger seat ,
the passenger's front airbag must be
deactivated without fail. Otherwise, the
child risks being seriously injured or
killed if the airbag were to inflate .
When a "for ward facing" child seat is
installed on the front passenger seat ,
the passenger's front airbag must remain
active.
(e)
When installing a child seat at the rear,
in either a for ward or rear ward facing
position, move the seats in front for wards,
then straighten their backrests to allow
enough space for the child seat and for
the child's legs.
(e)
The "RÖMER Baby-Safe Plus" child seat
cannot be installed on this seat. (f )
Place the backrests of the outer seats
and the central seat of row 2, located in
front of the seat occupied by the child
seat, in the table position, or if this is not
sufficient, remove these row 2 seats so
that the child seat or the child's legs do
not touch the row 2 seats.
(g) If the seats in row 3 are occupied, do not
leave a child seat installed on the foldable
row 2 seat, to ensure ease of access to
row 3.
Safety