2020 MERCEDES-BENZ GLS SUV service
[x] Cancel search: servicePage 193 of 549
Ensu
rethefo llowing before starting the engine:
R the legal stipulations in the area where your
ve hicle is par ked allow engine starting via
smartphone.
R it is safe tostart and runth e engine where
yo ur vehicle is par ked.
R The fuel tank is su fficiently full.
St arting theve hicle (Remo teOnline) &
WARNING Risk of crushing or entrap‐
ment due tounin tentional starting of the
engine
Limbs could be crushed or trapped if the
engine is star ted unintentionally during
service or maintenance work. #
Alw ays secure the engine against unin‐
te ntional starting before car rying out
maintenance or repair work. Re
quirements:
R park position jis selected.
R the anti- theft alarm sy stem is not activated.
R the panic alarm is not activated. R
the hazard warning light sy stem is switched
off.
R the bonn etis closed.
R the doors are closed and loc ked.
R the windo wsand sliding sun roof are closed. #
Start theve hicle using the smartphone.
Af tereve ryengine start, the engine runs for
te n minu tes.
Yo u can car ryout a maximum of two consecu‐
tive starting attem pts. Yo u must start theve hicle
once with theke y before trying tostart the
engine again with the smartphone. you can stop
th eve hicle again at any time.
% Further information can be found in the
smartphone app.
Securing the engine against starting before
car rying out maintenance or repair work: #
switch on the hazard warning light sy stem.
or #
unlock the doors.
or #
open a side window or the sliding sunroof. Ru
nning-in no tes To
preser vethe engine during thefirs t15 00 km:
R drive at varying road speeds and engine
speeds.
R do not drive at speeds greater than
14 0 km/h.
R drive theve hicle in drive program A
or ;.
R shift tothe next highest gear at theve ry lat‐
est when the needle reaches the last third
before there d area in there v counter.
R do not shift down a gear manually in order to
brake.
R avoidove rstraining theve hicle, e.g. driving at
full thro ttle.
R do not depress the accelera tor pedal past
th e pressure point (kickdown).
R only increase the engine speed gradually and
accelera tetheve hicle tofull speed af ter
15 00 km. 19 0
Driving and pa rking
Page 200 of 549

Also obser
vethefo llowing information when
driving in moun tainous terrain:
R Obse rveth eva lues of the approach/depar‐
ture angle and of the maximum gradient
(/ page 428).
R Avoid high engine speeds.
R Use the braking po wer of the engine when
driving downhill.
R Shift toa lo werge ar on uphill gradients and
on long, steep downhill gradients.
R Activate DSR be fore driving downhill, if nec‐
essary (/ page244).
Checklis t after driving off-road
Driving off-road places grea ter demands on your
ve hicle than driving on no rmalroads. Check the
entire vehicle for dama geand fore ign bodies
eve rytime af ter driving off-road. Foreign bodies
in the wheels or driv etra in can lead toimbalan‐
ces and therefore vibrations.
R Ifth eF orG drive prog ram is selec‐
te d: select ano ther drive prog ram.
R Shift the transfer case tothe on-ro ad posi‐
tion HIGH RANGE. R
Deactivate DSR.
R Lowe rth eve hicle le vel again toa le vel suita‐
ble tothero ad conditions, e.g. tothe normal
le ve l.
R Apply the brakes todry them af terfo rd ing.
R Check that the service brake is working nor‐
mally af ter a long downhill stre tch.
R Clean thefo llowing components everytime
af te r driving off-road:
- licence plate number
- headlamps and tail lamps
- tyres, wheels and wheel ar ches
- underbody
R After driving thro ugh sand, mud, water or
gr ave l, ha vethefo llowing components
ch ecked and cleaned:
- brake disks and brakepads
- tyres and wheels
- axle joints ECO
start/s top function Ope
ration of the ECO start/s top function
% The ECO start/ stop function is not available
in all drive prog rams, depending on the
engine. Obser vethest atus display in the
multifunction display forth is.
The engine is switched off automatically in the
fo llowing situations if all vehicle conditions for
an automatic engine stop are me t:
R you brake theve hicle toast andstill in trans‐
mission position hori.
R vehicles with a 48 V on-board electrical
sy stem: you depress the brake pedal when
tra velling at a low speed.
If th e sy stem has de tected one of thefo llowing
situations, the engine will not stop:
R youstop at a stop sign and there is no vehi‐
cle in front of you.
R theve hicle that stopped in front of youstarts
up again.
R you manoeuv re, turn thesteering wheel
sharply or engage reve rsege ar. Driving and parking
197
Page 218 of 549
Obser
vethe no tes on operating fluids
(/ page 417).
Ad Blue ®
is available here:
R AdBlue ®
can be topped up byfast service at
a qu alified specialist workshop, e.g. a
Mercedes-Benz Service Centre.
R AdBlue ®
is available at many filling stations
from AdBlue ®
filling pumps.
R Alternativel y,Ad Blue ®
is available at qualified
specialist workshops, e.g. Mercedes-Benz
Service Centres, and at many filling stations
in Ad Blue ®
re fill canis ters or AdBlue ®
re fill
bottles.
% Ensure the connection between there fill
con tainer and vehicle filler neck does not
drip. To
pping up AdBlue ®
* NOTEEngine dama gedue toAd Blue ®
being in the fuel #
AdBlue ®
must not be used tofill the
fuel tank. #
Only use AdBlue ®
to fill th eAd Blue ®
ta nk. #
Do not overfill theAd Blue ®
tank. *
NO
TEContamination of theve hicle inte‐
ri or due toAd Blue ®
lea kage #
Afterto pping up, carefully close the
Ad Blue ®
re fill con tainer. #
Avoid car rying AdBlue ®
re fill con tainers
permanently in theve hicle. Re
quirements:
R The vehicle is unloc ked. The
following messages appear in order in the
multifunction display when theAd Blue ®
tank
requ irestopping up:
R Refill AdBlue See Owner’s Manual The
Ad Blue ®
leve l has fallen below there ser ve
ra nge. Top up AdBlue ®
immediately.
R Top up AdBlue Emergency op. in XXX miles
See Owner's ManualThe low AdBlue ®
level
will lead tolimited per form ance af terthe
re maining dis tance displ ayed has been
driven. Top up AdBlue ®
immediately.
R XX,X l Top up AdBlue Emer. op.: max. XXX
km/h Start not poss. in XXX kmThe low
AdBlue ®
leve l will lead tolimited per form‐
ance from the speed displa yed. Af terthe
re maining dis tance displ ayed has been cov‐
ered, it will no longer be possible tostart the
engine. Top up with at least the amount of
Ad Blue ®
displ ayed.
R XX,X l Top up AdBlue Switch on ignition, wait
60 sec. or eng. start not poss. TheAdBlue ®
ta nk is em pty. Yo u can no lon gerst art the
engine. Top up with at least the amount of Driving and parking
215
Page 219 of 549
Ad
Blue ®
displ ayed. Switch on the ignition
and waitfor appro ximately 60 seconds. Start
th e engine.
Yo u can see theAd Blue ®
ra nge and le vel in the
Service menu in the multifunction displa y.
% The AdBlue ®
ra nge shown depends strongly
on the driving style and operating condi‐
tions. The actual range can therefore deviate
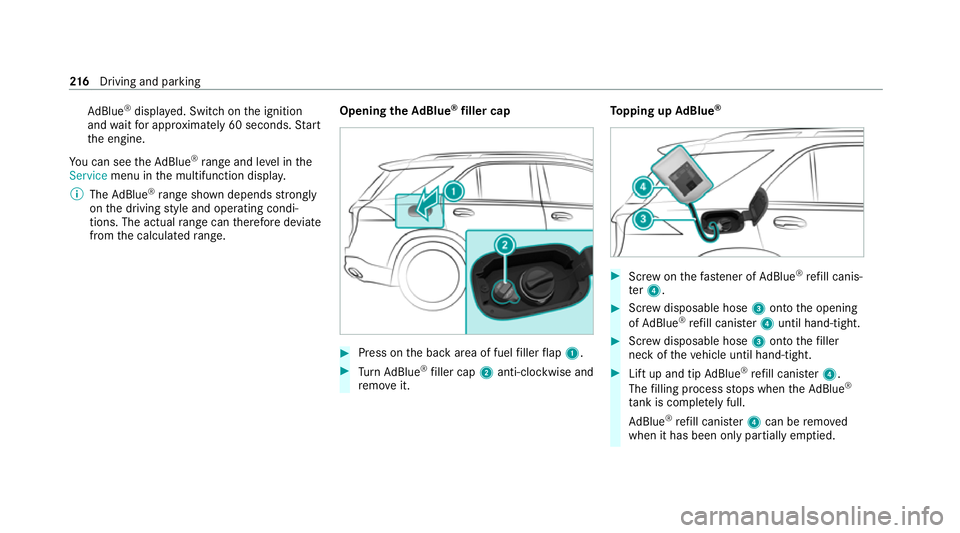
from the calculated range. Opening the
AdBlue ®
filler cap #
Press on the back area of fuel filler flap 1. #
Turn AdBlue ®
filler cap 2anti-clockwise and
re mo veit. To
pping up AdBlue ® #
Screw onthefast ener of AdBlue ®
re fill canis‐
te r4. #
Screw disposable hose 3onto the opening
of Ad Blue ®
re fill canis ter4 until hand-tight. #
Screw disposable hose 3onto thefiller
neck of theve hicle until hand-tight. #
Lift up and tip AdBlue ®
re fill canis ter4.
The filling process stops when theAd Blue ®
ta nk is compl etely full.
Ad Blue ®
re fill canis ter4 can be remo ved
when it has been only partially em ptied. 216
Driving and pa rking
Page 221 of 549
#
When leaving theve hicle, alw aysta ke
th eke y with you and lock theve hicle. #
Keep theve hicle key out of reach of
ch ildren. *
NO
TEDama getotheve hicle due toit
ro lling away #
Alw ays secure theve hicle against roll‐
ing away. *
NO
TEDama gedue totheve hicle lo wer‐
ing Ve
hicles with AIRMATIC or E- ACTIVE
BO DY CONT ROL:The vehicle can lo wer
because of temp erature dif fere nces or longer
non-operational times. This can cause dam‐
age toparts of the body. #
When stopping theve hicle and when
driving off, make sure that there are no
obs tacles su chas curbs under or in the
immediate vicinity of the body. #
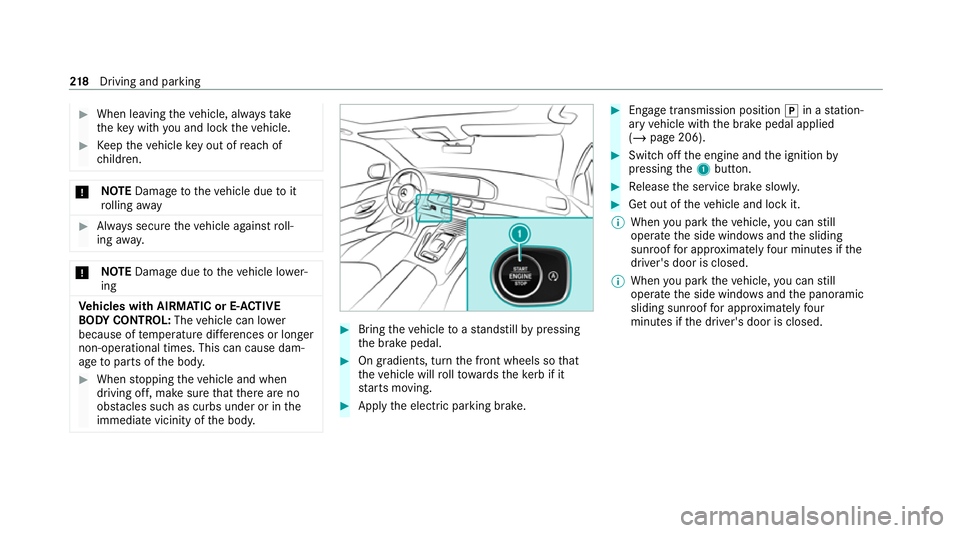
Bring theve hicle toast andstill bypressing
th e brake pedal. #
On gradients, turn the front wheels so that
th eve hicle will rollto wa rdsth eke rb if it
st arts moving. #
App lythe electric parking brake. #
Enga getransmission position jin a station‐
ary vehicle with the brake pedal applied
(/ page 206). #
Switch off the engine and the ignition by
pressing the1 button. #
Release the service brake slowl y. #
Get out of theve hicle and lock it.
% When you park theve hicle, you can still
opera tethe side windo wsand the sliding
sunroof for appro ximately four minutes if the
driver's door is closed.
% When you park theve hicle, you can still
opera tethe side windo wsand the panoramic
sliding sunroof for appro ximately four
minutes if the driver's door is closed. 218
Driving and pa rking
Page 227 of 549

R
the connection toonline services is inter rup‐
te d.
R theAT A (anti-theft alarm sy stem) is not avail‐
able.
R the interior pr otection and tow- aw ay protec‐
tion functions are not available.
R the function for de tecting collisions on a
pa rked vehicle is not available.
If th efo llowing conditions are fulfilled, standby
mode can be activated or deactivated using the
multimedia sy stem:
R The engine is switched off.
R The ignition is switched on.
Exceeding theve hicle's displa yed non-opera‐
tional time may cause incon venience, i.e. it can‐
not be guaranteed that thest ar ter battery will
re liably start the engine.
The star ter battery must be charge dfirs t in the
fo llowing situations:
R The vehicle's non-operational time must be
ex tended. R
The Battery charge insufficient for standby
mode messa geappears in the media displa y.
% Standby mode is automatically deactivated
when the ignition is switched on.
Ac tivating/deactivating standby mode (park‐
ing up theve hicle)
Re quirements:
R The engine is switched off.
Multimedia sy stem:
4 © 5
Settings 5
Vehicle #
Activate or deacti vate Standby mode. #
Select Yes. Driving and driving saf
ety sy stems Driving sy
stems and your responsibility Yo
ur vehicle is equipped with driving sy stems
which assist you in driving, parking and manoeu‐
vring theve hicle. The driving sy stems are only
aids. They are not a substitute foryo ur attention
to the sur roundings and do not relie ve you of
yo ur responsibility per taining toroad traf fic la w. The driver is alw
aysre sponsible for maintaining
a safe dis tance totheve hicle in front, forve hicle
speed, for braking in good time and forst ay ing
in lane. Pay attention tothe tra ffic conditions at
all times and inter vene when necessa ry. Be
aw are of the limitations rega rding the safe use of
th ese sy stems.
Driving sy stems can neither reduce therisk of
accident if youfa ilto adapt your driving style nor
ove rride the la wsof ph ysics. They cannot alw ays
ta ke into account road, weather or traf fic condi‐
tions. In
fo rm ation on vehicle sensors and cameras Some driving and driving saf
ety sy stems use
cameras as well as radar or ultrasonic sensors
to monitor the area in front of, behind or next to
th eve hicle. 224
Driving and parking
Page 309 of 549
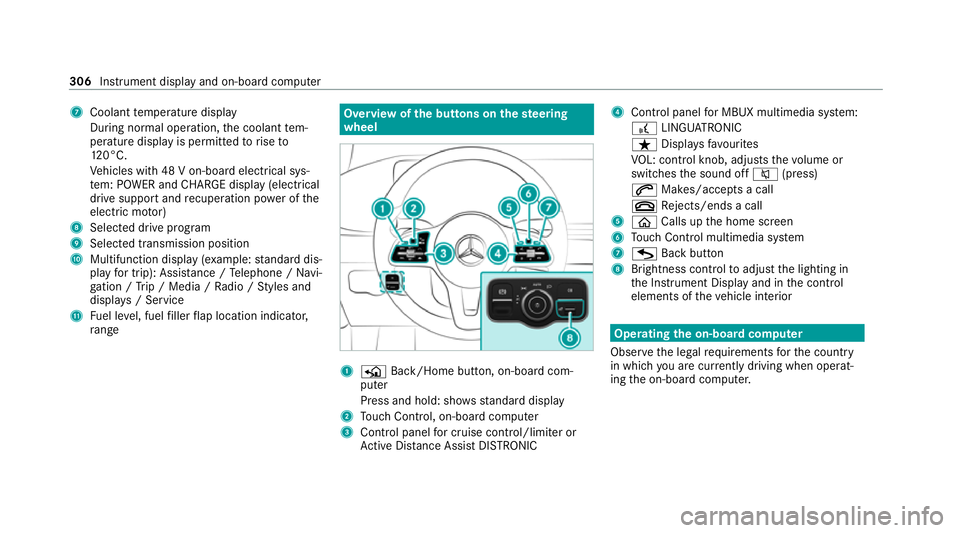
7
Coolant temp erature display
During normal operation, the coolant tem‐
perature display is permitted torise to
12 0°C.
Ve hicles with 48 V on-board electrical sys‐
te m: POWER and CHARGE displ ay(elect rical
drive suppo rtand recuperation po wer of the
electric mo tor)
8 Selected drive program
9 Selected transmission position
A Multifunction display (e xamp le:standard dis‐
play for trip): Assis tance / Telephone / Navi‐
ga tion / Trip / Media / Radio / Styles and
displa ys/ Service
B Fuel le vel, fuel filler flap location indicator,
ra nge Overvi
ewofthe but tons on thest eering
wheel 1
P Back/Home button, on-board com‐
puter
Press and hold: sho wsstandard display
2 Touch Control, on-board co mputer
3 Control panel for cruise control/limiter or
Ac tive Dis tance Assi stDISTRONIC 4
Control panel for MBUX multimedia sy stem:
£ LINGU ATRO NIC
ß Displa ysfavo urites
VO L: control knob, adjusts thevo lume or
switches the sound off 8(press)
6 Makes/accepts a call
~ Rejects/ends a call
5 ò Calls up the home screen
6 Touch Control multimedia sy stem
7 G Back button
8 Brightness control toadjust the lighting in
th e Instrument Display and in the control
elements of theve hicle interior Operating
the on-boa rdcompu ter
Obser vethe legal requ irements forth e count ry
in which you are cur rently driving when operat‐
ing the on-board computer. 306
Instrument display and on-board computer
Page 310 of 549
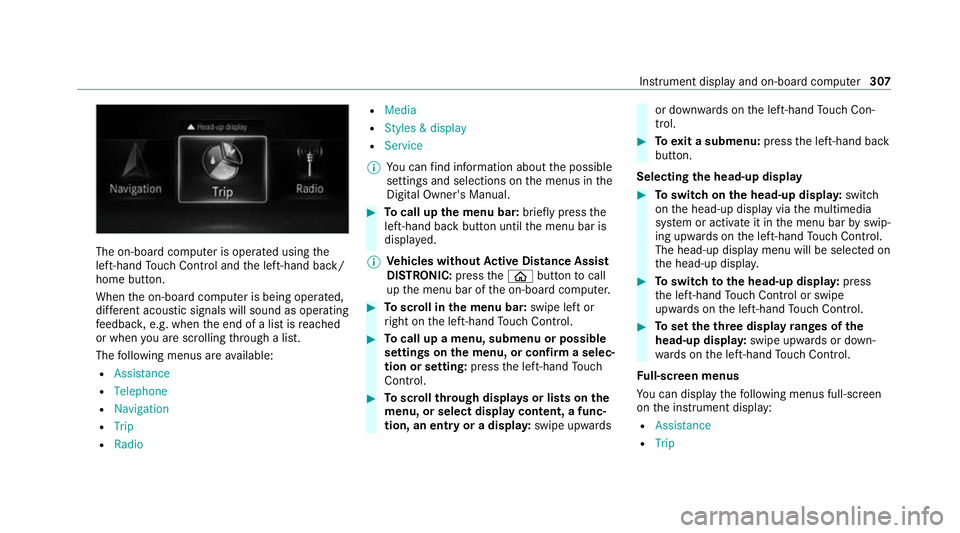
The on-board computer is operated using
the
left-hand Touch Control and the left-hand back/
home button.
When the on-board computer is being operated,
dif fere nt acoustic signals will sound as operating
fe edbac k,e.g. when the end of a list is reached
or when you are sc rolling thro ugh a list.
The following menus are available:
R Assistance
R Telephone
R Navigation
R Trip
R Radio R
Media
R Styles & display
R Service
% You can find information about the possible
settings and selections on the menus in the
Digital Owner's Manual. #
Tocall up the menu bar: briefly pressthe
left-hand back button until the menu bar is
displa yed.
% Ve
hicles without Active Di stance Assist
DISTRO NIC:press theò button tocall
up the menu bar of the on-board computer. #
Toscroll in the menu bar: swipe left or
ri ght on the left-hand Touch Control. #
Tocall up a menu, submenu or possible
settings on the menu, or confirm a selec‐
tion or setting: pressthe left-hand Touch
Control. #
Toscroll through displa ysor lists on the
menu, or select display content, a func‐
tion, an entry or a displa y:swipe upwards or down
wards on the left-hand Touch Con‐
trol. #
Toexit a submenu: pressthe left-hand back
button.
Selecting the head-up display #
Toswitch on the head-up displa y:switch
on the head-up display via the multimedia
sy stem or activate it in the menu bar byswip‐
ing upwards on the left-hand Touch Control.
The head-up displ aymenu will be selected on
th e head-up displa y. #
Toswitch tothe head-up displa y:press
th e left-hand Touch Control or swipe
upwards on the left-hand Touch Control. #
Toset theth ree display ranges of the
head-up displa y:swipe upwards or down‐
wa rds on the left-hand Touch Control.
Fu ll-screen menus
Yo u can displ aythefo llowing menus full-screen
on the instrument display:
R Assistance
R Trip Instrument display and on-board computer
307