2020 MERCEDES-BENZ AMG GT COUPE light
[x] Cancel search: lightPage 190 of 433
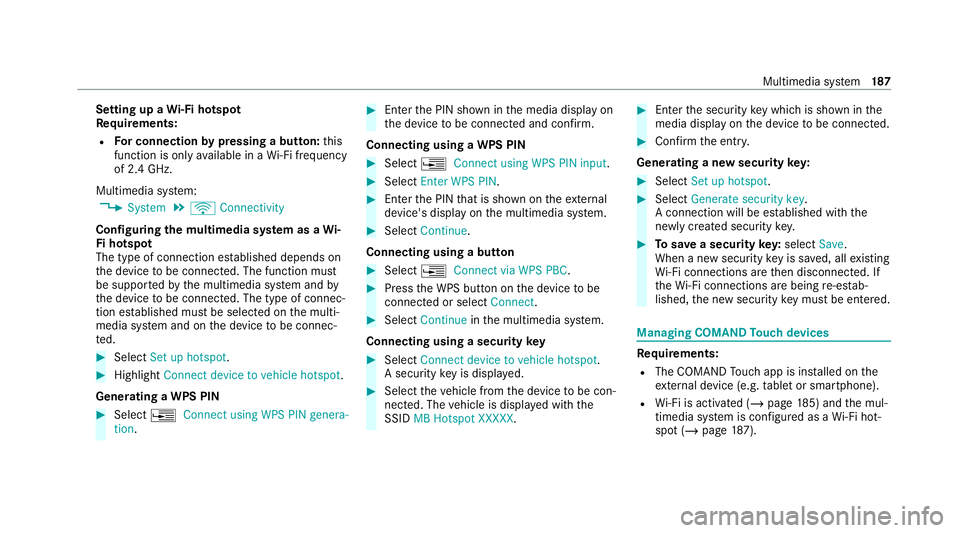
Setting up a
Wi-Fi hotspot
Re quirements:
R For connection bypressing a button: this
function is only available in a Wi-Fi frequency
of 2.4 GHz.
Multimedia sy stem:
4 System 5
ö Connectivity
Configuring the multimedia sy stem as a Wi-
Fi hotspot
The type of connection es tablished depends on
th e device tobe connec ted. The function must
be suppor tedby the multimedia sy stem and by
th e device tobe connec ted. The type of connec‐
tion es tablished must be selected on the multi‐
media sy stem and on the device tobe connec‐
te d. #
Select Set up hotspot. #
Highlight Connect device to vehicle hotspot.
Generating a WPS PIN #
Select ¥Connect using WPS PIN genera-
tion . #
Ente rth e PIN shown in the media display on
th e device tobe connec ted and confi rm.
Connecting using a WPS PIN #
Select ¥Connect using WPS PIN input. #
Select Enter WPS PIN. #
Enterth e PIN that is shown on theex tern al
device's display on the multimedia sy stem. #
Select Continue.
Connecting using a button #
Select ¥Connect via WPS PBC. #
Press the WPS button on the device tobe
connecte d or select Connect. #
Select Continue inthe multimedia sy stem.
Connecting using a security key #
Select Connect device to vehicle hotspot .
A secu rity key is displa yed. #
Select theve hicle from the device tobe con‐
nec ted. The vehicle is displa yed with the
SSID MB Hotspot XXXXX . #
Enter the security key which is shown in the
media display on the device tobe connec ted. #
Confirm the entry.
Genera ting a new security key: #
Select Set up hotspot . #
Select Generate security key .
A connection will be es tablished with the
newly crea ted security key. #
Tosave a security key:select Save.
When a new security key is sa ved, all existing
Wi -Fi connections are then disconnected. If
th eWi -Fi connections are being re-es tab‐
lished, the new security key must be ente red. Managing COMAND
Touch devices Re
quirements:
R The COMAND Touch app is ins talled on the
ex tern al device (e.g. tablet or smartphone).
R Wi-Fi is acti vated (/ page185) and the mul‐
timedia sy stem is confi gured as a Wi-Fi hot‐
spot (/ page 187). Mul
timedia sy stem 187
Page 194 of 433
The settings dif
fer depending on theve hicle
equipment.
Importing/exporting a user profile
Re quirements:
R There is an Internet connection
(/ page 252).
R A Mercedes me account exists at https://
me.secure.mercedes-benz.com.
R The Personalisation service is active.
R The function is available in your count ry.
Multimedia sy stem:
4 System 5
g Personalisation
5 Manual export/import
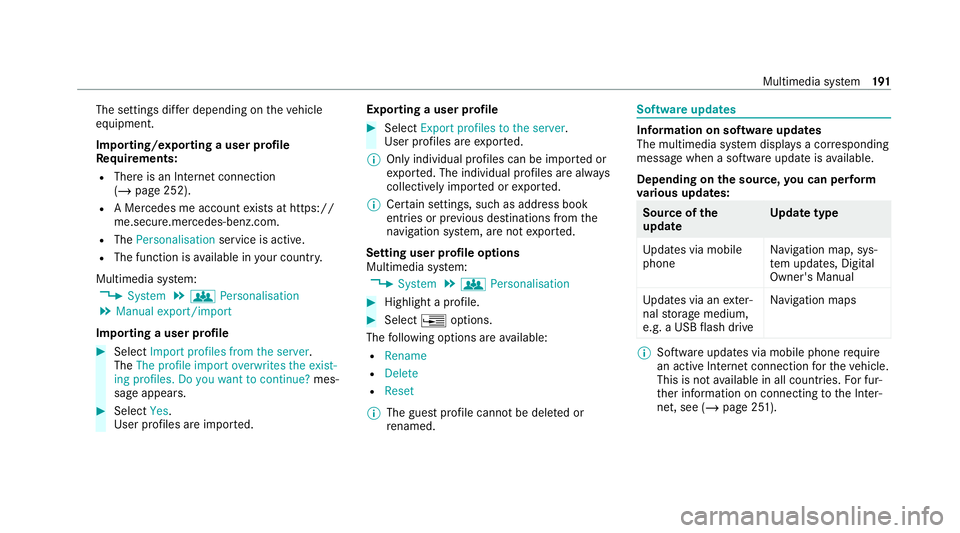
Importing a user profile #
Select Import profiles from the server.
The The profile import overwrites the exist-
ing profiles. Do you want to continue? mes‐
sage appears. #
Select Yes.
User profiles are impor ted. Exporting a user profile #
Select Export profiles to the server.
User profiles are expor ted.
% Only individual profiles can be impor ted or
ex por ted. The individual profiles are alw ays
collectively impor ted or expor ted.
% Certain settings, such as address book
ent ries or pr evious destinations from the
navigation sy stem, are not expor ted.
Setting user profile options
Multimedia sy stem:
4 System 5
g Personalisation #
Highlight a profile. #
Select ¥options.
The following options are available:
R Rename
R Delete
R Reset
% The guest profile cannot be dele ted or
re named. So
ftwa reupdates Information on software updates
The multimedia sy
stem displa ysa cor responding
message when a software update isavailable.
Depending on the source, you can per form
va rious update s: Source of
the
update Up
date type
Up dates via mobile
phone Na
vigation map, sys‐
te m updates, Digital
Owner's Manual
Up dates via an exter‐
nal storage medium,
e.g. a USB flash drive Na
vigation maps %
Software updates via mobile phone requ ire
an active Internet connection forth eve hicle.
This is not available in all countries. For fur‐
th er information on connecting tothe Inter‐
net, see (/ page 251). Multimedia sy
stem 191
Page 198 of 433

%
The following values can be set for parame‐
te rs 1 and 2, forex ample:
R Speed
R longitudinal/lateral acceleration
R steering angle
R Engine speed
R engine oil/tyre temp erature
Based on the anal ysis yo u can check and opti‐
mise driving characteristics for any position on
th e tra ck.
Exporting trac ksorraces (USB) #
Select All tracks.
An ove rview of all stored trac ksand races
appea rs. #
Highlight desired trac ksorraces. #
Select ÜOptions. #
Select Export.
The selected trac ksorraces can be expor ted
to a USB storage device connected tothe
ve hicle. Editing trac
ksand recordings #
Select All tracks. #
Highlight the desired trac k. #
Select Üoptions. #
Select Rename orDelete.
or #
Select a trac k. #
Highlight the desired recording. #
Select Üoptions. #
Select Weather orDelete. Setting Drag
Race Multimedia sy
stem:
4 vehicle 5
TRACK PACE 5
Drag Race
Measuring acceleration #
Select Acceleration.
Measurement begins when theve hicle accel‐
erates. Measurement is incremental, in steps
of 50 km/h toa maximum of 300 km/h or
up tothe set maximum speed. Measurement can be
stopped early by
selecting Stoporby stopping theve hicle.
Quar ter-mile race #
Select Quarter Mile.
The time measurement runs until a mile has
been tr avelled or a pr eviously set dis tance
(e.g. quarter mile, third mile or half mile) has
been reached.
% The possible values for setting the end dis‐
ta nce are de term ined bythe sy stem and
cann otbe freely chosen.
Measurement can be stopped early byselecting
Stop orby stopping theve hicle.
Manual start for accele ration and quarter-
mile race #
Select Acceleration orQuarter Mile . #
Select Manual start .
Three red traf fic lights appear one af terthe
ot her. The reaction time measurement starts
when they change togreen at the same time.
The reaction time is displa yed as soon as you
drive off. If you drive off too ear ly,th e mes‐
sage Jump start will appear and acceleration Multimedia sy
stem 19 5
Page 199 of 433
or
quarter mile measure ment will be cancel‐
led.
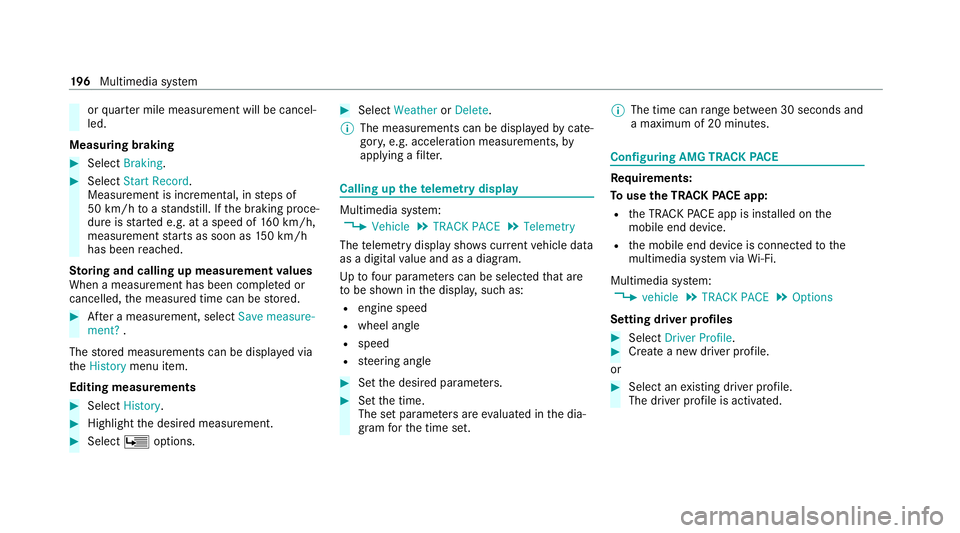
Measuring braking #
Select Braking . #
Select Start Record .
Measurement is incremental, in steps of
50 km/h toast andstill. If the braking proce‐
dure is star ted e.g. at a speed of 160 km/h,
measurement starts as soon as 150 km/h
has been reached.
St oring and calling up measurement values
When a measurement has been comple ted or
cancelled, the measured time can be stored. #
After a measu rement, select Save measure-
ment? .
The stored measurements can be displa yed via
th eHistory menu item.
Editing measu rements #
Select History . #
Highlight the desired measurement. #
Select Üoptions. #
Select Weather orDelete.
% The measurements can be displa yedby cate‐
gor y,e.g. acceleration measurements, by
applying a filter. Calling up
thete lemetry display Multimedia sy
stem:
4 Vehicle 5
TRACK PACE 5
Telemetry
The telemetry display sho wscurrent vehicle data
as a digital value and as a diagram.
Up tofour parame ters can be selected that are
to be shown in the displa y,such as:
R engine speed
R wheel angle
R speed
R steering angle #
Set the desired parame ters. #
Set the time.
The set parame ters are evaluated in the dia‐
gram forth e time set. %
The time can range between 30 seconds and
a maximum of 20 minu tes. Configuring AMG TRA
CKPACE Re
quirements:
To use the TRACK PACE app:
R the TRA CKPACE app is ins talled on the
mobile end device.
R the mobile end device is connected tothe
multimedia sy stem via Wi-Fi.
Multimedia sy stem:
4 vehicle 5
TRACK PACE 5
Options
Setting driver profiles #
Select Driver Profile. #
Create a new driver profile.
or #
Select an existing driver profile.
The driver profile is activated. 19 6
Multimedia sy stem
Page 204 of 433
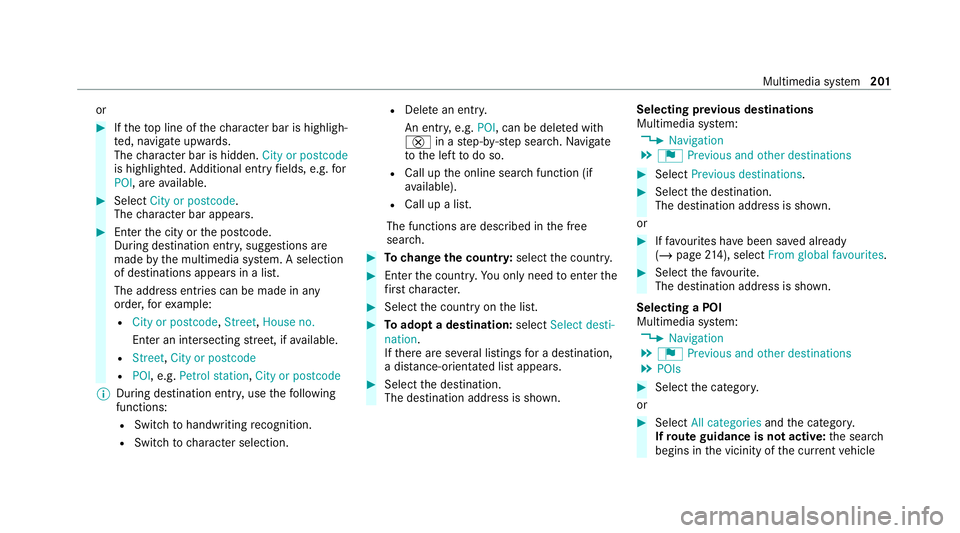
or
#
Ifth eto p line of thech aracter bar is highligh‐
te d, navigate upwards.
The character bar is hidden. City or postcode
is highlighted. Additional ent ryfields, e.g. for
POI, are available. #
Select City or postcode.
The character bar appears. #
Enterth e city or the postcode.
During destination entry , suggestions are
made bythe multimedia sy stem. A selection
of destinations appears in a list.
The address entri es can be made in any
order, forex ample:
R City or postcode, Street,House no.
En ter an intersecting stre et, if available.
R Street, City or postcode
R POI , e.g. Petrol station, City or postcode
% During destination ent ry, use thefo llowing
functions:
R Swit chtohandwriting recognition.
R Switch tocharacter selection. R
Dele tean ent ry.
An entr y,e.g. POI, can be dele ted with
£ in astep-b y-step sear ch.Na vigate
to the left todo so.
R Call up the online sear chfunction (if
av ailable).
R Call up a list.
The functions are desc ribed in the free
sear ch. #
Tochange the count ry:select the count ry. #
Enter the count ry.Yo u on ly need toenter the
fi rs tch aracter. #
Select the count ryon the list. #
Toadopt a destination: selectSelect desti-
nation.
If th ere are se veral listings for a destination,
a dis tance-o rientated list appears. #
Select the destination.
The destination address is shown. Selecting pr
evious destinations
Multimedia sy stem:
4 Navigation
5 ¬ Previous and other destinations #
Select Previous destinations. #
Select the destination.
The destination address is shown.
or #
Iffavo urites ha vebeen sa ved already
(/ page 214), sele ctFrom global favourites. #
Select thefa vo urite.
The destination address is shown.
Selecting a POI
Multimedia sy stem:
4 Navigation
5 ¬ Previous and other destinations
5 POIs #
Select the categor y.
or #
Select All categories andthe categor y.
If ro ute guidance is not active: the sear ch
begins in the vicinity of the cur rent vehicle Multimedia sy
stem 201
Page 205 of 433
position. The list is sor
tedby distance in
ascending order.
The POIs show thefo llowing information:
R name of POI
R linear dis tance tothe POI
R the direction of the linear dis tance tothe
POI (ar row) is displa yed when sear ching
fo rth eve hicle's cur rent position #
Select the POI. #
Route guidance is active: selectthe sear ch
position prior tochoosing a POI (see exam‐
ple). #
If intermediate destinations are set, these
can also be selected as the sear chposition
af te r selecting Near destination.
Fi ltering displa ysfor POIs #
Enter the sear chterm inª Search:.
The results list sho wsreleva nt POIs.
Entering Italyshowsthefo llowing results, for
ex ample:
R POIs which con tain Italy inthe name. R
POIs which belong tothe category Italian
cuisine . #
Select ¡.
The firs t POI in the list is highlighted. #
Select the POI.
Example: setting the sear chposition for the
parking ca tegory during active route guid‐
ance #
Select In the vicinity ,Near destination or
Along the route.
The list sho ws the located POIs or opens an
ove rview of thero ute destination af ter
selecting Near destination. #
Select the POI. #
Select Near destination: select the intermedi‐
ate destination or the destination.
St arting an automatic filling station sear ch
Re quirements:
R The automatic filling station sear chis activa‐
te dO (/ page 208). Driving situation
Ro
ute guidance is active. The fuel le vel in the
fuel tank reaches there ser vefuel le vel.
The Fuel tank reserve level Do you want to start
the search for filling stations? message is
shown. #
Select Yes.
The automatic filling station sear chbegins.
The available filling stations along thero ute
or in the vicinity of theve hicle's cur rent posi‐
tion are displ ayed. #
Select thefilling station.
The address of thefilling station is displa yed. #
Ifro ute guidance is not active, select Start
route guidance .
The selected filling station is set as the desti‐
nation. Route guidance begins.
or #
Ifro ute guidance is active, select Start new
route guidance orSet as next intermediate
destination .
Start new route guidance: the selected filling
st ation is set as a new destination. The pr evi‐
ous destinations and intermediate destina‐ 202
Multimedia sy stem
Page 206 of 433
tions are dele
ted. Ro ute guidance tothefill‐
ing station begins.
Set as next intermediate destination: the
selected filling station is set as the next inter‐
mediate destination. Route guidance begins. #
Ifth ere are already four intermediate des‐
tinations: selectYesinthe prom pt.
The selected filling station is entered into
position 1 of the intermediate destinations
menu. Intermediate destination 4 is dele ted.
Ro ute guidance begins.
Entering an intermediate destination
Re quirements:
R A destination is entered.
Multimedia sy stem:
4 Navigation
5 Intermediate destinations and info #
Select Search for an intermediate destina-
tion . #
Ente rth e intermediate destination as a POI
or address (/ page199). #
Select the intermediate destination. #
Select Set as destination.
or #
Select an intermediate destination using
ª Enter destination duringroute guid‐
ance. #
Select Set as next intermediate destination
af te r entering the destination.
Editing intermedia tedestinations
Re quirements:
R The destination and at least one intermediate
destination ha vebeen entered.
Multimedia sy stem:
4 Navigation
5 Intermediate destinations and info #
Tocall up the map: highlight the destination
or the intermediate destination. #
Select ¥Map. #
Movethe map (/ page219). #
Select destination on the map (/ page 205). #
Tochange the order of destinations: high‐
light the destination or the intermediate des‐
tination. #
Select ¥Move . #
Movethe intermediate destination tothe
desired position. #
Press theTo uch Control, the controller or the
to uchpad. #
Todel ete a destination: highlightthe desti‐
nation or the intermediate destination. #
Select ¥Delete.
Calculating a route with intermediate desti‐
nations
Re quirements:
R The destination and at least one intermediate
destination ha vebeen entered.
Multimedia sy stem:
4 Navigation
5 Intermediate destinations and info #
Select Start new route guidance.
The route is calculated with the set inter‐
mediate destinations. Multimedia sy
stem 203
Page 207 of 433
Selecting a contact
for destination entry
Re quirements:
R A mobile phone is connecte dto the multime‐
dia sy stem (/ page 226).
R The "N avigate tocontact" online service is
av ailable and activated.
Multimedia sy stem:
4 Navigation
5 ¬ Previous and other destinations
5 Contacts #
Select the conta ct.
The contact de tails are displa yed. #
Select the address.
The Please wait... message appears. The
sear chis car ried out online. #
Select the destination.
Fi ltering displa ysfor contacts #
Enter a name or telephone number, forex am‐
ple, into the sear chfield. #
Select ¡.
The firs t contact in the list is highlighted. #
Select the conta ct. #
Select the address.
Entering geo-coordina tes
Multimedia sy stem:
4 Navigation
5 ¬ Previous and other destinations
5 Geo-coordinates #
Ente rge o-coordinates as latitude and longi‐
tude coordinates in degrees, minutes and
seconds.
The map sho ws the position. #
Confirm the entry. #
Tocalculate a route: select Start route
guidance. #
If a route has already been created, select
Start new route guidance orSet as inter-
mediate destination .
Entering the destination as a 3 wordaddress
Re quirements:
R Sear ching for a destination using 3 word
addresses is possible in the online sear ch
( / page 199). R
There is an Internet connection.
% Sear ching for a destination using 3 word
addresses is not possible in all countries.
Multimedia sy stem:
4 Navigation 5
ª Enter destination #
Select Online search. #
Ente rth e destination address as a 3 word
address. Separate each of thewo rds with a
full stop.
The sear chresults are displa yed. #
Select the destination in the list.
The destination address is shown. The route
can be calculated.
% 3wo rdaddresses from what3words are an
alternative addressing sy stem for multilin‐
gual georeferencing of global locations with
a re solution of thre e metres. Using this grid,
locations on the Ear th's sur face are included
whi chdo not ha vea building address such
as a stre et and house number, forex ample.
The Brandenburg Gate has this language
dependent 3 wordaddress:
R German: tapfer.ge bäude.verliehen 204
Multimedia sy stem