2020 MERCEDES-BENZ AMG GT COUPE ad blue
[x] Cancel search: ad bluePage 26 of 433
Te
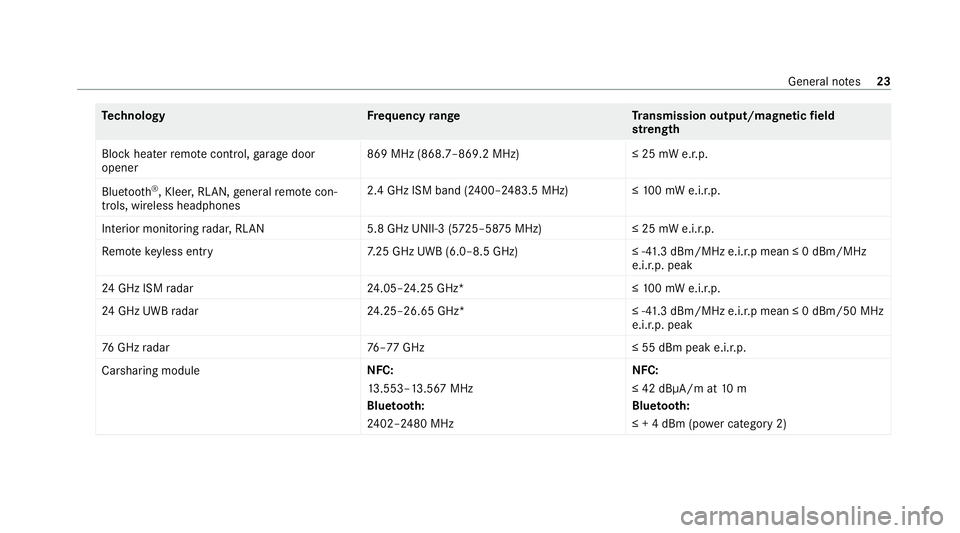
ch nology Frequency rang eT ransmission output/magnetic field
st re ngth
Block heater remo tecontrol, garage door
opener 869 MHz (868.7–869.2 MHz
)≤25 mW e.r.p.
Blue tooth ®
, Kleer, RLAN, general remo tecon‐
trols, wi reless headphones 2.4 GHz ISM band (2400–2483.5 MHz
)≤100 mW e.i.r.p.
Interior monitoring radar, RLAN 5.8 GHz UNII-3 (5725–58 75MHz) ≤ 25 mW e.i.r.p.
Re mo tekeyless entry 7.25 GHz UWB (6.0–8.5 GHz) ≤ -41.3 dBm/MHz e.i.r.p mean ≤ 0 dBm/MHz
e.i.r.p. peak
24 GHz ISM radar 24.05–24.25 GHz* ≤10 0 mW e.i.r.p.
24 GHz UWB radar 24.25–26.65 GHz* ≤ -41.3 dBm/MHz e.i.r.p mean ≤ 0 dBm/50 MHz
e.i.r.p. peak
76 GHz radar 76–77 GHz ≤ 55 dBm peak e.i.r.p.
Carsharing module NFC:
13
.553–13.567 MHz
Blue tooth:
24 02–2480 MHz NFC:
≤ 42 dBμA/m at
10 m
Blue tooth:
≤ + 4 dBm (po wer category 2) General no
tes23
Page 111 of 433
Deactivating or activating
the ECO start/
sto p function #
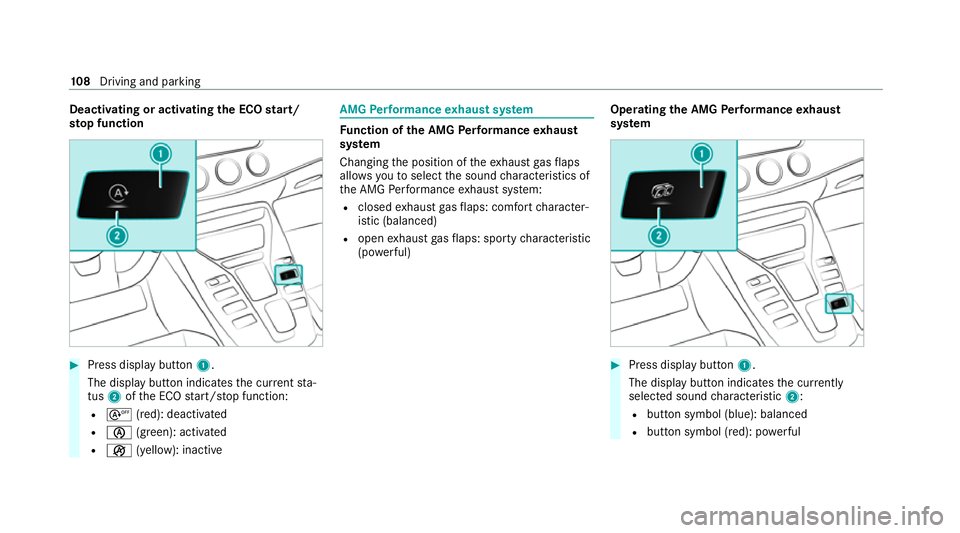
Press display button1.
The display button indicates the cur rent sta‐
tus 2ofthe ECO start/ stop function:
R s (red): deactivated
R è (green): activated
R ç (yellow): inactive AMG
Performance exhaust sy stem Fu
nction of the AMG Performance exhaust
sy stem
Changing the position of theex haust gasflaps
allo wsyouto select the sound characteristics of
th e AMG Performance exhaust sy stem:
R closed exhaust gasflaps: com fort ch aracter‐
istic (balanced)
R open exhaust gasflaps: sporty characteristic
(po werful) Ope
rating the AMG Performance exhaust
sy stem #
Press display button 1.
The display button indicates the cur rently
selected sound characteristic 2:
R button symbol (blue): balanced
R button symbol (red): po werful 108
Driving and pa rking
Page 120 of 433

Manual
gearshifting #
Toactivate/deacti vate: press display but‐
to n1.
The displ aybutton displa ys the cur rently
selected gear setting 2:
R M(red): manual gearshifting
R D(blue): automatic transmission %
Topermanently shift thege ars manually in
drive prog ram = using thesteering wheel
ge arshift paddles, select theM (Manual) set‐
ting forth e transmission.
* NO
TEDama getothe engine due toshift‐
ing up too late The automatic transmission does not shift up
in manual mode
even when the engine's lim‐
iting speed is reached.
The fuel supply is inter rupte d in order topre‐
ve nt the engine from overrev ving. #
Shift up before the engine speed rea‐
ch es there d area in there v counter. #
Toshift up: pullsteering wheel gearshift
paddle 2. #
Toshift down: pullsteering wheel gearshift
paddle 1. If
th e engine speed is too high or too lo w,you
cannot change gear using thesteering wheel
ge arshift paddles. In this case, segments 1
light up red. Gearshift
recommendation The
gearshift recommendation assists you in
adopting an economical driving style. Driving and parking
117
Page 133 of 433
R
In deep sno w.
R On sand or gra vel.
% Spinning the wheels results in a cutting
action, which enhances traction.
% Activate ESP ®
as soon as the situations
described abo veno longer apply. ESP ®
will
ot herwise not be able tostabilise theve hicle
if th eve hicle starts toskid or a wheel starts
to spin.
If th e÷ ESP®
wa rning lamp lights up continu‐
ously even when ESP ®
is acti vated, ESP ®
is not
av ailable due toa malfunction.
Obse rve any information which may be displa yed
in the instrument clus ter:
R Indicator and warning lamps (/ page 381)
R Display messages
ETS/4ETS (Electronic Traction Sy stem)
ETS/4ETS traction control is pa rtof ESP ®
.
ETS/4ETS can impr ovetheve hicle's traction by
inter vening in thefo llowing ways:
R The drive wheels are braked individually if
they spin. R
More drive torque is transferred tothe wheel
or wheels with traction. Ac
tivating/deactivating ESP ®
(Electronic Sta‐
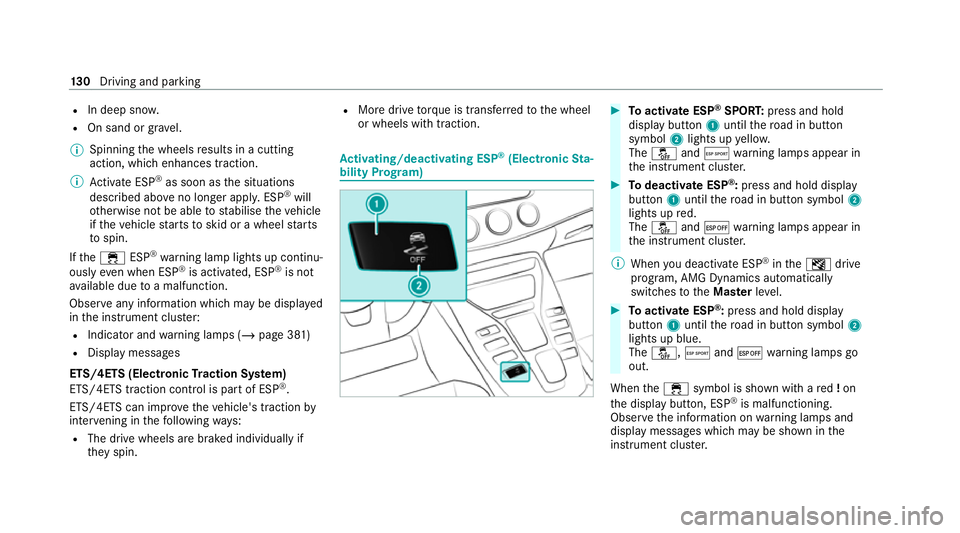
bility Prog ram) #
Toactivate ESP ®
SPORT: press and hold
display button 1until thero ad in button
symbol 2lights up yello w.
The å andÆ warning lamps appear in
th e instrument clus ter. #
Todeactivate ESP ®
:press and hold displ ay
button 1until thero ad in button symbol 2
lights up red.
The å and¤ warning lamps appear in
th e instrument clus ter.
% When you deactivate ESP ®
in theI drive
prog ram, AMG Dynamics auto matically
switches totheMas terleve l. #
Toactivate ESP ®
:press and hold display
button 1until thero ad in button symbol 2
lights up blue.
The å, Æand¤ warning lamps go
out.
When the÷ symbol is shown with a red!on
th e display button, ESP ®
is malfunctioning.
Obser vethe information on warning lamps and
display messages which may be shown in the
instrument clus ter. 13 0
Driving and pa rking
Page 147 of 433
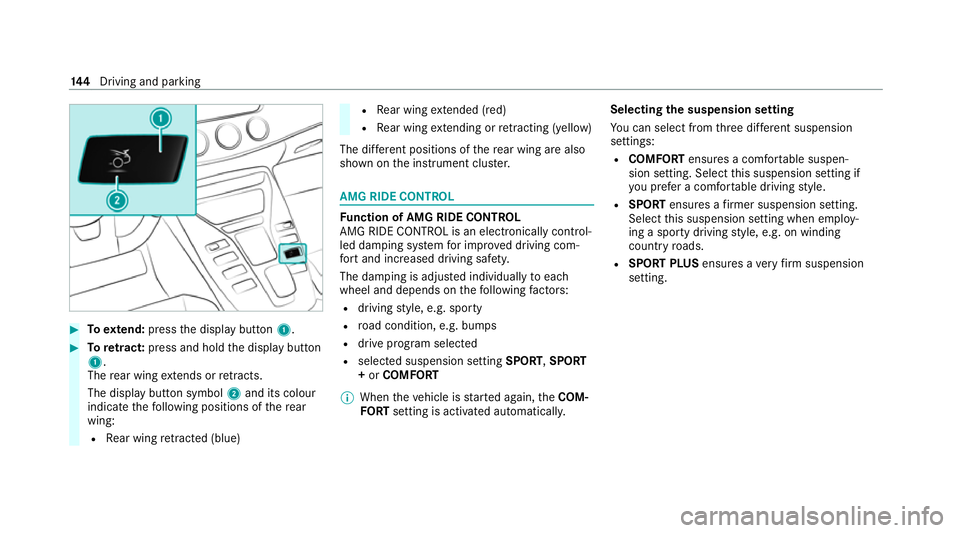
#
Toextend: press the display button 1.#
Toretract: press and hold the display button
1.
The rear wing extends or retracts.
The display button symbol 2and its colour
indica tethefo llowing positions of there ar
wing:
R Rear wing retracted (blue) R
Rear wing extended (red)
R Rear wing extending or retracting (yellow)
The di fferent positions of there ar wing are also
shown on the instrument clus ter. AMG RIDE CONTROL
Fu
nction of AMG RIDE CONTROL
AMG RIDE CONTROL is an electronically control‐
led damping sy stem for impr oved driving com‐
fo rt and inc reased driving saf ety.
The damping is adjus ted individually toeach
wheel and depends on thefo llowing factors:
R driving style, e.g. sporty
R road condition, e.g. bumps
R drive prog ram selected
R selected suspension setting SPORT,SPORT
+ or COMFORT
% When theve hicle is star ted again, theCOM‐
FO RT setting is activated automatically. Selecting
the suspension setting
Yo u can select from thre e dif fere nt suspension
settings:
R COMFORT ensures a comfor table suspen‐
sion setting. Select this suspension setting if
yo u prefer a comfor table driving style.
R SPORT ensures a firm er suspension setting.
Select this suspension setting when employ‐
ing a sporty driving style, e.g. on winding
count ryroads.
R SPORT PLUS ensures avery firm suspension
setting. 14 4
Driving and pa rking
Page 148 of 433
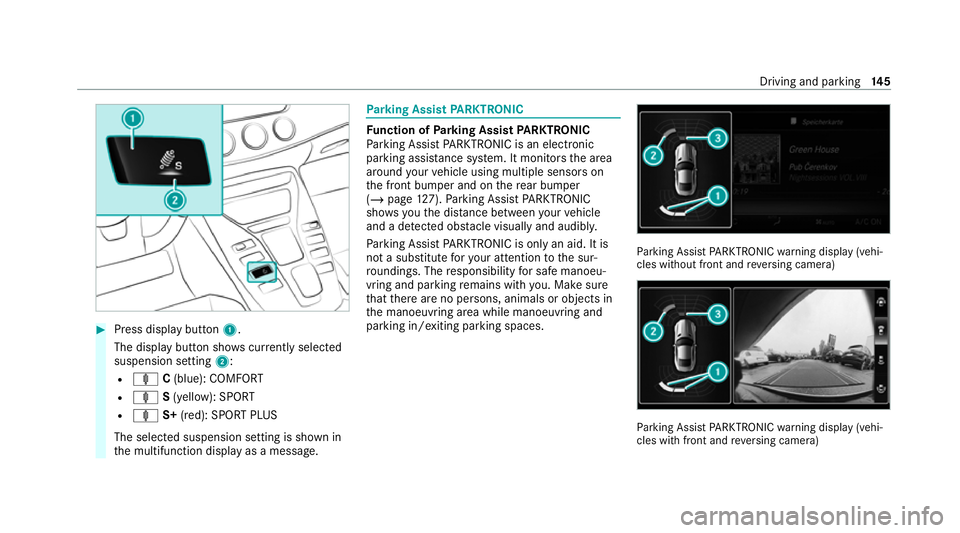
#
Press display button 1.
The display button sho wscurrently selected
suspension setting 2:
R ä C(blue): COMFORT
R ä S(yellow): SPORT
R ä S+(red): SPORT PLUS
The selected suspension setting is shown in
th e multifunction display as a message. Pa
rking Assist PARKTRONIC Fu
nction of Parking Assist PARKTRONIC
Pa rking Assist PARKTRONIC is an electronic
parking assi stance sy stem. It monitors the area
around your vehicle using multiple sensors on
th e front bumper and on there ar bumper
(/ page 127). Parking Assist PARKTRONIC
sho wsyouth e dis tance between your vehicle
and a de tected obs tacle visually and audibly.
Pa rking Assist PARKTRONIC is on lyan aid. It is
not a substitute foryo ur attention tothe sur‐
ro undings. The responsibility for safe manoeu‐
vring and parking remains with you. Make sure
th at there are no persons, animals or objects in
th e manoeuvring area while manoeuvring and
parking in/exiting parking spaces. Pa
rking Assist PARKTRONIC warning display (vehi‐
cles without front and reve rsing camera) Pa
rking Assist PARKTRONIC warning display (vehi‐
cles with front and reve rsing camera) Driving and parking
14 5
Page 187 of 433
R
Calculation of expected time of ar riva l.
Setting the time zone
Multimedia sy stem:
4 System 5
& Time and date
5 Time zone:
The list of count ries is displa yed. #
Select a count ry#.
Depending on the count ry, time zones are
displa yed. #
Select a time zone.
The time zone set is displa yed af terTime
zone:.
Setting summer time
The Automatic Summer Time andSummer Time
options cannot be selected in all countries.
Multimedia sy stem:
4 System 5
& Time and date
Au tomatically #
Switch Automatic Summer Time onO or off
ª. Manual
ly #
Switch Automatic Summer Time offª. #
Select Summer Time. #
Select OnorOff.
Setting the time and date form at
Multimedia sy stem:
4 System 5
& Time and date
5 Set format #
Set the date and time form at#.
Setting the time manually
Re quirements:
R The Manual time adjustment function is
switched on.
Multimedia sy stem:
4 System 5
& Time and date
5 Set time #
Set the hours. #
Navigate totheright toset the minutes. #
Set the minutes. #
Confirm changes when exiting the menu. The date is set automatically via GPS. Connectivity
Setting up a hotspot via business
telephony
Multimedia sy stem:
4 System 5
ö Connectivity
5 Set up hotspot #
Select Select the vehicle's mobile hotspot . #
Select Business phone.
The hotspot is active.
Exte rnal devices (e.g. tablets) can be connec‐
te dto the multimedia sy stem via business
te lephon y.
% Information about setting up a hotspot
(/ page 253). Blue
tooth ® Information about Blu
etoo th®
Bl ue tooth ®
tech nology is a standard for short-
ra nge wi reless data transfer up toappr oximately
10 m. 184
Multimedia sy stem
Page 188 of 433
Yo
u can use Blue tooth®
to connect your mobile
phone tothe multimedia sy stem and use thefo l‐
lowing functions, forex ample:
R Hands-free sy stem with access tothefo llow‐
ing options:
- con tacts (/ page 233)
- call lists (/ page 235)
- text messa ge (/page 236)
R Internet connection (/ page 251)
R Listening tomusic via Blue tooth®
audio
R Trans ferring business cards (vCards) into the
ve hicle
Blue tooth ®
is a regis tere d trademark of Blue‐
toot h Special Interest Group (SIG) Inc.
% Internet connection via Blue tooth®
is not
av ailable in all countries.
Ac tivating/deactivating Blue tooth ®
Re quirements:
R Deactivate Blue tooth®
: Apple CarPl ay®
is not
active. Multimedia sy
stem:
4 System 5
ö Connectivity #
Activate Oor deacti vate ª Bluetoo th®
.
If Android Autois active, a prom ptappears ask‐
ing whe ther Blue tooth®
should be deactivated. #
Select Yes.
Android Autois closed and Blue tooth®
is
deactivated. Wi
-Fi Wi
-Fi connection overview
Yo u can use Wi-Fi toestablish a connection with
a Wi -Fi network and toaccess the Internet or
ot her network devices.
The following connection options are available:
R Wi-Fi connection
The Wi-Fi connection toaWi -Fi-capable
device, e.g. the cus tomer's mobile phone or
a ta blet PC is es tablished.
R Multimedia sy stem as a Wi-Fi hotspot Using
this function, a tablet PC or no tebook
can be connecte d,forex ample.
To establish a connection, you can use thefo l‐
lowing me thods:
R WPS PIN
The connection toa secure Wi-Fi network is
made via a PIN.
R WPS PBC
The connection toa secure Wi-Fi network is
made bypressing a button (push button).
R Security key
The connection toa secure Wi-Fi network is
made via a secu rity key.
Setting up Wi-Fi
Requ irements:
R The device tobe connec ted supports one of
th eth re e means of connection described
(/ page 185). Multimedia sy
stem 18 5