Page 186 of 637
3-100
Convenient features of your vehicle
4 Wheel Drive (4WD)
Warning Light
(if equipped)
This warning light illuminates:
Once you set the ignition switch or
Engine Start/Stop button to the ON
position.
- It illuminates for approximately 3
seconds and then goes off.
When there is a malfunction with
the 4WD system.
In this case, we recommend that
you have the vehicle inspected by
an authorised HYUNDAI dealer.
Headlight Warning
Light (if equipped)
This warning light illuminates:
If there is a malfunction (burned-
out bulb except LED light or circuit
malfunction) with the exterior lights
(headlight, brake light, fog light,
etc.). In this case, we recommend
that you have your vehicle inspect-
ed by an authorised HYUNDAI
dealer.
Information
Make sure to replace the burned out
bulb with a new one of the same
wattage rating.
If not, this warning message will not
be displayed.
i
Fuel Filter Warning Light
When the Fuel Filter Warning
Light illuminates, engine
power (vehicle speed & idle
speed) may decrease.
If you keep driving with the
warning light on, engine parts
(injector, common rail, high
pressure fuel pump) may be
damaged. If this occurs, we
recommend that you have the
vehicle inspected by an
authorised HYUNDAI dealer
as soon as possible.
CAUTION
Page 192 of 637
3-106
Convenient features of your vehicle
Information
If the engine does not start within 10
seconds after the preheating is com-
pleted, set the ignition switch or
Engine Start/Stop Button to the
LOCK or OFF position for 10 seconds
and then to the ON position in order
to preheat the engine again.
4 Wheel Drive (4WD)
LOCK Indicator Light
(if equipped)
This indicator light illuminates:
Once you set the ignition switch or
Engine Start/Stop button to the ON
position.
- It illuminates for approximately 3
seconds and then goes off.
When you select 4WD LOCK
mode by pressing the 4WD LOCK
button.
- The 4WD LOCK mode increases
the drive power when driving on
wet pavement, snow covered
roads and/or off-road.
i
4WD LOCK Mode
Do not use 4WD LOCK mode on
dry paved roads or on a high-
way, it can cause noise, vibra-
tion or damage to 4WD related
parts.
CAUTION
Page 204 of 637
3-118
Convenient features of your vehicle
Automatic type
It automatically adjusts the headlight
beam level according to the number
of passengers and loading weight in
the luggage compartment.
And it offers proper headlight beam
under various conditions.
Low Beam Assist-Static light
(if equipped)
Whilst driving a corner, for greater
visibility and safety, either the left or
right side Low Beam Assist-Static
light will turn on automatically. The
Low Beam Assist-Static light will turn
on when one of the following condi-
tions occur:
Vehicle speed is less than 10 km/h
and the steering wheel angle is
turned approximately 80 degrees
with the low beam on.
Vehicle speed is between 10 km/h
to 90 km/h and steering wheel
angle is turned approximately 35
degrees with the low beam on.
When the vehicle is in reverse with
one of the conditions above satis-
fied, the light opposite to the direc-
tion the steering wheel is turned
will turn on.
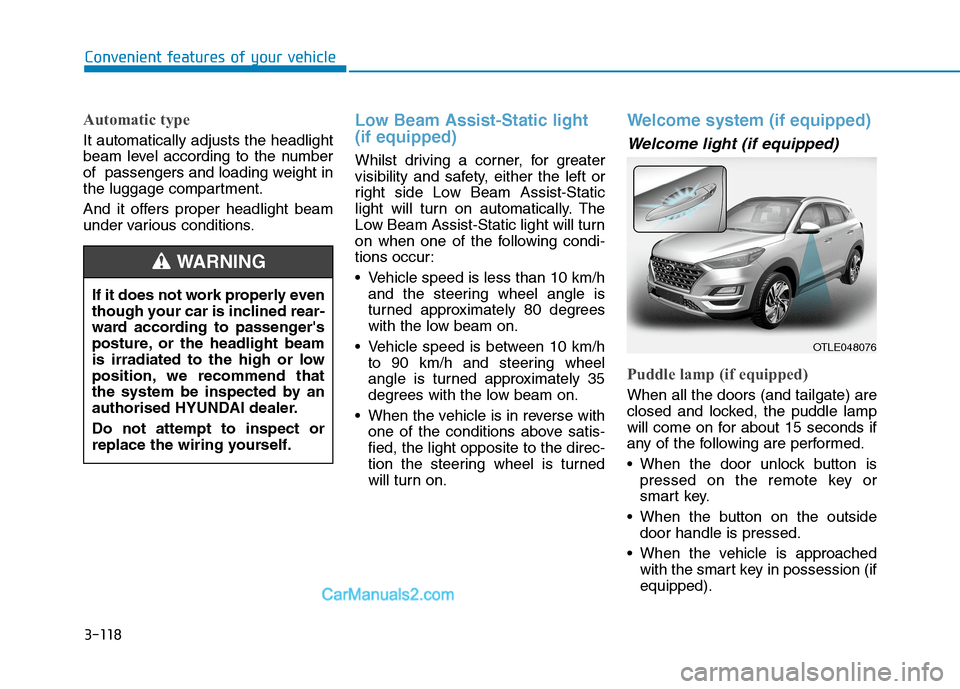
Welcome system (if equipped)
Welcome light (if equipped)
Puddle lamp (if equipped)
When all the doors (and tailgate) are
closed and locked, the puddle lamp
will come on for about 15 seconds if
any of the following are performed.
When the door unlock button is
pressed on the remote key or
smart key.
When the button on the outside
door handle is pressed.
When the vehicle is approached
with the smart key in possession (if
equipped). If it does not work properly even
though your car is inclined rear-
ward according to passenger's
posture, or the headlight beam
is irradiated to the high or low
position, we recommend that
the system be inspected by an
authorised HYUNDAI dealer.
Do not attempt to inspect or
replace the wiring yourself.
WARNING
OTLE048076
Page 230 of 637
3-144
Convenient features of your vehicle
MAX A/C (if equipped)
To operate the MAX A/C, turn the
mode selection knob to the extreme
left. Air flow is directed toward the
upper body and face.
In this mode, the air conditioning and
the recirculated air position will be
selected automatically.
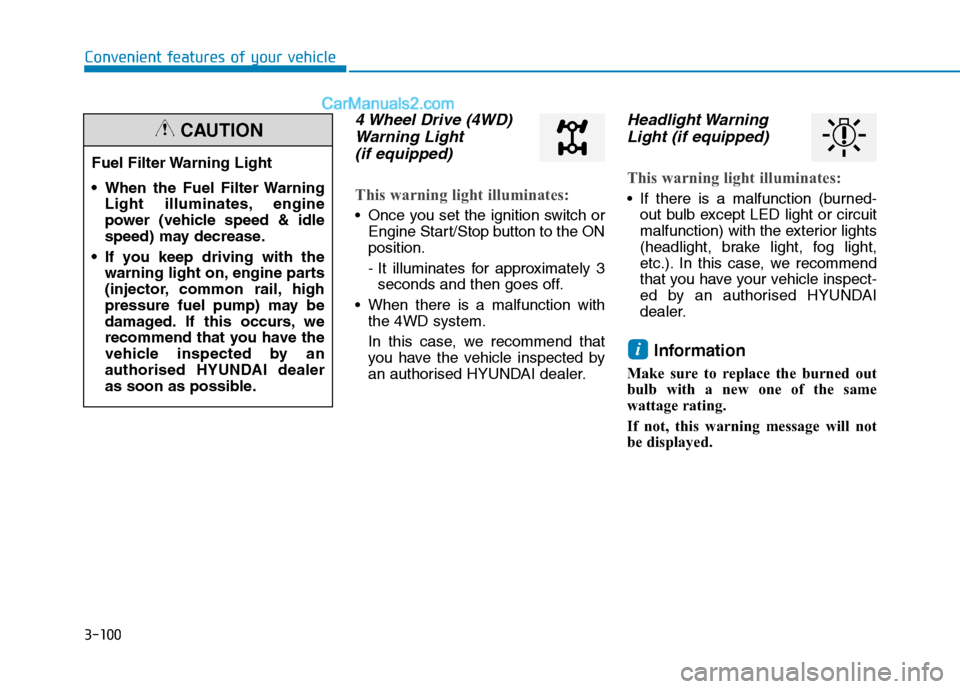
Instrument panel vents
The instrument panel vent air flow
can be directed up/down or left/right
using the vent adjustment lever.Front :
The outlet vents can be opened or
closed separately using the vent
control lever. To close the vent com-
pletely, move the vent control lever
all the way to the left. You will hear a
click.
Rear :
The outlet vents can be opened ( )
or closed ( ) separately using the
thumbwheel.
OTL045209OTLE048086R
■Front
OTLE048087
■Rear (if equipped)
Page 243 of 637
3-157
Convenient features of your vehicle
3
Instrument panel vents
The instrument panel vent air flow
can be directed up/down or left/right
using the vent adjustment lever.Front :
The outlet vents can be opened or
closed separately using the vent
control lever. To close the vent com-
pletely, move the vent control lever
all the way to the left. You will hear a
click.
Rear :
The outlet vents can be opened ( )
or closed ( ) separately using the
thumbwheel.
Temperature control
Turn the temperature control knob to
set the desired temperature.
OTL045219
OTLE048086R
■Front
OTLE048087
■Rear (if equipped)
Page 276 of 637
Multimedia System
Multimedia system .................................................4-2
AUX, USB and iPod®port ...............................................4-2
Antenna ...............................................................................4-3
Steering wheel audio control .........................................4-4
Audio / Video / Navigation system (AVN) ..................4-5
Bluetooth®Wireless Technology hands-free ............4-5
How Vehicle Audio Works ...............................................4-6
Audio ......................................................................4-10
Radio...................................................................................4-17
Media player ....................................................................4-19
Bluetooth ...........................................................................4-26
Setup ..................................................................................4-37
System status icons........................................................4-39
Audio system specifications .........................................4-40
Trademarks .......................................................................4-42
Declaration of conformity ............................................4-42
4
Page 279 of 637
4-4
Multimedia System
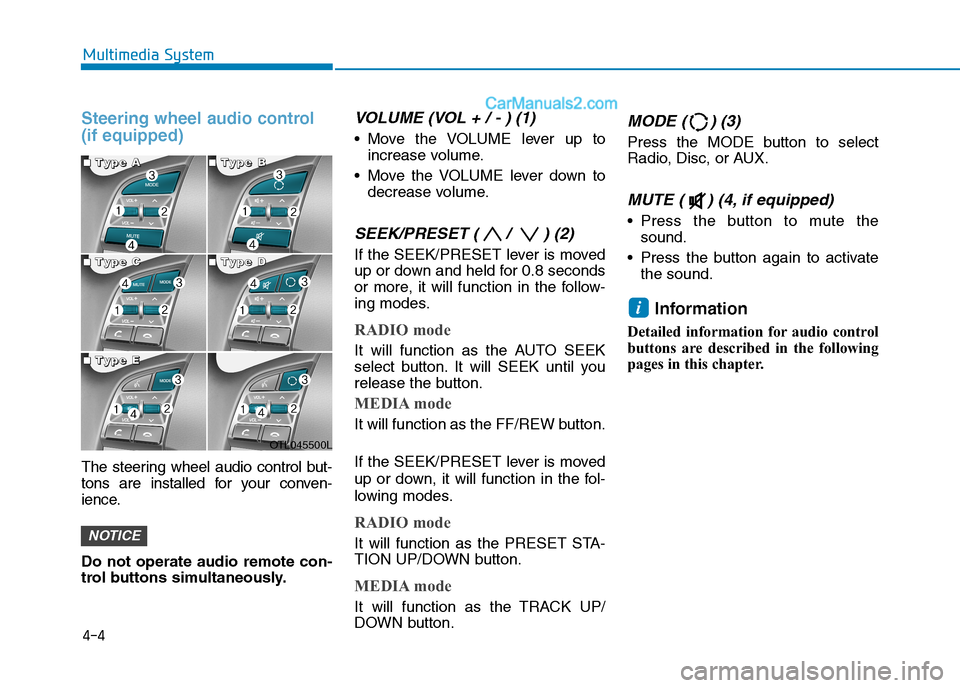
Steering wheel audio control
(if equipped)
The steering wheel audio control but-
tons are installed for your conven-
ience.
Do not operate audio remote con-
trol buttons simultaneously.
VOLUME (VOL + / - ) (1)
Move the VOLUME lever up to
increase volume.
Move the VOLUME lever down to
decrease volume.
SEEK/PRESET ( / ) (2)
If the SEEK/PRESET lever is moved
up or down and held for 0.8 seconds
or more, it will function in the follow-
ing modes.
RADIO mode
It will function as the AUTO SEEK
select button. It will SEEK until you
release the button.
MEDIA mode
It will function as the FF/REW button.
If the SEEK/PRESET lever is moved
up or down, it will function in the fol-
lowing modes.
RADIO mode
It will function as the PRESET STA-
TION UP/DOWN button.
MEDIA mode
It will function as the TRACK UP/
DOWN button.
MODE ( ) (3)
Press the MODE button to select
Radio, Disc, or AUX.
MUTE ( ) (4, if equipped)
Press the button to mute the
sound.
Press the button again to activate
the sound.
Information
Detailed information for audio control
buttons are described in the following
pages in this chapter.
i
NOTICE
OTL045500L
■ ■ ■ ■T
T T T
y y y y
p p p p
e e e e
A A A A■
■ ■ ■T
T T T
y y y y
p p p p
e e e e
B B B B
■
■ ■ ■T
T T T
y y y y
p p p p
e e e e
C C C C■
■ ■ ■T
T T T
y y y y
p p p p
e e e e
D D D D
■
■ ■ ■T
T T T
y y y y
p p p p
e e e e
E E E E
Page 287 of 637
4-12
Multimedia System
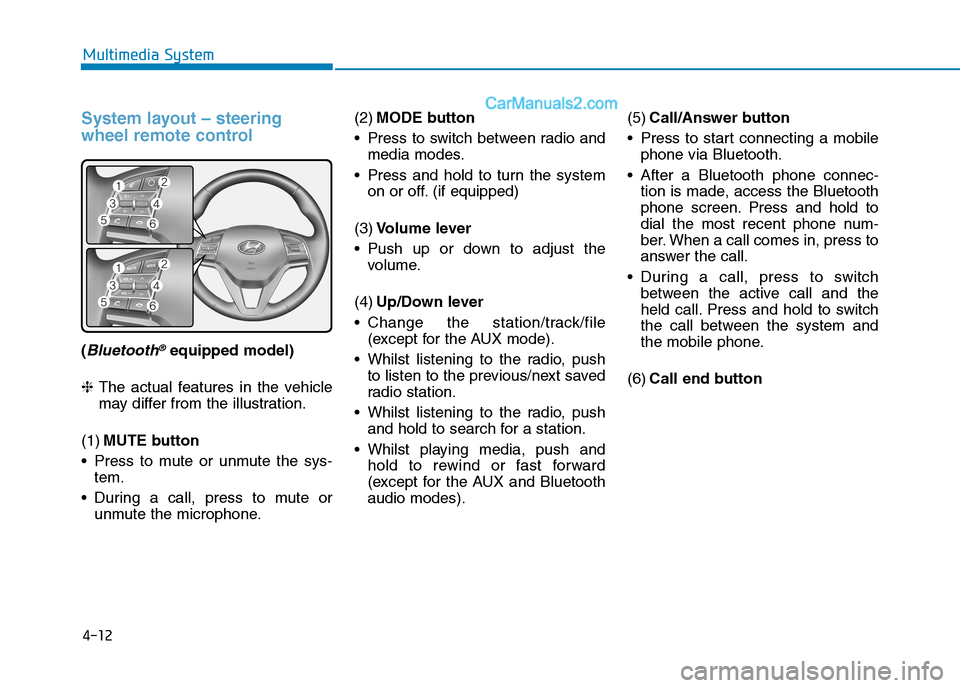
System layout – steering
wheel remote control
(Bluetooth®equipped model)
❈The actual features in the vehicle
may differ from the illustration.
(1)MUTE button
Press to mute or unmute the sys-
tem.
During a call, press to mute or
unmute the microphone.(2)MODE button
Press to switch between radio and
media modes.
Press and hold to turn the system
on or off. (if equipped)
(3)Volume lever
Push up or down to adjust the
volume.
(4)Up/Down lever
Change the station/track/file
(except for the AUX mode).
Whilst listening to the radio, push
to listen to the previous/next saved
radio station.
Whilst listening to the radio, push
and hold to search for a station.
Whilst playing media, push and
hold to rewind or fast forward
(except for the AUX and Bluetooth
audio modes).(5)Call/Answer button
Press to start connecting a mobile
phone via Bluetooth.
After a Bluetooth phone connec-
tion is made, access the Bluetooth
phone screen. Press and hold to
dial the most recent phone num-
ber. When a call comes in, press to
answer the call.
During a call, press to switch
between the active call and the
held call. Press and hold to switch
the call between the system and
the mobile phone.
(6)Call end button