Page 111 of 637

3-25
Convenient features of your vehicle
3
Day/night rearview mirror
(if equipped)
Make this adjustment before you
start driving and whilst the day/night
lever is in the day position.
Pull the day/night lever toward you to
reduce glare from the headlights of
the vehicles behind you during night
driving.
Remember that you lose some
rearview clarity in the night position.
Electric Chromic Mirror (ECM)
(if equipped)
The electric chromic rearview mirror
automatically controls the glare from
the headlamp of the vehicle behind
you in nighttime or low light driving
conditions.
When the engine is running, the
glare is automatically controlled by
the sensor mounted in the rearview
mirror. The sensor detects the light
level around the vehicle, and auto-
matically adjusts to control the head-
lamp glare from vehicles behind you.
Whenever the shift lever is placed in
R (Reverse), the mirror will automat-
ically go to the brightest setting in
order to improve the driver's view
behind the vehicle.
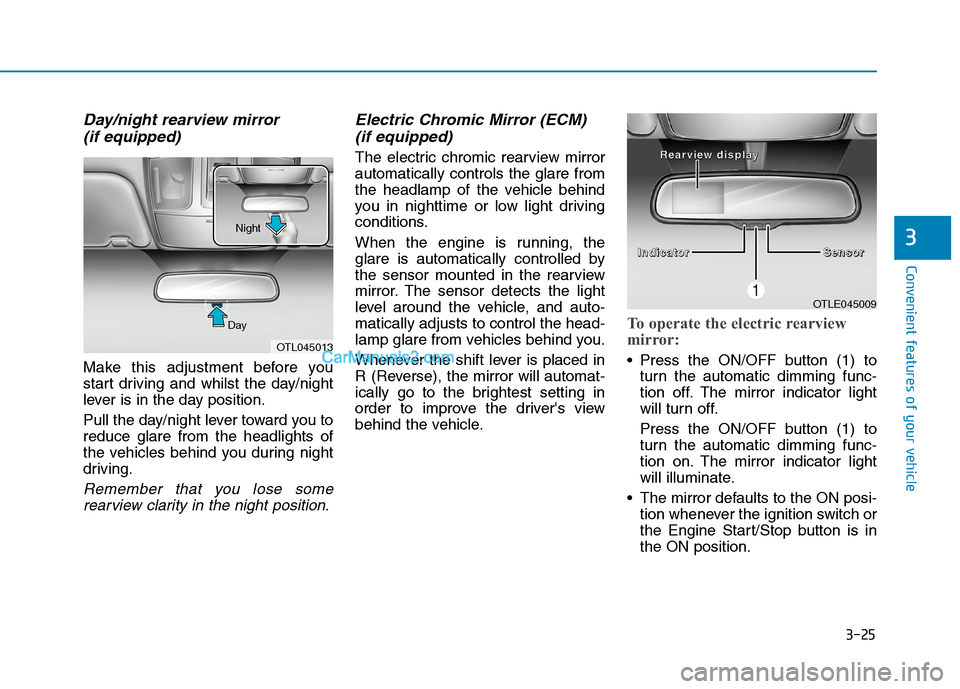
To operate the electric rearview
mirror:
Press the ON/OFF button (1) to
turn the automatic dimming func-
tion off. The mirror indicator light
will turn off.
Press the ON/OFF button (1) to
turn the automatic dimming func-
tion on. The mirror indicator light
will illuminate.
The mirror defaults to the ON posi-
tion whenever the ignition switch or
the Engine Start/Stop button is in
the ON position.
OTLE045009
I I I I
n n n n
d d d d
i i i i
c c c c
a a a a
t t t t
o o o o
r r r r
S S S S
e e e e
n n n n
s s s s
o o o o
r r r r R R R R
e e e e
a a a a
r r r r
v v v v
i i i i
e e e e
w w w w
d d d d
i
i i i
s s s s
p p p p
l l l l
a a a a
y y y y
OTL045013 DayNight
Page 112 of 637

3-26
Convenient features of your vehicle
Electric chromic mirror (ECM)
with compass (if equipped)
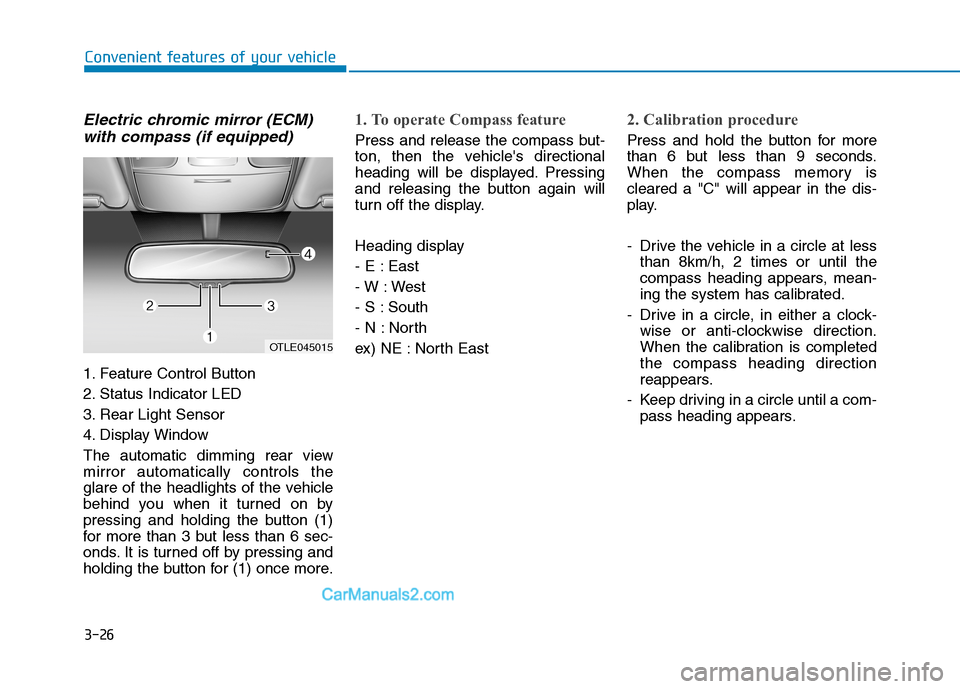
1. Feature Control Button
2. Status Indicator LED
3. Rear Light Sensor
4. Display Window
The automatic dimming rear view
mirror automatically controls the
glare of the headlights of the vehicle
behind you when it turned on by
pressing and holding the button (1)
for more than 3 but less than 6 sec-
onds. It is turned off by pressing and
holding the button for (1) once more.
1. To operate Compass feature
Press and release the compass but-
ton, then the vehicle's directional
heading will be displayed. Pressing
and releasing the button again will
turn off the display.
Heading display
- E : East
- W : West
- S : South
- N : North
ex) NE : North East
2. Calibration procedure
Press and hold the button for more
than 6 but less than 9 seconds.
When the compass memory is
cleared a "C" will appear in the dis-
play.
- Drive the vehicle in a circle at less
than 8km/h, 2 times or until the
compass heading appears, mean-
ing the system has calibrated.
- Drive in a circle, in either a clock-
wise or anti-clockwise direction.
When the calibration is completed
the compass heading direction
reappears.
- Keep driving in a circle until a com-
pass heading appears.
OTLE045015
Page 147 of 637
3-61
Convenient features of your vehicle
3
Instrument cluster control
Instrument panel illumination
When the vehicle's parking lights or
headlights are on, press the illumina-
tion control button to adjust the
brightness of the instrument panel
illumination.
When pressing the illumination con-
trol button, the interior switch illumi-
nation intensity is also adjusted.
The brightness of the instrument
panel illumination is displayed.
If the brightness reaches the maxi-
mum or minimum level, an alarm
will sound.Gauges
Speedometer
The speedometer indicates the
speed of the vehicle and is calibrated
in kilometers per hour (km/h). Never adjust the instrument
cluster whilst driving. This could
result in loss of control and lead
to an accident that may cause
death, serious injury, or property
damage.
WARNING
OTLE045102 ■km/hOTLE048070R
■Type A
OTLE048622R
■Type B
Page 190 of 637
3-104
Convenient features of your vehicle
Low Beam Indicator
Light (if equipped)
This indicator light illuminates:
When the headlights are on.
High Beam Indicator
Light
This indicator light illuminates:
When the headlights are on and in
the high beam position
When the turn signal lever is pulled
into the Flash-to-Pass position.
High Beam Assist
(HBA) indicator light
This warning light illuminates:
When the high-beam is on with the
light switch in the AUTO light posi-
tion.
If your vehicle detects oncoming or
preceding vehicles, the High Beam
Assist (HBA) system will switch the
high beam to low beam automati-
cally.
For more details, refer to "High
Beam Assist (HBA)" in this chap-
ter.
Light ON Indicator
Light
This indicator light illuminates:
When the tail lights or headlights
are on.
Page 203 of 637

3-117
Convenient features of your vehicle
3
Daytime running light (DRL)
(if equipped)
The Daytime Running Lights (DRL)
can make it easier for others to see
the front of your vehicle during the
day, especially after dawn and before
sunset.
The DRL system will turn the dedi-
cated lamps OFF when:
- The headlights or front fog lights
are in the ON position.
- The parking lamps switch is in the
ON position.
- The engine is turned off.
Headlight levelling device
(if equipped)
Manual type
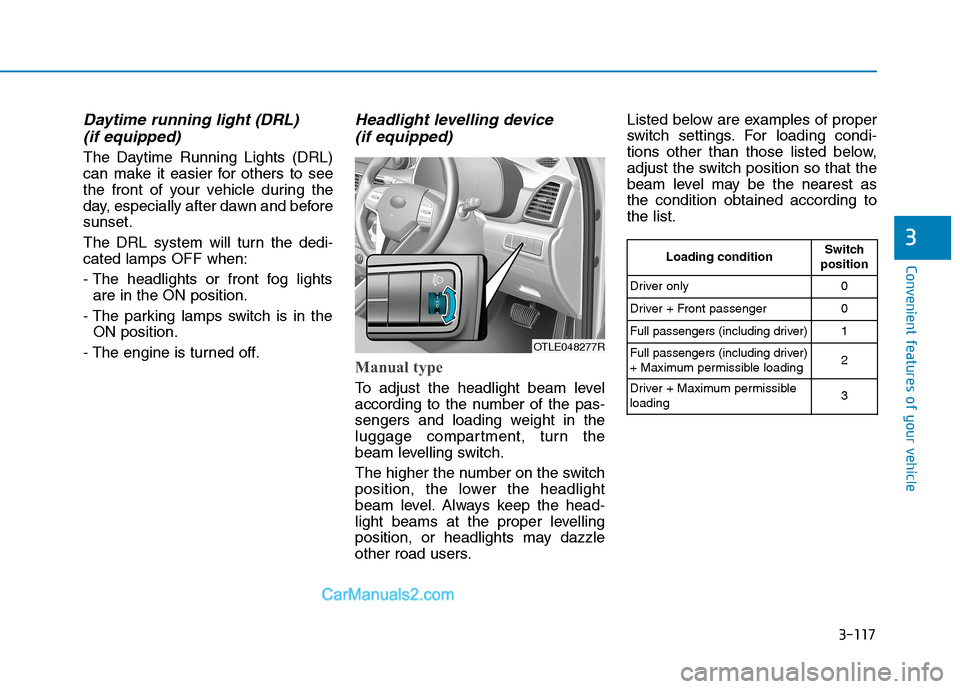
To adjust the headlight beam level
according to the number of the pas-
sengers and loading weight in the
luggage compartment, turn the
beam levelling switch.
The higher the number on the switch
position, the lower the headlight
beam level. Always keep the head-
light beams at the proper levelling
position, or headlights may dazzle
other road users.Listed below are examples of proper
switch settings. For loading condi-
tions other than those listed below,
adjust the switch position so that the
beam level may be the nearest as
the condition obtained according to
the list.
OTLE048277R
Loading conditionSwitch
position
Driver only 0
Driver + Front passenger 0
Full passengers (including driver) 1
Full passengers (including driver)
+ Maximum permissible loading2
Driver + Maximum permissible
loading 3