Page 209 of 292
207
In some weather conditions (e.g. low
temperature or humidity), the presence
of misting on the internal sur face of the
glass of the headlamps and rear lamps is
normal; it disappears after the lamps have
been on for a few minutes.
Light-emitting diodes (LED)
For the replacement of this type of bulb,
you must contact a
CITROËN dealer or
a
qualified workshop.
Halogen bulbs
To ensure good quality lighting, check
that the bulb is correctly positioned in its
housing.Front lamps
Model A
1. Daytime running lamps/sidelamps/
direction indicators (LED).
2. Dipped beam headlamps (LED).
3. Dipped beam/main beam headlamps
(LED).
4. Front foglamps (P21W).
Model B
1.Daytime running lamps/sidelamps/
direction indicators (LED).
2. Dipped beam headlamps (H7-55W).
3. Main beam headlamps (HB3-65W).
4. Front foglamps (P21W).
8
In the event of a breakdown
Page 210 of 292

208
Model C
1.Daytime running lamps/sidelamps (LED).
2. Direction indicators (W Y21W).
3. Dipped beam headlamps (H7-55W).
4. Main beam headlamps (HB3-65W).
5. Front foglamps (P21W).
Opening the bonnet /Access to bulbs
With the engine warm, proceed with
caution – Risk of burns!
Take care with objects or clothing that
could be caught in the blades of the
engine fan – Risk of strangulation!
Direction indicators (halogen
headlamps)
Rapid flashing of a direction indicator
l amp (left or right) indicates that one of
the bulbs on the corresponding side has
failed.
Amber coloured bulbs, such as the
direction indicators, must be replaced
by bulbs with identical colour and
specifications.
Main beam headlamps (halogen
headlamps)
F Turn the bulb holder a quarter turn anti-
clockwise.
F
P
ull the bulb and bulb holder assembly
rearwards.
F
R
eplace the bulb.
To refit, carry out these operations in reverse
o r d e r. F
R
emove the protective cover.
F
D
isconnect the bulb connector.
F
T
urn the bulb holder anti-clockwise.
F
R
emove the bulb and replace it.
To refit, carry out these operations in reverse
order. When refitting, close the protective cover
very carefully to guarantee the sealing of the
lamp.
In the event of a breakdown
Page 211 of 292

209
Dipped beam headlamps (halogen
headlamps)
F Remove the protective cover.
F D isconnect the bulb connector.
F
T
urn the lamp a quarter turn anti-clockwise
and replace it.
To refit, carry out these operations in reverse
order. When refitting, close the protective cover
very carefully to guarantee the sealing of the
lamp.
Daytime running lamps/sidelamps
(LEDs)
For the replacement of this type of diode bulb,
contact a CITROËN dealer or a qualified
workshop.
Changing foglamp bulbsTo replace this type of bulb, you can also
contact a CITROËN dealer or a qualified
workshop.
Direction indicator side repeaters
(LED)
For the replacement of this type of diode bulb,
contact a CITROËN dealer or a qualified
workshop.
Door mirror spotlamps (LED)
For the replacement of this type of diode bulb,
contact a CITROËN dealer or a qualified
workshop.
F
I
ntroduce a
flat screwdriver in the hole in
the trim.
F
P
ull and lever to unclip the foglamp trim.
F
W
ith a
Torx screwdriver, remove the two
module fixing screws.
F
R
emove the module from its housing.
F
D
isconnect the bulb holder connector.
F
T
urn the bulb holder a
quarter turn and pull
it out.
F
C
hange the assembly.
To refit, carry out these operations in reverse
o r d e r.
8
In the event of a breakdown
Page 212 of 292

210
Rear lamps
1.Brake lamps (LED).
2. Sidelamps (LED).
3. Direction indicators (W Y21W).
4. Reversing lamps (W16W).
5. Foglamps (P21W).
Direction indicators (on the
wings)
F Open the tailgate, then unclip the access
cover on the side in question.
F
U
nblock the lamp fixing nut with a 10 mm
box spanner.
F
T
o avoid losing the nut in the wing trim if it
drops, first place a
cloth below it.
F
M
anually unscrew and remove the lamp
fixing nut.
F
D
isengage the retaining clip, while pushing
the lamp out slightly. F
F
rom the outside, carefully remove the lamp
by pulling it to the rear, then up.
F
D
isengage the cable duct from the panel.
F
T
urn the bulb holder a quarter turn using
a universal pair of pliers if necessary and
pull it out.
F
R
emove the bulb and replace it.
To refit, carry out these operations in reverse
o r d e r.
Reversing lamps (on the tailgate)
F Open the tailgate, then insert a flat
screwdriver into the cut-out to unclip the
access cover on the side in question.
F
U
nblock the lamp fixing nut with a 10 mm
box spanner.
F
M
anually unscrew and remove the lamp
fixing nut.
F
D
isengage the retaining clip, while pushing
the lamp out slightly.
In the event of a breakdown
Page 213 of 292

211
To refit, carry out these operations in reverse
o r d e r.
Foglamps
If changing a bulb within a few minutes of
s witching off the ignition, take care not to
touch the exhaust – risk of burns!
Third brake lamp (LED)
For the replacement of this type of diode bulb,
contact a CITROËN dealer or a qualified
workshop.
Number plate lamps (W5W)
Interior lighting
Courtesy lamps
Front courtesy lamp
F From the outside, carefully remove the lamp by pulling it to the rear.
F
D
isconnect the lamp connector by pressing
on each side.
F
T
urn the bulb holder a quarter turn and pull
it out.
F
R
emove the bulb and replace it.
These bulbs are replaced from outside the rear
bumper:
F
p
ass your hand under the bumper,
F
t
urn the bulb holder a quarter turn and
remove it, F
t
urn the bulb a quarter turn and replace it.
To refit, carry out these operations in reverse
o r d e r.
F
I
nsert a thin screwdriver into one of the cut-
outs in the lens.
F
P
ush it outwards to unclip it.
F
R
emove the lens.
F
R
eplace the faulty bulb.
To refit, press the lens to clip it in.
Rear courtesy lamp
For the replacement of these bulbs, contact
a CITROËN dealer or a qualified workshop.
8
In the event of a breakdown
Page 214 of 292

212
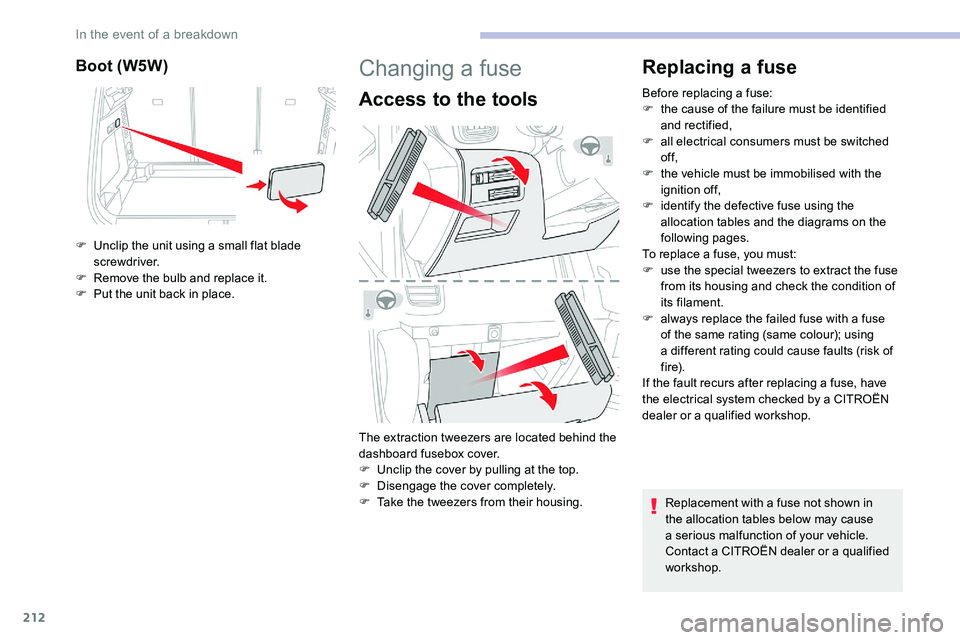
Boot (W5W)
F Unclip the unit using a small flat blade
screwdriver.
F
R
emove the bulb and replace it.
F
P
ut the unit back in place.
Changing a fuse
Access to the tools
The extraction tweezers are located behind the
dashboard fusebox cover.
F
U
nclip the cover by pulling at the top.
F
D
isengage the cover completely.
F
T
ake the tweezers from their housing.
Replacing a fuse
Before replacing a fuse:
F t he cause of the failure must be identified
and rectified,
F
a
ll electrical consumers must be switched
of f,
F
t
he vehicle must be immobilised with the
ignition off,
F
i
dentify the defective fuse using the
allocation tables and the diagrams on the
following pages.
To replace a
fuse, you must:
F
u
se the special tweezers to extract the fuse
from its housing and check the condition of
its filament.
F
a
lways replace the failed fuse with a fuse
of the same rating (same colour); using
a
different rating could cause faults (risk of
f i r e).
If the fault recurs after replacing a
fuse, have
the electrical system checked by a
CITROËN
dealer or a
qualified workshop.
Replacement with a
fuse not shown in
the allocation tables below may cause
a
serious malfunction of your vehicle.
Contact a
CITROËN dealer or a qualified
workshop.
In the event of a breakdown
Page 215 of 292
213
Installing electrical accessories
Your vehicle's electrical system is
designed to operate with standard or
optional equipment.
Before installing other electrical
equipment or accessories on your vehicle,
contact a CITROËN dealer or a qualified
workshop. CITROËN accepts no responsibility for
the cost incurred in repairing your vehicle
or for rectifying malfunctions resulting
from the installation of accessories
not supplied and not recommended by
CITROËN and not installed in accordance
with specifications, in particular when the
combined power consumption of all of the
additional equipment connected exceeds
10
milliamperes.
Dashboard fuses
The fusebox is placed in the lower dashboard
(left-hand side).
Access to the fuses
F Unclip the cover by pulling at the top.
Good
Failed
Tw e e z e r s
8
In the event of a breakdown
Page 216 of 292
214
Lower fuseboxF145Alarm (unit).
F18 5Trailer power supply.
F28 5Alarm (siren), additional
heating/ventilation
remote control receiver.
F29 20Touch screen
(CITROËN Connect
Radio or CITROËN
Connect Nav).
F31 10Cigarette lighter/front
12
V accessory socket.
F34 5Wireless smartphone
charger.Upper fusebox
Fuse No. Rating
(A) Functions
F2 10Heated door mirrors.
F3 40Rear one-touch electric
windows.
F5 40Front one-touch electric
windows.
F6 1512
V socket in boot.
F7 30Front heated seats.
F10 30Panoramic opening
sunroof.
Fuse No.
Rating
(A) Functions
F4 15Horn.
F6 20Front and rear
screenwash pump.
F7 1012
V rear USB socket
F8 20Rear wiper.
F10 30Locking/unlocking of
the doors and fuel filler
flap.
In the event of a breakdown