2020 CHRYSLER 300 lane assist
[x] Cancel search: lane assistPage 5 of 328

3
EXTERIOR LIGHTS ................................................42 Multifunction Lever ...................................... 42
Headlight Switch .......................................... 42
Daytime Running Lights (DRLs) .................. 43
High/Low Beam Switch ............................... 43
Automatic High Beam — If Equipped ......... 43
Flash-To-Pass ............................................... 44
Automatic Headlights ................................. 44
Parking Lights ............................................. 44
Headlights On With Wipers ......................... 44
Adaptive Bi-Xenon High Intensity
Discharge Headlights — If Equipped........... 44 Headlight Time Delay .................................. 45
Lights-On Reminder .................................... 45
Fog Lights — If Equipped ............................. 45
Turn Signals ................................................ 46
Lane Change Assist — If Equipped ............. 46
INTERIOR LIGHTS ................................................46
Courtesy Lights ............................................ 46
WINDSHIELD WIPERS AND WASHERS .............48
Wiper Operation ........................................... 48
Rain Sensing Wipers — If Equipped ........... 49
CLIMATE CONTROLS ...........................................50
Automatic Climate Control Overview .......... 50
Climate Control Functions ........................... 55
Automatic Temperature Control (ATC) ....... 55
Operating Tips ............................................. 56 WINDOWS ............................................................ 57
Power Window Controls .............................. 57
Wind Buffeting ............................................ 59
PANORAMIC SUNROOF — IF EQUIPPED ........... 59
Opening Sunroof .......................................... 59
Closing Sunroof............................................ 60
Wind Buffeting ............................................ 60
Opening Power Shade ................................. 60
Closing Power Shade................................... 61
Pinch Protect Feature.................................. 61
Sunroof Maintenance.................................. 61
Ignition Off Operation .................................. 61
HOOD ..................................................................... 61
To Open The Hood ...................................... 61
To Close The Hood ....................................... 62
TRUNK.................................................................... 62
Opening ........................................................ 62
Closing .......................................................... 63
Trunk Safety ................................................. 63
Cargo Area Features ................................... 64
LOAD LEVELING SYSTEM — IF EQUIPPED ....... 65
GARAGE DOOR OPENER — IF EQUIPPED ........ 66 Before You Begin Programming
HomeLink® .................................................. 66 Canadian/Gate Operator Programming ..... 68
Using HomeLink®........................................ 69
Security......................................................... 69
Troubleshooting Tips ................................... 69
General Information .................................... 70 INTERNAL EQUIPMENT ........................................70
Storage ......................................................... 70
Cupholders .................................................. 72
Power Sunshade — If Equipped .................. 73
Electrical Power Outlets .............................. 74
Sunglasses Bin Door .................................. 75
GETTING TO KNOW YOUR
INSTRUMENT PANEL
INSTRUMENT CLUSTER .......................................76
Instrument Cluster Descriptions ................ 77
INSTRUMENT CLUSTER DISPLAY .......................78
Location And Controls ................................. 78
Engine Oil Life Reset .................................. 79
Instrument Cluster Display Selectable
Menu Items .................................................. 80 Battery Saver On/Battery Saver Mode
Message — Electrical Load Reduction
Actions — If Equipped ................................. 83
WARNING LIGHTS AND MESSAGES ..................84
Red Warning Lights ..................................... 85
Yellow Warning Lights ................................. 88
Yellow Indicator Lights ................................ 91
Green Indicator Lights ................................. 91
White Indicator Lights ................................. 92
Blue Indicator Lights ................................... 92
ONBOARD DIAGNOSTIC SYSTEM — OBD II ......93
Onboard Diagnostic System (OBD II)
Cybersecurity ............................................... 93
20_LX_OM_EN_USC_t.book Page 3
Page 7 of 328

5
Service The ParkSense Park Assist
System ........................................................ 182 Cleaning The ParkSense System ..............182
ParkSense System Usage Precautions ....182
LANESENSE — IF EQUIPPED ........................... 183
LaneSense Operation ................................183Turning LaneSense On Or Off ...................184LaneSense Warning Message ..................184
Changing LaneSense Status .....................186
PARKVIEW REAR BACK UP CAMERA ............. 186
REFUELING THE VEHICLE ................................. 188
Emergency Fuel Filler Door Release.........189
VEHICLE LOADING ............................................ 190
Vehicle Certification Label ........................ 190Gross Vehicle Weight Rating (GVWR) .......190
Gross Axle Weight Rating (GAWR) ........... 190Overloading ................................................190
Loading ......................................................190
TRAILER TOWING .............................................. 191
Common Towing Definitions .....................191Trailer Hitch Classification ........................ 193Trailer Towing Weights (Maximum Trailer
Weight Ratings) .........................................194 Trailer And Tongue Weight .......................194
Towing Requirements ................................195Towing Tips ................................................197 RECREATIONAL TOWING
(BEHIND MOTORHOME, ETC.) .......................... 198
DRIVING TIPS ...................................................... 198
Driving On Slippery Surfaces .................... 198
Driving Through Water .............................. 199
IN CASE OF EMERGENCY
HAZARD WARNING FLASHERS .......................201
ASSIST AND SOS MIRROR —
IF EQUIPPED ....................................................... 201General Information .................................. 205
BULB REPLACEMENT ........................................ 206
Replacement Bulbs ................................... 206
Replacing Exterior Bulbs ........................... 207
FUSES ..................................................................209
General Information .................................. 210Underhood Fuses ...................................... 210
Rear Interior Fuses .................................... 213
JACKING AND TIRE CHANGING ........................217
Jack Location/Spare Tire Stowage ........... 218
Preparations For Jacking .......................... 218Jacking And Changing A Tire .................... 219
Road Tire Installation ................................ 222
JUMP STARTING ................................................ 222
Preparations For Jump Start ..................... 222Jump Starting Procedure .......................... 223 REFUELING IN EMERGENCY –
IF EQUIPPED ...................................................... 224
IF YOUR ENGINE OVERHEATS ......................... 225
MANUAL PARK RELEASE ................................ 225
FREEING A STUCK VEHICLE ............................. 227
TOWING A DISABLED VEHICLE ........................ 228 All Wheel Drive (AWD) Models .................. 229Rear-Wheel Drive (RWD) Models ............. 229
ENHANCED ACCIDENT RESPONSE
SYSTEM (EARS) ................................................. 230
EVENT DATA RECORDER (EDR) ....................... 230
SERVICING AND MAINTENANCE
SCHEDULED SERVICING .................................. 231
Maintenance Plan ..................................... 232
ENGINE COMPARTMENT .................................. 236
3.6L Engine ............................................... 236
5.7L Engine ............................................... 237
Checking Oil Level .................................... 238Adding Washer Fluid ................................. 238Maintenance-Free Battery ....................... 238Pressure Washing...................................... 239
20_LX_OM_EN_USC_t.book Page 5
Page 48 of 328

46GETTING TO KNOW YOUR VEHICLE
TURN SIGNALS
Move the multifunction lever up or down and
the arrows on each side of the instrument
cluster display flash to show proper operation of
the front and rear turn signal lights.
NOTE:
If either light remains on and does not flash,
or there is a very fast flash rate, check for a
defective outside light bulb. If an indicator
fails to light when the lever is moved, it would
suggest that the indicator bulb is defective.
A “Turn Signal On” message will appear in the
instrument cluster display and a continuous
chime will sound if the vehicle is driven more
than 1 mile (1.6 km) with either turn signal on.
LANE CHANGE ASSIST — IF EQUIPPED
Tap the multifunction lever up or down once,
without moving beyond the detent, and the turn
signal (right or left) will flash three times then
automatically turn off.
INTERIOR LIGHTS
The interior lights come on when a door is
opened.
To protect the battery, the interior lights will turn
off automatically 10 minutes after the ignition is
placed in the OFF position. This will occur if the
interior lights were switched on manually or are
on because a door is open. The Battery
Protection also includes the glove compartment
light and the trunk light. To restore interior light
operation after automatic battery protection is
enabled (lights off), either place the ignition in
the ON/RUN position, or cycle the light switch.
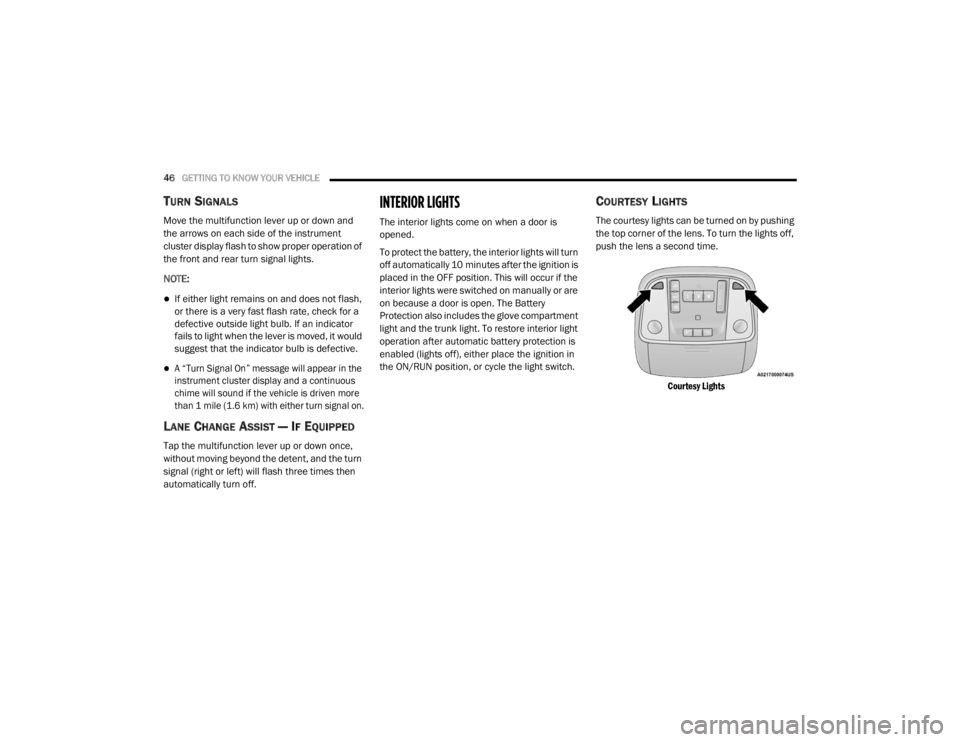
COURTESY LIGHTS
The courtesy lights can be turned on by pushing
the top corner of the lens. To turn the lights off,
push the lens a second time.
Courtesy Lights
20_LX_OM_EN_USC_t.book Page 46
Page 83 of 328

GETTING TO KNOW YOUR INSTRUMENT PANEL81
Battery Voltage
AWD Status — If Equipped
Driver Assist — If Equipped
The Driver Assist menu provides the status and
visuals about the Adaptive Cruise Control and
LaneSense features. When they are both off the
screen, the display will read "Adaptive Cruise
Control (ACC) and LaneSense Off."
Adaptive Cruise Control (ACC) Feature — If
Equipped
The instrument cluster display displays the
current ACC system settings. The information
displayed depends on ACC system status.
Push the Adaptive Cruise Control (ACC) ON/OFF
button (located on the steering wheel) until one
of the following displays in the instrument
cluster display:
Adaptive Cruise Control Off
When ACC is deactivated, the display will read
“Adaptive Cruise Control Off.”
Adaptive Cruise Control Ready
When ACC is activated but the vehicle speed
setting has not been selected, the display will
read “Adaptive Cruise Control Ready.” Push the SET + or the SET- button (located on
the steering wheel) and the following will display
in the instrument cluster display:
ACC Set
When ACC is set, the set speed will display in
the instrument cluster.
The ACC screen may display once again if any
ACC activity occurs, which may include any of
the following:
Distance Setting Change
System Cancel
Driver Override
System Off
ACC Proximity Warning
ACC Unavailable Warning
Refer to “Adaptive Cruise Control (ACC) — If
Equipped” in “Starting And Operating” for
further information.
LaneSense — If Equipped
The instrument cluster display displays the
current LaneSense system settings. The
information displayed depends on LaneSense
system status. Push the LaneSense button (located on the center stack below the
Uconnect display) until one of the following
displays in the instrument cluster display:
LaneSense Off
When LaneSense is deactivated, the display
will read “LaneSense Off.”
LaneSense On
When LaneSense is activated, the display will
read “LaneSense On.”
Refer to “LaneSense — If Equipped” in “Starting
And Operating” for further information.
Fuel Economy
The Fuel Economy Menu has two submenu
pages; one with Current Value (instantaneous
calculation of the fuel economy) displayed and
one without the Current Value displayed (toggle
the left or right arrow button to select one):
Current Fuel Economy (MPG, L/100 km, or
km/L).
Range To Empty (miles or km).
Average Fuel Economy (MPG, L/100 km, or
km/L).
3
20_LX_OM_EN_USC_t.book Page 81
Page 171 of 328

STARTING AND OPERATING169
instrument cluster displays the “Sensed Vehicle
Indicator” icon, and the system adjusts vehicle
speed automatically to maintain the distance
setting, regardless of the set speed.
The vehicle will then maintain the set distance
until:
The vehicle ahead accelerates to a speed
above the set speed.
The vehicle ahead moves out of your lane or
view of the sensor.
The distance setting is changed.
The system disengages. (Refer to the infor -
mation on ACC Activation).
The maximum braking applied by ACC is limited;
however, the driver can always apply the brakes
manually, if necessary.
NOTE:
The brake lights will illuminate whenever the
ACC system applies the brakes.
A Proximity Warning will alert the driver if ACC
predicts that its maximum braking level is not
sufficient to maintain the set distance. If this
occurs, a visual alert “BRAKE” will flash in the instrument cluster display and a chime will
sound while ACC continues to apply its
maximum braking capacity.
Brake Alert
NOTE:
The “BRAKE!” screen in the instrument cluster
display is a warning for the driver to take action
and does not necessarily mean that the
Forward Collision Warning system is applying
the brakes autonomously.
OVERTAKE AID
When driving with ACC engaged and following a
vehicle, the system will provide an additional
acceleration up to the ACC set speed to assist in
passing the vehicle. This additional acceleration
is triggered when the driver utilizes the left turn
signal (Lane Change Assist feature included) and will only be active when passing on the left
hand side. Switching lanes will not impact the
ACC system if the driver is already traveling at
the set speed.
ACC OPERATION AT STOP
If the ACC system brings your vehicle to a
standstill while following a target vehicle, if the
target vehicle starts moving within two seconds
of your vehicle coming to a standstill, your
vehicle will resume motion without the need for
any driver action.
If the target vehicle does not start moving within
two seconds of your vehicle coming to a
standstill, the ACC with Stop system will cancel
and the brakes will release. A cancel message
will display on the instrument cluster display
and produce a warning chime. Driver
intervention will be required at this moment.
While ACC with Stop is holding your vehicle at a
standstill, if the driver seat belt is unbuckled or
the driver door is opened, the ACC with Stop
system will cancel and the brakes will release. A
cancel message will display on the instrument
cluster display and produce a warning chime.
Driver intervention will be required at this
moment.
5
20_LX_OM_EN_USC_t.book Page 169
Page 188 of 328

186STARTING AND OPERATING
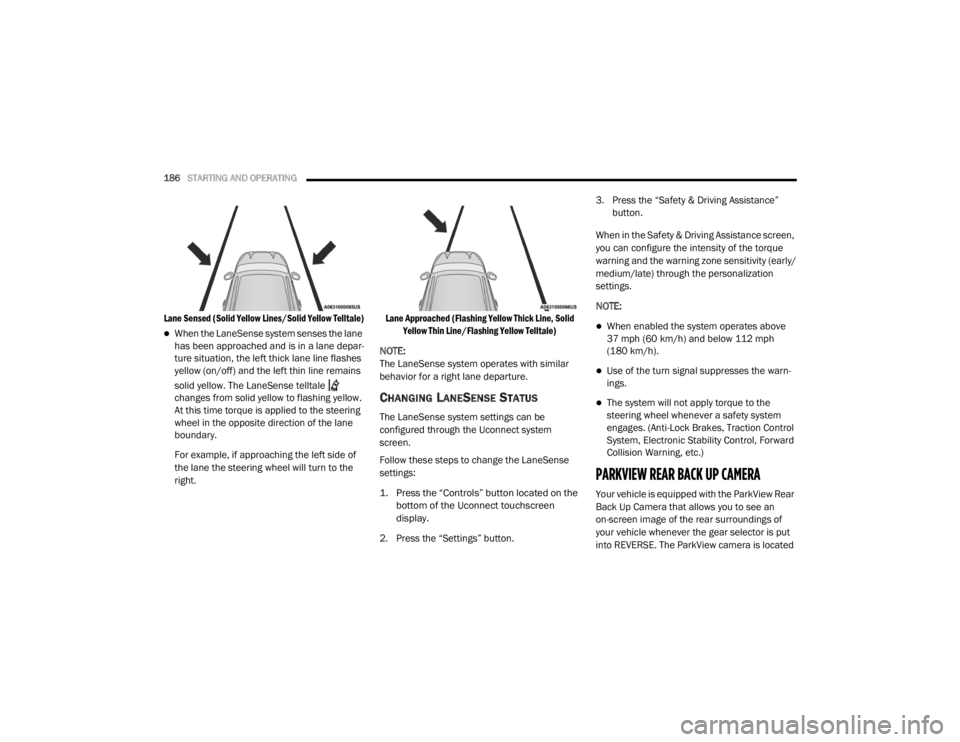
Lane Sensed (Solid Yellow Lines/Solid Yellow Telltale)
When the LaneSense system senses the lane
has been approached and is in a lane depar -
ture situation, the left thick lane line flashes
yellow (on/off) and the left thin line remains
solid yellow. The LaneSense telltale
changes from solid yellow to flashing yellow.
At this time torque is applied to the steering
wheel in the opposite direction of the lane
boundary.
For example, if approaching the left side of
the lane the steering wheel will turn to the
right.
Lane Approached (Flashing Yellow Thick Line, Solid
Yellow Thin Line/Flashing Yellow Telltale)
NOTE:
The LaneSense system operates with similar
behavior for a right lane departure.
CHANGING LANESENSE STATUS
The LaneSense system settings can be
configured through the Uconnect system
screen.
Follow these steps to change the LaneSense
settings:
1. Press the “Controls” button located on the bottom of the Uconnect touchscreen
display.
2. Press the “Settings” button. 3. Press the “Safety & Driving Assistance”
button.
When in the Safety & Driving Assistance screen,
you can configure the intensity of the torque
warning and the warning zone sensitivity (early/
medium/late) through the personalization
settings.
NOTE:
When enabled the system operates above
37 mph (60 km/h) and below 112 mph (180 km/h).
Use of the turn signal suppresses the warn -
ings.
The system will not apply torque to the
steering wheel whenever a safety system
engages. (Anti-Lock Brakes, Traction Control
System, Electronic Stability Control, Forward
Collision Warning, etc.)
PARKVIEW REAR BACK UP CAMERA
Your vehicle is equipped with the ParkView Rear
Back Up Camera that allows you to see an
on-screen image of the rear surroundings of
your vehicle whenever the gear selector is put
into REVERSE. The ParkView camera is located
20_LX_OM_EN_USC_t.book Page 186
Page 218 of 328

216IN CASE OF EMERGENCY
43–20 Amp Yellow Rear Heated Seats – If Equipped / Heated Steering Wheel –
If Equipped
44 –10 Amp Red Park Assist / Blind Spot / Rear View Camera
45 –15 Amp Blue Cluster / Rearview Mirror / Lane Departure
46 – –Fuse – Spare
47 –10 Amp Red Adaptive Front Lighting / Day Time Running Lamps – If Equipped
48 –20 Amp Yellow Active Suspension – (6.4L)
49 – –Fuse – Spare
50 – –Fuse – Spare
51 –20 Amp Yellow Front Heated / Vented Seats – If Equipped
52 –10 Amp RedHeated/Cooled Cup Holders/Rear Heated Seat Switches –
If Equipped
53 –10 Amp Red HVAC Module/In Vehicle Temperature Sensor
54 – –Fuse – Spare
55 – –Fuse – Spare
56 – –Fuse – Spare
57 – –Fuse – Spare
58 –10 Amp Red Airbag Module
59 –20 Amp Yellow Adjustable Pedals – Police
Cavity Cartridge Fuse Mini-FuseDescription
20_LX_OM_EN_USC_t.book Page 216
Page 292 of 328

290MULTIMEDIA
Forward Collision Warning
Sensitivity — If Equipped Near
Far
NOTE:
The FCW Sensitivity feature provides an audible and/or visual warning to potential forward collisions. The feature can be can be set to “Far”, or set
to “Near”. The default status of FCW Sensitivity is the “Far” setting. This means the system will warn you of a possible collision with the vehicle in front
of you when you are farther away. This gives you the most reaction time. To change the setting for more dynamic driving, select the “Near” setting.
This warns you of a possible collision when you are much closer to the vehicle in front of you. Forward Collision Warning Active Braking — If Equipped On
Off
NOTE:
The FCW system includes Advanced Brake Assist (ABA). When this feature is selected, the ABA applies additional brake pressure when the driver
requests insufficient brake pressure to avoid a potential frontal collision. The ABA system becomes active at 5 mph (8 km/h). To make your selection,
press the Forward Collision Warning Active Braking button on the touchscreen, until a check mark appears next to setting, indicating that the setting
had been selected. LaneSense Warning — If Equipped EarlyMedium Late
NOTE:
When the “LaneSense Warning” feature is selected, it sets the distance at which the steering wheel will provide feedback for potential lane depar -
tures.
LaneSense Strength — If Equipped LowMedium High
NOTE:
When the “LaneSense Strength” feature is selected, it sets the strength of the steering wheel feedback for potential lane departures.
Setting Name Selectable Options
20_LX_OM_EN_USC_t.book Page 290