2020 CHRYSLER 300 service schedule
[x] Cancel search: service schedulePage 7 of 328

5
Service The ParkSense Park Assist
System ........................................................ 182 Cleaning The ParkSense System ..............182
ParkSense System Usage Precautions ....182
LANESENSE — IF EQUIPPED ........................... 183
LaneSense Operation ................................183Turning LaneSense On Or Off ...................184LaneSense Warning Message ..................184
Changing LaneSense Status .....................186
PARKVIEW REAR BACK UP CAMERA ............. 186
REFUELING THE VEHICLE ................................. 188
Emergency Fuel Filler Door Release.........189
VEHICLE LOADING ............................................ 190
Vehicle Certification Label ........................ 190Gross Vehicle Weight Rating (GVWR) .......190
Gross Axle Weight Rating (GAWR) ........... 190Overloading ................................................190
Loading ......................................................190
TRAILER TOWING .............................................. 191
Common Towing Definitions .....................191Trailer Hitch Classification ........................ 193Trailer Towing Weights (Maximum Trailer
Weight Ratings) .........................................194 Trailer And Tongue Weight .......................194
Towing Requirements ................................195Towing Tips ................................................197 RECREATIONAL TOWING
(BEHIND MOTORHOME, ETC.) .......................... 198
DRIVING TIPS ...................................................... 198
Driving On Slippery Surfaces .................... 198
Driving Through Water .............................. 199
IN CASE OF EMERGENCY
HAZARD WARNING FLASHERS .......................201
ASSIST AND SOS MIRROR —
IF EQUIPPED ....................................................... 201General Information .................................. 205
BULB REPLACEMENT ........................................ 206
Replacement Bulbs ................................... 206
Replacing Exterior Bulbs ........................... 207
FUSES ..................................................................209
General Information .................................. 210Underhood Fuses ...................................... 210
Rear Interior Fuses .................................... 213
JACKING AND TIRE CHANGING ........................217
Jack Location/Spare Tire Stowage ........... 218
Preparations For Jacking .......................... 218Jacking And Changing A Tire .................... 219
Road Tire Installation ................................ 222
JUMP STARTING ................................................ 222
Preparations For Jump Start ..................... 222Jump Starting Procedure .......................... 223 REFUELING IN EMERGENCY –
IF EQUIPPED ...................................................... 224
IF YOUR ENGINE OVERHEATS ......................... 225
MANUAL PARK RELEASE ................................ 225
FREEING A STUCK VEHICLE ............................. 227
TOWING A DISABLED VEHICLE ........................ 228 All Wheel Drive (AWD) Models .................. 229Rear-Wheel Drive (RWD) Models ............. 229
ENHANCED ACCIDENT RESPONSE
SYSTEM (EARS) ................................................. 230
EVENT DATA RECORDER (EDR) ....................... 230
SERVICING AND MAINTENANCE
SCHEDULED SERVICING .................................. 231
Maintenance Plan ..................................... 232
ENGINE COMPARTMENT .................................. 236
3.6L Engine ............................................... 236
5.7L Engine ............................................... 237
Checking Oil Level .................................... 238Adding Washer Fluid ................................. 238Maintenance-Free Battery ....................... 238Pressure Washing...................................... 239
20_LX_OM_EN_USC_t.book Page 5
Page 233 of 328

231
SERVICING AND MAINTENANCE
SCHEDULED SERVICING
This vehicle is equipped with an automatic oil
change indicator system. The oil change
indicator system will remind you that it is time to
take your vehicle in for scheduled maintenance.
Based on engine operation conditions, the oil
change indicator message will illuminate. This
means that service is required for the vehicle.
Operating conditions such as frequent
short-trips, trailer tow, and extremely hot or cold
ambient temperatures will influence when the
“Change Oil” or “Oil Change Required” message
is displayed. Severe Operating Conditions can
cause the change oil message to illuminate as
early as 3,500 miles (5,600 km) since last
reset. Have your vehicle serviced as soon as
possible, within the next 500 miles (805 km).
The “Oil Change Required” message will be
displayed in the instrument cluster and a single
chime will sound, indicating that an oil change
is necessary.An authorized dealer will reset the oil change
indicator message after completing the
scheduled oil change. If a scheduled oil change
is performed by someone other than an
authorized dealer, the message can be reset by
referring to “Instrument Cluster Display” in
“Getting To Know Your Instrument Panel” for
further information.
NOTE:
Under no circumstances should oil change
intervals exceed 10,000 miles (16,000 km),
12 months or 350 hours of engine run time,
whichever comes first. The 350 hours of engine
run or idle time is generally only a concern for
fleet customers.
Severe Duty All Models
Change Engine Oil at 4,000 miles (6,500 km) or
350 hours of engine run time if the vehicle is
operated in a dusty and off-road environment,
or is operated predominantly at idle or only very
low engine RPM. This type of vehicle use is
considered Severe Duty.Once A Month Or Before A Long Trip:Check engine oil level.
Check windshield washer fluid level.
Check tire pressure and look for unusual
wear or damage. Rotate tires at the first sign
of irregular wear, even if it occurs before your
next scheduled service.
Check the fluid levels of the coolant reservoir,
brake master cylinder, and power steering (if
equipped) and fill as needed.
Check function of all interior and exterior
lights.
7
20_LX_OM_EN_USC_t.book Page 231
Page 234 of 328

232SERVICING AND MAINTENANCE
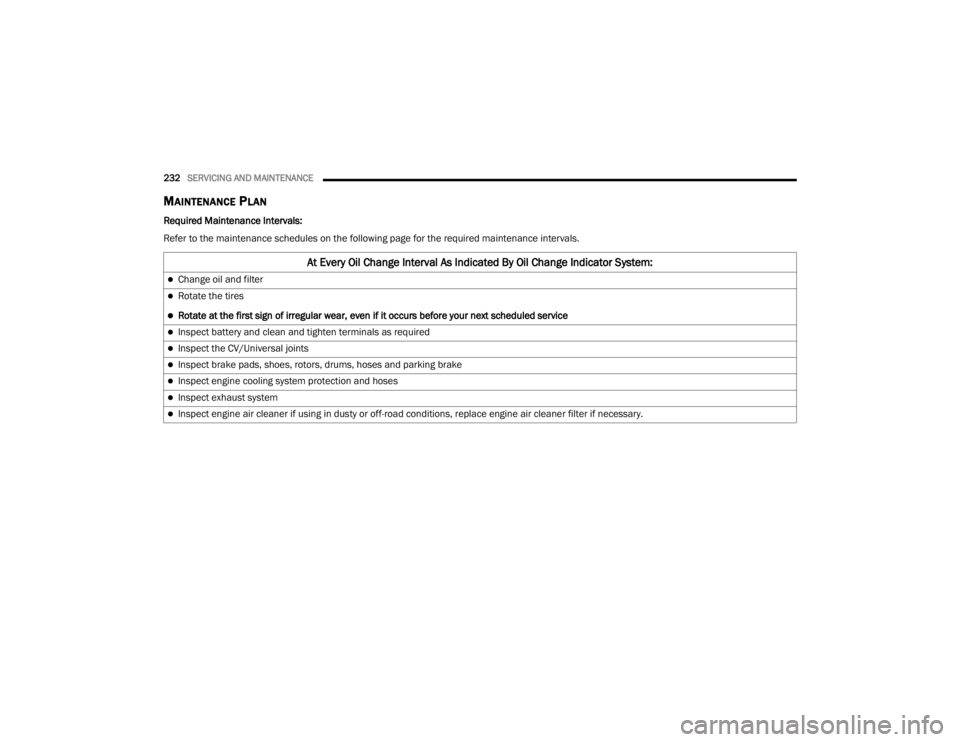
MAINTENANCE PLAN
Required Maintenance Intervals:
Refer to the maintenance schedules on the following page for the required maintenance intervals.
At Every Oil Change Interval As Indicated By Oil Change Indicator System:
Change oil and filter
Rotate the tires
Rotate at the first sign of irregular wear, even if it occurs before your next scheduled service
Inspect battery and clean and tighten terminals as required
Inspect the CV/Universal joints
Inspect brake pads, shoes, rotors, drums, hoses and parking brake
Inspect engine cooling system protection and hoses
Inspect exhaust system
Inspect engine air cleaner if using in dusty or off-road conditions, replace engine air cleaner filter if necessary.
20_LX_OM_EN_USC_t.book Page 232
Page 245 of 328

SERVICING AND MAINTENANCE243
NOTE:
Use only manufacturer approved A/C system
PAG compressor oil, and refrigerants.
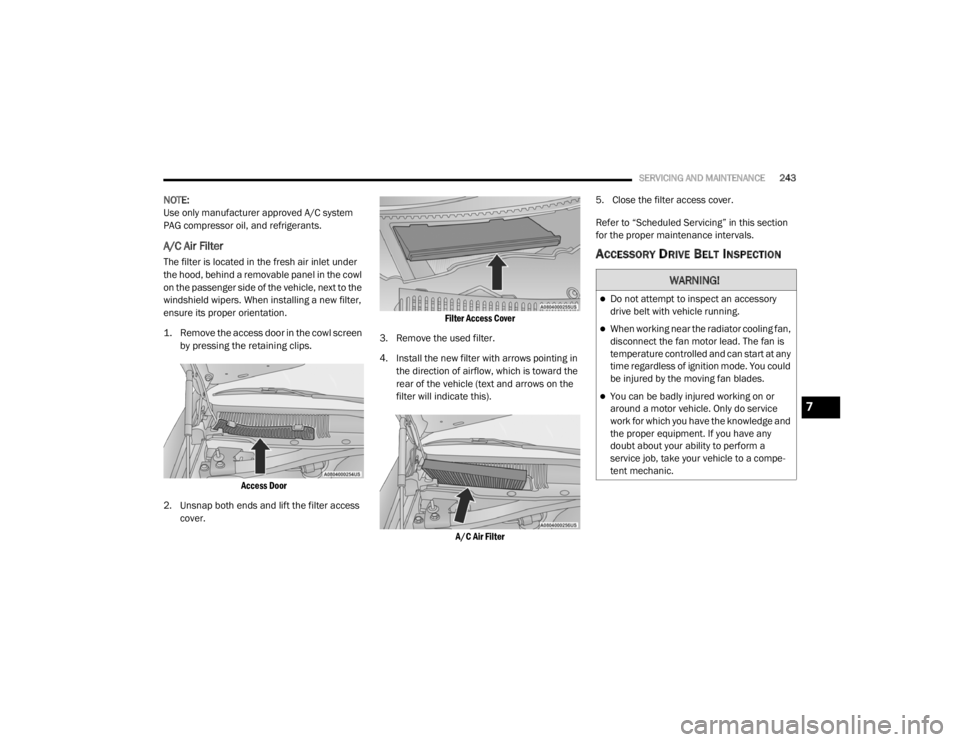
A/C Air Filter
The filter is located in the fresh air inlet under
the hood, behind a removable panel in the cowl
on the passenger side of the vehicle, next to the
windshield wipers. When installing a new filter,
ensure its proper orientation.
1. Remove the access door in the cowl screen
by pressing the retaining clips.
Access Door
2. Unsnap both ends and lift the filter access cover.
Filter Access Cover
3. Remove the used filter.
4. Install the new filter with arrows pointing in the direction of airflow, which is toward the
rear of the vehicle (text and arrows on the
filter will indicate this).
A/C Air Filter
5. Close the filter access cover.
Refer to “Scheduled Servicing” in this section
for the proper maintenance intervals.ACCESSORY DRIVE BELT INSPECTION
WARNING!
Do not attempt to inspect an accessory
drive belt with vehicle running.
When working near the radiator cooling fan,
disconnect the fan motor lead. The fan is
temperature controlled and can start at any
time regardless of ignition mode. You could
be injured by the moving fan blades.
You can be badly injured working on or
around a motor vehicle. Only do service
work for which you have the knowledge and
the proper equipment. If you have any
doubt about your ability to perform a
service job, take your vehicle to a compe
-
tent mechanic.7
20_LX_OM_EN_USC_t.book Page 243
Page 255 of 328

SERVICING AND MAINTENANCE253
ALL WHEEL DRIVE (AWD) — IF
E
QUIPPED
The All Wheel Drive system consists of a
transfer case and front differential. The exterior
surface of these components should be
inspected for evidence of fluid leaks. Confirmed
leaks should be repaired as soon as possible.
The transfer case fluid fill/inspection plug is
located in the middle of the rear housing. To
inspect the transfer case fluid level, remove the
fill/inspection plug. The fluid level should be
even with the bottom of the hole. Use this plug
to add fluid as required.
The front differential fill plug is located on the
outer cover near the halfshaft attachment. To
inspect the differential fluid level, remove the fill
plug. The fluid level should be even with or
slightly below the bottom of the hole.
Fluid Changes
Refer to “Scheduled Servicing” in “Servicing
And Maintenance” for the proper maintenance
intervals.
REAR AXLE
For normal service, periodic fluid level checks
are not required. When the vehicle is serviced
for other reasons the exterior surfaces of the
axle assembly should be inspected. If gear oil
leakage is suspected inspect the fluid level.
Refer to “Fluids And Lubricants” in “Technical
Specifications” for further information.
RAISING THE VEHICLE
In the case where it is necessary to raise the
vehicle, go to an authorized dealer or service
station.
TIRES
TIRE SAFETY INFORMATION
Tire safety information will cover aspects of the
following information: Tire Markings, Tire
Identification Numbers, Tire Terminology and
Definitions, Tire Pressures, and Tire Loading.
Tire Markings
Tire Markings
1 — US DOT Safety Standards Code (TIN)
2 — Size Designation
3 — Service Description
4 — Maximum Load
5 — Maximum Pressure
6 — Treadwear, Traction and Tempera -
ture Grades
7
20_LX_OM_EN_USC_t.book Page 253
Page 266 of 328

264SERVICING AND MAINTENANCE
Tread Wear Indicators
Tread wear indicators are in the original
equipment tires to help you in determining
when your tires should be replaced.
Tire Tread
These indicators are molded into the bottom of
the tread grooves. They will appear as bands
when the tread depth becomes a 1/16 of an
inch (1.6 mm). When the tread is worn to the
tread wear indicators, the tire should be
replaced.
Refer to “Replacement Tires” in this section for
further information.
Life Of Tire
The service life of a tire is dependent upon
varying factors including, but not limited to:
Driving style.
Tire pressure - Improper cold tire inflation
pressures can cause uneven wear patterns
to develop across the tire tread. These
abnormal wear patterns will reduce tread life,
resulting in the need for earlier tire replace -
ment.
Distance driven.
Performance tires, tires with a speed rating of
V or higher, and Summer tires typically have
a reduced tread life. Rotation of these tires
per the vehicle scheduled maintenance is
highly recommended. NOTE:
Wheel valve stem must be replaced as well
when installing new tires due to wear and tear
in existing tires.
Keep dismounted tires in a cool, dry place with
as little exposure to light as possible. Protect
tires from contact with oil, grease, and gasoline.
Replacement Tires
The tires on your new vehicle provide a balance
of many characteristics. They should be
inspected regularly for wear and correct cold
tire inflation pressures. The manufacturer
strongly recommends that you use tires
equivalent to the originals in size, quality and
performance when replacement is needed.
Refer to the paragraph on “Tread Wear
Indicators” in this section. Refer to the Tire and
Loading Information placard or the Vehicle
Certification Label for the size designation of
your tire. The Load Index and Speed Symbol for
your tire will be found on the original equipment
tire sidewall.
See the Tire Sizing Chart example found in the
“Tire Safety Information” section of this manual
for more information relating to the Load Index
and Speed Symbol of a tire.
1 — Worn Tire
2 — New Tire
WARNING!
Tires and the spare tire should be replaced
after six years, regardless of the remaining
tread. Failure to follow this warning can result
in sudden tire failure. You could lose control
and have a collision resulting in serious injury
or death.
20_LX_OM_EN_USC_t.book Page 264
Page 272 of 328

270SERVICING AND MAINTENANCE
TIRE ROTATION RECOMMENDATIONS
Tires on the front and rear axles of vehicles
operate at different loads and perform different
steering, driving, and braking functions. For
these reasons, they wear at unequal rates.
These effects can be reduced by timely rotation
of tires. The benefits of rotation are especially
worthwhile with aggressive tread designs such
as those on all season type tires. Rotation will
increase tread life, help to maintain mud, snow
and wet traction levels, and contribute to a
smooth, quiet ride.
Refer to “Scheduled Servicing” in “Servicing
And Maintenance” for the proper maintenance
intervals. The reasons for any rapid or unusual
wear should be corrected prior to rotation being
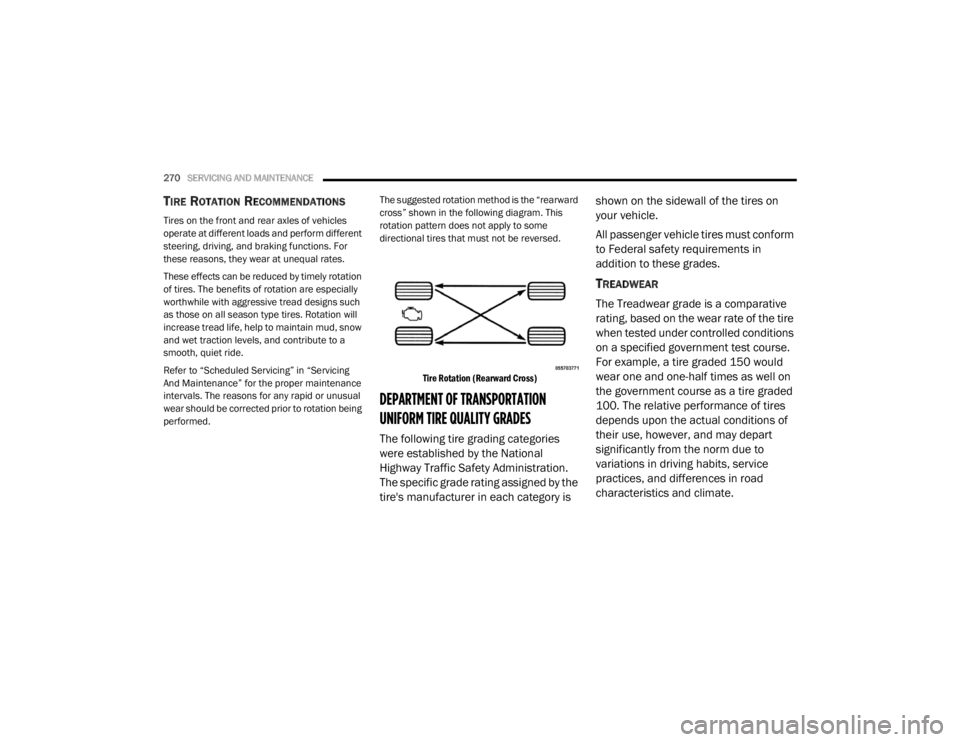
performed. The suggested rotation method is the “rearward
cross” shown in the following diagram. This
rotation pattern does not apply to some
directional tires that must not be reversed.
Tire Rotation (Rearward Cross)
DEPARTMENT OF TRANSPORTATION
UNIFORM TIRE QUALITY GRADES
The following tire grading categories
were established by the National
Highway Traffic Safety Administration.
The specific grade rating assigned by the
tire's manufacturer in each category is shown on the sidewall of the tires on
your vehicle.
All passenger vehicle tires must conform
to Federal safety requirements in
addition to these grades.
TREADWEAR
The Treadwear grade is a comparative
rating, based on the wear rate of the tire
when tested under controlled conditions
on a specified government test course.
For example, a tire graded 150 would
wear one and one-half times as well on
the government course as a tire graded
100. The relative performance of tires
depends upon the actual conditions of
their use, however, and may depart
significantly from the norm due to
variations in driving habits, service
practices, and differences in road
characteristics and climate.
20_LX_OM_EN_USC_t.book Page 270
Page 322 of 328

320 M
Maintenance Free Battery
............................. 238Maintenance Schedule........................ 231, 232Malfunction Indicator Light
(Check Engine)......................................... 88, 93Manual Park Release............................................. 225Service...................................................... 314Media Hub..................................................... 302Memory Feature (Memory Seats).................... 30Memory Seat................................................... 30Memory Seats And Radio................................ 30Methanol....................................................... 277Mirrors............................................................. 39Electric Powered......................................... 40Electric Remote........................................... 40Heated........................................................ 41Outside........................................................ 39Rearview............................................ 39, 201Vanity.......................................................... 42Modifications/AlterationsVehicle.......................................................... 9Monitor, Tire Pressure System....................... 109Mopar Parts................................................... 313MP3 Control.................................................. 302Multi-Function Control Lever............................ 42
N
New Vehicle Break-In Period......................... 150
O
Occupant Restraints..................................... 113Octane Rating, Gasoline (Fuel)............ 276, 281Oil Change Indicator........................................ 79Reset........................................................... 79Oil Filter, Change.......................................... 241Oil Filter, Selection........................................ 241Oil Pressure Light............................................. 87Oil, Engine............................................ 240, 281Capacity.................................................... 280Change Interval........................................ 240Checking................................................... 238Dipstick.................................................... 238Disposal................................................... 241Filter................................................ 241, 281Filter Disposal........................................... 241Identification Logo.................................... 240Materials Added To.................................. 241Pressure Warning Light............................... 87Recommendation............................ 240, 280Synthetic.................................................. 241Viscosity................................. 240, 241, 280Onboard Diagnostic System............................. 93
Operating Precautions.....................................93Operator ManualOwner's Manual....................................9, 314Outside Rearview Mirrors.................................39Overheating, Engine...................................... 225Owner’s Manual (Operator Manual)................... 9
P
Paddle Shift Mode........................................ 158Paddle Shifters............................................. 158Paint Care..................................................... 272Panic Alarm......................................................13Parking Brake............................................... 150ParkSense System, Rear............................... 177Passive Entry....................................................24Pets............................................................... 142Placard, Tire And Loading Information.......... 257PowerBrakes...................................................... 275Deck Lid Release.........................................62Distribution Center (Fuses)....................... 213Door Locks...................................................24Mirrors.........................................................40Outlet (Auxiliary Electrical Outlet).................74Seats...........................................................31Steering.................................................... 160Sunroof........................................................59Tilt/Telescoping Steering Column................38Windows......................................................57
20_LX_OM_EN_USC_t.book Page 320