2020 CHRYSLER 300 sunroof
[x] Cancel search: sunroofPage 5 of 328

3
EXTERIOR LIGHTS ................................................42 Multifunction Lever ...................................... 42
Headlight Switch .......................................... 42
Daytime Running Lights (DRLs) .................. 43
High/Low Beam Switch ............................... 43
Automatic High Beam — If Equipped ......... 43
Flash-To-Pass ............................................... 44
Automatic Headlights ................................. 44
Parking Lights ............................................. 44
Headlights On With Wipers ......................... 44
Adaptive Bi-Xenon High Intensity
Discharge Headlights — If Equipped........... 44 Headlight Time Delay .................................. 45
Lights-On Reminder .................................... 45
Fog Lights — If Equipped ............................. 45
Turn Signals ................................................ 46
Lane Change Assist — If Equipped ............. 46
INTERIOR LIGHTS ................................................46
Courtesy Lights ............................................ 46
WINDSHIELD WIPERS AND WASHERS .............48
Wiper Operation ........................................... 48
Rain Sensing Wipers — If Equipped ........... 49
CLIMATE CONTROLS ...........................................50
Automatic Climate Control Overview .......... 50
Climate Control Functions ........................... 55
Automatic Temperature Control (ATC) ....... 55
Operating Tips ............................................. 56 WINDOWS ............................................................ 57
Power Window Controls .............................. 57
Wind Buffeting ............................................ 59
PANORAMIC SUNROOF — IF EQUIPPED ........... 59
Opening Sunroof .......................................... 59
Closing Sunroof............................................ 60
Wind Buffeting ............................................ 60
Opening Power Shade ................................. 60
Closing Power Shade................................... 61
Pinch Protect Feature.................................. 61
Sunroof Maintenance.................................. 61
Ignition Off Operation .................................. 61
HOOD ..................................................................... 61
To Open The Hood ...................................... 61
To Close The Hood ....................................... 62
TRUNK.................................................................... 62
Opening ........................................................ 62
Closing .......................................................... 63
Trunk Safety ................................................. 63
Cargo Area Features ................................... 64
LOAD LEVELING SYSTEM — IF EQUIPPED ....... 65
GARAGE DOOR OPENER — IF EQUIPPED ........ 66 Before You Begin Programming
HomeLink® .................................................. 66 Canadian/Gate Operator Programming ..... 68
Using HomeLink®........................................ 69
Security......................................................... 69
Troubleshooting Tips ................................... 69
General Information .................................... 70 INTERNAL EQUIPMENT ........................................70
Storage ......................................................... 70
Cupholders .................................................. 72
Power Sunshade — If Equipped .................. 73
Electrical Power Outlets .............................. 74
Sunglasses Bin Door .................................. 75
GETTING TO KNOW YOUR
INSTRUMENT PANEL
INSTRUMENT CLUSTER .......................................76
Instrument Cluster Descriptions ................ 77
INSTRUMENT CLUSTER DISPLAY .......................78
Location And Controls ................................. 78
Engine Oil Life Reset .................................. 79
Instrument Cluster Display Selectable
Menu Items .................................................. 80 Battery Saver On/Battery Saver Mode
Message — Electrical Load Reduction
Actions — If Equipped ................................. 83
WARNING LIGHTS AND MESSAGES ..................84
Red Warning Lights ..................................... 85
Yellow Warning Lights ................................. 88
Yellow Indicator Lights ................................ 91
Green Indicator Lights ................................. 91
White Indicator Lights ................................. 92
Blue Indicator Lights ................................... 92
ONBOARD DIAGNOSTIC SYSTEM — OBD II ......93
Onboard Diagnostic System (OBD II)
Cybersecurity ............................................... 93
20_LX_OM_EN_USC_t.book Page 3
Page 19 of 328
GETTING TO KNOW YOUR VEHICLE17
(Continued)
(Continued)
ON/RUN
Driving position.
All the electrical devices are available.
START
The engine will start.
NOTE:
Refer to "Starting The Engine" in "Starting And
Operating" for further information.
VEHICLE ON MESSAGE
When opening the driver's door and the ignition
is in the ON/RUN (engine not running) position,
a chime will sound to remind you to place the
ignition in the OFF position.
In addition to the chime, the Vehicle On
message will display in the cluster (if equipped). NOTE:
The power window switches and power sunroof
(if equipped) will remain active for three
minutes after the ignition is placed in the OFF
position. Opening either front door will cancel
this feature. The timing for this feature is
programmable.
WARNING!
When exiting the vehicle, always remove
the key fob from the vehicle and lock your
vehicle.
Never leave children alone in a vehicle, or
with access to an unlocked vehicle.
Allowing children to be in a vehicle unat
-
tended is dangerous for a number of
reasons. A child or others could be seriously
or fatally injured. Children should be
warned not to touch the parking brake,
brake pedal or the gear selector.
Do not leave the key fob in or near the
vehicle, or in a location accessible to chil-
dren, and do not leave the ignition of a
vehicle equipped with Keyless Enter-N-Go
in the ON/RUN mode. A child could operate
power windows, other controls, or move the
vehicle.
Do not leave children or animals inside
parked vehicles in hot weather. Interior
heat build-up may cause serious injury
or death.
CAUTION!
An unlocked vehicle is an invitation for
thieves. Always remove key fob from the
vehicle and lock all doors when leaving the
vehicle unattended.
WARNING! (Continued)
WARNING!
Before exiting a vehicle, always come to a
complete stop, then shift the automatic
transmission into PARK, apply the parking
brake, place the engine in the OFF position,
remove the key fob from the vehicle and
lock your vehicle. If equipped with Keyless
Enter-N-Go, always make sure the keyless
ignition is in “OFF” position, remove the key
fob from the vehicle and lock the vehicle.
Never leave children alone in a vehicle, or
with access to an unlocked vehicle.
Allowing children to be in a vehicle unat -
tended is dangerous for a number of
reasons. A child or others could be seriously
or fatally injured. Children should be
warned not to touch the parking brake,
brake pedal or the gear selector.
2
20_LX_OM_EN_USC_t.book Page 17
Page 21 of 328

GETTING TO KNOW YOUR VEHICLE19
REMOTE START ABORT MESSAGE ON
T
HE INSTRUMENT CLUSTER DISPLAY —
I
F EQUIPPED
The following messages will display in the
instrument cluster display if the vehicle fails to
remote start or exits remote start prematurely:
Remote Start Aborted — Door Open
Remote Start Aborted — Hood Open
Remote Start Aborted — Fuel Low
Remote Start Aborted — Trunk Open
Remote Start Disabled — Start Vehicle To
Reset
Remote Start Aborted — Too Cold
Remote Start Aborted — Time Expired
The message will stay active until the ignition is
placed in the ON/RUN position.
TO ENTER REMOTE START MODE
Push and release the remote start button on the
key fob twice within five seconds. The vehicle
doors will lock, the parking lights will flash, and
the horn will chirp twice (if programmed). Then,
the engine will start, and the vehicle will remain
in the Remote Start mode for a 15 minute cycle.
NOTE:
If an engine fault is present or fuel level is
low, the vehicle will start and then shut down
in 10 seconds.
The park lamps will turn on and remain on
during Remote Start mode.
For security, power window and power
sunroof operation (if equipped) are disabled
when the vehicle is in the Remote Start
mode.
The engine can be started two consecutive
times with the key fob. However, the ignition
must be cycled by pushing the START/STOP
ignition button twice (or the ignition switch
must be placed in the ON/RUN position)
before you can repeat the start sequence for
a third cycle.
TO EXIT REMOTE START MODE
W
ITHOUT DRIVING THE VEHICLE
Push and release the remote start button one
time or allow the engine to run for the entire
15 minute cycle.
NOTE:
To avoid unintentional shutdowns, the system
will disable for two seconds after receiving a
valid remote start request.
TO EXIT REMOTE START MODE AND
D
RIVE THE VEHICLE
Before the end of 15 minute cycle, push and
release the unlock button on the key fob to
unlock the doors and disarm the vehicle
security alarm (if equipped). Then, prior to the
end of the 15 minute cycle, push and release
the START/STOP ignition button.
NOTE:
For vehicles not equipped with the Keyless
Enter-N-Go — Passive Entry feature, the igni -
tion switch must be in the ON/RUN position
in order to drive the vehicle.
Keep key fobs away from children. Opera -
tion of the Remote Start System, windows,
door locks or other controls could cause
serious injury or death.
WARNING! (Continued)
2
20_LX_OM_EN_USC_t.book Page 19
Page 61 of 328
GETTING TO KNOW YOUR VEHICLE59
(Continued)
WIND BUFFETING
Wind buffeting can be described as the
perception of pressure on the ears or a
helicopter-type sound in the ears. Your vehicle
may exhibit wind buffeting with the windows
down, or the sunroof (if equipped) in certain
open or partially open positions. This is a normal
occurrence and can be minimized. If the
buffeting occurs with the rear windows open,
open the front and rear windows together to
minimize the buffeting. If the buffeting occurs
with the sunroof open, adjust the sunroof
opening to minimize the buffeting or open any
window.
PANORAMIC SUNROOF — IF EQUIPPED
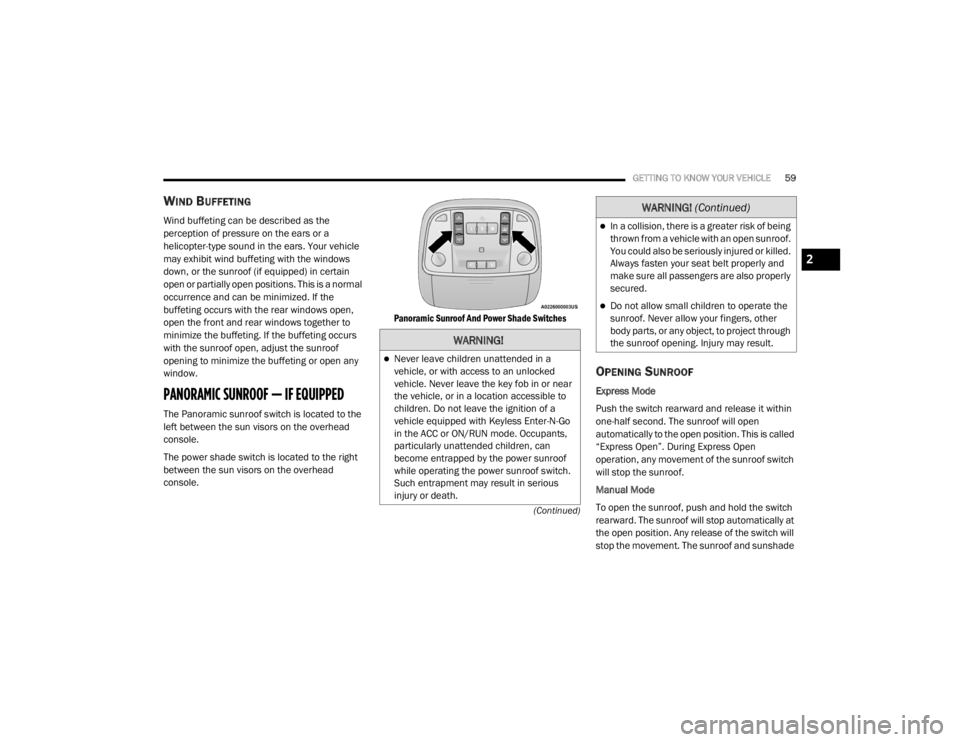
The Panoramic sunroof switch is located to the
left between the sun visors on the overhead
console.
The power shade switch is located to the right
between the sun visors on the overhead
console.
Panoramic Sunroof And Power Shade Switches
OPENING SUNROOF
Express Mode
Push the switch rearward and release it within
one-half second. The sunroof will open
automatically to the open position. This is called
“Express Open”. During Express Open
operation, any movement of the sunroof switch
will stop the sunroof.
Manual Mode
To open the sunroof, push and hold the switch
rearward. The sunroof will stop automatically at
the open position. Any release of the switch will
stop the movement. The sunroof and sunshade
WARNING!
Never leave children unattended in a
vehicle, or with access to an unlocked
vehicle. Never leave the key fob in or near
the vehicle, or in a location accessible to
children. Do not leave the ignition of a
vehicle equipped with Keyless Enter-N-Go
in the ACC or ON/RUN mode. Occupants,
particularly unattended children, can
become entrapped by the power sunroof
while operating the power sunroof switch.
Such entrapment may result in serious
injury or death.
In a collision, there is a greater risk of being
thrown from a vehicle with an open sunroof.
You could also be seriously injured or killed.
Always fasten your seat belt properly and
make sure all passengers are also properly
secured.
Do not allow small children to operate the
sunroof. Never allow your fingers, other
body parts, or any object, to project through
the sunroof opening. Injury may result.
WARNING!
(Continued)
2
20_LX_OM_EN_USC_t.book Page 59
Page 62 of 328
60GETTING TO KNOW YOUR VEHICLE
will remain in a partially opened condition until
the switch is pushed and held rearward again.
NOTE:
If the sunshade is in the closed position when
Express or Manual Open operation is initiated
the sunshade will automatically open to the half
open position prior to the sunroof opening.
Vent Open
Push and release the vent switch within
one-half second and the sunroof will open to the
vent position. This is called “Express Vent”, and
it will occur regardless of sunroof position.
During Express vent operation, any movement
of the switch will stop the sunroof.
NOTE:
If the sunshade is in the closed position when the
vent switch is pushed, the sunshade will auto -
matically cycle to the halfway open position prior
to the sunroof opening to the Vent position.
CLOSING SUNROOF
Express Mode
Push the switch forward and release it within
one-half second and the sunroof will close
automatically from any position. The sunroof will close fully and stop automatically. This is
called “Express Close”. During Express Close
operation, any other actuation of the switch will
stop the sunroof.
Manual Mode
To close the sunroof, push and hold the switch
in the forward position. Any release of the
switch will stop the movement and the sunroof
will remain in a partially closed condition until
the sunroof switch is pushed again.
WIND BUFFETING
Wind buffeting can be described as the
perception of pressure on the ears or a
helicopter-type sound in the ears. Your vehicle
may exhibit wind buffeting with the windows
down, or the sunroof (if equipped) in certain
open or partially open positions. This is a normal
occurrence and can be minimized. If the
buffeting occurs with the rear windows open,
then open the front and rear windows together
to minimize the buffeting. If the buffeting occurs
with the sunroof open, adjust the sunroof
opening to minimize the buffeting or open any
window.
OPENING POWER SHADE
Express Mode
Push the shade switch rearward and release it
within one-half second and the shade will
automatically open to the halfway position and
stop automatically. Push the switch a second
time from the halfway position and the shade
will automatically open to the full open position
and stop automatically. This is called “Express
Open”. During Express Open operation, any
movement of the shade switch will stop the
shade.
Manual Mode
To open the shade, push and hold the switch
rearward. The shade will open and stop
automatically at the half-open position. Push
and hold the shade switch rearward again and
the shade will open automatically to the
full-open position. Any release of the switch will
stop the movement and the shade will remain in
a partially opened condition until the switch is
pushed again.
20_LX_OM_EN_USC_t.book Page 60
Page 63 of 328
GETTING TO KNOW YOUR VEHICLE61
CLOSING POWER SHADE
Express Mode
Push the switch forward and release it within
one-half second and the shade will close
automatically from any position. If the sunroof is
completely closed the shade will close fully and
stop automatically. This is called “Express
Close”. During Express Close operation, any
movement of the switch will stop the shade.
NOTE:
If the sunroof is open, the shade will close to the
half-open position. Pushing the shade close
button again will automatically close both the
sunroof and shade completely.
Manual Mode
To close the shade, push and hold the switch in
the forward position. Any release of the switch
will stop the movement and the shade will
remain in a partially closed condition until the
switch is pushed again.
PINCH PROTECT FEATURE
This feature will detect an obstruction in the
closing of the sunroof during the Express Close
operation. If an obstruction in the path of the sunroof is detected, the sunroof will
automatically retract. Remove the obstruction if
this occurs.
NOTE:
If three consecutive sunroof close attempts
result in Pinch Protect reversals, Pinch Protect
will disable and the sunroof must be closed in
Manual Mode.
SUNROOF MAINTENANCE
Use only a non-abrasive cleaner and a soft cloth
to clean the glass panel. Periodically check for
and clear out any debris that may have
collected in the tracks.
IGNITION OFF OPERATION
NOTE:
The power sunroof switch can remain active
in Accessory Delay for up to approximately
10 minutes after the vehicle’s ignition is
placed in the OFF position. Opening either
front door will cancel this feature.
This feature is programmable using the
Uconnect system. Refer to “Uconnect
Settings” in “Multimedia” for further informa
-
tion.
HOOD
TO OPEN THE HOOD
Two latches must be released to open the hood.
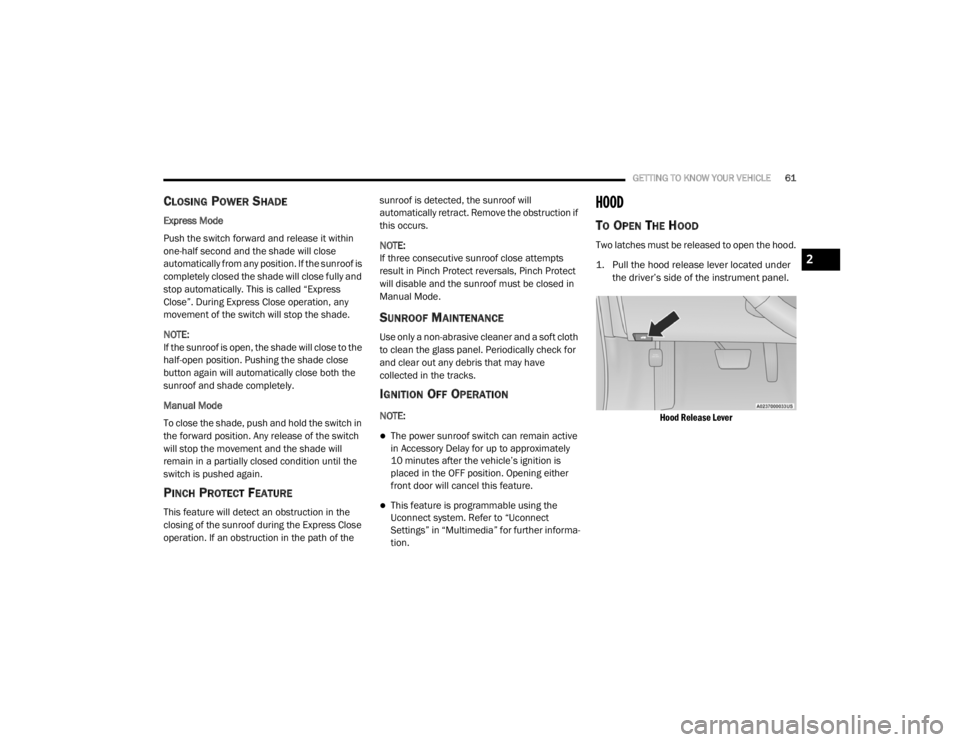
1. Pull the hood release lever located under
the driver’s side of the instrument panel.
Hood Release Lever
2
20_LX_OM_EN_USC_t.book Page 61
Page 128 of 328

126SAFETY
Supplemental Side Air Bag Inflatable Curtain (SABIC)
Label Location
SABICs may help reduce the risk of head and
other injuries to front and rear seat outboard
occupants in certain side impacts, in addition to
the injury reduction potential provided by the
seat belts and body structure.
The SABIC deploys downward, covering the side
windows. An inflating SABIC pushes the outside
edge of the headliner out of the way and covers
the window. The SABICs inflate with enough
force to injure occupants if they are not belted
and seated properly, or if items are positioned
in the area where the SABICs inflate. Children
are at an even greater risk of injury from a
deploying air bag. The SABICs may help reduce the risk of partial
or complete ejection of vehicle occupants
through side windows in certain side impact
events.
Side Impacts
The Side Air Bags are designed to activate in
certain side impacts. The Occupant Restraint
Controller (ORC) determines whether the
deployment of the Side Air Bags in a particular
impact event is appropriate, based on the
severity and type of collision. The side impact
sensors aid the ORC in determining the
appropriate response to impact events. The
system is calibrated to deploy the Side Air Bags
on the impact side of the vehicle during impacts
that require Side Air Bag occupant protection. In
side impacts, the Side Air Bags deploy
independently; a left side impact deploys the
left Side Air Bags only and a right-side impact
deploys the right Side Air Bags only. Vehicle
damage by itself is not a good indicator of
whether or not Side Air Bags should have
deployed.
The Side Air Bags will not deploy in all side
collisions, including some collisions at certain
angles, or some side collisions that do not
impact the area of the passenger compartment.
The Side Air Bags may deploy during angled or
offset frontal collisions where the front air bags
deploy.
WARNING!
Do not mount equipment, or stack luggage
or other cargo up high enough to block the
deployment of the SABICs. The trim
covering above the side windows where the
SABIC and its deployment path are located
should remain free from any obstructions.
In order for the SABICs to work as intended,
do not install any accessory items in your
vehicle which could alter the roof. Do not
add an aftermarket sunroof to your vehicle.
Do not add roof racks that require perma
-
nent attachments (bolts or screws) for
installation on the vehicle roof. Do not drill
into the roof of the vehicle for any reason.
20_LX_OM_EN_USC_t.book Page 126
Page 216 of 328
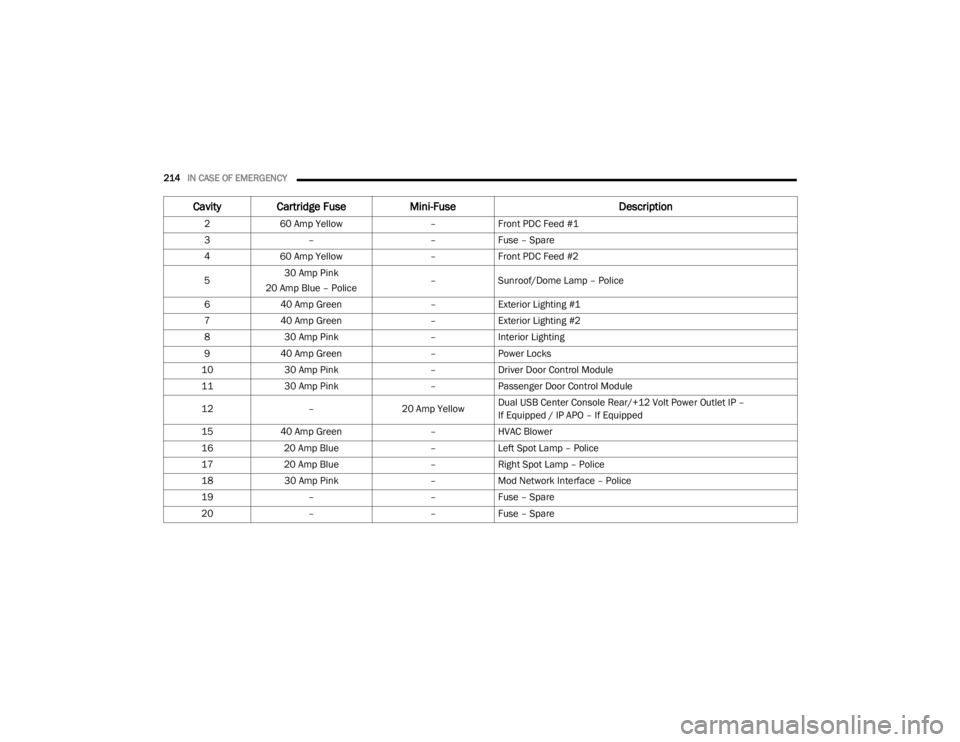
214IN CASE OF EMERGENCY
Cavity Cartridge Fuse Mini-FuseDescription
260 Amp Yellow –Front PDC Feed #1
3 – –Fuse – Spare
4 60 Amp Yellow –Front PDC Feed #2
5 30 Amp Pink
20 Amp Blue – Police –
Sunroof/Dome Lamp – Police
6 40 Amp Green –Exterior Lighting #1
7 40 Amp Green –Exterior Lighting #2
8 30 Amp Pink –Interior Lighting
9 40 Amp Green –Power Locks
10 30 Amp Pink –Driver Door Control Module
11 30 Amp Pink –Passenger Door Control Module
12 –20 Amp Yellow Dual USB Center Console Rear/+12 Volt Power Outlet IP –
If Equipped / IP APO – If Equipped
15 40 Amp Green –HVAC Blower
16 20 Amp Blue –Left Spot Lamp – Police
17 20 Amp Blue –Right Spot Lamp – Police
18 30 Amp Pink –Mod Network Interface – Police
19 – –Fuse – Spare
20 – –Fuse – Spare
20_LX_OM_EN_USC_t.book Page 214