2020 CHRYSLER 300 service interval
[x] Cancel search: service intervalPage 124 of 328

122SAFETY
Air Bag System Components
Occupant Restraint Controller (ORC)
Air Bag Warning Light
Steering Wheel and Column
Instrument Panel
Knee Impact Bolsters
Driver and Front Passenger Air Bags
Seat Belt Buckle Switch
Supplemental Side Air Bags
Supplemental Knee Air Bags
Front and Side Impact Sensors
Seat Belt Pretensioners
Seat Track Position Sensors
Air Bag Warning Light
The Occupant Restraint Controller
(ORC) monitors the readiness of the
electronic parts of the air bag system
whenever the ignition switch is in the
START or ON/RUN position. If the ignition switch is in the OFF position or in the ACC position, the
air bag system is not on and the air bags will not
inflate.
The ORC contains a backup power supply
system that may deploy the air bag system even
if the battery loses power or it becomes
disconnected prior to deployment.
The ORC turns on the Air Bag Warning Light in
the instrument panel for approximately four to
eight seconds for a self-check when the ignition
switch is first in the ON/RUN position. After the
self-check, the Air Bag Warning Light will turn
off. If the ORC detects a malfunction in any part
of the system, it turns on the Air Bag Warning
Light, either momentarily or continuously. A
single chime will sound to alert you if the light
comes on again after initial startup.
The ORC also includes diagnostics that will
illuminate the instrument panel Air Bag Warning
Light if a malfunction is detected that could
affect the air bag system. The diagnostics also
record the nature of the malfunction. While the
air bag system is designed to be maintenance
free, if any of the following occurs, have an
authorized dealer service the air bag system
immediately.
The Air Bag Warning Light does not come on
during the four to eight seconds when the
ignition switch is first in the ON/RUN position.
The Air Bag Warning Light remains on after
the four to eight-second interval.
The Air Bag Warning Light comes on intermit
-
tently or remains on while driving.
NOTE:
If the speedometer, tachometer, or any engine
related gauges are not working, the Occupant
Restraint Controller (ORC) may also be
disabled. In this condition the air bags may not
be ready to inflate for your protection. Have an
authorized dealer service the air bag system
immediately.
WARNING!
Ignoring the Air Bag Warning Light in your
instrument panel could mean you won’t have
the air bag system to protect you in a collision.
If the light does not come on as a bulb check
when the ignition is first turned on, stays on
after you start the vehicle, or if it comes on as
you drive, have an authorized dealer service
the air bag system immediately.
20_LX_OM_EN_USC_t.book Page 122
Page 233 of 328

231
SERVICING AND MAINTENANCE
SCHEDULED SERVICING
This vehicle is equipped with an automatic oil
change indicator system. The oil change
indicator system will remind you that it is time to
take your vehicle in for scheduled maintenance.
Based on engine operation conditions, the oil
change indicator message will illuminate. This
means that service is required for the vehicle.
Operating conditions such as frequent
short-trips, trailer tow, and extremely hot or cold
ambient temperatures will influence when the
“Change Oil” or “Oil Change Required” message
is displayed. Severe Operating Conditions can
cause the change oil message to illuminate as
early as 3,500 miles (5,600 km) since last
reset. Have your vehicle serviced as soon as
possible, within the next 500 miles (805 km).
The “Oil Change Required” message will be
displayed in the instrument cluster and a single
chime will sound, indicating that an oil change
is necessary.An authorized dealer will reset the oil change
indicator message after completing the
scheduled oil change. If a scheduled oil change
is performed by someone other than an
authorized dealer, the message can be reset by
referring to “Instrument Cluster Display” in
“Getting To Know Your Instrument Panel” for
further information.
NOTE:
Under no circumstances should oil change
intervals exceed 10,000 miles (16,000 km),
12 months or 350 hours of engine run time,
whichever comes first. The 350 hours of engine
run or idle time is generally only a concern for
fleet customers.
Severe Duty All Models
Change Engine Oil at 4,000 miles (6,500 km) or
350 hours of engine run time if the vehicle is
operated in a dusty and off-road environment,
or is operated predominantly at idle or only very
low engine RPM. This type of vehicle use is
considered Severe Duty.Once A Month Or Before A Long Trip:Check engine oil level.
Check windshield washer fluid level.
Check tire pressure and look for unusual
wear or damage. Rotate tires at the first sign
of irregular wear, even if it occurs before your
next scheduled service.
Check the fluid levels of the coolant reservoir,
brake master cylinder, and power steering (if
equipped) and fill as needed.
Check function of all interior and exterior
lights.
7
20_LX_OM_EN_USC_t.book Page 231
Page 234 of 328

232SERVICING AND MAINTENANCE
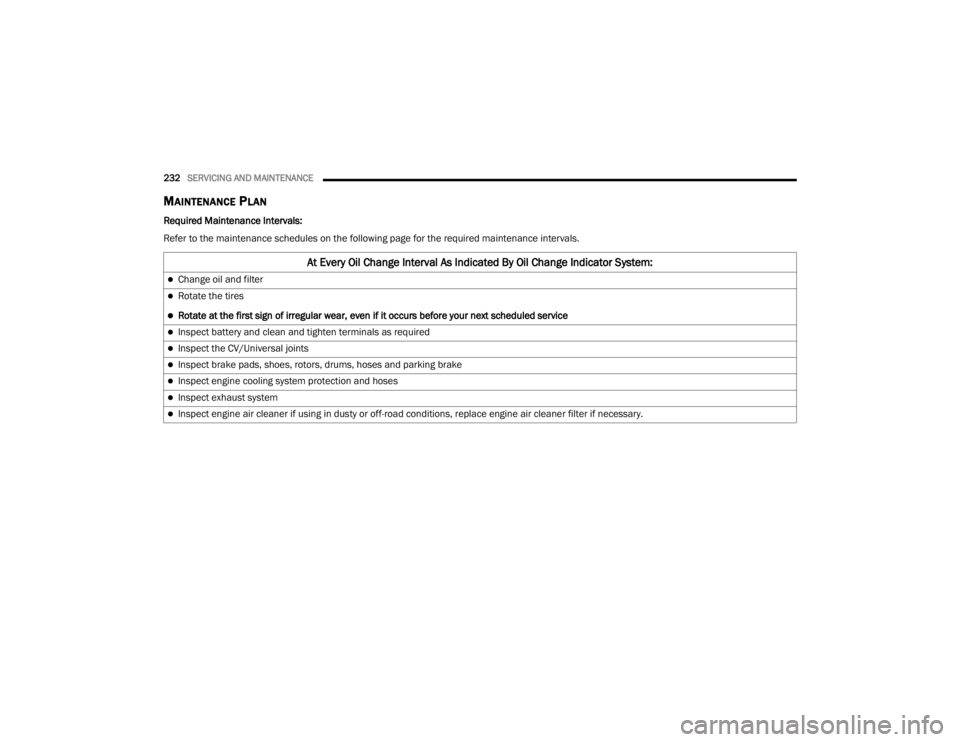
MAINTENANCE PLAN
Required Maintenance Intervals:
Refer to the maintenance schedules on the following page for the required maintenance intervals.
At Every Oil Change Interval As Indicated By Oil Change Indicator System:
Change oil and filter
Rotate the tires
Rotate at the first sign of irregular wear, even if it occurs before your next scheduled service
Inspect battery and clean and tighten terminals as required
Inspect the CV/Universal joints
Inspect brake pads, shoes, rotors, drums, hoses and parking brake
Inspect engine cooling system protection and hoses
Inspect exhaust system
Inspect engine air cleaner if using in dusty or off-road conditions, replace engine air cleaner filter if necessary.
20_LX_OM_EN_USC_t.book Page 232
Page 237 of 328

SERVICING AND MAINTENANCE235
(Continued)
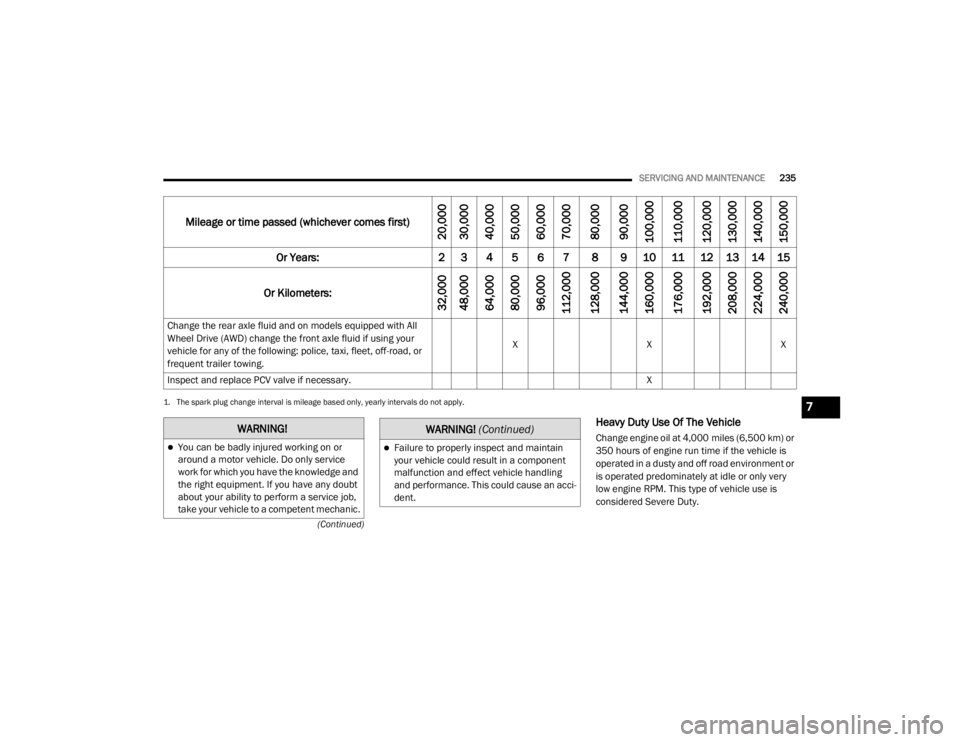
Heavy Duty Use Of The Vehicle
Change engine oil at 4,000 miles (6,500 km) or
350 hours of engine run time if the vehicle is
operated in a dusty and off road environment or
is operated predominately at idle or only very
low engine RPM. This type of vehicle use is
considered Severe Duty.
Change the rear axle fluid and on models equipped with All
Wheel Drive (AWD) change the front axle fluid if using your
vehicle for any of the following: police, taxi, fleet, off-road, or
frequent trailer towing.
X
XX
Inspect and replace PCV valve if necessary. X
1. The spark plug change interval is mileage based only, yearly intervals do not apply.
Mileage or time passed (whichever comes first)
20,000
30,000
40,000
50,000
60,000
70,000
80,000
90,000
100,000
110,000
120,000
130,000
140,000
150,000
Or Years: 2 3 4 5 6 7 8 9 10 11 12 13 14 15
Or Kilometers:
32,000
48,000
64,000
80,000
96,000
112,000
128,000
144,000
160,000
176,000
192,000
208,000
224,000
240,000
WARNING!
You can be badly injured working on or
around a motor vehicle. Do only service
work for which you have the knowledge and
the right equipment. If you have any doubt
about your ability to perform a service job,
take your vehicle to a competent mechanic.Failure to properly inspect and maintain
your vehicle could result in a component
malfunction and effect vehicle handling
and performance. This could cause an acci -
dent.
WARNING! (Continued)
7
20_LX_OM_EN_USC_t.book Page 235
Page 243 of 328

SERVICING AND MAINTENANCE241
Engine Oil Viscosity (SAE Grade) — 5.7L
Engine
Mopar SAE 5W-20 engine oil approved to FCA
Material Standard MS-6395 such as Pennzoil,
Shell Helix Ultra or equivalent is recommended
for all operating temperatures. This engine oil
improves low temperature starting and vehicle
fuel economy.
The engine oil filler cap also shows the
recommended engine oil viscosity for your
engine. For information on engine oil filler cap
location, refer to the “Engine Compartment”
illustration in this section.
NOTE:
Vehicles equipped with a 5.7L engine must use
SAE 5W-20 oil. Failure to do so may result in
improper operation of the Fuel Saver Tech -
nology. Refer to “Fuel Saver Technology – If
Equipped” in “Starting And Operating” for
further information.
Lubricants which do not have both the engine
oil certification mark and the correct SAE
viscosity grade number should not be used.
Synthetic Engine Oils
You may use synthetic engine oils provided the
recommended oil quality requirements are met,
and the recommended maintenance intervals
for oil and filter changes are followed.
Synthetic engine oils which do not have both the
engine oil certification mark and the correct SAE
viscosity grade number should not be used.
Materials Added To Engine Oil
The manufacturer strongly recommends
against the addition of any additives (other than
leak detection dyes) to the engine oil. Engine oil
is an engineered product and its performance
may be impaired by supplemental additives.
Disposing Of Used Engine Oil And Oil
Filters
Care should be taken in disposing of used
engine oil and oil filters from your vehicle. Used
oil and oil filters, indiscriminately discarded, can
present a problem to the environment. Contact
an authorized dealer, service station or
governmental agency for advice on how and
where used oil and oil filters can be safely
discarded in your area.
ENGINE OIL FILTER
The engine oil filter should be replaced with a
new filter at every engine oil change.
Engine Oil Filter Selection
This manufacturer's engines have a full-flow
type disposable oil filter. Use a filter of this type
for replacement. The quality of replacement
filters varies considerably. Only high quality
filters should be used to ensure most efficient
service. Mopar engine oil filters are high quality
oil filters and are recommended.
ENGINE AIR CLEANER FILTER
Refer to the “Maintenance Plan” in this section
for the proper maintenance intervals.
NOTE:
Be sure to follow the “Severe Duty Conditions”
maintenance interval if applicable.
7
20_LX_OM_EN_USC_t.book Page 241
Page 245 of 328

SERVICING AND MAINTENANCE243
NOTE:
Use only manufacturer approved A/C system
PAG compressor oil, and refrigerants.
A/C Air Filter
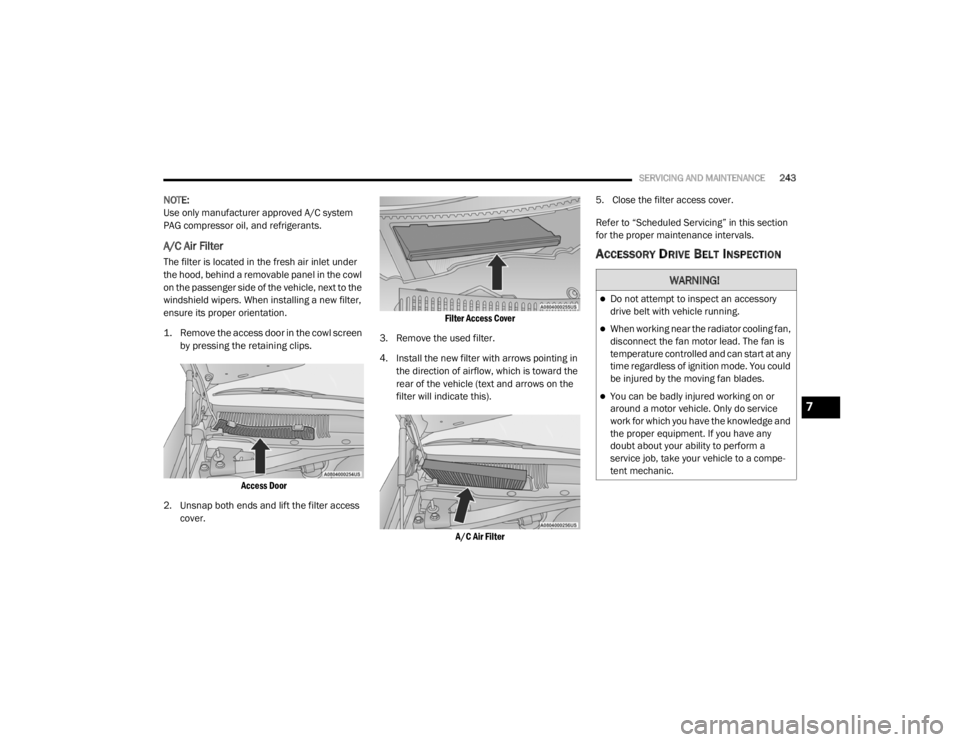
The filter is located in the fresh air inlet under
the hood, behind a removable panel in the cowl
on the passenger side of the vehicle, next to the
windshield wipers. When installing a new filter,
ensure its proper orientation.
1. Remove the access door in the cowl screen
by pressing the retaining clips.
Access Door
2. Unsnap both ends and lift the filter access cover.
Filter Access Cover
3. Remove the used filter.
4. Install the new filter with arrows pointing in the direction of airflow, which is toward the
rear of the vehicle (text and arrows on the
filter will indicate this).
A/C Air Filter
5. Close the filter access cover.
Refer to “Scheduled Servicing” in this section
for the proper maintenance intervals.ACCESSORY DRIVE BELT INSPECTION
WARNING!
Do not attempt to inspect an accessory
drive belt with vehicle running.
When working near the radiator cooling fan,
disconnect the fan motor lead. The fan is
temperature controlled and can start at any
time regardless of ignition mode. You could
be injured by the moving fan blades.
You can be badly injured working on or
around a motor vehicle. Only do service
work for which you have the knowledge and
the proper equipment. If you have any
doubt about your ability to perform a
service job, take your vehicle to a compe
-
tent mechanic.7
20_LX_OM_EN_USC_t.book Page 243
Page 252 of 328

250SERVICING AND MAINTENANCE
Coolant Level
The coolant bottle provides a quick visual
method for determining that the coolant level is
adequate. With the engine off and cold, the
level of the engine coolant (antifreeze) in the
bottle should be between the ranges indicated
on the bottle.
The radiator normally remains completely full,
so there is no need to remove the radiator/
coolant pressure cap unless checking for
engine coolant (antifreeze) freeze point or
replacing coolant. Advise your service attendant
of this. As long as the engine operating
temperature is satisfactory, the coolant bottle
need only be checked once a month.
When additional engine coolant (antifreeze) is
needed to maintain the proper level, only
OAT coolant that meets the requirements of
FCA Material Standard MS.90032 should be
added to the coolant bottle. Do not overfill.
Points To Remember
NOTE:
When the vehicle is stopped after a few miles/
kilometers of operation, you may observe vapor
coming from the front of the engine compart -
ment. This is normally a result of moisture from rain, snow, or high humidity accumulating on
the radiator and being vaporized when the ther
-
mostat opens, allowing hot engine coolant (anti -
freeze) to enter the radiator.
If an examination of your engine compartment
shows no evidence of radiator or hose leaks,
the vehicle may be safely driven. The vapor will
soon dissipate.
Do not overfill the coolant expansion bottle.
Check the coolant freeze point in the radiator
and in the coolant expansion bottle. If engine
coolant (antifreeze) needs to be added, the
contents of the coolant expansion bottle
must also be protected against freezing.
If frequent engine coolant (antifreeze) addi-
tions are required, the cooling system should
be pressure tested for leaks.
Maintain engine coolant (antifreeze) concen -
tration at a minimum of 50% OAT coolant
(conforming to MS.90032) and distilled
water for proper corrosion protection of your
engine which contains aluminum compo -
nents.
Make sure that the coolant expansion bottle
overflow hoses are not kinked or obstructed.
Keep the front of the radiator clean. If your
vehicle is equipped with air conditioning,
keep the front of the condenser clean.
Do not change the thermostat for Summer or
Winter operation. If replacement is ever
necessary, install ONLY the correct type ther -
mostat. Other designs may result in unsatis -
factory engine coolant (antifreeze)
performance, poor gas mileage, and
increased emissions.
BRAKE SYSTEM
In order to ensure brake system performance,
all brake system components should be
inspected periodically. Refer to the
“Maintenance Plan” in this section for the
proper maintenance intervals.
WARNING!
Riding the brakes can lead to brake failure
and possibly a collision. Driving with your foot
resting or riding on the brake pedal can result
in abnormally high brake temperatures,
excessive lining wear, and possible brake
damage. You would not have your full braking
capacity in an emergency.
20_LX_OM_EN_USC_t.book Page 250
Page 255 of 328

SERVICING AND MAINTENANCE253
ALL WHEEL DRIVE (AWD) — IF
E
QUIPPED
The All Wheel Drive system consists of a
transfer case and front differential. The exterior
surface of these components should be
inspected for evidence of fluid leaks. Confirmed
leaks should be repaired as soon as possible.
The transfer case fluid fill/inspection plug is
located in the middle of the rear housing. To
inspect the transfer case fluid level, remove the
fill/inspection plug. The fluid level should be
even with the bottom of the hole. Use this plug
to add fluid as required.
The front differential fill plug is located on the
outer cover near the halfshaft attachment. To
inspect the differential fluid level, remove the fill
plug. The fluid level should be even with or
slightly below the bottom of the hole.
Fluid Changes
Refer to “Scheduled Servicing” in “Servicing
And Maintenance” for the proper maintenance
intervals.
REAR AXLE
For normal service, periodic fluid level checks
are not required. When the vehicle is serviced
for other reasons the exterior surfaces of the
axle assembly should be inspected. If gear oil
leakage is suspected inspect the fluid level.
Refer to “Fluids And Lubricants” in “Technical
Specifications” for further information.
RAISING THE VEHICLE
In the case where it is necessary to raise the
vehicle, go to an authorized dealer or service
station.
TIRES
TIRE SAFETY INFORMATION
Tire safety information will cover aspects of the
following information: Tire Markings, Tire
Identification Numbers, Tire Terminology and
Definitions, Tire Pressures, and Tire Loading.
Tire Markings
Tire Markings
1 — US DOT Safety Standards Code (TIN)
2 — Size Designation
3 — Service Description
4 — Maximum Load
5 — Maximum Pressure
6 — Treadwear, Traction and Tempera -
ture Grades
7
20_LX_OM_EN_USC_t.book Page 253