Page 145 of 218
8-14
8
4. Remove the passenger seat cushion.(See page 4-26.)
5. Remove the passenger seat by removing the bolts. 6. Remove the quick fastener screws and
the bolts, and then pull the panel off as
shown.1. Top cover
2. Bolt
3. Quick fastener screw
2
3
1
1. Passenger seat
2. Bolt
3. Seat belt
1
3
2
2
UB5H7AE0.book Page 14 Wednesday, July 4, 2018 1:37 PM
Page 146 of 218
8-15
8
To install the panel1. Place the panel in the original position,and then install the bolts and the quick
fastener screws. 2. Install the passenger seat by installing the
bolts, and then tighten them to the spec-
ified torque.
TIPMake sure that the seat frame is properly
secured.
1. Panel B
2. Quick fastener screw
3. Bolt
1
2
2
3
2
3
3
1. Panel BTightening torque:
Passenger seat bolt:32 N·m (3.2 kgf·m, 24 lb·ft)
1
UB5H7AE0.book Page 15 Wednesday, July 4, 2018 1:37 PM
Page 147 of 218
8-16
8
Place the passenger seat belt in the original
position. 3. Install the passenger seat cushion.
4. Install the top cover by installing the bolts
and quick fastener screw.
5. Install panel A and the hood.
Panels C and D
To remove a panel1. Pull the tab on the panel lock up, and then turn the panel lock 1/4 turn clock-
wise.
1. Panel C
2. Panel D
3. Tab
1. Tab
2. Panel lock
1
3
2
3
1
2
UB5H7AE0.book Page 16 Wednesday, July 4, 2018 1:37 PM
Page 148 of 218
8-17
8
2. Remove the panel as shown.To install a panel
1. Place the panel in the original position.
1. Panel C
1. Panel D
1
1
1. Panel C
1. Panel D
1
1
UB5H7AE0.book Page 17 Wednesday, July 4, 2018 1:37 PM
Page 149 of 218

8-18
8
2. Turn the panel lock 1/4 turn counter-clockwise, and then push the tab on the
p a n e l l o c k d o w n s o t h a t i t i s p o i n t i n g r e a r -
ward.EBU3543AEngine oil and oil filterCheck the engine oil level before each opera-
tion. In addition, change the oil and the oil fil-
ter cartridge at the intervals specified in the
periodic maintenance chart.
NOTICEECB03020 Do not use oils with a diesel specifica-
tion of “CD” or oils of a higher quality
than specified. In addition, do not use
oils labeled “ENERGY CONSERVING II”
or higher.
Make sure that no foreign material en-
ters the oil tank. To check the engine oil level
1. Park the vehicle on a level surface.
2. Remove panel D. (See page 8-11.)
3. Start the engine and warm it up to a nor- mal operating temperature (the engine oil
temperature should reach 60 °C [140 °F]),
then let the engine idle for a minimum of
ten seconds before turning the engine off.TIPIf the engine is cold, take the vehicle for a
short drive or let it idle for approximately ten
minutes before checking the engine oil level.
Recommended engine oil:YA M A L U B E5W-30, 10W-30, 10W-40, 15W-40, 20W-
40, 20W-50
Oil quantity: Oil change only:2.50 L (2.64 US qt, 2.20 Imp.qt)
Oil change and filter replacement: 2.70 L (2.85 US qt, 2.38 Imp.qt)
UB5H7AE0.book Page 18 Wednesday, July 4, 2018 1:37 PM
Page 150 of 218
8-19
8
4. Remove the engine oil tank filler cap andwipe the dipstick with a clean rag.
5. Insert the dipstick back into the oil tank (without screwing it in), and then remove
it again to check the oil level.
6. If the oil level is below the tip of the dip- stick, add oil.
TIPAdd oil a little at a time so as not to overfill be-
yond the maximum level mark. 7. Check the O-ring for damage, and re-place it if necessary.
8. Install the engine oil tank filler cap.
9. Install the panel.
To change the engine oil 1. Park the vehicle on a level surface.
2. Remove panel D. (See page 8-11.)
3. Remove the engine oil tank cover by re- moving the bolts.
1. Engine oil tank filler cap
2. O-ring
3. Engine oil dipstick
4. Maximum level mark
5. Tip of the engine oil dipstick
45
32
1
UB5H7AE0.book Page 19 Wednesday, July 4, 2018 1:37 PM
Page 151 of 218
8-20
8
4. Start the engine, warm it up for severalminutes, and then turn it off.
5. Remove the engine oil tank filler cap and the cylinder head cap.
6. Place an oil pan under the oil tank to col-lect the used engine oil.1. Engine oil tank cover
2. Bolt
1
2
1. Engine oil tank filler cap
1. Cylinder head cap
1
1
UB5H7AE0.book Page 20 Wednesday, July 4, 2018 1:37 PM
Page 152 of 218
8-21
8
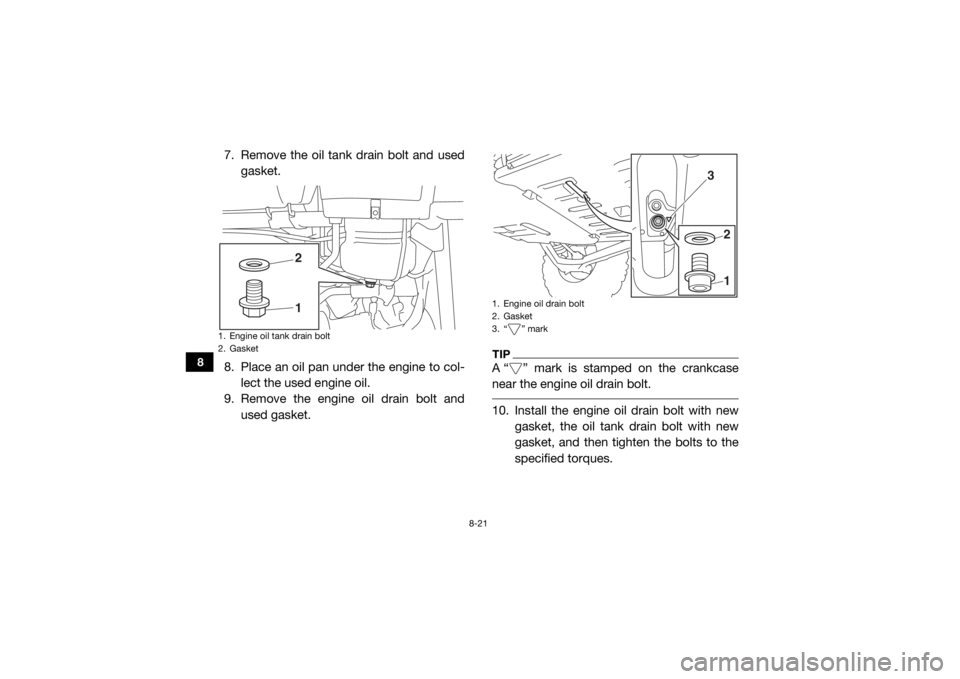
7. Remove the oil tank drain bolt and usedgasket.
8. Place an oil pan under the engine to col- lect the used engine oil.
9. Remove the engine oil drain bolt and used gasket.
TIPA “ ” mark is stamped on the crankcase
near the engine oil drain bolt. 10. Install the engine oil drain bolt with new gasket, the oil tank drain bolt with new
gasket, and then tighten the bolts to the
specified torques.
1. Engine oil tank drain bolt
2. Gasket
2
1
1. Engine oil drain bolt
2. Gasket
3. “ ” mark
1 2
3
UB5H7AE0.book Page 21 Wednesday, July 4, 2018 1:37 PM