2019 VOLVO S60 TWIN ENGINE change time
[x] Cancel search: change timePage 130 of 645

||
DISPLAYS AND VOICE CONTROL
128
Suggestions for characters/letters/words/parts of words. You can scroll through thelist.
Space bar. Blank spaces can be created bywriting a dash (‒) in the field for handwrittenletters (1). See "Writing blank spaces in free-text fields" below.
Delete. Tap once to erase one character/letter at a time. Wait a moment before tap-ping again to erase the next character, letteretc.
Return to the standard keyboard layout.
Switch off/on screen tap sounds.
Hide the keyboard. In cases where this is notpossible, the button will not be displayed.
Change language for text input.
Handwriting characters/letters/words
1. Write a character, a letter, a word or parts ofa word in the field for handwritten letters (1).Write the word or part of the word verticallyor horizontally.
> A number of suggestions for characters,letters or words will be displayed (3). Themost likely will be shown at the top of thelist.
CAUTION
Do not use sharp objects on the screen asthis could cause scratches.
2. The character/letter/word will be enteredautomatically after a short pause if no otheraction is taken.
>The character/letter/word at the top ofthe list will be used. Tap one of the othercharacters/letters/words in the list to useit instead.
Erasing/changing handwritten characters/
letters
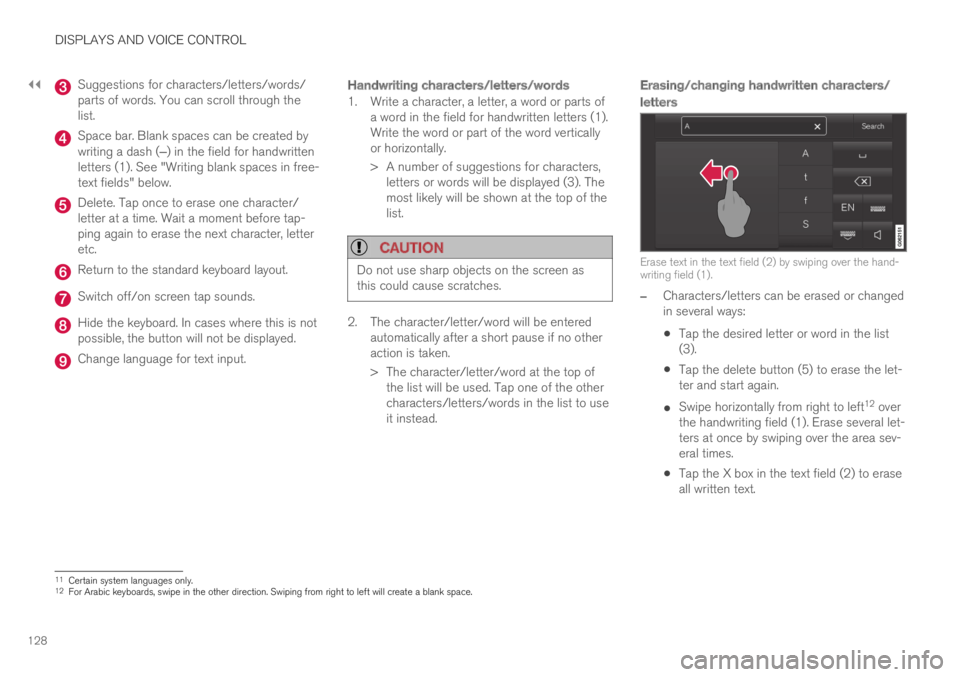
Erase text in the text field (2) by swiping over the hand-writing field (1).
–Characters/letters can be erased or changedin several ways:
Tap the desired letter or word in the list(3).
Tap the delete button (5) to erase the let-ter and start again.
Swipe horizontally from right to left12 overthe handwriting field (1). Erase several let-ters at once by swiping over the area sev-eral times.
Tap the X box in the text field (2) to eraseall written text.
11Certain system languages only.12For Arabic keyboards, swipe in the other direction. Swiping from right to left will create a blank space.
Page 136 of 645

||
DISPLAYS AND VOICE CONTROL
* Option/accessory.134
System
Sub-categories
Driver Profile
Date and Time
System Languages and Units
Privacy and Data
Keyboard Layouts
Voice Control*
Factory Reset
System Information
Related information
Center display overview (p. 107)
Changing settings in the center display's Topview (p. 130)
Resetting center display settings (p. 132)
Driver profiles
Many of the vehicle's settings can be custom-ized to the driver's personal preferences andsaved in one or more driver profiles.
These personal settings are automatically savedin the active driver profile. Each key can be linkedto one driver profile. When the linked key is used,the vehicle is customized to the specific settingsof that driver profile.
Which settings are saved in driver
profiles?
Many of the settings made in the vehicle will beautomatically stored in the active driver profile ifthe profile is not protected. The vehicle has set-tings that can be made either personal or global.The personal settings are saved in driver profiles.
Settings that can be saved in a driver profileinclude, among other things, screens, mirrors,front seats, navigation*, audio and media system,language and voice control.
Some settings are global settings. These settingscan be changed but are not saved to a specificdriver profile. Changes to global settings affect allprofiles.
Global settings
Global settings and parameters do not changewhen driver profiles are changed. They remainthe same regardless of which driver profile is cur-rently active.
Keyboard layout is an example of a global setting.If driver profile X is used to add additional key-board languages, these languages will also beavailable for driver profile Y. The settings for key-board layout are not saved to a specific driverprofile - the settings are global.
Personal settings
If driver profile X has been used to e.g., set thebrightness for the center display, driver profile Ywill not be affected by this setting. It will only besaved to driver profile X because brightness set-ting is a personal setting.
Related information
Selecting a driver profile (p. 135)
Changing a driver profile's name (p. 135)
Linking a remote key to a driver profile(p. 136)
Protecting a driver profile (p. 136)
Resetting driver profile settings (p. 137)
Table of settings in the center display(p. 133)
Page 137 of 645

DISPLAYS AND VOICE CONTROL
135
Selecting a driver profile
When the center display starts up, the selecteddriver profile will be shown at the top of thescreen. The most recently used driver profile willbe active the next time the vehicle is unlocked. Adifferent driver profile can be selected once thevehicle has been unlocked. However, if theremote key has been linked to a driver profile,this profile will be used instead.
There are two options for switching betweendriver profiles.
Option 1:
1.Tap the name of the driver profile shown atthe top of the center display when the dis-play starts up.
> A list will appear, showing driver profilesthat can be selected.
2. Select desired driver profile.
3.Tap Confirm.
>The driver profile has now been selectedand the system will load the settingsstored in that profile.
Option 2:
1. Pull down Top view in the center display.
2.Tap Profile.
>The same list as in option 1 will be dis-played.
3. Select desired driver profile.
4.Tap Confirm.
>The driver profile has now been selectedand the system will load the settingsstored in that profile.
Option 3:
1. Pull down Top view in the center display.
2.Tap Settings in the Top view in the centerdisplay.
3.Tap SystemDriver Profiles.
> A list will appear, showing driver profilesthat can be selected.
4. Select desired driver profile.
5.Tap Confirm.
>The driver profile has now been selectedand the system will load the settingsstored in that profile.
Related information
Driver profiles (p. 134)
Navigating in the center display's views(p. 113)
Changing a driver profile's name (p. 135)
Linking a remote key to a driver profile(p. 136)
Changing a driver profile's name
It is possible to change the names of the differ-ent driver profiles used in the vehicle.
1.Tap Settings in the Top view in the centerdisplay.
2.Tap SystemDriver Profiles.
3.Select Edit Profile.
>A menu will open in which the driver pro-file can be changed.
4.Tap the Profile Name box.
>A keyboard will be displayed and can be
used to change the name. Tap toclose the keyboard.
5.Save the name change by pressing Back orClose.
>The name has now been changed.
NOTE
Profile names may not begin with a space. If aspace is entered first, the profile name will notbe saved.
Related information
Selecting a driver profile (p. 135)
Using the center display keyboard (p. 124)
Page 138 of 645

DISPLAYS AND VOICE CONTROL
136
Protecting a driver profile
It may not always be desirable to store settingsmade in the vehicle to the active driver profile. Inthese instances, the driver profile can be protec-ted.
NOTE
Protecting a driver profile is only possiblewhen the vehicle is stationary.
To protect a driver profile:
1.Tap Settings in the Top view in the centerdisplay.
2.Tap SystemDriver Profiles.
3.Select Edit Profile.
>A menu will open in which the driver pro-file can be changed.
4.Tap Protect Profile to protect the profile.
5.Confirm your selection to protect the profileby tapping Back/Close.
>When the profile is protected, settingsmade in the vehicle will not be automati-cally stored to the profile. The changesmust instead be saved manually under
SettingsSystemDriver Profiles
Edit Profile by tapping Save currentsettings to the profile. If the profile isnot protected, the settings will be auto-matically stored to the profile.
Related information
Driver profiles (p. 134)Linking a remote key to a driverprofile
A remote key can be linked to a driver profile.This driver profile and all of its settings will thenautomatically be selected every time the vehicleis used with that particular remote key.
The first time the remote key is used, it is notlinked to any specific driver profile. The Guestprofile is automatically activated when the ignitionis switched on.
A driver profile can also be selected manuallywithout linking it to any key. When the vehicle isunlocked, the last active driver profile will be acti-vated. If the key has ever been linked to a driverprofile, it is not necessary to manually select adriver profile when using that particular key.
Linking a remote key to a specific driver
profile
NOTE
A remote key can only be connected to adriver profile when the vehicle is stationary.
First select the profile you would like to link tothe key (if that profile is not already active). Theactive profile can then be linked to the key.
1.Tap Settings in the Top view in the centerdisplay.
Page 146 of 645

||
DISPLAYS AND VOICE CONTROL
* Option/accessory.144
ses from the system. The voice control systemuses the same microphone as devices connectedwith Bluetooth, and the voice control systemresponds through the vehicle's loudspeakers. Incertain cases, text messages will also be dis-played in the instrument panel. The functions arecontrolled using the right-side steering wheelkeypad and settings are made in the center dis-play.
System updates
The voice control system is continuouslyimproved. For optimal functionality, always down-load the latest update at support.volvocars.com.
Related information
Using voice commands (p. 144)
Voice control for cellular phones (p. 145)
Voice control for radio and media (p. 146)
Climate control system voice commands(p. 197)
Voice control settings (p. 147)
Using voice commands16
Press the button for voice con-
trol on the right-sidesteering wheel keypad to acti-vate the system and initiate avoice command dialog.
These may include:
Wait until after the tone, and then speak inyour normal voice at a normal speed.
Do not speak while the system is responding(the system is unable to process commandsduring this time).
Avoid background noises in the passengercompartment by keeping doors, windows andthe panoramic roof* closed.
Voice control can be canceled by:
pressing briefly and saying "Cancel".
pressing and holding the steering wheel key-
pad's voice command button until twoaudible signals are given.
To speed up the voice command dialog and skipsystem responses, press the voice command but-
ton while the system is responding and giveyour next command.
To change the audio volume of the system, turnthe volume knob while the voice is speaking. It ispossible to use other buttons while voice com-mands are being given. However, because otheraudio is silenced during dialog with the system, itis not possible to perform any functions con-nected to audio using the buttons.
Voice command examples
Press , say "Call [First name] [Last name][number category]" - calls the selected contactfrom the phone book. If the contact has severalphone numbers (e.g. home, cell, work), the rightcategory must also be given.
Press and say "Call Robyn Smithcellular".
Commands/phrases
The following commands can usually be used inany situation:
"Repeat" - repeats the most recent voicecommand in the current dialog.
"Cancel" - cancels the dialog.
"Help" - initiates a help dialog. The systemresponds with commands that can be usedin the current situation, an instruction or anexample.
15Certain markets only.16Certain markets only.
Page 154 of 645

LIGHTING
* Option/accessory.152
Adjusting the headlight pattern
The headlight pattern can be reset from right-hand to left-hand traffic, and vice versa. Thefunction adapts the light pattern from the head-lights so that they do not cause a glare toapproaching traffic.
1.Tap Settings in the center display's Topview.
2.Tap My CarLights and LightingExterior Lights.
3.Select Temporary Right Hand Traffic/Temporary Left Hand Traffic.
NOTE
Active Bending Lights are not available whenthe headlight pattern is temporarily changedfrom left-hand to right-hand traffic, or viceversa.
Related information
Changing settings in the center display's Topview (p. 130)
Function view in the center display (p. 120)
Active Bending Lights* (p. 157)
Parking lights
The parking lights can be used to help otherroad users see the vehicle if it is stopped orparked. Use the lighting ring on the steeringwheel lever to turn on the parking lights.
Lighting ring in the parking light position.
Turn the lighting ring to the position toturn on the parking lights (the license plate light-ing will also illuminate).
Canadian models: If the ignition is in the II posi-tion, the daytime running lights will illuminateinstead of the front parking lights. With the light-ing ring in this position, the parking lights willremain on regardless of what position the ignitionis in.
US models: When mode is selected, thedaytime running lights can be deactivated in thecenter display. The parking lights will also be
deactivated. In weak daylight or dark conditions,the parking lights and low beams will be illumi-nated.
In dark conditions, the rear parking lights alsoilluminate when the trunk lid is opened to alertfollowing traffic. This happens regardless of whatposition the lighting ring or ignition is in.
Related information
Lighting control and panel (p. 150)
Ignition modes (p. 395)
Page 170 of 645

WINDOWS, GLASS AND MIRRORS
* Option/accessory.168
Rearview/door mirrors
The rearview mirror and door mirrors can beused to improve the driver's visibility behind thevehicle.
Rearview mirror
The rearview mirror can be adjusted manually.The rearview mirror can be equipped with Home-Link*, auto-dim* and compass*.
Door mirrors
WARNING
The door mirror on the passenger side iscurved to improve visibility. Objects in the mir-ror may appear farther away than they actuallyare.
The joystick in the drivers' door control panel isused to adjust the position of the door mirrors.There are also several automatic settings thatcan also be connected to the memory functionbuttons for the power seat*.
Related information
HomeLink®* (p. 440)
Compass* (p. 443)
Adjusting the rearview mirror dimming func-tion (p. 168)
Adjusting the door mirrors (p. 169)
Storing positions for seats, mirrors and head-up display* (p. 182)
Activating and deactivating the heated rearwindow and door mirrors (p. 213)
Adjusting the rearview mirrordimming function
Bright light entering the vehicle from behind, e.g.from the headlights of following vehicles, couldreflect in the rearview mirror and door mirrorsand cause a glare. Use the dimming functionwhen light from behind is distracting.
Auto-dim
If bright light enters the vehicle from behind, thedoor mirrors will automatically dim. Auto-dim isalways active when the engine is running, exceptwhen reverse gear is engaged.
NOTE
Adjustments to the sensitivity level will not benoticeable immediately but will instead takeeffect after a short period of time.
The sensitivity level for dimming will affect boththe rearview mirror and door mirrors.
To change the dimming sensitivity level:
1.Tap Settings in the Top view in the centerdisplay.
2.Tap My CarMirrors and Convenience.
3.Under Rearview Mirror Auto Dimming,select Normal, Dark or Light.
The rearview mirror instead has two sensors -one pointing forward and one pointing rearward -
Page 184 of 645

||
SEATS AND STEERING WHEEL
* Option/accessory.182
Raise/lower the seat by moving the controlup/down.
Move the seat forward/rearward by movingthe control forward/rearward.
Change the backrest tilt by moving the con-trol forward/backward.
Only one movement (forward/rearward/up/down) can be performed at a time.
The front seat backrests cannot be folded downcompletely.
Related information
Manual front seats (p. 180)
Power* front seats (p. 181)
Storing positions for seats, mirrors and head-up display* (p. 182)
Using stored positions for seats, mirrors andhead-up display* (p. 183)
Adjusting front seat massage settings*(p. 185)
Adjusting* front seat cushion length (p. 185)
Front seat massage* settings (p. 184)
Adjusting front seat side bolster settings*(p. 186)
Adjusting front seat lumbar support* (p. 187)
Adjusting the passenger seat from the driv-er's seat* (p. 188)
Storing positions for seats, mirrors
and head-up display*
Adjustment settings for the power* seat, doormirrors and head-up display* can be stored inthe memory buttons.
Two different positions for the power* seat, doormirrors and head-up display* can be stored usingthe memory buttons. The buttons are located onthe inside of either one or both* front doors.
Button M for storing a setting.
Memory button.
Memory button.
Storing positions
1. Adjust the seat, door mirrors and head-updisplay to the desired position.
2.Press and hold the M button. The indicatorlight in the button will illuminate.
3.Within three seconds, press and hold the 1or 2 button.
> When the position has been stored in thememory button, an audio signal will soundand the indicator light in the M button willgo out.
If none of the memory buttons are pressed withinthree seconds, the M button will go out and noposition will be stored.
The seats, door mirrors or head-up display mustbe readjusted before a new memory position canbe set.
Related information
Manual front seats (p. 180)
Power* front seats (p. 181)
Adjusting the power* front seats (p. 181)
Using stored positions for seats, mirrors andhead-up display* (p. 183)
Adjusting front seat massage settings*(p. 185)
Adjusting* front seat cushion length (p. 185)
Front seat massage* settings (p. 184)
Adjusting front seat side bolster settings*(p. 186)
Adjusting front seat lumbar support* (p. 187)