Page 89 of 322

#
Adjus tthe seat int othe desired position. #
Press memor ybutton Mtogether wit hone of
th ep rese tp osition buttons 1,2or3.
An acou stic signal sounds .The settings are
st ored. #
Tocall up: press and hold ther ele vant preset
position button 1,2or3u ntilthef ront seat is
in thes tore dp osition. Ro
tating thef ront seats &
WARNING Risk of inju ryor deat hifthe
driver's seat and front-passenge rseat
ar en otengaged
If th ed rive r's and front-passenger seats are
no te ngaged in thed irection of tr avelduring
th et rip, ther estraint sy stems cann otoffer
pr otection as intended. #
Enga gethed rive r's and front-passenger
seat in thed irection of tr avel befor ethe
engine is star ted. &
WARNING Risk of inju ryfrom adju sting
th ev ehicle settings while thev ehicle is in
motion
Yo uc oul dlose control of thev ehicle in the
fo llowing situations:
R ifyo ua djus tthe driver's seat, theh ead
re stra int ,the steering wheel or them irror
while thev ehicle is in motion
R ifyo uf asteny our seat belt whilet hevehi‐
cle is in motion #
Befor estarti ngthee ngine: adjus tthe
driver's seat, theh ead restra int ,the st
eering wheel or them irro ra nd fast en
yo ur seat belt. Yo
uc an rotate thed rive r's and front-passenger
seat 50 °and 180°.T he seats engag ebothin
and opposit etothe direction of tra velasw ell as
at 50 °totheexit. #
Ensur ethat thep arking brak eisapplied and
th eb rake leve risf olded down wardsasf ar as
it will go (/ page133). #
Adjus tthe steering wheel in suc hawaythat
th er eiss ufficient free space torotate and
adjus tthe driver's seat (/ page71). #
Slide thef ront-passen gers eat forw ardb efore
ro tating it (/ page 59). #
Torotat ethe sea t:push le ver1towa rds
th ev ehicle center and rotat ethe seat slightly
in wa rds.
The rotatio nd eviceisu nlocked. #
Release le ver1again. #
Rotate thes eat byaround 50 °outwa rdsor
in wa rdsi ntot he requ ired position. Seat
sand stow age 65
Page 90 of 322

Ad
justin garmrests Exampl
eima ge #
Tosetthe armres tinclination: fold thea rm‐
re st mor ethan 45 °upwards 2.
The armres tisreleased. #
Foldthea rmrest forw ards 3asfarasitw ill
go. #
Slowly fold thea rmrest upwards int othe
re qu ired position. #
Tofold thea rmrest upwa rds: if necessar y,
fo ld thea rmrest mor ethan 90 °upwards 1. Fo
lding thef olding seat up or down &
WARNING Risk of inju rywhen using the
fo lding seat due toinser tedk ey
When thek eyis in thel oc koft he partition
sliding door ,itcan come int ocontact wit hthe
person on thef olding seat. #
Alwaysr emo vethek eyfrom thep arti‐
tion sliding door befor eaperson sits on
th ef olding seat. #
Remo vekey 1from thep artition sliding
door. #
Press thep ush button on catch 2and fold
seat cushion 3up or down. #
Release push button on cat ch2 when seat
cushion 3reaches its end position. #
Moveseat cushion 3until it has loc ked. The
push button on catch 2mus tbec omple tely
fl ush wit hthe seat frame. Installing and
removing the rear ben chseat &
WARNING Risk of inju ryifre ar ben ch
seat is ins talled incor rectly
If yo udon otins tallth er ear benc hseat as
described, or ins tall an unsuitable rear ben ch
seat, thes eat belts ma ynotprov ide thei nten‐
ded pr otection. #
Installth er ear benc hseat as described
and only in thed irection of tra vel. #
Installing ther ear benc hseat in the
opposit edirection is no tpermitted. #
Use onl yrear benc hseats appr ovedfor
yo ur vehicle byMercedes-Benz. &
WARNING Risk of inju ryifth er ear bench
seat is no tloc kedinp lace
If th el ocking mechanisms on ther ear bench
seat legs ar enotcor rectly engaged, ther ear
benc hseat will no tbeheldfirm lyand could
ro llove rduring tr avel. #
Ensur ethat ther ear benc hseat is
engaged befor esetting off. Ther emust
be no redi ndicator tabs visible on the
re lease handle. 66
Seatsand stow age
Page 91 of 322

#
Ifre di ndicator tabs ar evisible on the
re lease handle, re-engag ethe rear
ben chseat int oplace. &
WARNING Risk of inju rywhen ins talling
and removing ther ear benc hseat
When youi nstall or remo vether ear bench
seat, body parts suc hasfeetm aybecome
trapped when ther ear benc hseat is tipped. #
When ins talling and removing ther ear
benc hseat, ensur ethat ther ea reno
body parts between ther ear benc hseat
and thef loor. *
NO
TEDama getorear ben chseat rollers
caused byincor rect use The
rear ben chseat roller scan be damaged if
th er ear benc hseat is used improperly or is
re mo vedi ncor rectl y. #
As long as ther ear benc hseat is in the
mounting shells, do no tpullt hese in the
direction of ther ear-end doors. Rollthe
re ar ben chseat onl ybeside them ount‐
ing shells. #
Do no troll ther ear benc hseat when it
has been remo vedoru se it as ameans
of transport. Wa
rning on rear ben chseat wit hcorrectly
ins talled rear ben chseat shown.
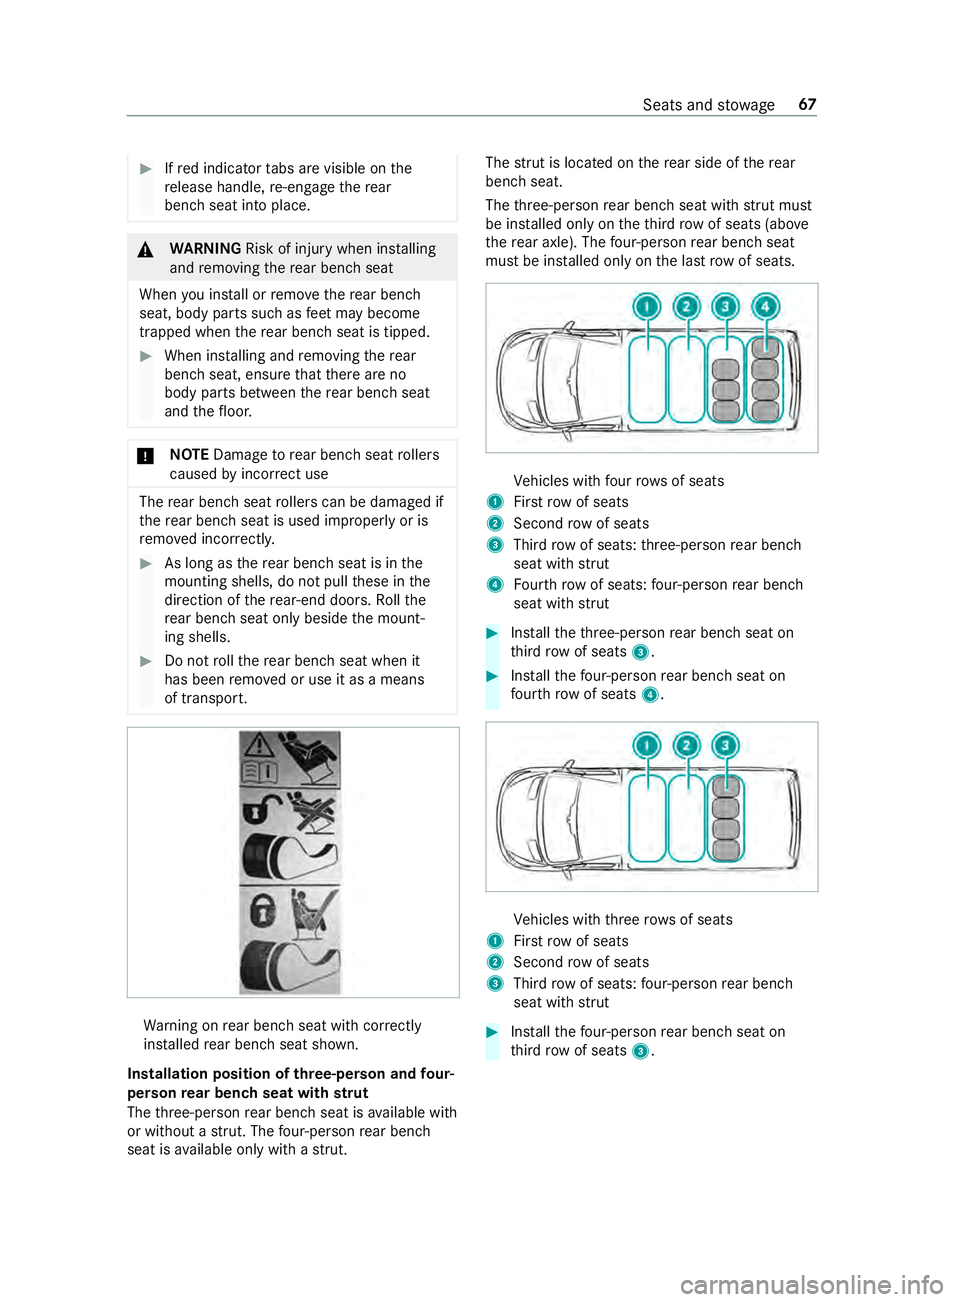
Installation position of three-person and four-
person rear ben chseat with strut
The thre e-person rear ben chseat is available with
or without astrut. The four-pe rson rear ben ch
seat is available onl ywithas trut. The
stru tisl oc ated on ther ear side of ther ear
benc hseat.
The thre e-person rear ben chseat wit hstrut mu st
be ins talled onl yonthethirdr ow of seats (abo ve
th er ear axle). The four-pe rson rear ben chseat
mus tbei nstalled onl yonthe las trow of seats. Ve
hicles wit hfour rows of seats
1 Firstrowofs eats
2 Second rowof seats
3 Thirdrow of seats: thre e-person rear ben ch
seat wit hstrut
4 Fourth row of seats: four-pe rson rear ben ch
seat wit hstrut #
Installth et hree-person rear ben chseat on
th irdr ow of seats 3. #
Installth ef our-person rear ben chseat on
fo ur th row of seats 4. Ve
hicles wit hthree rowsofs eats
1 Firstrowofs eats
2 Second rowof seats
3 Thirdrow of seats: four-pe rson rear ben ch
seat wit hstrut #
Installth ef our-person rear ben chseat on
th irdr ow of seats 3. Seats and
stowage 67
Page 92 of 322

Re
moving the rear ben chseat Pe
rfor mt hese jobs carefull ywitht he assis tance
of as econd pe rson. #
Toremo vethec ove rsof them ounting
shells: push clip 1inthed irection of the
ar row and de tach cover 2byremoving it at
an angle upwards and bac k.#
Push release handle 2fort he benc hseat all
th ew aydown and hold it ther ew hile tilting
th eb enc hseat backwards slightl yatthe
same time using ther elease handle and pull it
slightly backwards. #
Letgooft herelease handle.
The loc kson theb enc hseat legs will be
unloc keda nd redi ndicator tabs 3 onthe
housing of release handle 2will be visible. #
Hold theu nloc kedb enc hseat bygrab han‐
dles 1and pull backwards slightl y. #
Tilt benc hseat 1backwards and pull it out
of them ounting shells.
% If
th eb enc hseat cann otbe pulled out of the
mounting shells, theb enc hseat ma ybe
we dged in thes eat anchorage. This can hap‐
pen if theb enc hseat is tilted toof ar back‐
wa rds.
If th eb enc hseat cann otbe pulled out of the
mounting shells, youc an rectify this situation as
fo llo ws: #
Tilt th eb enc hseat forw ards without engaging
it. #
Pull theb enc hseat backwards again using
re lease handle 2. #
Tilt th eb enc hseat backwards slightl yand
pull it out of them ounting shells. #
Toremo veorstor et he benc hseat, place it
next tothem ounting shells and roll it towa rds
th er ear-end doors.
or #
Liftthe benc hseat out from thes ide tostore
it.
% It ma
yben ecessar yfor theb enc hseats in
front or behind tobe remo ved. 68
Seats and stowage
Page 93 of 322

#
Toattac hthe co vers of them ounting
shells: hold cover3suchthat retainin glug
1 is pointing towa rdsr ear seat anchorage
2. #
Inser tcover 3 intor ear seat anchorage 2
by pushing it down wardsatana ngle and then
clip it tothem ounting shell. #
Afterr emoving ther ear benc hseat, ensure
th at ther ear benc hseat can stand securely
and do no ttip ove rwhen in storage.
Installing ther ear benc hseat
Secur eengagement of ther ear benc hseat is
guaranteed only if youk eep thes eat anchorages
clean and free of objects.
% In
vehicles regis tere dasp assenger vehicles,
obser vethem aximum permitted number of
seats. #
Remo vethec ove rsof them ounting shells as
described under "Removing ther ear bench
seat". #
Ensur ethat ther ea reno object sinthe seat
anchorages and mounting shells. #
Position theb enc hseat behind thei nstalla‐
tion position. #
Hold theb enc hseat bytheg rabh andles and
tilt it backwards. #
Rollth eb enc hseat forw ards on thel evel
plastic car riers. #
Ensur ethat ther ear legs of theb enc hseat
ar ee ngaged. #
Tilt th eb enc hseat forw ards firm lyuntil the
loc kson thef ront legs of theb enc hseat
engag eaudibly.
The loc kson thef ront legs of theb enc hseat
will no wbelockeda nd ther ed indicator tabs
on theh ousing of release handle 1should
no longer be visible.
% If
th er ed indicator tabs on ther elease handle
housing ar evisible, theb enc hseat is no tcor‐
re ctly engaged.
If th eb enc hseat is no tcorrectl ye ngaged, you
can rectify this situation as follo ws: #
Unloc kthe benc hseat again and tilt it for‐
wa rdsf irml yuntil thel oc ks on theb enc hseat
front legs engag eaudibly. #
Attach thec oversoft he mounting shells as
described under "Removing ther ear bench
seat". Ad
justin gthe seat backres toftherear ben ch
seat Seats and
stowage 69
Page 94 of 322

#
Pull release handle 1fort he seat backrest
upwards and hold it in position. #
Movethes eat backres ttothe desired posi‐
tion. #
Letgoofr elease handle 1fort he seat back‐
re st and mo vethes eat backres tslightl y.
The seat backres tengages in position. Head
restra ints Ad
justin gthe hea drestraints manually &
WARNING Risk of inju ryfrom adju sting
th ev ehicle settings while thev ehicle is in
motion
Yo uc oul dlose control of thev ehicle in the
fo llowing situations:
R ifyo ua djus tthe driver's seat, theh ead
re stra int ,the steering wheel or them irror
while thev ehicle is in motion
R ifyo uf asteny our seat belt whilet hevehi‐
cle is in motion #
Befor estarti ngthee ngine: adjus tthe
driver's seat, theh ead restra int ,the
st eering wheel or them irro ra nd fast en
yo ur seat belt. &
WARNING Risk of inju rydue tohead
re stra int sw hicha renotins talled or are
adjus tedi ncor rectly
If hea drestraints ar enotins talled or are
adjus tedi ncor rectly ,the head restra int sc an‐
no tp rovide pr otection as intended.
Ther eisani ncreased risk of injur yinthe
head and nec karea, e.g. in thee vent of an
accident or when braking. #
Alwaysd rive wit hthe head restra ints
ins talled. #
Befor edriving off, mak esuref or every
ve hicle occupant that thec enter of the
head restra int supports theb ackoft he
head at about eyel eve l. Do no
tswa pthe head restra int soft he front and
re ar seats. Otherwise, youw ill no tbea bletoset
th eh eight and inclination of theh ead restra ints
to thec orrect position.
Using theh ead restra int fore /af tadjustment,
adjus tthe head restra int in suc hawaythat it is
as close totheb ackoft he head as possible. Head
restra int (e xamp le of com fort head restra int
on thed rive r's seat) #
Toraise: pulltheh ead restra int upwards into
th er equired position and ensur ethat the
head restra int is engaged.
Onl yusetheh ead restra int in thee ngaged
st ate. #
Tolowe r:push release button 1and slide
th eh ead restra int down wardsi ntot he
re qu ired position and ensur ethat theh ead
re stra int is engaged.
Onl yusetheh ead restra int in thee ngaged
st ate. #
Tomo veforw ards: pushrelease button 2
and pull theh ead restra int forw ards until it
engages in ther equired position. #
Tomo vebackwards: pushrelease button 2
and slide theh ead restra int backwards into
th er equired position.
% Depending on
theh ead restra int model, indi‐
vidual adjustment option smaybe omit ted. Switching
thes eat heating on and off &
WARNING Risk of bu rnsd ue torepeat‐
edly switching on thes eat heating
Re peatedly switching on thes eat heating can
cause thes eat cushion and seat backrest
padding tobecome very hot.
The healt hofpersons wit hlimited temp era‐
tur es ensitivity or alimited ability toreact to
high temp eratures ma ybeaffected or they
ma yevens ufferb urn-lik einjuries. #
Do no trepeatedl yswitc hont he seat
heating. 70
Seats and stowage
Page 95 of 322

To
protect agains toverheating, thes eat heating
ma ybet emporaril ydeactivated af teritis
switched on repeatedly.
* NO
TEDama getothes eats caused by
object sordocument swhen thes eat
heater is switched on When
thes eat heater is switched on, over‐
heating can occur due toobject sordocu‐
mentsp laced on thes eats e.g. seat cushions
or child seats .This could cause damag eto
th es eat sur face. #
Mak esuret hat no objects or docu‐
ments ar eonthe seats when thes eat
heater is switched on. Re
quirements:
R The po wersupp lyhas been switched on. #
Toswitc hon:press button 1.
All indicator lamps on theb utton light up. #
Tolowe rthe le vel:press button 1until the
re qu ired heatin gleve lisr eached.
Depending on theh eating le vel, one tothree
indicator lamps light up. #
Toswitc hoff:press button 1until all indi‐
cator lamps ar eoff.
% The seat heating automaticall
yswitches back
out of thet hree heating le vels af ter8,10a nd
20 minutes until thes eat heating switches
off. Ad
justin gthe steering wheel &
WARNING Risk of inju ryfrom adju sting
th ev ehicle settings while thev ehicle is in
motion
Yo uc oul dlose control of thev ehicle in the
fo llowing situations:
R ifyo ua djus tthe driver's seat, theh ead
re stra int ,the steering wheel or them irror
while thev ehicle is in motion
R ifyo uf asteny our seat belt whilet hevehi‐
cle is in motion #
Befor estarti ngthee ngine: adjus tthe
driver's seat, theh ead restra int ,the
st eering wheel or them irro ra nd fast en
yo ur seat belt. &
WARNING Risk of entrapment forc hil‐
dren when adjusting thes teering wheel
Children could injur ethemselves if they
adjus tthe steering wheel. #
Neverlea ve children unat tende dint he
ve hicle. #
When leaving thev ehicle, alw ayst ake
th eS martK eywit hyou and loc kthe
ve hicle. 1
Lever
2 Steering column height
3 Steering column fore -and-af tadjustment #
Toadjus tthe steering wheel: swing lever
1 down as farasitw illg o.
The steering wheel is unloc ked. Seats and
stowage 71
Page 96 of 322

#
Movethes teering wheel tothed esired posi‐
tion. #
Pull le ver1up as farasitw illg o.
The steering wheel is loc ked. St
ow agea reas Note
sonl oading guidelines &
DANG ER Risk of poisonin gfrome xhau st
ga ses
Combustion engines emit poisonous exhaust
ga ses, suc hascarbon monoxide. Exhaust
ga ses can enter thev ehicle interior if the
re ar-en ddoor is open when thee ngine is run‐
ning ,especially if thev ehicle is in motion. #
Alwayss witc hoffthee ngine before
opening ther ear-end door. #
Neverd rive wit hthe rear-en ddoor
open. &
WARNING Risk of inju ryfrom unsecu red
object sinthevehicle
When objects ar eunsecured or inadequately
secured, they can slip, tip overorbet hrown
about, striking vehicle occupants.
This also appliest o:
R Luggag eorl oads
R Seats whic hhave been remo veda nd are
being transpor tedint hevehicle in an
ex ceptiona lcase
The reisar isk of injur y,particular lyin the
eve nt of braking maneuver sorabrupt
ch anges in direction. #
Alwayss towo bjectsins uchaw aythat
th ey canno tbetossed about. #
Befor etrave ling, secur eobjects, lug‐
ga ge or load topreve ntthem slipping or
tipping over. #
When aseat is remo ved, keep it prefera‐
bly outside thev ehicle. &
WARNING Risk of inju rydue toobjects
being stowedincor rectly
If yo udon otadequatel ystowo bjectsint he
ve hicle interior ,the yc ould sli porbet ossed
around and thereb ystrik evehicle occupants.
In addition, cup holders, open stowage
spaces and mobile phon ebrack etsc annot al
wa ys restra in theo bject stheyc ontai nint he
eve nt of an accident.
The reisar isk of injur y,particular lyin the
eve nt of sudden braking or asudde nchange
in direction. #
Alwayss towo bjectsins uchaw aythat
th ey canno tbetossed about in these or
similar situations. #
Alwaysm akes uret hat objects do not
project from stowages paces, parcel
nets or stowagen ets. #
Close thel oc kable stow ages paces
befor estarti ngajou rney. #
Stow and secur eobject sthat ar eheavy,
hard, poin ted, sharp-edged, fragile or
to ol arge inthec argo compartment. &
WARNING Risk of bu rning from thet ail‐
pipe or tailpipe trim
The tailpipe and tailpipe trim can become
ve ry hot. If youc om eintoc ontact wi th these
car parts, youc oul db urny ourself. #
Alwaysbep articularly careful when in
th ev icinit yoft hetailpipe and tailpipe
trims and supervise children very
closely whe ninthis area. #
Befor eanycon tact, allo wthe car parts
to cool down. If
yo ua reusin gar oofrack ,p lease no tethem axi‐
mum roof load and them aximum load capacity of
th er oof rack.
Yo uw illfind information abou tthe maximum roof
load in the" Tech nical data" chap tera nd informa‐
tion abou troof rack sint he "Car rier sy stems"
section .
Camera-based driving sy stems and thes ensor
functions of thei nside rearvie wmirro rm aybe
impaire difyou ar etranspo rting aload on the
ro of and it pr otru des mor ethan 16in (40 cm)
ove rthe edg eoftheroof. Therefore, mak esure
th at thel oad does no toverhang bymor ethan
16 in (40 cm).
The handlin gcharacteristics of your vehicle are
dependent on thel oad distribution. Therefore,
please obser vethef ollowing no tesw hen loading:
R when transporting aload, ne vere xceed the
permissible gross mass or theg ross axle
we ight rating fort he vehicle (including occu‐ 72
Seats and stowage