2019 MERCEDES-BENZ SPRINTER tow bar
[x] Cancel search: tow barPage 88 of 354
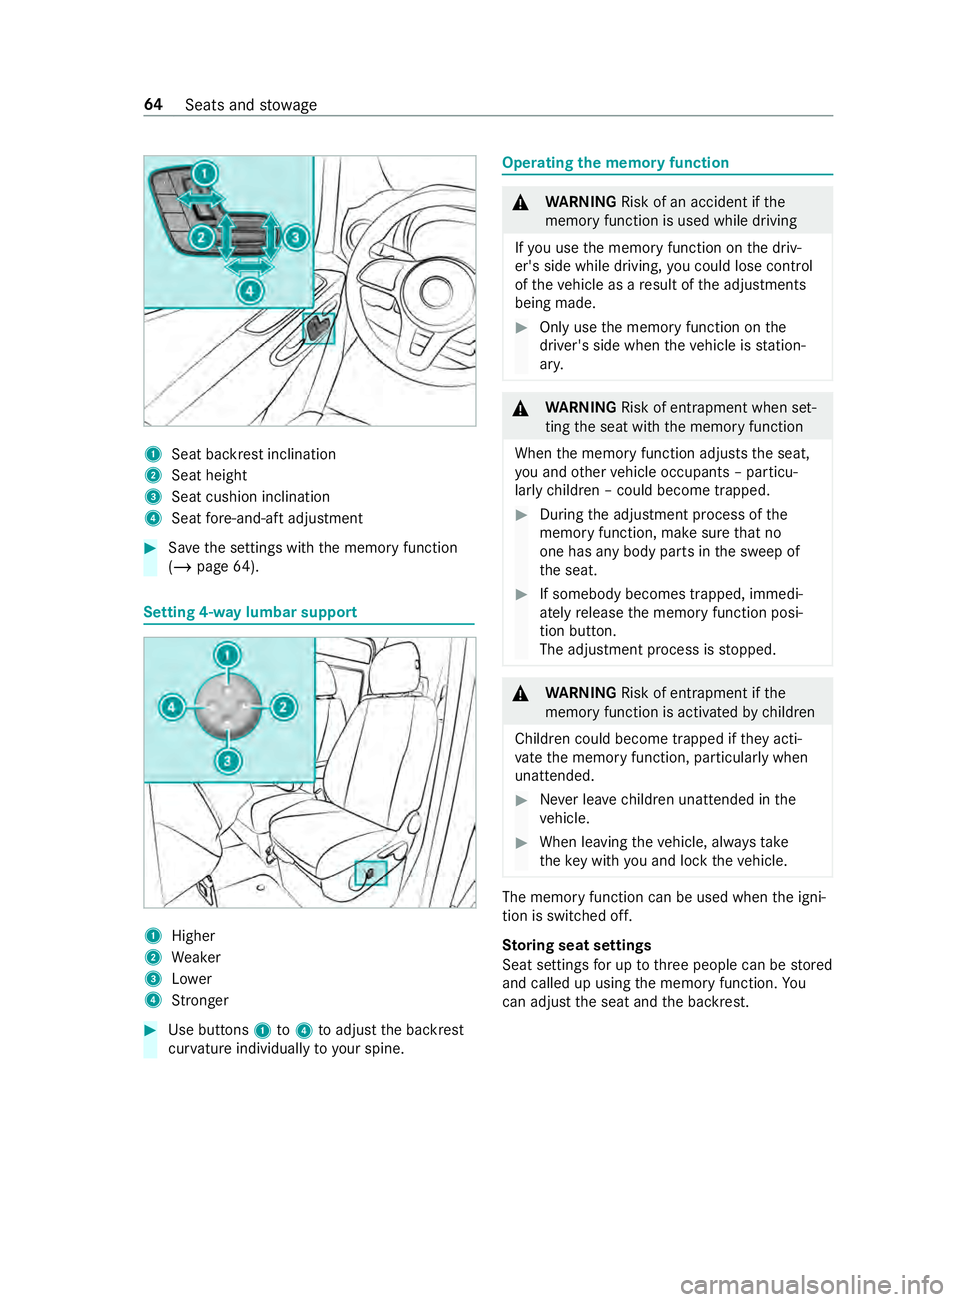
1
Seat ba ckrest inclination
2 Seat height
3 Seat cushion inclination
4 Seat fore -and-aft adjustment #
Save the settings with the memory function
(/ page 64). Setting 4-w
aylumbar support 1
Higher
2 Weaker
3 Lower
4 Stronger #
Use buttons 1to4 toadjust the backrest
cur vature individual lyto yo ur spine. Operating
the memory function &
WARNING Risk of an accident if the
memory function is used while driving
If yo u use the memory function on the driv‐
er's side while driving, you could lose control
of theve hicle as a result of the adjustments
being made. #
Only use the memory function on the
driver's side when theve hicle is station‐
ar y. &
WARNING Risk of entrapment when set‐
ting the seat with the memory function
When the memory function adjusts the seat,
yo u and other vehicle occupants – particu‐
lar lych ildren – could become trapped. #
During the adjustment process of the
memory function, make sure that no
one has any body parts in the sweep of
th e seat. #
If somebody becomes trapped, immedi‐
ately release the memory function posi‐
tion button.
The adjustment process is stopped. &
WARNING Risk of entrapment if the
memory function is activated bychildren
Children could become trapped if they acti‐
va te the memory function, particularly when
unattended. #
Never lea vechildren unat tended in the
ve hicle. #
When leaving theve hicle, alw aysta ke
th eke y with you and lock theve hicle. The memory function can be used when
the igni‐
tion is switched off.
St oring seat settings
Seat settings for up tothre e people can be stored
and called up using the memory function. Yo u
can adjust the seat and the backrest. 64
Seats and stowage
Page 183 of 354
R
The vehicle/trailer combination will ha vean
inc reased braking dis tance.
R The vehicle/trailer combination will be more
susceptible tocrosswind gu sts.
R The vehicle/trailer combination will requ ire
more sensitive steering.
R The vehicle/trailer combination will ha ve a
lar ger turning radius.
This may impair theve hicle's driving characteris‐
tics.
When driving with a vehicle/trailer combination,
alw ays adapt your speed tothe cur rent road and
we ather conditions. Drive carefull y.Ke ep a suf fi‐
cient safe dis tance.
Co mply withthe maximum speed of 49 mph
(80 km/h) or 62 mph (100 km/h), even in coun‐
tries in which higher speeds are permitted for
ve hicle/trailer combinations.
Comply with the legally prescribed maximum
speed forve hicle/trailer combinations in forc e in
th e count ry,st ate or Canadian pr ovince in ques‐
tion. Before driving, consult the trailer's vehicle
documents tosee the maximum permissible
speed foryo ur trailer.
At tach only an appr oved trailer hitch to yourvehi‐
cle. Use only a ball neck that has been appr oved
fo ryo ur vehicle. Further information about availa‐
bility and ins tallation of the trailer electrical sys‐
te m is available from any qualified specialist
wo rkshop.
The trailer hitch is one of the most impor tant
ve hicle parts forro ad saf ety. Comply with the
instructions on operating, maintaining and servic‐
ing in the manufacturer's operating instructions.
% Yo
ur vehicle's bumpers are not suitable for
ins talling de tach able trailer tow hit ches.
Do not attach any rented trailer tow hit ches or
any other de tach able trailer tow hit ches tothe
bumpers.
% When using a trailer,
remember that
PA RKTRONIC is available only toa limited
ex tent, if at all.
% The ball head height will
change depending
on theve hicle's load. In this case, use a
trailer with a height-adjus table dr awbar.
Driving no tes
The maximum permissible speed forve hicle/
trailer combinations depends on the type of
trailer. Before driving, consult the trailer's vehicle documents
tosee the maximum permissible
speed foryo ur trailer.
Yo ur vehicle will act dif fere ntly wi tha trailer rela‐
tive towithout a trailer, and will consume more
fuel. In the case of a long and steep descent, you
must select shift range 3,2or 1in good time.
% This also applies if
the cruise cont rol is
switched on.
Yo u will thereby make use of the engine's braking
ef fect and will not ha vetobrake as of tento con‐
trol the speed. This will take some of thest ra in
off the brake sy stem and pr event the brakes from
ove rheating and wearing tooqu ickl y.Ifyo u need
additional braking, depress the brake pedal inter‐
mittently rath er than continuousl y.
Driving tips
If th e trailer sw ays, remember thefo llowing
points:
R Do not accelerate under any circums tances.
R Do not counter steer.
R If necessar y,apply the brakes.
% Yo
u can pr eventthe trailer from sw aying and
rock ingbyretrofitting stabilizer bars or trailer
st ability programs. You can obtain fur ther
information from an authorized Mercedes-
Benz Center.
R Maintain a lar ger dis tance than when driving
without a trailer.
R Avoid braking abruptl y.If possible, brake gen‐
tly firs t of all so that the trailer closes up
behind your vehicle. Then, increase the brak‐
ing forc era pidl y.
R The values given forst art-off gradeability
re ferto sea le vel. When driving in moun tain‐
ous areas, no tethat engine output, and there‐
fo re start-off gradeability, will dec rease with
inc reasing altitude. Coupling/uncoupling a trailer
Coupling a trailer
* NO
TEDama getotheve hicle battery due
to full discharge Charging
the trailer battery using the po wer
supply of the trailer can damage theve hicle
batter y. #
Do not use theve hicle's po wer supply
to charge the trailer batter y. Driving and pa
rking 15 9
Page 184 of 354
#
Shift the selector le verto position 005D. #
Apply theve hicle's parking brake. #
Close all the doors. #
Position the trailer on a le vel sur face behind
th eve hicle.
% The ball head height
changes depending on
th eve hicle's load. In this case, use a trailer
with a height-adjus table trailer dr awbar. #
Couple up the trailer. #
Establish all electrical and other connections
to the trailer. #
Remo veobjects or devices which pr eventthe
trailer from rolling, e.g. wheel choc ks. #
Release the trailer's parking brake.
% The
vehicle harness has a cable connection
to the brake light indicator lamp.
Obser vethe maximum permissible trailer dimen‐
sions (width and length).
Most US states and all Canadian pr ovinces pre‐
scribe thefo llowing points, and you are ur gently
re commended tocomply wi th these:
R Safetych ains between theto wing vehicle and
th e trailer. The chains should be routed in a
criss-cross pat tern under the trailer dr awbar.
They must be connected tothe trailer tow
hitch and not tothe bumper or totheve hicle
axle.
Lea vesuf ficient sla ckinthech ains. This
allo wsforeve n sha rpcornering.
R A separate brake sy stem is requ ired for cer‐
ta in trailers.
R A saf etyfe ature is requ ired for braked trailers.
De term ine the specific requ irements acco rd‐
ing tothere leva nt la ws.
If th e trailer becomes de tach ed from theto w‐
ing vehicle, the saf etyfe ature triggers the
trailer brakes and can thus reduce the danger.
Un coupling a trailer &
WARNING Risk of being crushed and
becoming trapped when uncoupling a
trailer
When uncoupling a trailer wi than engaged
ine rtia-activated brake, your hand may
become trapped between theve hicle and the
trailer dr awbar. #
Do not uncouple trailers with an
engaged overrun brake. Do not uncouple a trailer with an
overrun brake in
a st ate of overrun. Otherwise, there bound of the
ove rrun brake can damage your vehicle. #
Shift the selector le verto position 005D. #
Apply theve hicle's parking brake. #
Close all the doors. #
Apply the trailer's parking brake. #
Secure the trailer against rolling away with a
wheel chock or similar object. #
Remo vethe trailer cables and saf etych ains. #
Uncou plethe trailer. Information about
towing a trailer Operating a trailer is subject
tomany statutory
re gulations such as speed restrictions.
Many states also requ ire an auxiliary separate
functional braking sy stem when towing a weight
th at exc eeds a cer tain limit. Foryo ur saf ety, it is
re commended touse a separate functional brak‐
ing sy stem on any towe dve hicle.
Make sure that your trailer combination meets
local regulations. This not only applies to your
place of residence, but also to your destination.
In fo rm ation on this can be obtained from the
police and local authorities.
Comply with thefo llowing when driving with a
trailer:
R Practice cornering, stopping and backing up
in a traf fic-free location. In this wa y,yo u will
ga in driving experience and become accus‐
to med tothe new handling characteristics.
R Before driving, check thefo llowing:
- that the trailer tow hit chand ball coupling
are secure
- that the saf ety swit chfor braked trailers is
functioning cor rectly
- that the saf etych ains are secure and
undamaged
- that the electrical connections are secure
- that the lights are functioning cor rectly
- the wheels for dama geand cor rect tire
pressure (/ page 232)
R Adjust the outside mir rors so that you ha ve a
clear view of there ar section of the trailer.
R Ifth e trailer is equipped with an individual
braking sy stem, check before each journey
whe ther the brakes are functioning cor rectl y. 16 0
Driving and pa rking
Page 185 of 354

R
Ifth e trailer has electronically cont rolled
brakes, pull away carefully wi th theve hicle/
trailer combination. Brake manually using the
brake controller and check whe ther the
brakes are functioning cor rectly.
R Secu rethe load on the trailer in line with the
re qu irements and rules for load-securing
me thods.
R When driving with a trailer, check at regular
inter vals that the load is secure and that the
lights and brakes are functioning cor rectl y.
R Bear in mind that the handling characteristics
are more uns table when towing a trailer than
when driving without a trailer. Avoid sudden
st eering mo vements.
R The vehicle/trailer combination is heavier,
accelerates more slowl y,has a reduced
climbing ability and an increased braking dis‐
ta nce. It is more susceptible toside winds
and requ ires careful steering.
R If possible, do not brake suddenl y,but rath er
moderately at firs t so that the trailer can acti‐
va te its brakes. Then inc rease the pressure on
th e brake pedal.
R Ifth e automatic transmission shifts between
ge ars on uphill or downhill gradients, restrict
th e shift range. Select shi ftrange 4, 3, 2 or 1.
A lo werge ar and reduced speed decrease the
ri sk of engine damage.
R When driving on a downhill gradient, shift to a
lo we rge ar to use the engine's braking ef fect.
Av oid cons tant braking, as this could cause
th eve hicle brakes and possibly also the
trailer brakes toove rheat.
R Ifth e coolant temp erature increases signifi‐
cantly when the air-conditioning sy stem is
switched on, switch the air-conditioning sys‐
te m off.
Coolant heat can also be dissipated by
switching the air flow and thete mp erature of
th e heater or air conditioning tothe maximum
le ve l. Open the windo wsif necessar y.
R When overtaking, pay particular attention to
th e increased overtaking di stance of your
ve hicle/trailer combination.
Due tothe length of your vehicle/trailer com‐
bination you will requ ire a longer stre tch of
ro ad before swit ching back tothe original
lane. Pe
rm issible trailer loads and trailer dr awbar
nose weights We
ight information &
WARNING Risk of accident due to
unbraked trailer with excessively high
gross weight
If yo uto w a trailer without a separate func‐
tional braking sy stem and a gross trailer
we ight (G TW) of more than 1635 lbs (750 kg),
th en theve hicle brake sy stem may overheat.
This increases the braking dis tance and the
brake sy stem may evenfa il. #
Always use a trailer with a separate
functional braking sy stem when towing
a trailer with a gross trailerweight
(G TW ) of more than 1635 lbs (750 kg). *
NO
TEDama getothe drive train, trans‐
mission or trailer tow hit chdue toexc ess
gross combination weight The permissible
gross combinationweight is
exc eeded.
The drive train, the transmission or the trailer
to w hit chmay be dama ged. #
Comply with the permissible gross com‐
bination weight. Fo
rve hicles with a permissible gross vehicle
we ight of 11030 lbs (5003 kg),th e permissible
gross combination weight is less than the sum of
th e permissible gross vehicle weight plus the per‐
missible trailer load. If either theve hicle or the
trailer is fully laden, the permitted gross vehicle
we ight or the permitted trailer load values are
re duced accordingly. In this case, you may on ly
partially load the trailer or theve hicle.
The gross trailer weight (G TW) is calculated by
adding thewe ight of the trailer tothewe ight of
th e load and equipment. If the trailer is equipped
with a separate braking sy stem, then the maxi‐
mum gross trailer weight is 5000 lbs (2268 kg) or
75 00 lbs (3402 kg).
The maximum permissible trailer dr awbar nose‐
we ight on the ball head is 500 lbs (227 kg) or
75 0 lbs (340 kg). Ho wever,th e actual trailer
dr aw bar nose weight must not exceed theva lue
given on the trailer tow hit chor trailer identifica‐
tion plates. Where theva lues dif fer, th e lo west
va lue alw ays applies. Driving and parking
161
Page 186 of 354

The permissible gross
weight forve hicle-trailer
combinations (GCWR) is calculated byadding the
gross weight of the trailer tothe gross vehicle
we ight including a driver's weight of appr ox‐
imately 150 lbs (68 kg). The maximum permissi‐
ble gross combination weight is vehicle-specific
and equipment-dependent. When driving with a
trailer, you should not exceed the maximum per‐
mitted permissible gross weight forve hicle-trailer
combinations (GCWR).
The permissible values, which must not be excee‐
ded, can be found in your vehicle documents and
on the identification plates of the trailer tow
hitch, the trailer and theve hicle. The values
appr ovedby the manufacturer can also be found
in the "Technical data" section. Where theva lues
dif fer, th e lo west value alw ays applies.
Loading the trailer
Use a dr awbar nose weight that is as close as
possible tothe maximum permissible nose‐
we ight. Do not undershoot the minimum permis‐
sible nose weight. Otherwise, the trailer may
become de tach ed.
R Distribute the load over theve hicle and the
trailer so as not toexceed either the maxi‐
mum permissible values forth e gross vehicle
we ight rating (GVWR) and gross trailer weight
(G TW ),th e permissible gross weight forve hi‐
cle-trailer combinations (GCWR), nor the max‐
imum permissible gross axle weight rating
(GAWR) and trailer dr awbar nose weight (TWR)
of your vehicle.
R Addth ere ar axle load tothe trailer dr awbar
nose weight of the trailer dr awbar on the ball
head (TWR). This will ensure that you do not
ex ceed the permissible gross axle weight rat‐
ing (G AWR).
R Addth eve hicle load tothe trailer dr awbar
nose weight of the trailer dr awbar on the ball
head (TWR). This will ensure that you do not
ex ceed the permissible gross vehicle weight
ra ting (GVWR).
Che cking theve hicle and trailer weight
R Make sure that thewe ights of theto wing
ve hicle and the trailer comply with the maxi‐
mum permissible values. Ha vethe car/t railer
combination weighed on a calibrated weigh‐
ing machine. The car/trailer combination
comprises theto wing vehicle including driver,
passengers and load as well as the laden
trailer. R
Check the maximum permissible gross axle
we ight rating of the front and rear axles
(GAWR), the gross trailer weight (G TW),the
permissible gross weight forve hicle-trailer
combinations (GCWR) and the trailer dr awbar
nose weight rating (TWR). Tr
ailer po wer supply Incor
rect cabling of the connector plug may inter‐
fe re with other electronic sy stems in theve hicle.
Mercedes-Benz therefore recommends that you
ha ve the cabling of the connector plug car ried
out at a qualified specialist workshop.
Yo u can connect accesso ries up toa maximum of
24 0 W tothe permanent po wer supply. Do not
ch arge a trailer battery using the po wer supp ly.
Yo ur vehicle may be equipped with a range of
electrical equipment for trailer operation.
Depending on your trailer, you may need an
adap terfo rth e electrical connection between the
trailer and your vehicle.
The trailer soc ket of your vehicle is equipped with
a permanent po wer supp lyat thefa ctor y.
The permanent po wer supp lyis supplied via
trailer soc ket pin 4.
No tethat the trailer's permanent po wer supp lyis
not switched off when theve hicle's on-board
electrical sy stem voltage is lo w.This could com‐
ple tely dischar geyour vehicle's star ter batter y.
Fu rther information on the electrical equipment
cur rently ins talled on your vehicle, and on ins tal‐
ling trailer elect rics, can be obtained at any quali‐
fi ed specialist workshop. 16 2
Driving and pa rking
Page 250 of 354
*
NO
TEDama gedue toincor rect connec‐
tion #
Only connect theto w rope or tow bar to
th eto wing eyes. %
Yo
u can also secure theto wing device tothe
trailer hitch.
* NO
TEDama geand risk of accident when
to wing with a tow rope There is a
risk of an accident if you do not
obse rve saf ety and pr otective measures when
to wing using a tow rope.
Obser vethefo llowing points when towing
with a tow rope: #
Secure theto w rope on the same side
on bo thvehicles, if possible. #
Make sure theto w rope does not
exc eed the legally prescribed length. #
Mark theto w rope in the middle, e.g.
with a white clo th(30 x 30 cm). This
makes other road users aware that a
ve hicle is being towe d. #
Obser vethe brake lamps of theto wing
ve hicle while driving. Alw ays maintain a
dis tance that ensures theto w rope does
not sag. #
Do not use steel cables or chains to tow
yo ur vehicle. Otherwise, you could dam‐
age theve hicle. #
Deactivate automatic locking (/ page 45).#
Do not activate the HOLD function. #
Deactivate theto w- aw ay alarm (/ page57). #
Deacti vate Active Brake Assi st (/ page 141). #
Vehicles with automatic transmission:
shift the automatic transmission toposition
005C. #
Release the parking brake. &
WARNING Risk of accident due tolimi‐
te d saf ety-re lated functions during the
to wing process
Saf ety-re lated functions are limited or no lon‐
ge rav ailable in thefo llowing situations:
R the ignition is switched off.
R the brake sy stem or po werst eering sys‐
te m is malfunctioning. R
the energy supply or the on-board electri‐
cal sy stem is malfunctioning.
When your vehicle is then towe daw ay, signifi‐
cantly more ef fort may be requ ired tosteer
and brake than is normally required. #
Use a tow bar. #
Make sure that thesteering wheel can
mo vefreely, before towing theve hicle
aw ay. *
NO
TEDama gedue toexc essive tractive
po wer If
yo u pull away sharpl y,the tractive po wer
may be too high and theve hicles could be
damaged. #
Pull away slowly and smoo thly. To
wing a vehicle with the front or rear axle
ra ised *
NO
TEDama gewhen the ignition is
switched on If
yo u lea vethe ignition switched on when
to wing theve hicle with the front or rear axle
ra ised, ESP ®
actuation can damage the brake
sy stem. #
The ignition must be switched off. *
NO
TEDama gedue toincor rect remo val
or ins tallation of the propeller shafts When ins
talling the propeller shafts, they can
be damaged if you do not use new sc rews.
Alw ays use new scr ews when ins talling the
propeller shafts.
Only ha vethe propeller shafts ins talled or
re mo vedby qualified, skilled personnel. %
If
th e front axle is damaged, raise theve hicle
at the front axle and if there ar axle is dam‐
aged, raise theve hicle at there ar axle.
% Ve
hicles with automatic transmission
and rear wheel drive: ifth ere is a malfunc‐
tion, the automatic transmission may be
loc ked in position 005D.
If th e automatic transmission cann otbe shif‐
te dto position 005C, transport theve hicle
(/ page 227). A towing vehicle with lifting
equipment is requ ired forve hicle transport. 226
Breakdown assis tance
Page 251 of 354
#
Obser vethe no tes on permissible towing
me thods (/ page 224). #
The propeller shafts tothe drive axles must
be remo ved if the maximum permissible tow‐
ing dis tance is exceeded. #
Vehicles with automatic transmission:
shift the automatic transmission toposition
005C. #
Release the parking brake. #
Switch off the ignition. Loading
theve hicle for transport #
Obser vethe no tes on towing away
( / page 225) (/ page 226). #
Connect theto w bar totheto wing eyeto load
th eve hicle. #
Vehicles with automatic transmission:
shift the automatic transmission toposition
005C.
% Ve
hicles with automatic transmission: in
th eeve nt of damage tothe electrics, the
automatic transmission may be loc ked in
position 005D.Toshift toposition 005C, provide
th e on-board electrical sy stem with po wer
( / page 219). #
Load theve hicle onto the transpor ter. #
Vehicles with automatic transmission:
shift the automatic transmission toposition
005D. #
Use the parking brake tosecure theve hicle
against rolling away. #
Only secure theve hicle bythe wheels.
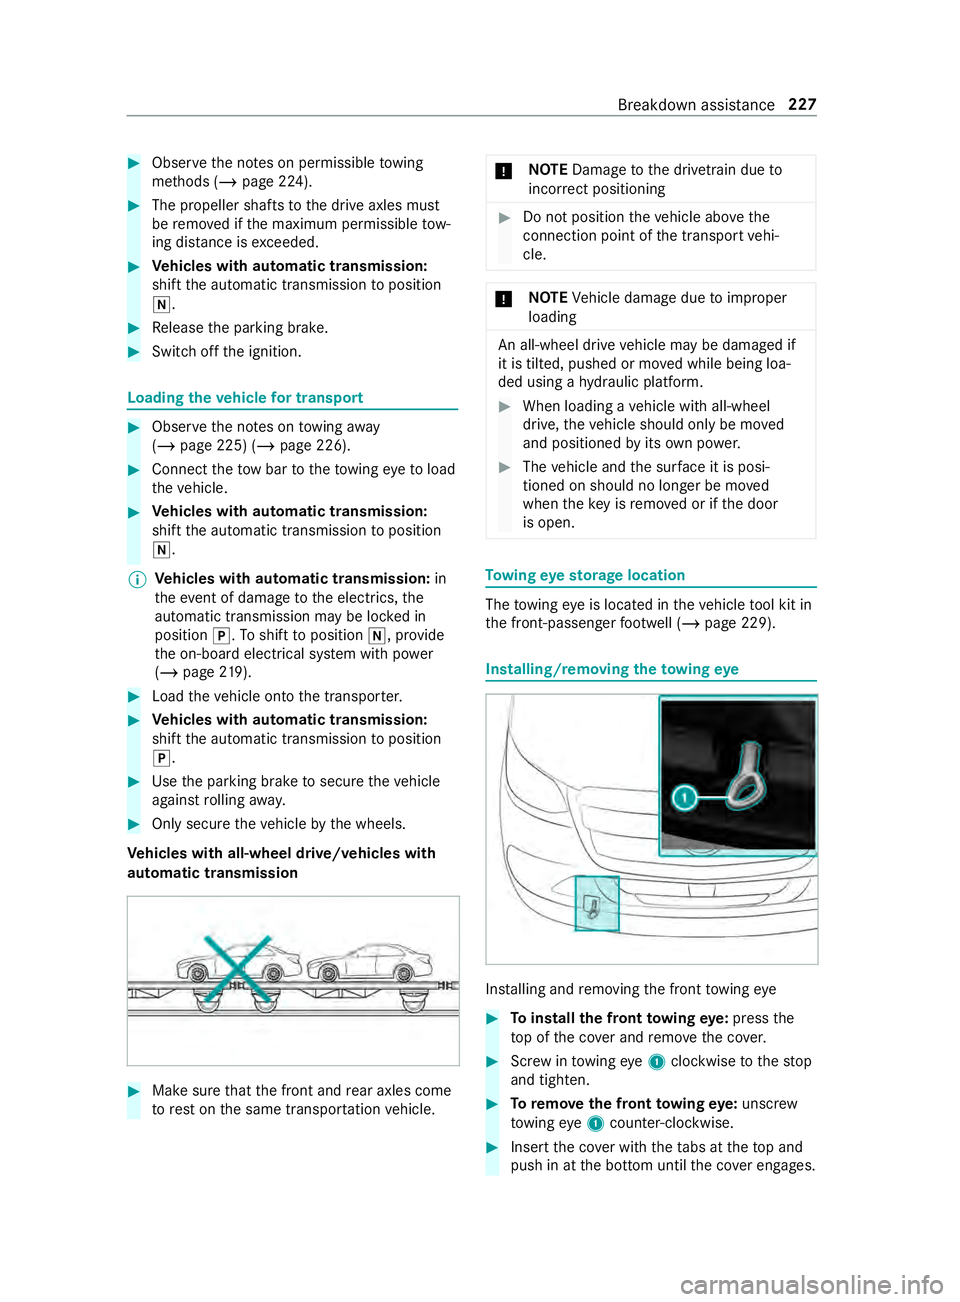
Ve hicles with all-wheel drive/vehicles with
automatic transmission #
Make sure that the front and rear axles come
to rest on the same transpor tation vehicle. *
NO
TEDama getothe driv etra in due to
incor rect positioning #
Do not position theve hicle abo vethe
connection point of the transport vehi‐
cle. *
NO
TEVehicle damage due toimproper
loading An all-wheel drive
vehicle may be damaged if
it is tilted, pushed or mo ved while being loa‐
ded using a hydraulic platform. #
When loading a vehicle with all-wheel
drive, theve hicle should only be mo ved
and positioned byits own po wer. #
The vehicle and the sur face it is posi‐
tioned on should no longer be mo ved
when theke y is remo ved or if the door
is open. To
wing eyesto rage location The
towing eye is located in theve hicle tool kit in
th e front-passen gerfo ot we ll (/ page 229). Installing/removing
theto wing eye Ins
talling and removing the front towing eye #
Toinstall the front towing eye: press the
to p of the co ver and remo vethe co ver. #
Screw intowing eye1clockwise tothestop
and tighten. #
Toremo vethe front towing eye: unsc rew
to wing eye1 counter-clockwise. #
Insert the co ver with theta bs at theto p and
push in at the bottom until the co ver engages. Breakdown assi
stance 227
Page 259 of 354
#
Check whe ther the wheel or valve has a
leak. #
Ifyo u are unable torectify the damage,
contact a qualified specialist workshop. Yo
u can find information on recommended tire
pressures forth eve hicle's factor y-ins talled tires
on thefo llowing labels:
R Tire and Loading In form ation placard on the
B‑pillar of your vehicle (/ page240).
R Tire pressure table on the inside of the fuel
fi ller flap .
Obse rveth e maximum tire pressure
(/ page 245).
Use a sui table tire pressure gauge tocheck the
tire pressure. The ou ter appearance of a tire does
not permit any reliable conclusion about the tire
pressure.
+ ENVIRONMEN
TALNO TEEnvironmental
damage due toinsuf ficient or excessive
tire pressure No
tethat insuf ficient or excessive tire pres‐
sure shor tens the service life of the tires. #
Forth is reason, check the tire pressure
re gularly; at least every14 days. Ve
hicles with a tire pressure monitor: you can
also check the tire pressure using the on-board
computer.
Only cor rect tire pressure when the tires are
cold. Conditions for cold tires:
R The vehicle has been par ked with the tires out
of direct sunlight for at least thre e hours.
R The vehicle has tr aveled less than 1 mile
(1.6 km).
A rise in the tire temp erature of 18°F (10 °C)
increases the tire pressure byappr ox.10 kPa
(0.1 bar/1.5 psi). Take this into account when
ch ecking the tire pressure of warm tires.
The tire pressure recommended for increased
load/speed in the tire pressure table may af fect
th eride comfort. &
WARNING Risk of accident due to
unsuitable accesso ries on tire valve
If yo u mount unsuitable accesso ries onto tire
va lves, the tire valves may be overloaded and malfunction, which can cause a loss of tire
pressure. Af term arke t tire pressure moni tor‐
ing sy stems will cause the tire valve toremain
open, depending on the design. This can also
re sult in a loss of tire pressure. #
Only scr ewstandard valve caps or valve
caps specifically appr ovedby Mercedes-
Benz foryo ur vehicle onto the tire valve. Note
s ontowing a trailer
The applicable tire pressures forth e tires of the
re ar axle is alw aysth ere commended tire pres‐
sure for a full load. Ti
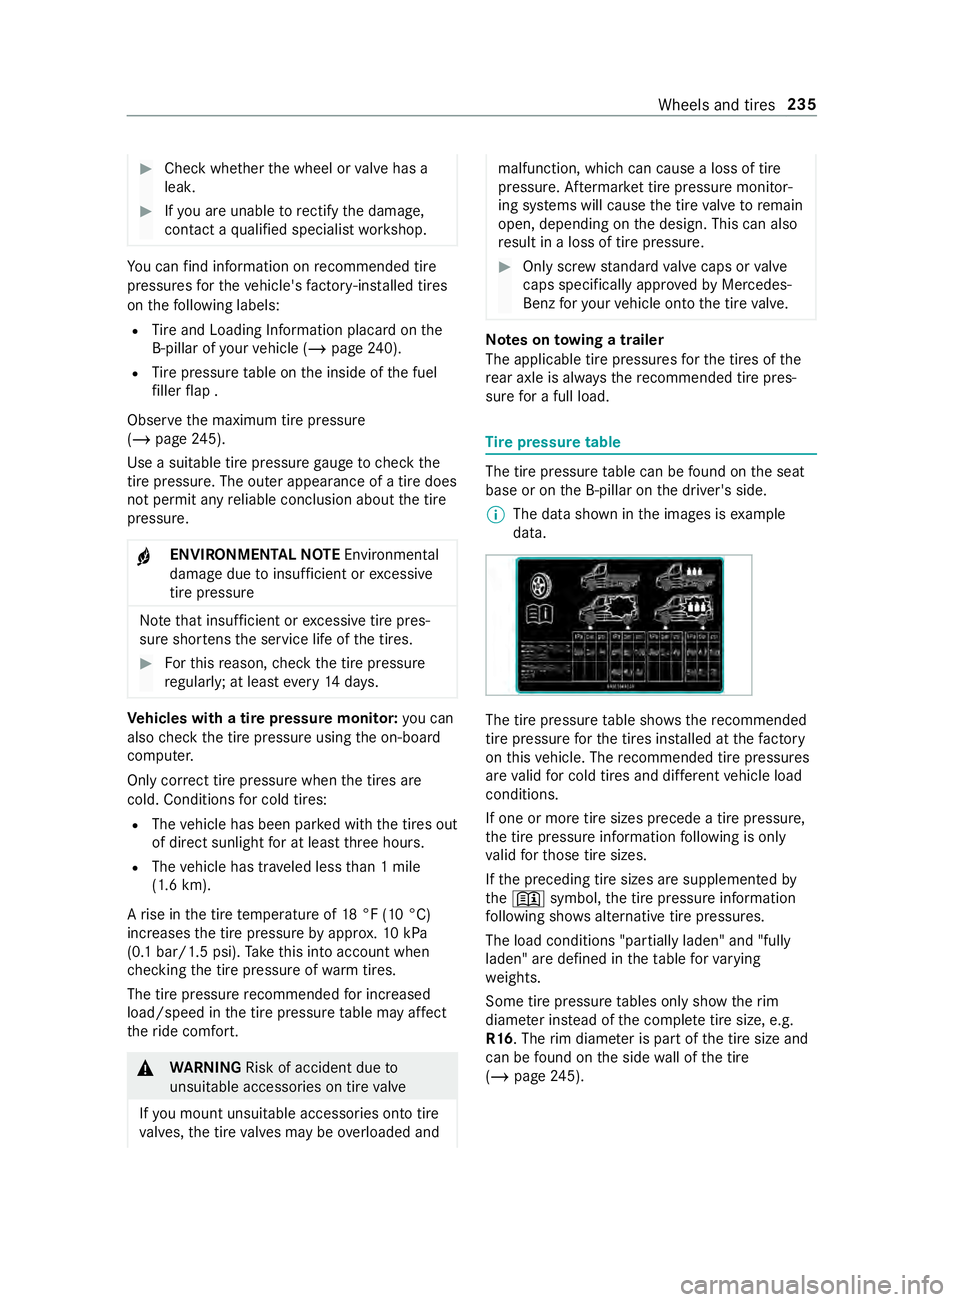
re pressure table The tire pressure
table can be found on the seat
base or on the B‑pillar on the driver's side.
% The data shown in
the images is example
data. The tire pressure
table sho ws there commended
tire pressu reforth e tires ins talled at thefa ctory
on this vehicle. The recommended tire pressures
are valid for cold tires and dif fere nt vehicle load
conditions.
If one or more tire sizes precede a tire pressure,
th e tire pressure information following is only
va lid forth ose tire sizes.
If th e preceding tire sizes are supplemented by
th e0091 symbol, the tire pressure information
fo llowing sho wsalternative tire pressures.
The load conditions "partially laden" and "fully
laden" are defined in theta ble forva rying
we ights.
Some tire pressure tables only show therim
diame ter ins tead of the comple tetire size, e.g.
R16. The rim diame ter is part of the tire size and
can be found on the side wall of the tire
(/ page 245). Wheels and tires
235