2019 MERCEDES-BENZ SPRINTER heating
[x] Cancel search: heatingPage 26 of 354

Symbols
..................................................... 4At
agl ance ................................................. 6
Cockpit ........................................................ 6
Instrument clus ter ....................................... 7
Overhead control panel ............................. 10
Door control panel .................................... .14
Emergencies and breakdowns ................... 16Genera
l notes.......................................... 18
Environmental pr otection .......................... 18
Mercedes-Benz Genuine Parts ...................18
Information about attachments, add-
on equipment, ins tallations and con‐
ve rsions .................................................... .19
Operating Instructions ...............................20
Service and vehicle operation ...................20
Operating saf ety ........................................ 21
Declarations of conformity ........................ 22
Diagno stics connection ............................ .22
No tes on changes tothe engine output ..... 23
Qualified specialist workshop .................... 23
Ve hicle registration ................................... 23
Cor rect use of theve hicle .........................23
Multi Purpose Vehicle ................................ 24
Information on problems with your
ve hicle .......................................................24
Re porting saf ety defects ............................ 24
Limited Warranty ...................................... .24
QR codes forre scue card .......................... 24
Data storage ..............................................25
Copyright .................................................. .27Occupant saf
ety...................................... 28
Re stra int sy stem ........................................28
Seat belts .................................................. 30
Airbags ...................................................... 32
Children in theve hicle ...............................34
No tes on pets in theve hicle ......................40 Opening and closing
...............................41
SmartK ey................................................... 41
Doo rs........................................................ 44
Sliding door ............................................... 45
Electrical sliding door ................................ 46
Re ar-end doors .......................................... 50
Pa rtition sliding door .................................. 51
Electrical step ............................................ 52
Side window ..............................................53
Anti-theft pr otection ..................................55 Seats and
stowage .................................. 59
Co rrect driver's seat position .................... 59
Seats ......................................................... 59
Ad justing thesteering wheel ..................... 71
St ow age areas .......................................... .72
Bottle holder .............................................. 74
Cup holder ................................................ .74
Ashtr ayand cigar ette lighter ...................... 74
Soc kets ...................................................... 75
Wi relessly charging the mobile phone
and coupling with theex terior antenna ..... 77
Ins talling or removing thefloor mats ......... 78 Light and vision
....................................... 79
Ex terior lighting ......................................... 79
Ad justing the interior lighting .................... 82
Changing bulbs .......................................... 83
Wi ndshield wipe rs..................................... 88
Mir rors ...................................................... 90
Using sun visors ........................................ 92 Climate control
....................................... 93
Overview of climate control sy stems ......... 93
Operating climate control sy stems ............ 95
Operating air vents .................................... 98
Au xilia ryheating ........................................99
Operating cargo compartment ventila‐
tion .......................................................... 102 Driving and pa
rking .............................. 103
Driving .................................................... .103
Battery main switch ................................. 11 4
Au tomatic transmission ........................... 11 5
All-wheel drive .......................................... 11 8
DSR (Downhill Speed Regulation) ............ 12 0
Electronic le vel control ............................ 121
Re fueling ................................................ .125
Pa rking .................................................... 13 2
Driving and driving sa fety sy stems ..........1 36
Wo rkmode ............................................. .156
Tr ailer operation ...................................... 157 Instrument Display and on-board
compu
ter............................................... 16 3
Overview of Instrument Display ............... 16 3
Overview of the buttons on thesteer‐
ing wheel .................................................1 64
Operating the on-board computer ........... 16 4
Overview of the displa yson the multi‐
function display ....................................... 16 5
Setting the instrument lighting ................1 662
Contents
Page 38 of 354

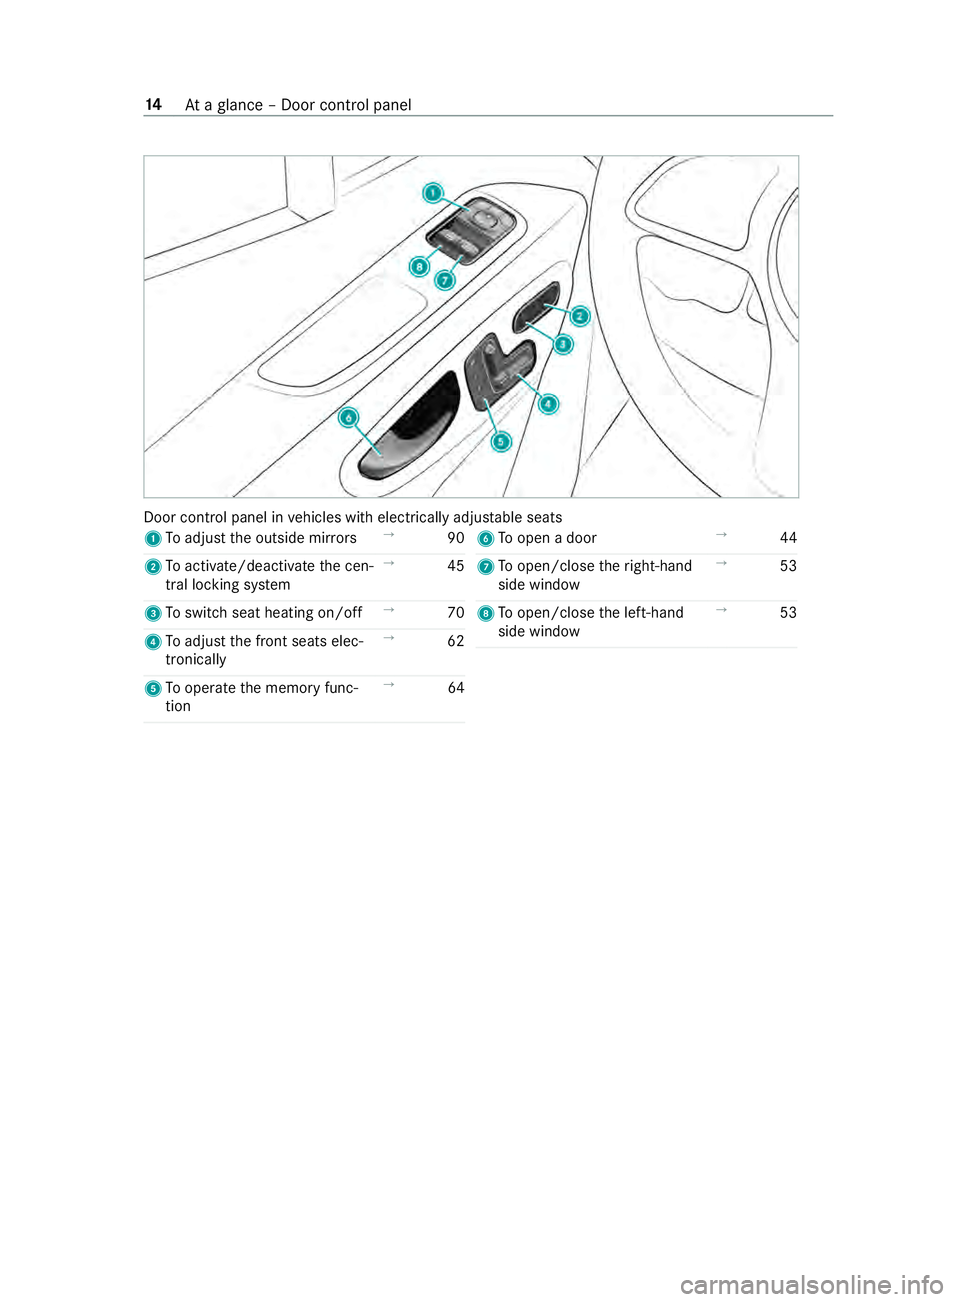
Door control panel in
vehicles with electrically adjus table seats
1 Toadjust the outside mir rors →
90
2 Toactivate/deactivate the cen‐
tral locking sy stem →
45
3 Toswitch seat heating on/off →
70
4 Toadjust the front seats elec‐
tronically →
62
5 Tooperate the memory func‐
tion →
64 6
Toopen a door →
44
7 Toopen/close theright-hand
side window →
53
8 Toopen/close the left-hand
side window →
53 14
Ataglance – Door control panel
Page 39 of 354

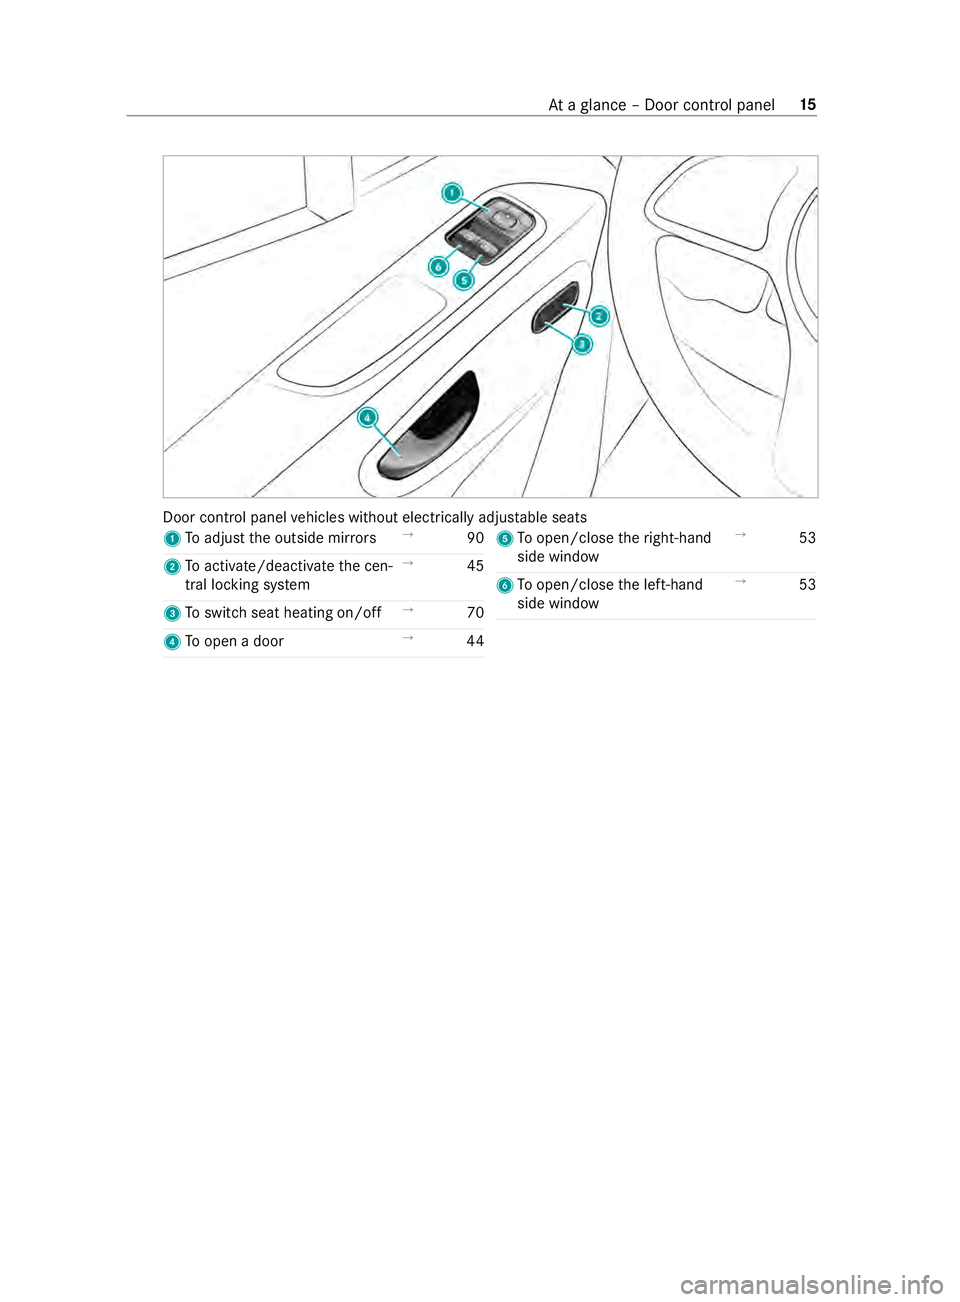
Door control panel
vehicles without electrically adjus table seats
1 Toadjust the outside mir rors →
90
2 Toactivate/deactivate the cen‐
tral locking sy stem →
45
3 Toswitch seat heating on/off →
70
4 Toopen a door →
44 5
Toopen/close theright-hand
side window →
53
6 Toopen/close the left-hand
side window →
53 At
aglance – Door control panel 15
Page 71 of 354

Yo
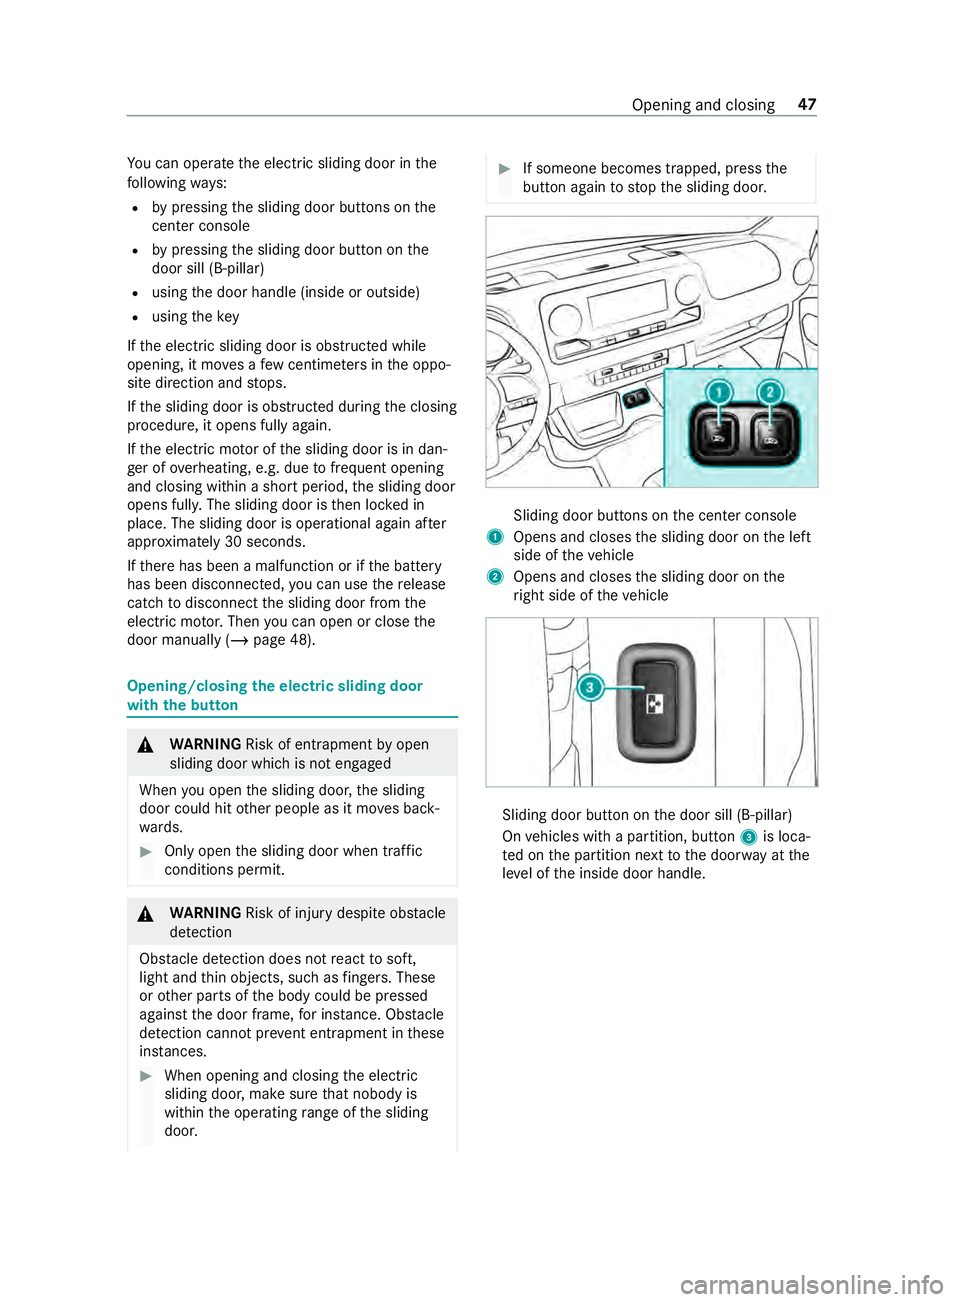
u can operate the electric sliding door in the
fo llowing ways:
R bypressing the sliding door buttons on the
center console
R bypressing the sliding door button on the
door sill (B-pillar)
R using the door handle (inside or outside)
R using thekey
If th e electric sliding door is obstructed while
opening, it mo ves a few centim eters in the oppo‐
site direction and stops.
If th e sliding door is obstructed during the closing
procedure, it opens fully again.
If th e electric mo tor of the sliding door is in dan‐
ge r of overheating, e.g. due tofrequent opening
and closing within a short period, the sliding door
opens fully. The sliding door is then loc ked in
place. The sliding door is operational again af ter
appr oximately 30 seconds.
If th ere has been a malfunction or if the battery
has been disconnected, you can use there lease
cat chtodisconnect the sliding door from the
electric mo tor.Then you can open or close the
door manually (/ page 48). Opening/closing
the electric sliding door
with the but ton &
WARNING Risk of entrapment byopen
sliding door which is not engaged
When you open the sliding door, the sliding
door could hit other people as it mo ves back‐
wa rds. #
Only open the sliding door when tra ffic
conditions permit. &
WARNING Risk of inju rydespite obs tacle
de tection
Obs tacle de tection does not react tosoft,
light and thin objects, such as fingers. These
or other parts of the body could be pressed
against the door frame, for ins tance. Obs tacle
de tection cannot pr event entrapment in these
ins tances. #
When opening and closing the electric
sliding door, make sure that nobody is
within the operating range of the sliding
door. #
If someone becomes trapped, press the
button again tostop the sliding door. Sliding door buttons on
the center console
1 Opens and closes the sliding door on the left
side of theve hicle
2 Opens and closes the sliding door on the
ri ght side of theve hicle Sliding door button on
the door sill (B-pillar)
On vehicles with a partition, button 3is loca‐
te d on the partition next tothe door way at the
le ve l of the inside door handle. Opening and closing
47
Page 94 of 354

#
Pull release handle 1forth e seat backrest
upwards and hold it in position. #
Movethe seat backrest tothe desired posi‐
tion. #
Let go of release handle 1forth e seat back‐
re st and mo vethe seat backrest slightl y.
The seat backrest engages in position. Head
restra ints Ad
justing the head restra ints manually &
WARNING Risk of inju ryfrom adju sting
th eve hicle settings while theve hicle is in
motion
Yo u could lose control of theve hicle in the
fo llowing situations:
R ifyo u adjust the driver's seat, the head
re stra int, thesteering wheel or the mir ror
while theve hicle is in motion
R ifyo ufast enyour seat belt while theve hi‐
cle is in motion #
Before starting the engine: adjust the
driver's seat, the head restra int, the
st eering wheel or the mir ror and fasten
yo ur seat belt. &
WARNING Risk of inju rydue tohead
re stra ints which are not ins talled or are
adjus ted incor rectly
If head restra ints are not ins talled or are
adjus ted incor rectly, the head restra ints can‐
not pr ovide pr otection as intended.
There is an increased risk of injury in the
head and neck area, e.g. in theeve nt of an
accident or when braking. #
Always drive with the head restra ints
ins talled. #
Before driving off, make sure forev ery
ve hicle occupant that the center of the
head restra int supports the back of the
head at about eye le vel. Do not swap
the head restra ints of the front and
re ar seats. Otherwise, you will not be able toset
th e height and inclination of the head restra ints
to the cor rect position.
Using the head restra int fore /aft adjustment,
adjust the head restra int in such a wayth at it is
as close tothe back of the head as possible. Head
restra int (e xamp le of com fort head restra int
on the driver's seat) #
Toraise: pullthe head restra int upwards into
th ere qu ired position and ensure that the
head restra int is engaged.
Only use the head restra int in the engaged
st ate. #
Tolowe r:push release button 1and slide
th e head restra int down wards into the
re qu ired position and ensure that the head
re stra int is engaged.
Only use the head restra int in the engaged
st ate. #
Tomo veforw ards: pushrelease button 2
and pull the head restra int forw ards until it
engages in there qu ired position. #
Tomo vebackwards: pushrelease button 2
and slide the head restra int backwards into
th ere qu ired position.
% Depending on
the head restra int model, indi‐
vidual adjustment options may be omit ted. Switching
the seat heating on and off &
WARNING Risk of bu rns due torepeat‐
edly switching on the seat heating
Re peatedly switching on the seat heating can
cause the seat cushion and seat backrest
padding tobecome very hot.
The health of persons with limited temp era‐
ture sensitivity or a limited ability toreact to
high temp eratures may be af fected or they
may even su ffer burn-like injuries. #
Do not repeatedly switch on the seat
heating. 70
Seats and stowage
Page 95 of 354

To
protect against overheating, the seat heating
may be temp orarily deactivated af ter it is
switched on repeatedly.
* NO
TEDama getothe seats caused by
objects or documents when the seat
heater is switched on When
the seat heater is switched on, over‐
heating can occur due toobjects or docu‐
ments placed on the seats e.g. seat cushions
or child seats. This could cause damage to
th e seat sur face. #
Make sure that no objects or docu‐
ments are on the seats when the seat
heater is switched on. Re
quirements:
R The po wer supp lyhas been switched on. #
Toswitch on: press button 1.
All indicator lamps on the button light up. #
Tolowe r the le vel:press button 1until the
re qu ired heating le vel is reached.
Depending on the heating le vel, one tothree
indicator lamps light up. #
Toswitch off: press button 1until all indi‐
cator lamps are off.
% The seat heating automatically switches back
out of
theth re e heating le vels af ter 8, 10and
20 minutes until the seat heating switches
off. Ad
justing the steering wheel &
WARNING Risk of inju ryfrom adju sting
th eve hicle settings while theve hicle is in
motion
Yo u could lose control of theve hicle in the
fo llowing situations:
R ifyo u adjust the driver's seat, the head
re stra int, thesteering wheel or the mir ror
while theve hicle is in motion
R ifyo ufast enyour seat belt while theve hi‐
cle is in motion #
Before starting the engine: adjust the
driver's seat, the head restra int, the
st eering wheel or the mir ror and fasten
yo ur seat belt. &
WARNING Risk of entrapment forch il‐
dren when adjusting thesteering wheel
Children could injure themselves if they
adjust thesteering wheel. #
Never lea vechildren unat tended in the
ve hicle. #
When leaving theve hicle, alw aysta ke
th e SmartK eywith you and lock the
ve hicle. 1
Lever
2 Steering column height
3 Steering column fore -and-aft adjustment #
Toadjust thest eering wheel: swing lever
1 down as far as it will go.
The steering wheel is unloc ked. Seats and
stowage 71
Page 99 of 354

Using
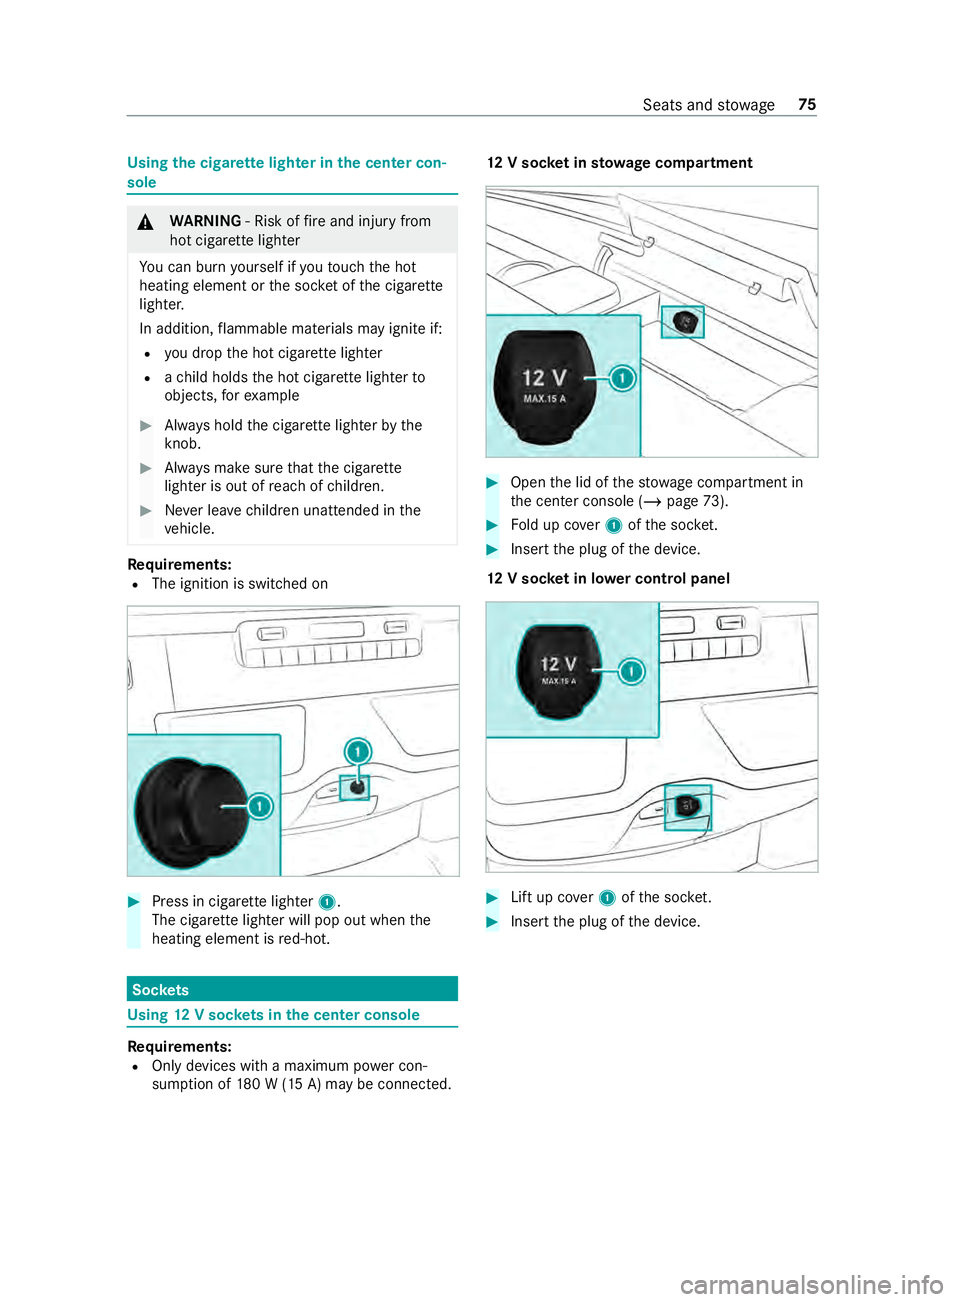
the cigar ette lighter in the center con‐
sole &
WARNING ‑ Risk of fire and injury from
hot cigar ette lighter
Yo u can burn yourself if youto uch the hot
heating element or the soc ket of the cigar ette
lighter.
In addition, flammable materials may ignite if:
R you drop the hot cigar ette lighter
R ach ild holds the hot cigar ette lighter to
objects, forex ample #
Always hold the cigar ette lighter bythe
knob. #
Always make sure that the cigar ette
lighter is out of reach of children. #
Never lea vechildren unat tended in the
ve hicle. Re
quirements:
R The ignition is switched on #
Press in cigar ette lighter 1.
The cigar ette lighter will pop out when the
heating element is red-hot. Soc
kets Using
12V so ckets in the center console Re
quirements:
R Only devices with a maximum po wer con‐
sum ption of 180 W (15 A) may be connected. 12
V so cket insto wage compa rtment #
Open the lid of thestow age compartment in
th e center console (/ page73). #
Fold up co ver1 ofthe soc ket. #
Inse rtthe plug of the device.
12 V so cket in lo wer control panel #
Lift up co ver1 ofthe soc ket. #
Inse rtthe plug of the device. Seats and
stowage 75
Page 115 of 354

st
eering wheel or the mir ror and fasten
yo ur seat belt. &
WARNING Risk of accident due tomis‐
judgment of dis tances when using the
passenger mir ror
The outside mir ror on the front-passenger
side reflects objects on a smaller scale. The
objects in view are in fact closer than they
appear.
As a result, you may misjudge the dis tance
between you and thero ad user driving behind
yo u, forex ample, when changing lanes. #
Therefore, alw ays look overyo ur shoul‐
der in order toensure that you are
aw are of the actual dis tance between
yo u and thero ad users driving behind
yo u. Ad
justing the outside mir rors manually #
Adjust the outside mir rors to the cor rect posi‐
tion manually. #
Toengage an outside mir ror that has
been pushed out of position: pushthe out‐
side mir ror into position manually.
Ad justing the outside mir rors electrically Example image
* NO
TEDama getothe electric outside
mir rors If
yo ufo ld the electric outside mir rors in or
out manuall y,yo u may damage the outside
mir rors and they will not lock in place prop‐
er ly. If
th e outside mir rors are not folded in when
wa shing theve hicle in a car wash, thewa sher
brushes may fold them in forc ibly and dam‐
age them. #
The outside mir rors must only be folded
in and out elect rical ly. #
Foldthe outside mir rors in before wash‐
ing theve hicle in a car wash. #
Before driving off, switch on the po wer supp ly
or the ignition. #
Tofold in or out: brieflypress button 2. #
Toadjus t:use button 1or3 toselect the
outside mir rorto be adjus ted. #
Set the position of the mir rorgl ass bypress‐
ing button 4. #
Toengage an outside mir ror that has
been pushed out of position: press and
hold button 2.
Yo u will hear a click and the mir ror will audi‐
bly engage in position. The outside mir ror is
set in the cor rect position.
Heating the outside mir rors #
Vehicles without a rear window defros ter:
at low temp eratures, the mir ror heating
switches on automatically when the engine is
st ar ted. #
Vehicles with a rear window defros ter: at
low temp eratures, the mir ror heater switches
on automatically when the engine is star ted.
The mir ror heater can also be switched on
to ge ther with there ar wind owdefros ter using
th ere ar wind owdefros ter button. Dimming
the inside rearview mir ror Light and vision
91