2019 MERCEDES-BENZ SPRINTER turn signal bulb
[x] Cancel search: turn signal bulbPage 108 of 354

#
Allow the component parts tocool
down before replacing the bulbs. When
you are replacing the light bulb, obser ve
th efo llowing:
R Do not use any bulb that has been dropped or
has scratches on its glass tube. Otherwise,
th e bulb may explode.
R The bulb may explode if it is hot or if you
to uch, drop or sc ratch it.
R Stains on theglass tube reduce the bulb's
service life. Do not touch theglass tube with
yo ur bare hands. If necessar y,clean theglass
tube with alcohol or spirits in a cold state and
wipe it down with a lint-f ree clo th.
R Protect bulbs from humidity and do not bring
th em into contact with liquids.
Alw ays ensure the bulbs are firm lysecured.
If yo ur vehicle is equipped with LED lamps, you
can check this as follo ws :th e light cone will mo ve
from topto bottom and back again when the
engine starts. Forth is to wo rk,th e low beam
needs tohave been switched on before the
engine is star ted.
Bulbs and lights are a major part of vehicle
saf ety. Therefore, ensure that they are alw ays
wo rking. Ha vethe headlamp setting checkedre g‐
ular ly.
R Before changing the lamps, switch off the
ve hicle's lighting sy stem. This will pr event a
sho rtcircuit.
R Use bulbs only in closed lights that ha vebeen
designed forth em.
R Use only spare bulbs of the same type and
with the cor rect voltage.
If th e new bulb also does not light up, consult a
qu alified specialist workshop. Re
placing front light bulbs (vehicles with hal‐
ogen headlamps) Overview of front bulb types
Yo
u can change thefo llowing bulbs. Halogen headlamps
1 High beam/daytime running la mps:
H15 55 W/15 W
2 Low beam/perime ter ligh t:H7 55 W/W 5 W
3 Turn signal: 3457 NAK 28 W
Changing the halogen headlamps
Re quirements:
R Low beam: light bulb type H7 55 W
R High beam/daytime running lights: light
bulb type H15 55 W/15 W
R Perime ter lights: light bulb type W 5 W
R Turn signal indicators: bulb type 3457NAK
28 W 1
Low beam/perime ter lights housing co ver
2 High beam/daytime running lights housing
co ver
3 Indicator soc ket #
Switch off the lighting sy stem. 84
Light and vision
Page 109 of 354

#
Low beam/perime ter lights: pull back
housing co ver1. #
Pull out the soc ketto wa rdsth ere ar. #
Remo vethe bulb from the soc ket. #
Inse rtthe new bulb into the soc ket su chthat
th e base of the bulb rests fully against the
base of the soc ket. #
Align and insert the soc ket. #
Attach housing co ver1. #
High beam/daytime running lights: pull
back housing co ver2. #
Turn the soc ket counter-clo ckwise and pull it
out. #
Remo vethe bulb from the soc ket. #
Inse rtthe new bulb into the soc ket su chthat
th e base of the bulb rests fully against the
base of the soc ket. #
Inse rtthe soc ket and turn it clo ckwise. #
Attach housing co ver2. #
Turn signal indicator: #
Turn soc ket3 counter-clo ckwise and
re mo veit. #
Gently turn the bulb counter-clockwise and
ta ke it out of the soc ket. #
Inse rtthe new bulb into the soc ket and turn it
clo ckwise. #
Insert soc ket3 and turn it clo ckwise.
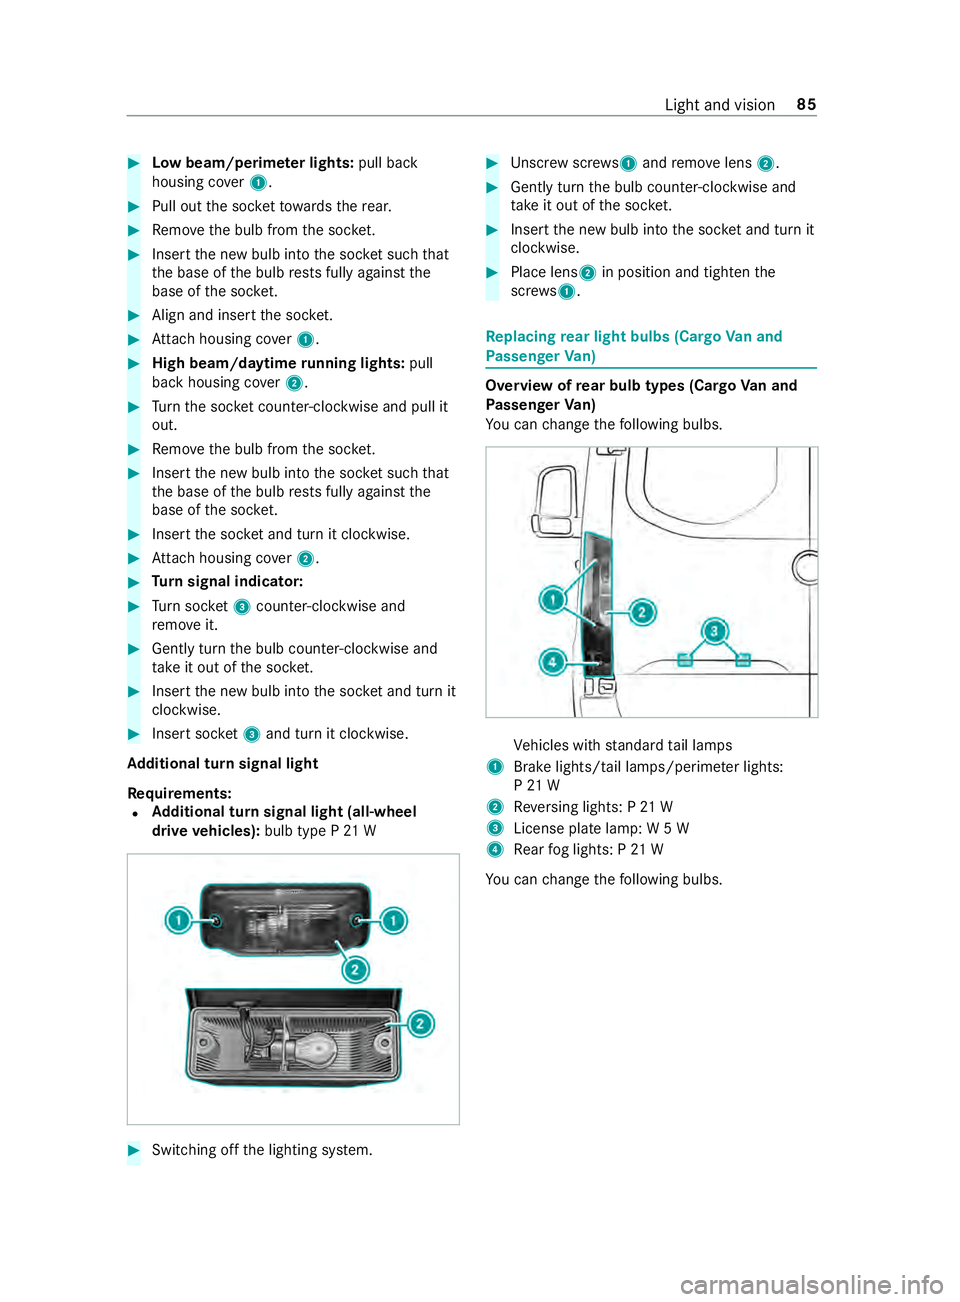
Ad ditional turn signal light
Re quirements:
R Ad
ditional turn signal light (all-wheel
drive vehicles): bulb type P 21 W #
Switching off the lighting sy stem. #
Unscr ewscrews 1and remo velens 2. #
Gently turn the bulb counter-clockwise and
ta ke it out of the soc ket. #
Inse rtthe new bulb into the soc ket and turn it
clo ckwise. #
Place lens 2in position and tigh tenthe
scr ews 1. Re
placing rear light bulbs (Cargo Van and
Pa ssenger Van) Overview of
rear bulb types (Cargo Van and
Pa ssenger Van)
Yo u can change thefo llowing bulbs. Ve
hicles with standard tail lamps
1 Brake lights/tail lamps/pe rime ter lights:
P 21 W
2 Reversing lights: P 21 W
3 License plate lamp: W 5 W
4 Rear fog lights: P 21 W
Yo u can change thefo llowing bulbs. Light and vision
85
Page 111 of 354

#
Switch off the lighting sy stem. #
Place a scr ewdriver, forex ample, at opening
2 between lamp 3and panel 1and care‐
fully pry off lamp 3. #
Remo velamp 3from panel 1. #
Rotate the bulb holder byaround 45° and
de tach it from the lamp. #
Remo vethe light bulb. #
Insert the new bulb into the bulb holder. #
Insert the bulb holder into the lamp and
ro tate itby around 45°. #
Insert the lamp into the panel opening until it
engages. Re
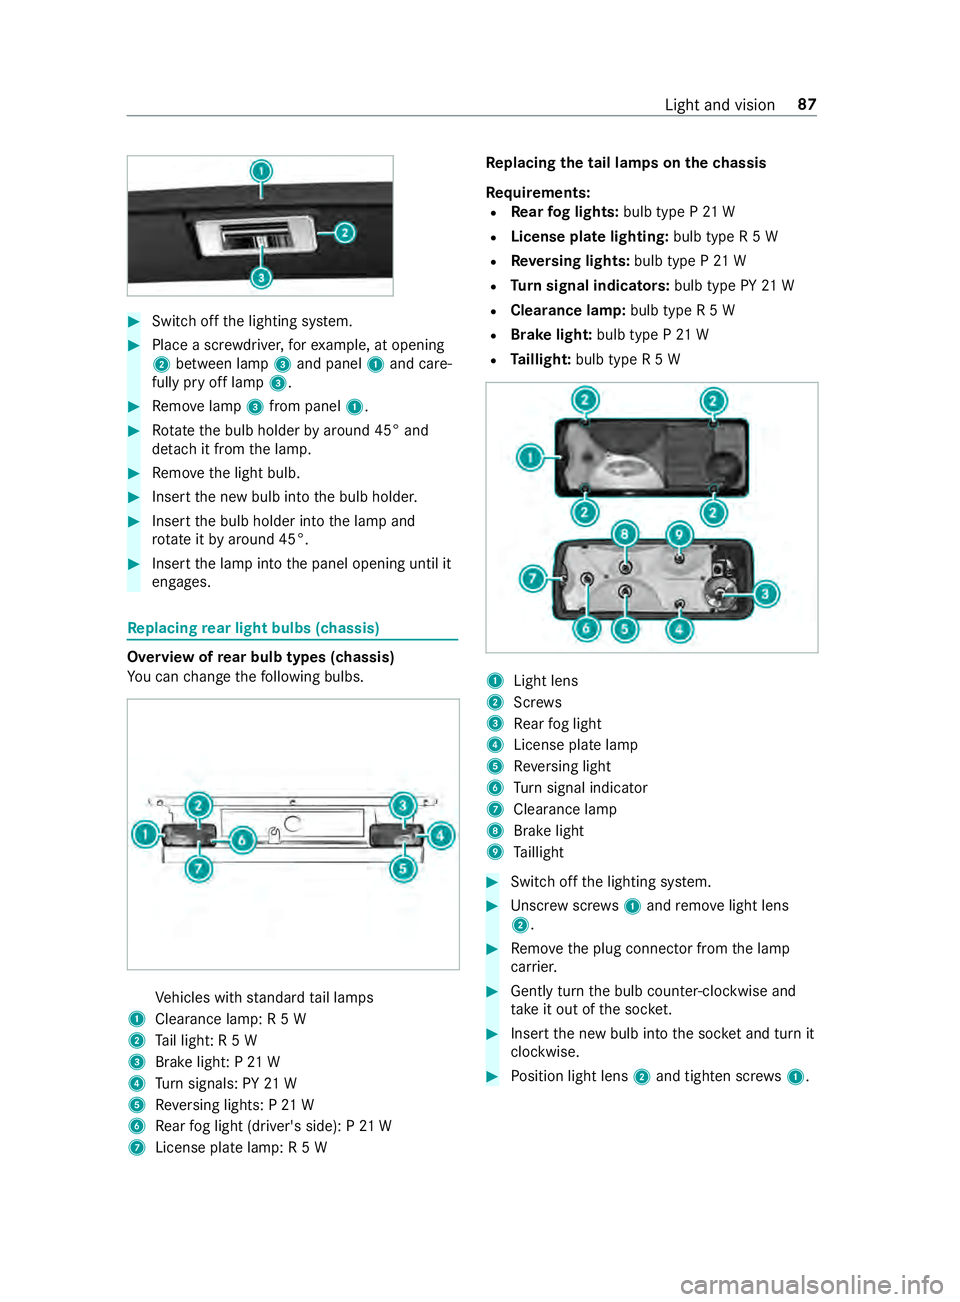
placing rear light bulbs (chassis) Overview of
rear bulb types (chassis)
Yo u can change thefo llowing bulbs. Ve
hicles with standard tail lamps
1 Clearance lamp: R 5 W
2 Tail light: R 5 W
3 Brake light: P 21 W
4 Turn signals: PY 21 W
5 Reversing lights: P 21 W
6 Rear fog light (driver's side): P 21 W
7 License plate lamp: R 5 W Re
placing the tail lamps on the chassis
Re quirements:
R Rear fog lights: bulb type P 21 W
R License pla telighting: bulb type R 5 W
R Reversing lights: bulb type P 21 W
R Turn signal indicators: bulb type PY21 W
R Clearance lamp: bulb type R 5 W
R Brake light: bulb type P21 W
R Taillight: bulb type R 5 W 1
Light lens
2 Screws
3 Rear fog light
4 License plate lamp
5 Reversing light
6 Turn signal indicator
7 Cleara nce lamp
8 Brake light
9 Taillight #
Swit choff the lighting sy stem. #
Unscr ewscrews1 and remo velight lens
2. #
Remo vethe plug connector from the lamp
car rier. #
Gently turn the bulb counter-clockwise and
ta ke it out of the soc ket. #
Inse rtthe new bulb into the soc ket and turn it
clo ckwise. #
Position light lens 2and tighten scr ews1. Light and vision
87
Page 320 of 354

Display messages
Possible causes/consequences and 0050 0050Solutions
Adaptive Highbeam
Assist Currently Unavail-
able See Operator's Man-
ual *A
daptive Highbeam Assist is temp orarily una vailable.
The sy stem limits ha vebeen reached (/ page81). #
Continue driving.
When the causes ha vebeen eliminated, the sy stem will be avail‐
able again. The display message Adaptive Highbeam Assist Now
Available appears.
Adaptive Highbeam
Assist Inoperative *A
daptive Highbeam Assist is malfunctioning. #
Visit a qualified specialist workshop.
0049
Switch On Headlamps *Y
ou are driving without a low beam. #
Turn the light switch toposition 0058.
or #
Turn the light switch tothe0058 position.
0049
Switch Off Lights *Y
ou are leaving theve hicle and the light is still switched on. #
Turn the light switch toposition 0058.
0049
Auto Lamp Function
Inoperative *T
he light sensor is malfunctioning. #
Visit a qualified specialist workshop.
0049
Malfunction See Opera-
tor’s Manual *T
heexterior lighting is malfunctioning. #
Visit a qualified specialist workshop.
Ve hicles with trailer hitch: a fuse may ha veblown. #
Stop in accordance with the tra ffic conditions. #
Check the fuses, and replace them if necessary(/ page 228).
0049
Check Left Low
Beam (exa mp le) *T
he bulb in question is faulty. #
Visit a qualified specialist workshop.
or #
Check whe ther changing the bulb is permitted. Indicator and
warning lamps Overview of
warning and indicator lamps When
the ignition is switched on, many sy stems
per form a self-test. Some warning and indicator
lamps may switch on or flash temp orarily during
th is time. This behavior is no cause for alarm.
These warning and indicator lamps only signal a
malfunction if they light up or flash, once the
engine has been star ted or theve hicle is in oper‐
ation. Wa
rning and indicator lamps:
0058 Low beam (/
page 79)
0060 Pa
rking light (/ page 79)
0057 High beam (/
page 80)
003E003D Tu
rn signal (/ page 80)
005E Re
ar fog light (/ page 79)
00E9 Saf
ety belt not fastened
(/ page 302)
0027 and
004D USA: Brakes (red) (/
page 297)296
Display messages and warning and indicator lamps
Page 332 of 354

Braking wi
thparking brake: .............. 108
Breaking-in no tes ............................. 105
Downhill gradient ............................. 108
Driving tips ....................................... 105
EBD (electronic brake forc e distri‐
bution) ..............................................1 39
Heavy and light loads ....................... 108
HOLD function .................................. 14 5
New brake discs and brake pads/
linings ............................................... 108
Re stricted braking ef fect (salt-trea‐
te dro ads) ........................................ .105
We tro ad sur faces ............................ 108
Brake Assi stSystem
see BAS (Brake Assi stSystem)
Brake Assistance see BAS (Brake Assi stSystem)
Brake fluid
No tes ............................................... 269
Brake forc e distribution
EBD (electronic brake forc e distri‐
bution) ..............................................1 39
Brakes New/replaced brakepads/brake
discs ................................................. 105
Breakdown Assi stance overview .......................... .16
Changing a wheel ............................ .251
Ro adside Assis tance ........................... 21
To w starting .................................... .228
To wing away ..................................... 225
Tr ansporting theve hicle ...................2 27
Breakdown see Flat tire
Breaking-in no tes ................................. 105
Bulbs Reversing light .................................... 87
Buttons Steering wheel ..................................1 64C
Call list Making a call .................................... 186
Overview .......................................... 185
Selecting options .............................. 186
Calls ...................................................... .184
Ac cepting ......................................... 184
Ac tivating functions du ring a call ...... 184
Calls with se veral participants .......... 184
Declining .......................................... 184
Ending a call .................................... .184 Incoming call during an
existing
call .................................................. .184
Making ............................................. 184
Camera see 360° Camera
see Rear view camera
Car wash
see Care
Car wash (care) .....................................2 10
Care ........................................................ 214
Car wash ...........................................2 10
Carpet .............................................. .214
Displ ay.............................................. 214
Exterior lighting ................................ 212
Headliner .......................................... 214
Matte finish ....................................... 211
Pa int ................................................ .211
Plastic trim ....................................... 214
Po we rwa sher ................................... 210
Re alwo od/trim elements ................. 214
Re ar view camera/360° Camera ...... 212
Seat belt ........................................... 214
Seat co ver ........................................ 214
Senso rs............................................ 212
Ta ilpipes ............................................ 212
Tr ailer hit ch....................................... 212
Wa shing byhand ...............................2 11
Wheels/rims .....................................2 12
Wi ndo ws ........................................... 212
Wi per blades .....................................2 12
Cargo compa rtment lighting
Motion de tector .................................. 83
Cargo co mpartment ventilation
Deactivating .....................................1 02
Setting .............................................. 102
Cargo tie-down point ............................197
Cargo tie-down points Info rm ation ...................................... .275
Carpet (care) ........................................ .214
Change bulbs Additional turn signal light (all-
wheel drive vehicles) .......................... 85
Changing a bulb see Changing bulbs
Changing a wheel Lowe ring theve hicle ........................ 254
Preparing .......................................... 251
Ra ising theve hicle ............................2 51
Re moving a wheel ............................ 253
Changing address ................................... 21308
Index