2019 MERCEDES-BENZ SPRINTER maintenance
[x] Cancel search: maintenancePage 236 of 354

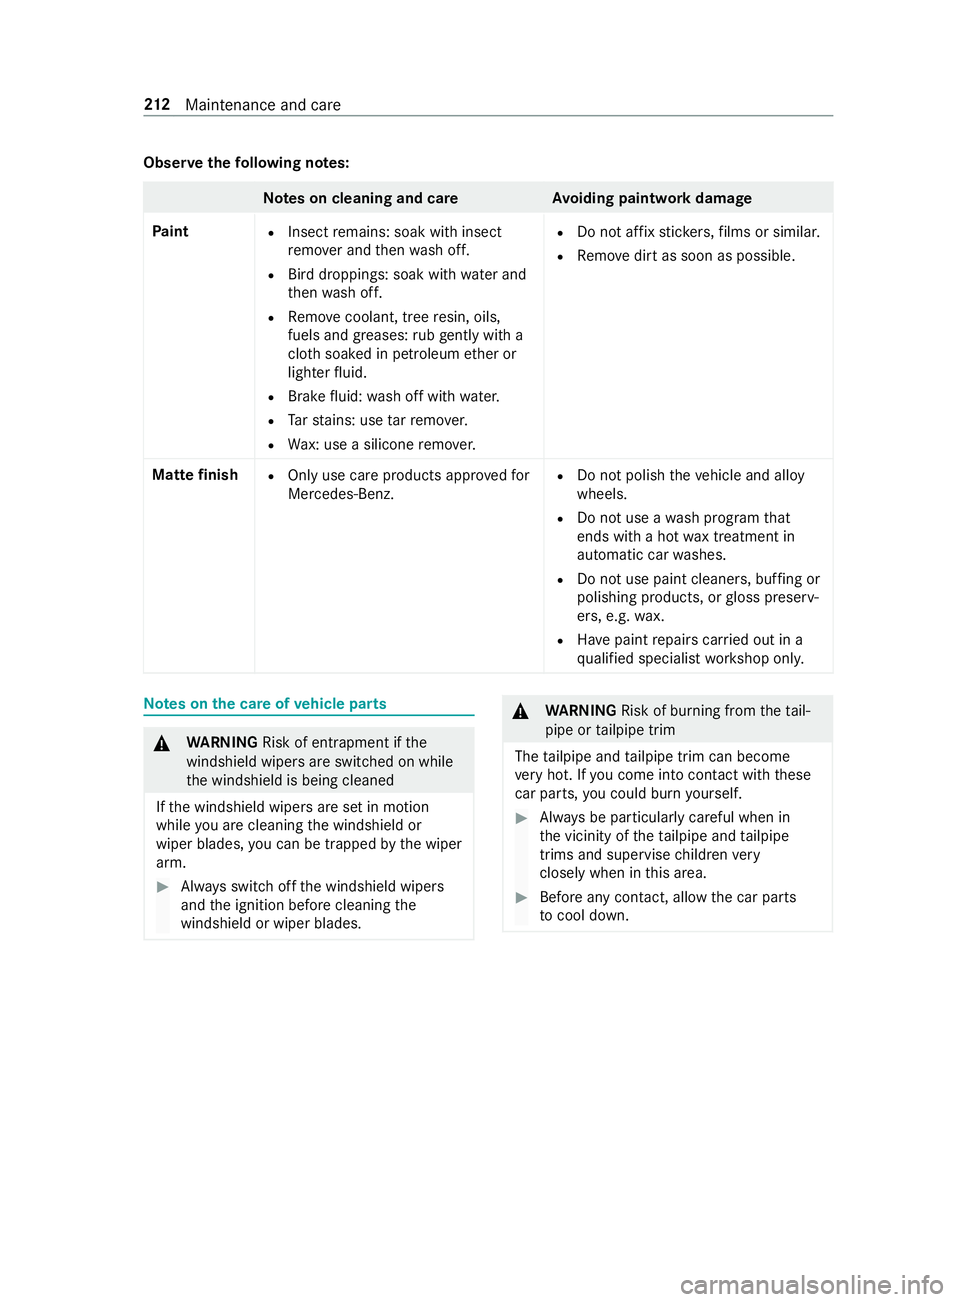
Obser
vethefo llowing no tes: Note
s on cleaning and car eAvoiding paintwork damage
Pa int
R
Insect remains: soak with insect
re mo ver and then wash off.
R Bird droppings: soak with water and
th en wash off.
R Remo vecoolant, tree resin, oils,
fuels and greases: rubge ntly wi th a
clo thsoaked in petroleum ether or
lighter fluid.
R Brake fluid: wash off with water.
R Tarst ains: use tarre mo ver.
R Wax: use a silicone remo ver. R
Do not af fix st icke rs,fi lms or similar.
R Remo vedirt as soon as possible.
Mat tefinish
R
Only use care products appr ovedfor
Mercedes-Benz. R
Do not polish theve hicle and alloy
wheels.
R Do not use a wash program that
ends with a hot wax treatment in
au tomatic car washes.
R Do not use paint cleaners, buf fing or
polishing products, or gloss preserv‐
ers, e.g. wax.
R Have paint repairs car ried out in a
qu alified specialist workshop onl y. Note
s onthe care of vehicle parts &
WARNING Risk of entrapment if the
windshield wipers are swit ched on while
th e windshield is being cleaned
If th e windshield wipers are set in motion
while you are cleaning the windshield or
wiper blades, you can be trapped bythe wiper
arm. #
Always switch off the windshield wipers
and the ignition before cleaning the
windshield or wiper blades. &
WARNING Risk of bu rning from theta il‐
pipe or tailpipe trim
The tailpipe and tailpipe trim can become
ve ry hot. If you come into con tact wi th these
car parts, you could burn yourself. #
Always be particularly careful when in
th e vicinity of theta ilpipe and tailpipe
trims and supervise children very
closely when in this area. #
Before any con tact, allow the car parts
to cool down. 212
Maintenance and care
Page 237 of 354

Obser
vethefo llowing no tes: Note
s on cleaning and car ePreve nting damage totheve hicle
Wheels/rims Usewate r and acid-free wheel cleaner. R
Do not use acidic wheel cleaners to
re mo vebrake dust. Otherwise, wheel
bolts and brake components may be
damaged.
R Toavo id cor rosion of brake discs and
brakepads, drive for a few minutes
af te r cleaning before parking the
ve hicle. The brake discs and brake‐
pads warm up and dry out.
Wi ndo ws
Clean wind owsinside and outside with a
damp clo thand with a cleaning agent
re commended for Mercedes-Benz . Do not use dry clo
ths or abrasive or sol‐
ve nt-based cleaning agents toclean the
inside of windo ws.
Wi per blades
Carefully clean thefo lded-a way wiper
blades with a damp clo th.Do not clean
the wiper blades too of ten.
Ex terior
lighting Clean
the lenses with a wet sponge and
mild cleaning agent, e.g. car sha mpoo. Only use cleaning agents or clo
ths suita‐
ble for plast ic lenses.
Sensors Cleanthe sensors in the front and rear
bumper and in thera diator grill with a
soft clo thand car shampoo. When using a po
werwa sher, keep a min‐
imum dis tance of 11.8 in (30 cm).
Re ar view
camera and
360° Cam‐
era Use clean
water and a soft clo thtoclean
th e camera lens. Do not use a po
werwa sher.
Tr ailer hitch
R
Remo vetraces of rust on the ball,
e.g. with a wire brush.
R Remo vedirt with a lint-free clo th.
R After cleaning, lightly oil or grease
th e ball head.
R Obser vethe no tes on care in the
trailer hitch manufactu rer's operat‐
ing instructions. Do not clean
the ball neck with a po wer
wa sher or sol vent.
Sliding door R
Remo vefore ign objects from the
vicinity of the contact plates and
contact pins of the sliding door.
R Clean the contact plates and contact
pins with a mild cleaning agent and a
soft clo th. Do not oil or grease
the contact plates
and the contact pins. Maintenance and care
213
Page 238 of 354

Note
s on cleaning and car ePreve nting damage totheve hicle
Ste ps
R
Clean the electrically operated steps
and their housing with a po wer
wa sher.
R After cleaning, spr aythe lateral
guides with silicone spr ay.
R Clean thesteps in the bumper with a
po we rwa sher. Do not use oil or grease as a lubricant.
Aluminum
dropsides R
Brush down the aluminum dropsides
with water and a neutral or mild alka‐
line cleaning agent. Do not use abrasive cleaning agents
to
clean the dropsides. Note
s on interior care &
WARNING Risk of inju ryfrom pla stic
parts breaking off af terth e use of sol‐
ve nt-based care products
Ca reand cleaning products con taining sol‐
ve nts can cause su rfaces in the cockpit to
become porous.
When the airbags are deplo yed, plastic parts
may break away. #
Do not use any care or cleaning prod‐
ucts containing sol vents toclean the
cockpit. &
WARNING Risk of inju ryor death from
bleached seat belts
Bleaching or dyeing seat belts can se verely
we aken them.
This can, forex ample, cause seat belts totear
or fail in an accident. #
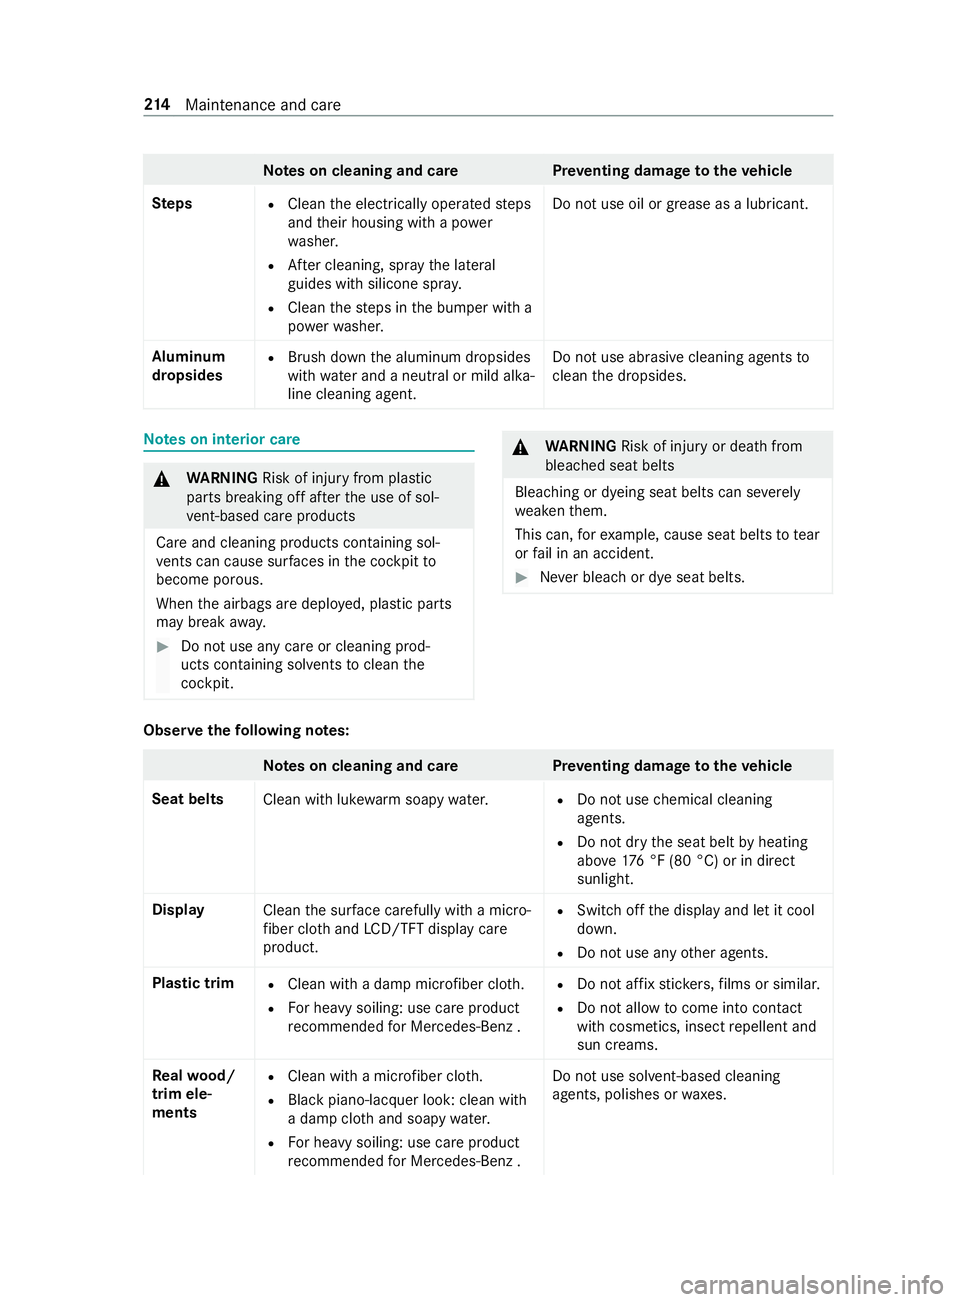
Never blea chor dye seat belts. Obser
vethefo llowing no tes: Note
s on cleaning and car ePreve nting damage totheve hicle
Seat belts Clean with lukewarmsoapy water. R
Do not use chemical cleaning
agents.
R Do not dry the seat belt byheating
abo ve176 °F (80 °C) or in direct
sunlight.
Display Cleanthe sur face carefully wi tha mic ro‐
fi ber clo thand LCD/TFT displ aycare
product. R
Switch off the display and let it cool
down.
R Do not use any other agents.
Plastic trim R
Clean with a damp microfiber clo th.
R For heavy soiling: use care product
re commended for Mercedes-Benz . R
Do not af fix st icke rs,fi lms or similar.
R Do not allow tocome into contact
wi th cosmetics, insect repellent and
sun creams.
Re alwo od/
trim ele‐
ments R
Clean with a mic rofiber clo th.
R Blackpiano-lacquer look: clean with
a damp clo thand soapy water.
R For heavy soiling: use care product
re commended for Mercedes-Benz . Do not use sol
vent-based cleaning
agents, polishes or waxes. 214
Maintenance and care
Page 239 of 354

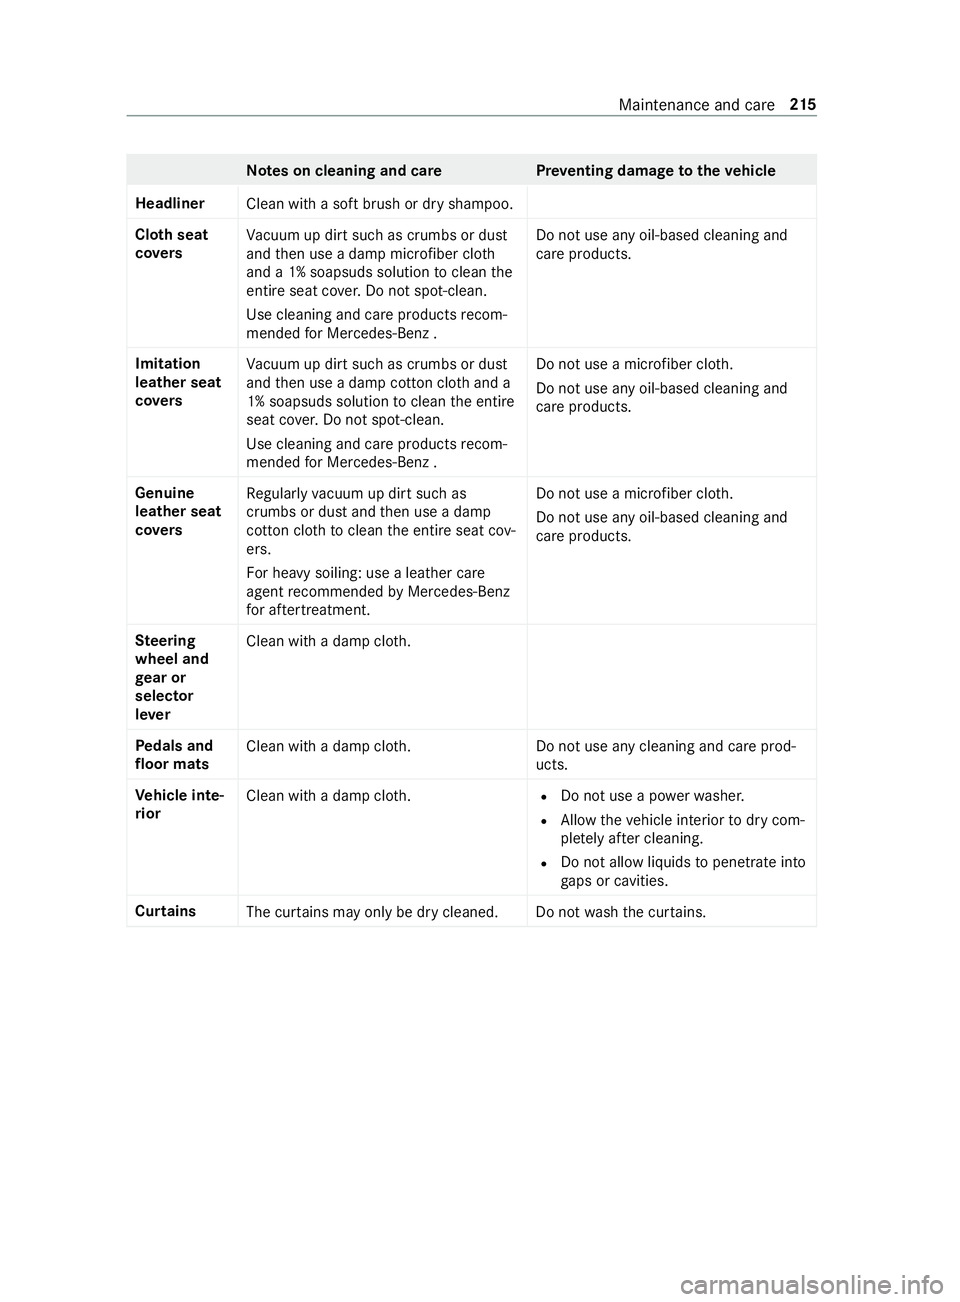
Note
s on cleaning and car ePreve nting damage totheve hicle
Headliner Clean with a soft brush or dry shampoo.
Clo thseat
co vers Va
cuum up dirt such as crumbs or du st
and then use a damp microfiber clo th
and a 1% soapsuds solution toclean the
entire seat co ver.Do not spot-clean.
Use cleaning and care products recom‐
mended for Mercedes-Benz . Do not use any oil-based cleaning and
care products.
Imitation
leather seat
co vers Va
cuum up dirt such as crumbs or du st
and then use a damp cotton clo thand a
1% soapsuds solution toclean the entire
seat co ver.Do not spot-clean.
Use cleaning and care products recom‐
mended for Mercedes-Benz . Do not use a microfiber clo
th.
Do not use any oil-based cleaning and
care products.
Genuine
leather seat
co vers Re
gular lyvacuum up dirt such as
crumbs or du stand then use a damp
cotton clo thtoclean the entire seat cov‐
ers.
Fo r heavy soiling: use a leath er care
agent recommended byMercedes-Benz
fo r af tertre atment. Do not use a mic
rofiber clo th.
Do not use any oil-based cleaning and
care products.
Ste ering
wheel and
ge ar or
selecto r
le ver Clean with a damp clo
th.
Pe dals and
floo r mats Clean wi
tha damp clo th.D o not use any cleaning and care prod‐
ucts.
Ve hicle inte‐
ri or Clean with a damp clo
th.R
Do not use a po werwa sher.
R Allow theve hicle interior todry com‐
ple tely af ter cleaning.
R Do not allow liquidstopenetra teinto
ga ps or cavities.
Curtains The curtains may only be dry cleaned. Do not wash the cur tains. Maintenance and care
215
Page 254 of 354

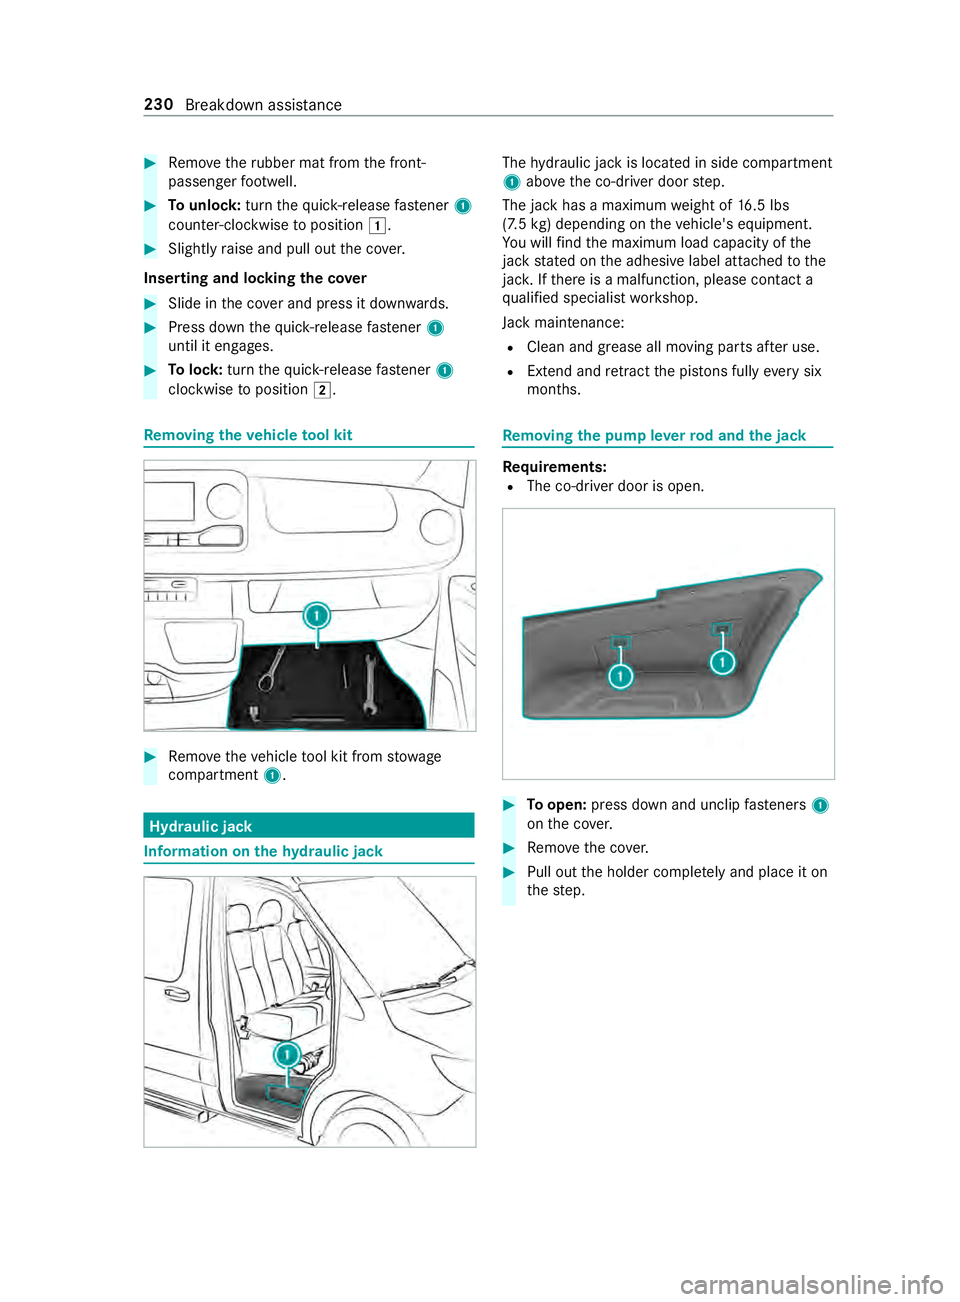
#
Remo vetheru bber mat from the front-
passenger foot we ll. #
Tounlo ck:turn thequ ick- re lease fastener 1
counter-clockwise toposition 0047. #
Slightly raise and pull out the co ver.
Inserting and locking the co ver #
Slide in the co ver and press it down wards. #
Press down thequ ick- re lease fastener 1
until it engages. #
Tolock: turnthequ ick- re lease fastener 1
clockwise toposition 0048. Re
moving the vehicle tool kit #
Remo vetheve hicle tool kit from stowage
compartment 1. Hyd
raulic jack Information on
thehy draulic jack The
hydraulic jack is located in side compartment
1 abo vethe co-driver door step.
The jack has a maximum weight of 16.5 lbs
(7.5 kg) depe nding on theve hicle's equipment.
Yo u will find the maximum load capacity of the
jack stated on the adhesive label attached tothe
jac k.Ifth ere is a malfunction, please contact a
qu alified specialist workshop.
Jack maintenance:
R Clean and grease all moving parts af ter use.
R Extend and retract the pis tons ful lyeve rysix
months. Re
moving the pump le verro d and the jack Re
quirements:
R The co-driver door is open. #
Toopen: press down and unclip fasteners 1
on the co ver. #
Remo vethe co ver. #
Pull out the holder comple tely and place it on
th estep. 230
Breakdown assis tance
Page 262 of 354

Re
ar axle tire pressures on vehicles with rear wheel drive and Super Single tires
Max. rear axle load 7055 lbs (3200 kg)Ti
re s/disc wheel Vehicle load Max.rear axle load
7055 lbs (3200 kg)
225/75R16C 121/120R (122L) Fully laden
690 kPa (6.9 bar/100 psi)3)
285/65R16C 131R Fully laden 460 kPa (4.6 bar/67 psi)Max.
rear axle load 7716 lbs (3500 kg) Ti
re s/disc wheel Vehicle load Max.rear axle load
77 16 lbs (3500 kg)
225/75R16C 121/120R (122L) Fully laden
690 kPa (6.9 bar/100 psi)3)
285/65R16C 131R Fully laden 520 kPa (5.2 bar/75 psi)3)
Va lid touse for a short time as a spare wheel
on there ar axle for a maximum dis tance of
62 miles (100 km) and a maximum speed of
34 mph (55 km/h).
Be sure toalso obse rveth efo llowing fur ther rela‐
te d subjects:
R Notes on tire pressure (/ page 234)
R Tire and Loading In form ation placard
(/ page 240)
R Maximum tire pressure (/ page 245) Ti
re pressure moni tor Fu
nction of tire pressure monitor on single
tires &
DANG ER Risk of accident due toincor‐
re ct tire pressure
Every tire, including the spare (if pr ovided),
should be checked when cold at least once a
month and inflated tothe pressure recom‐
mended bytheve hicle manufacturer (see Tire
and Loading In form ation placard on the B-pil‐
lar on the driver ’sside or the tire pressure
label on the inside of the fuel filler flap of your
ve hicle). If your vehicle has tires of a dif fere nt
size than the size indicated on theTire and
Loading In form ation placard or the tire pres‐
sure table, you need todeterm ine the proper
tire pressure forth ose tires.
As an added saf etyfe ature, your vehicle has
been equipped with a tire pressure monitor‐ ing sy
stem (TPMS) that illuminates a low tire
pressure indicator lamp when one or more of
yo ur tires are significantly unde rinfla ted.
Ac cording ly, if the low tire pressure indicator
lamp lights up, you should stop and check
yo ur tires as soon as possible, and inflate
th em tothe proper pressure. Driving on a sig‐
nificant lyunde rinfla ted tire causes the tire to
ove rheat and can lead totire failure. Underin‐
fl ation also inc reases fuel consum ption and
re duces tire tread life, and may af fect the
ve hicle's handling and braking ability. Please
no te that the TPMS is not a substitute for
proper tire maintenance, and it is the driver's
re sponsibility tomaintain cor rect tire pres‐
sure, even if underinflation has not reached
th e le velto trig ger illumination of the TPMS
low tire pressure indicator lamp.
Yo ur vehicle has also been equipped with a
TPMS malfunction indicator toindicate when
th e sy stem is not operating properly. The
TPMS malfunction indicator is combined with
th e low tire pressure indicator lamp. When
th e sy stem de tects a malfunction, the indica‐
to r lamp will flash for appro ximately a minute
and then remain continuously illumina ted.
This sequence will continue upon subsequent
ve hicle start-ups as long as the malfunction
ex ists.
When the malfunction indicator is illuminated,
th e sy stem may not be able todetect or sig‐
nal low tire pressu reas intended. TPMS mal‐
functions may occur for a variet y of reasons,
including the ins tallation of incompatible 238
Wheels and tires
Page 276 of 354

Only position
the jack on the jack support points
intended forth is purpose. You could otherwise
damage theve hicle.
Impor tant no tes on using the jack:
R Only use theve hicle-specific jack that has
been tested and appr ovedby Mercedes-Benz
to raise theve hicle. If the jack is used incor‐
re ctly, it could tip over while theve hicle is
ra ised.
R The jack is designed only toraise theve hicle
fo r a short time while a wheel is being
ch anged and is not suitable for car rying out
maintenance workunder theve hicle.
R Avoid changing a wheel on uphill and downhill
slopes.
R The jack must be placed on a firm ,fl at and
non-slip sur face. If necessar y,use a lar ge,
fl at, load bearing and non-slip unde rlay.
R The base of the jack is positioned vertically
under the jack support point.
Saf ety instructions while theve hicle is raised:
R Do not put your hands or feet under theve hi‐
cle.
R Do not lie underneath theve hicle.
R Do not start the engine and do not release
th e parking brake.
R Do not open or close any doors.
Ve hicles with rear wheel drive Jack
support points
Only use the middle rod and the pump le verrod
with the largest diame terfo rth e jack as a lug
wrench extension. Only inse rtthe middle rod on
th e lug wrench, and alw ays as far as it will go.
Otherwise, thero ds could bend and deform so much
that they can no longer be used as pu mp
le ve rs forth e jac k. #
Toprepare the hydraulic jack: insertthe
th ird rod of pump le ver1 forth e jack into
th e lug wrench extension. #
Close pressure release scr ew3. #
Todo this, use theflattened section on pump
le ve r1 toturn pressure release scr ew3
clockwise tothestop.
% Do not turn pressure
release scr ew3 more
th an one or two full turns. Hydraulic fluid
could otherwise escape. #
Insert pump le ver1 with the largest rod into
th ere cess on the jack and secure byturning
it clo ckwise. #
Place the jack vertically beneath the jack sup‐
port points described belo w. Jack support point, front axle252
Wheels and tires
Page 284 of 354

Information on
technical data
The given data only applies tovehicles with
st andard equipment. Further information can be
obtained at a qualified specialist workshop. On-board electronics
Note
s onworkon the engine electronics *
NO
TES Premature wearthro ugh
improper main tenance Improper maintenance may cause
vehicle
components towe ar more quickly and the
ve hicle's operating permit may be in validated. #
Always ha vewo rkon the engine elec‐
tronics and related components car ried
out at a qualified specialist workshop. Tw
o-w ayradios In
stallation no tesfo r two-w ayradios &
WARNING Risk of accident due to
improper workon two-w ayradios
The electromagnetic radiation from two-w ay
ra dios can inter fere with the on-board elec‐
tronics if RF transmit ters are manipulated or
re trofitted inco rrectl y.
This could jeopardize the operating saf ety of
th eve hicle. #
You should ha veall workon electrical
and electronic components car ried out
at a qualified specialist workshop. &
WARNING Risk of accident from incor‐
re ct ope ration of two-w ayradios
If yo u operate two- wayra dios incor rectly in
th eve hicle, the electromagnetic radiation
could inter fere with the on-board electronics,
e.g.:
R ifth e two-w ayradio is not connected to
an exterior antenna
R ifth eex terior antenna is not cor rectly
mounted or is not of low reflection
This could jeopardies the operating saf ety of
th eve hicle. #
Have the lo w-reflection exterior antenna
ins talled at a qualified specialist work‐
shop. #
When operating two-w ayradios in the
ve hicle, alw ays connect them tothe
lo w- reflection exterior antenna. *
NO
TEInva lidation of the operating per‐
mit due tofailure tocomply wi th the
instructions for ins tallation and use The operating permit may be in
validated if the
instructions for ins tallation and use of two-
wa yra dios are not obser ved. #
Only use appr oved frequency bands. #
Obser vethe maximum permissible out‐
put po wer in these frequency bands. #
Only use appr oved antenna positions. Use
Tech nical Specification ISO/TS 21609 (Road
Ve hicles - EMC guidelines for ins tallation of af ter‐
mar ketra dio frequency transmitting equipment)
when retrofitting two-w ayradios. Comply with the
legal requirements for de tach able parts.
If yo ur vehicle has ins talling for two-w ayradio
equipment, use the po wer supp lyor antenna con‐
nections intended for use with the ins talling.
Obser vethe manufacturer's supplement during
ins tallation.
Information on two-w ayradio transmission
output
The maximum transmission outputs (PEAK) at the
base of the antenna must not exceed theva lues
in thefo llowing table:
Fr equency band and maximum transmission
output Fr
equency band Maximum transmis‐
sion output
Sho rtwa ve
3 — 54MHz 10
0 W
4 — m — waveband
74 — 88 MHz 30 W
2 — m — waveband
14 4 — 174 MHz 50 W
Tr unked radio sys‐
te m/T etra
380 — 460 MHz 10 W260
Tech nical da ta