2019 MERCEDES-BENZ GLS SUV door lock
[x] Cancel search: door lockPage 107 of 398
Always make sure that the seat and backrest
are engaged as described:
R before traveling with a passenger on a seat
with the EASY-ENTRY/EXIT feature
R after you have adjusted the seat
R after the EASY-ENTRY/EXIT feature has
been used
R after the cargo compartment enlargement
has been folded forwards G
WARNING
The seat does not engage in the entry/exit
position. The seat could fold back suddenly,
e.g. when accelerating, braking, changing
direction suddenly or in the event of an acci-
dent. Persons in the sweep of the seat could
become trapped. There is a risk of injury.
Always fold back a seat which has been folded forwards before you pull away. Make sure thatthe seat and backrest engage fully.
X To lock the seat: fold back the seat until it
engages.
X Fold back the backrest until it engages.
Folding down the seats in the second
row electrically Important safety notes
G
WARNING
If the seat and backrest are not engaged, they can fold forwards, e.g. in the event of sudden
braking or an accident.
R This will cause the vehicle occupants to be
forced into the seat belt by a seat or back-
rest which is not engaged. The seat belt can no longer offer the intended level of pro-
tection and could even cause injuries.
R A child restraint system would no longer be
anchored or positioned correctly and would not be able to perform its required function.
R The seat backrests cannot restrain objects
or loads in the cargo compartment.
There is an increased risk of injury. Always make sure that the seat and backrest
are engaged as described:
R before traveling with a passenger on a seat
with the EASY-ENTRY/EXIT feature
R after you have adjusted the seat
R after the EASY-ENTRY/EXIT feature has
been used
R after the cargo compartment enlargement
has been folded forwards G
WARNING
The seat does not engage in the entry/exit
position. The seat could fold back suddenly,
e.g. when accelerating, braking, changing
direction suddenly or in the event of an acci-
dent. Persons in the sweep of the seat could
become trapped. There is a risk of injury.
Always fold back a seat which has been folded forwards before you pull away. Make sure thatthe seat and backrest engage fully.
General notes
To enter or exit the third row of seats: the outer
left and right seats of the second row can be
folded down electrically.
One of the outer seats of the second row is in the
entry/exit position: the multifunction display
shows, e.g. the 2nd Seat Row, Right Not
2nd Seat Row, Right Not
Locked Locked display message.
If you fold the seat back until it engages, the
display message disappears.
Pull the backrest firmly to ensure that it is fully
engaged.
i Further related subjects:
R Cargo compartment enlargement (folding
the second row of seats forwards)
(Y page 298)
R Folding the seats in the third row forwards/
back (Y page 101)
Folding down the seats
The seats can be folded down electrically if the
vehicle is stationary and the respective rear
door is open. Seats
105Seats, steering wheel and mirrors Z
Page 111 of 398
Steering wheel heating
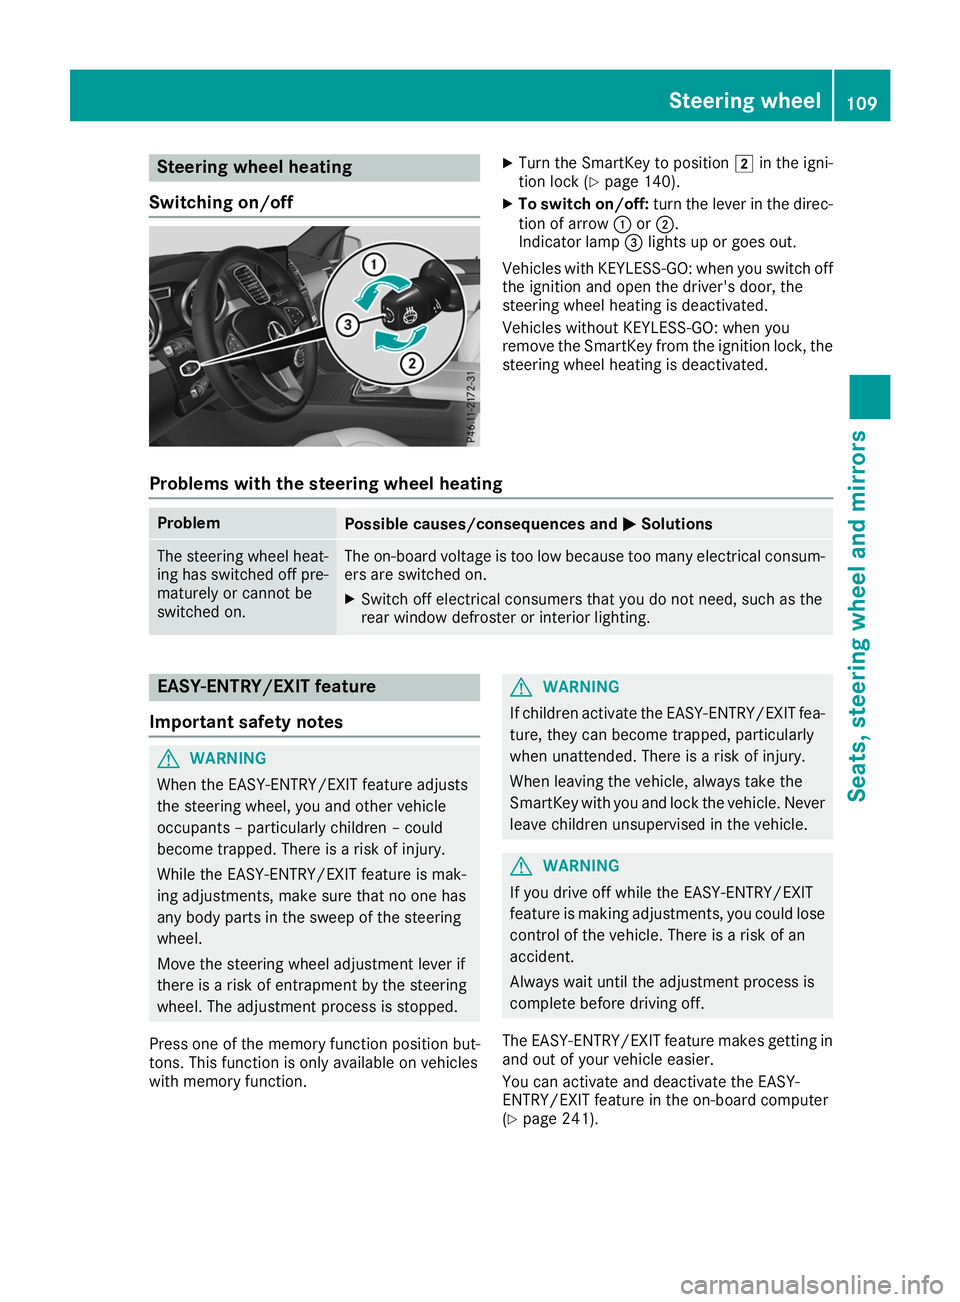
Switching on/off X
Turn the SmartKey to position 0048in the igni-
tion lock (Y page 140).
X To switch on/off: turn the lever in the direc-
tion of arrow 0043or0044.
Indicator lamp 0087lights up or goes out.
Vehicles with KEYLESS-GO: when you switch off the ignition and open the driver's door, the
steering wheel heating is deactivated.
Vehicles without KEYLESS-GO: when you
remove the SmartKey from the ignition lock, the
steering wheel heating is deactivated.
Problems with the steering wheel heating Problem
Possible causes/consequences and
0050 0050Solutions The steering wheel heat-
ing has switched off pre-
maturely or cannot be
switched on. The on-board voltage is too low because too many electrical consum-
ers are switched on.
X Switch off electrical consumers that you do not need, such as the
rear window defroster or interior lighting. EASY-ENTRY/EXIT feature
Important safety notes G
WARNING
When the EASY-ENTRY/EXIT feature adjusts
the steering wheel, you and other vehicle
occupants – particularly children – could
become trapped. There is a risk of injury.
While the EASY-ENTRY/EXIT feature is mak-
ing adjustments, make sure that no one has
any body parts in the sweep of the steering
wheel.
Move the steering wheel adjustment lever if
there is a risk of entrapment by the steering
wheel. The adjustment process is stopped.
Press one of the memory function position but-
tons. This function is only available on vehicles
with memory function. G
WARNING
If children activate the EASY-ENTRY/EXIT fea- ture, they can become trapped, particularly
when unattended. There is a risk of injury.
When leaving the vehicle, always take the
SmartKey with you and lock the vehicle. Never leave children unsupervised in the vehicle. G
WARNING
If you drive off while the EASY-ENTRY/EXIT
feature is making adjustments, you could lose
control of the vehicle. There is a risk of an
accident.
Always wait until the adjustment process is
complete before driving off.
The EASY-ENTRY/EXIT feature makes getting in
and out of your vehicle easier.
You can activate and deactivate the EASY-
ENTRY/EXIT feature in the on-board computer
(Y page 241). Steering wheel
109Seats, steering wheel and mirrors Z
Page 112 of 398
Position of the steering wheel when the
EASY-ENTRY/EXIT feature is active The steering wheel swings up when you:
R remove the SmartKey from the ignition lock.
R open the driver's door and KEYLESS-GO is in
position 0047.
R open the driver's door and the SmartKey is in
position 0092or0047 in the ignition lock.
i The steering wheel only moves up if it has
not already reached the upper stop.
Position of the steering wheel for driv-
ing The steering wheel is moved to the last selected
position when:
R the driver's door is closed
R you insert the SmartKey into the ignition lock
or
R you press the Start/Stop button once on vehi-
cles with KEYLESS-GO
When you close the driver's door with the igni-
tion switched on, the steering wheel is also
automatically moved to the previously set posi- tion.
The last position of the steering column is stored
when you:
R switch the ignition off
R save the setting with the memory function
(Y page 113).
Crash-responsive EASY-EXIT feature If the crash-responsive EASY-EXIT feature is trig-
gered in an accident, the steering column will
move upwards when the driver's door is opened.
This occurs irrespective of the position of the
SmartKey in the ignition lock. This makes it eas- ier to exit the vehicle and rescue the occupants.
The crash-responsive EASY-EXIT feature is only
operational if the EASY-EXIT/ENTRY feature is
activated in the on-board computer
(Y page 241). Mirrors
Rear-view mirror
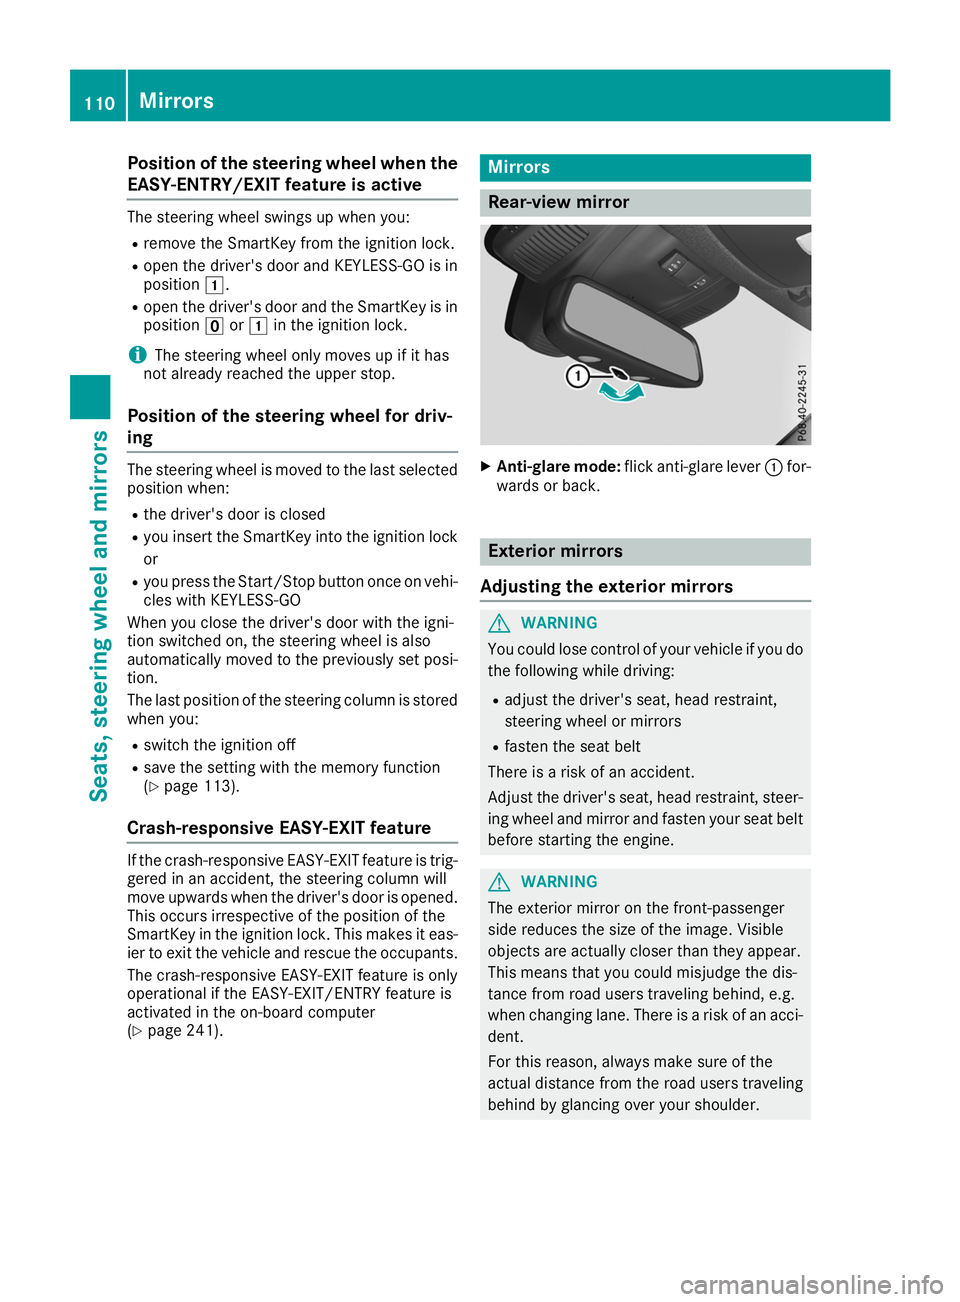
X
Anti-glare mode: flick anti-glare lever 0043for-
wards or back. Exterior mirrors
Adjusting the exterior mirrors G
WARNING
You could lose control of your vehicle if you do the following while driving:
R adjust the driver's seat, head restraint,
steering wheel or mirrors
R fasten the seat belt
There is a risk of an accident.
Adjust the driver's seat, head restraint, steer-
ing wheel and mirror and fasten your seat belt before starting the engine. G
WARNING
The exterior mirror on the front-passenger
side reduces the size of the image. Visible
objects are actually closer than they appear.
This means that you could misjudge the dis-
tance from road users traveling behind, e.g.
when changing lane. There is a risk of an acci-
dent.
For this reason, always make sure of the
actual distance from the road users traveling
behind by glancing over your shoulder. 110
MirrorsSeats, steering wheel and mirrors
Page 113 of 398
X
Turn the SmartKey to position 0047or0048 in the
ignition lock (Y page 140).
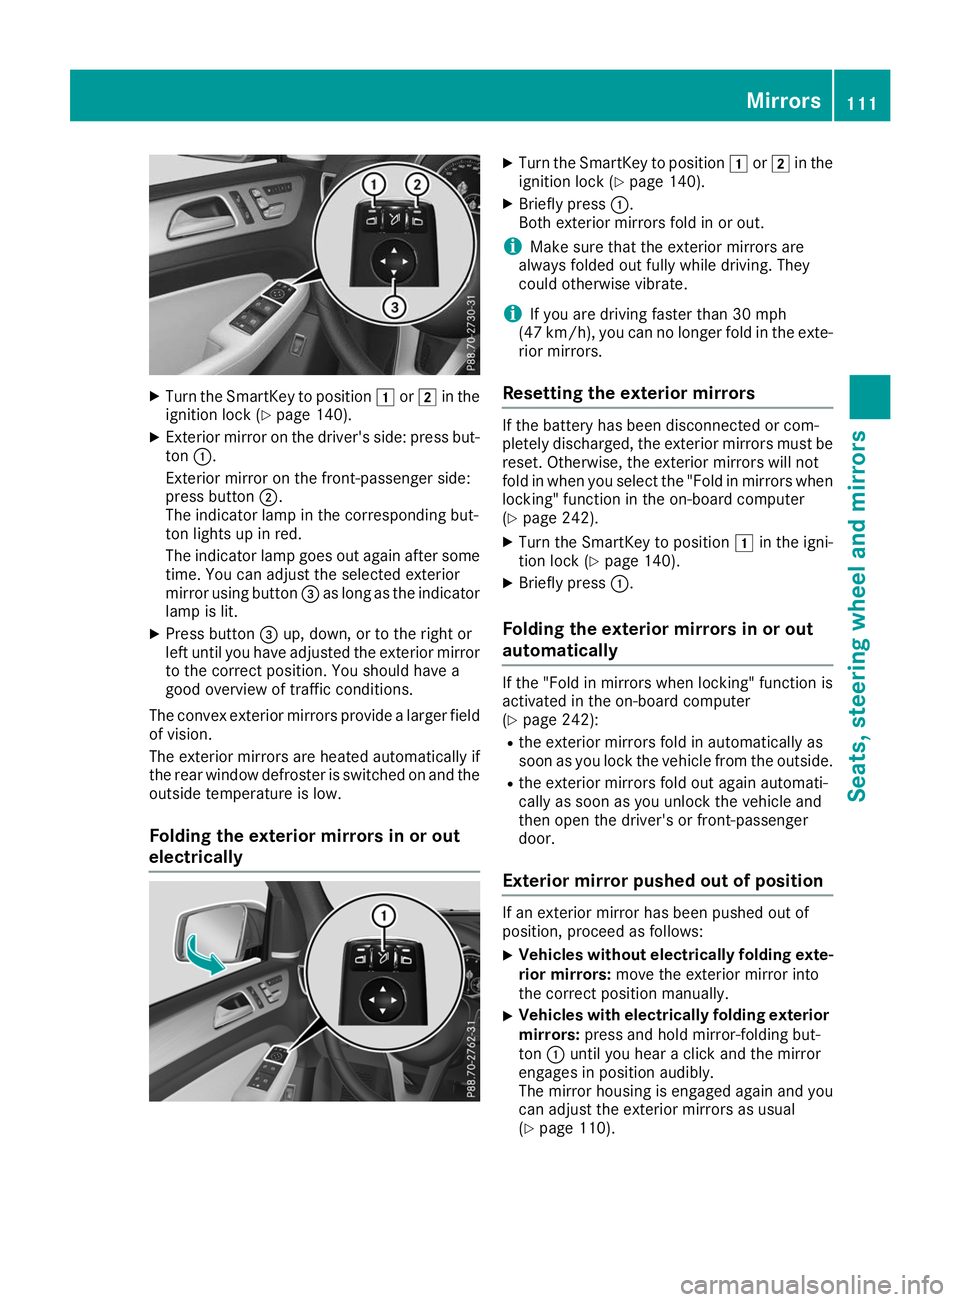
X Exterior mirror on the driver's side: press but-
ton 0043.
Exterior mirror on the front-passenger side:
press button 0044.
The indicator lamp in the corresponding but-
ton lights up in red.
The indicator lamp goes out again after some
time. You can adjust the selected exterior
mirror using button 0087as long as the indicator
lamp is lit.
X Press button 0087up, down, or to the right or
left until you have adjusted the exterior mirror
to the correct position. You should have a
good overview of traffic conditions.
The convex exterior mirrors provide a larger field of vision.
The exterior mirrors are heated automatically if
the rear window defroster is switched on and the
outside temperature is low.
Folding the exterior mirrors in or out
electrically X
Turn the SmartKey to position 0047or0048 in the
ignition lock (Y page 140).
X Briefly press 0043.
Both exterior mirrors fold in or out.
i Make sure that the exterior mirrors are
always folded out fully while driving. They
could otherwise vibrate.
i If you are driving faster than 30 mph
(47 km/h), you can no longer fold in the exte-
rior mirrors.
Resetting the exterior mirrors If the battery has been disconnected or com-
pletely discharged, the exterior mirrors must be
reset. Otherwise, the exterior mirrors will not
fold in when you select the "Fold in mirrors whenlocking" function in the on-board computer
(Y page 242).
X Turn the SmartKey to position 0047in the igni-
tion lock (Y page 140).
X Briefly press 0043.
Folding the exterior mirrors in or out
automatically If the "Fold in mirrors when locking" function is
activated in the on-board computer
(Y
page 242):
R the exterior mirrors fold in automatically as
soon as you lock the vehicle from the outside.
R the exterior mirrors fold out again automati-
cally as soon as you unlock the vehicle and
then open the driver's or front-passenger
door.
Exterior mirror pushed out of position If an exterior mirror has been pushed out of
position, proceed as follows:
X
Vehicles without electrically folding exte-
rior mirrors: move the exterior mirror into
the correct position manually.
X Vehicles with electrically folding exterior
mirrors: press and hold mirror-folding but-
ton 0043until you hear a click and the mirror
engages in position audibly.
The mirror housing is engaged again and you
can adjust the exterior mirrors as usual
(Y page 110). Mirrors
111Seats, steering wheel and mirrors Z
Page 117 of 398
Exterior lighting
General notes
For reasons of safety, Mercedes-Benz recom-
mends that you drive with the lights switched on even during the daytime. In some countries,
operation of the headlamps varies due to legal
requirements and self-imposed obligations. Setting the exterior lighting
Setting options Exterior lighting can be set using:
R the light switch
R the combination switch (Y page 116)
R the on-board computer (Y page 240)
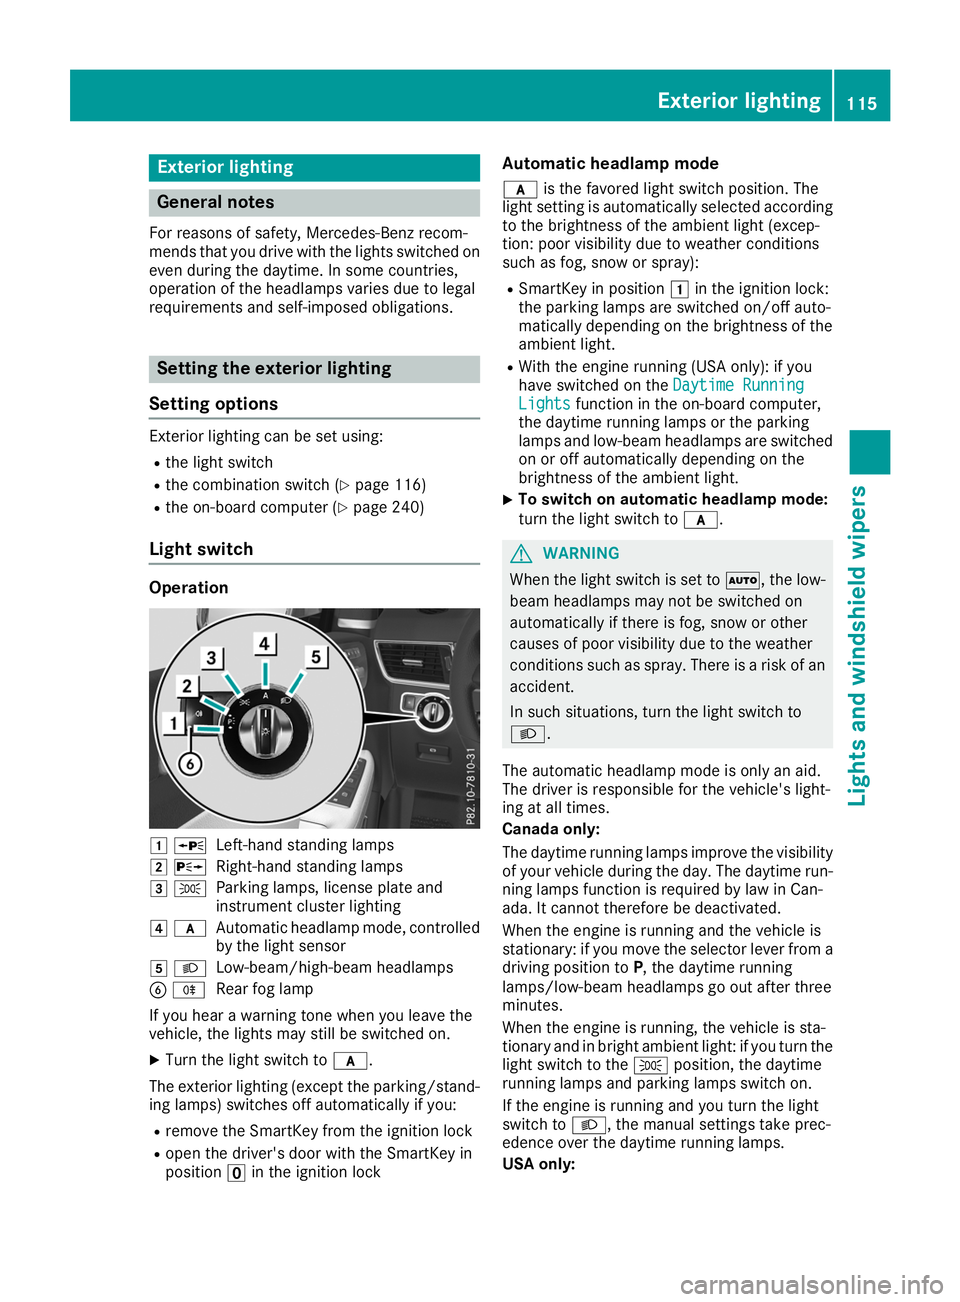
Light switch Operation
0047
0063
Left-hand standing lamps
0048 0064
Right-hand standing lamps
0049 0060
Parking lamps, license plate and
instrument cluster lighting
004A 0071
Automatic headlamp mode, controlled
by the light sensor
004B 0058
Low-beam/high-beam headlamps
0084 005E
Rear fog lamp
If you hear a warning tone when you leave the
vehicle, the lights may still be switched on.
X Turn the light switch to 0071.
The exterior lighting (except the parking/stand-
ing lamps) switches off automatically if you:
R remove the SmartKey from the ignition lock
R open the driver's door with the SmartKey in
position 0092in the ignition lock Automatic headlamp mode
0071 is the favored light switch position. The
light setting is automatically selected according
to the brightness of the ambient light (excep-
tion: poor visibility due to weather conditions
such as fog, snow or spray):
R SmartKey in position 0047in the ignition lock:
the parking lamps are switched on/off auto-
matically depending on the brightness of the
ambient light.
R With the engine running (USA only): if you
have switched on the Daytime Running
Daytime Running
Lights Lights function in the on-board computer,
the daytime running lamps or the parking
lamps and low-beam headlamps are switched on or off automatically depending on the
brightness of the ambient light.
X To switch on automatic headlamp mode:
turn the light switch to
0071. G
WARNING
When the light switch is set to 0058, the low-
beam headlamps may not be switched on
automatically if there is fog, snow or other
causes of poor visibility due to the weather
conditions such as spray. There is a risk of an
accident.
In such situations, turn the light switch to
0058.
The automatic headlamp mode is only an aid.
The driver is responsible for the vehicle's light-
ing at all times.
Canada only:
The daytime running lamps improve the visibility
of your vehicle during the day. The daytime run-
ning lamps function is required by law in Can-
ada. It cannot therefore be deactivated.
When the engine is running and the vehicle is
stationary: if you move the selector lever from a driving position to P, the daytime running
lamps/low-beam headlamps go out after three
minutes.
When the engine is running, the vehicle is sta-
tionary and in bright ambient light: if you turn the light switch to the 0060position, the daytime
running lamps and parking lamps switch on.
If the engine is running and you turn the light
switch to 0058, the manual settings take prec-
edence over the daytime running lamps.
USA only: Exterior lighting
115Lights and windshield wipers Z
Page 122 of 398
Automatic interior lighting control
X
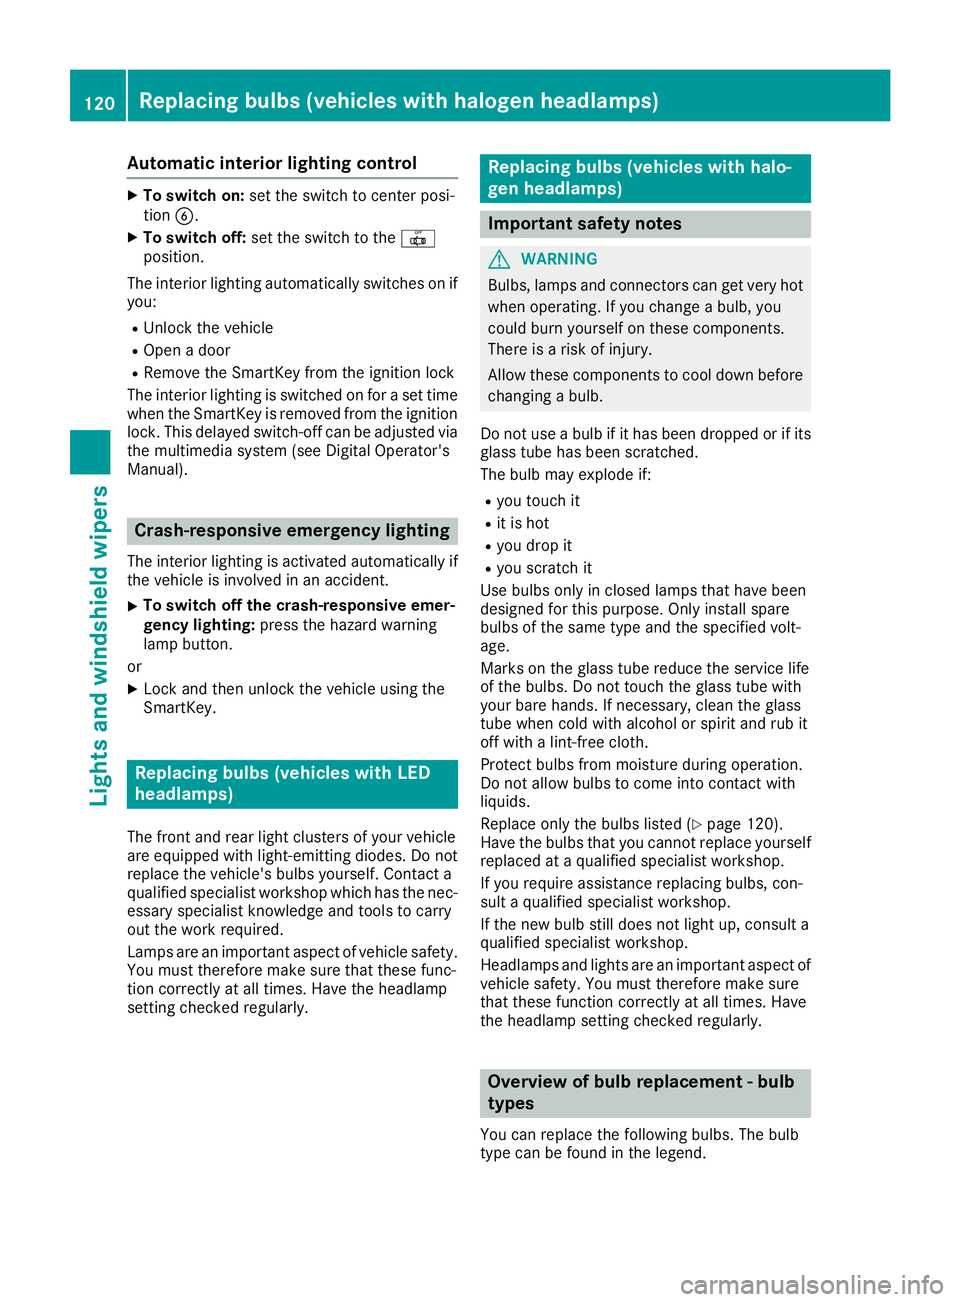
To switch on: set the switch to center posi-
tion 0084.
X To switch off: set the switch to the 0033
position.
The interior lighting automatically switches on if
you:
R Unlock the vehicle
R Open a door
R Remove the SmartKey from the ignition lock
The interior lighting is switched on for a set time
when the SmartKey is removed from the ignition
lock. This delayed switch-off can be adjusted via the multimedia system (see Digital Operator's
Manual). Crash-responsive emergency lighting
The interior lighting is activated automatically if
the vehicle is involved in an accident.
X To switch off the crash-responsive emer-
gency lighting: press the hazard warning
lamp button.
or X Lock and then unlock the vehicle using the
SmartKey. Replacing bulbs (vehicles with LED
headlamps)
The front and rear light clusters of your vehicle
are equipped with light-emitting diodes. Do not
replace the vehicle's bulbs yourself. Contact a
qualified specialist workshop which has the nec-
essary specialist knowledge and tools to carry
out the work required.
Lamps are an important aspect of vehicle safety. You must therefore make sure that these func-
tion correctly at all times. Have the headlamp
setting checked regularly. Replacing bulbs (vehicles with halo-
gen headlamps)
Important safety notes
G
WARNING
Bulbs, lamps and connectors can get very hot when operating. If you change a bulb, you
could burn yourself on these components.
There is a risk of injury.
Allow these components to cool down before changing a bulb.
Do not use a bulb if it has been dropped or if its glass tube has been scratched.
The bulb may explode if:
R you touch it
R it is hot
R you drop it
R you scratch it
Use bulbs only in closed lamps that have been
designed for this purpose. Only install spare
bulbs of the same type and the specified volt-
age.
Marks on the glass tube reduce the service life
of the bulbs. Do not touch the glass tube with
your bare hands. If necessary, clean the glass
tube when cold with alcohol or spirit and rub it
off with a lint-free cloth.
Protect bulbs from moisture during operation.
Do not allow bulbs to come into contact with
liquids.
Replace only the bulbs listed (Y page 120).
Have the bulbs that you cannot replace yourself
replaced at a qualified specialist workshop.
If you require assistance replacing bulbs, con-
sult a qualified specialist workshop.
If the new bulb still does not light up, consult a
qualified specialist workshop.
Headlamps and lights are an important aspect of
vehicle safety. You must therefore make sure
that these function correctly at all times. Have
the headlamp setting checked regularly. Overview of bulb replacement - bulb
types
You can replace the following bulbs. The bulb
type can be found in the legend. 120
Replacing bulbs (vehicles with halogen headla
mps)Lights and windshield wipers
Page 126 of 398
X
Position new wiper blade 0043in the retainer on
the wiper arm and slide it into place in the
direction of the arrow.
The wiper blade audibly engages.
X Make sure that the wiper blade is seated cor-
rectly.
X Fold the wiper arm back onto the windshield.
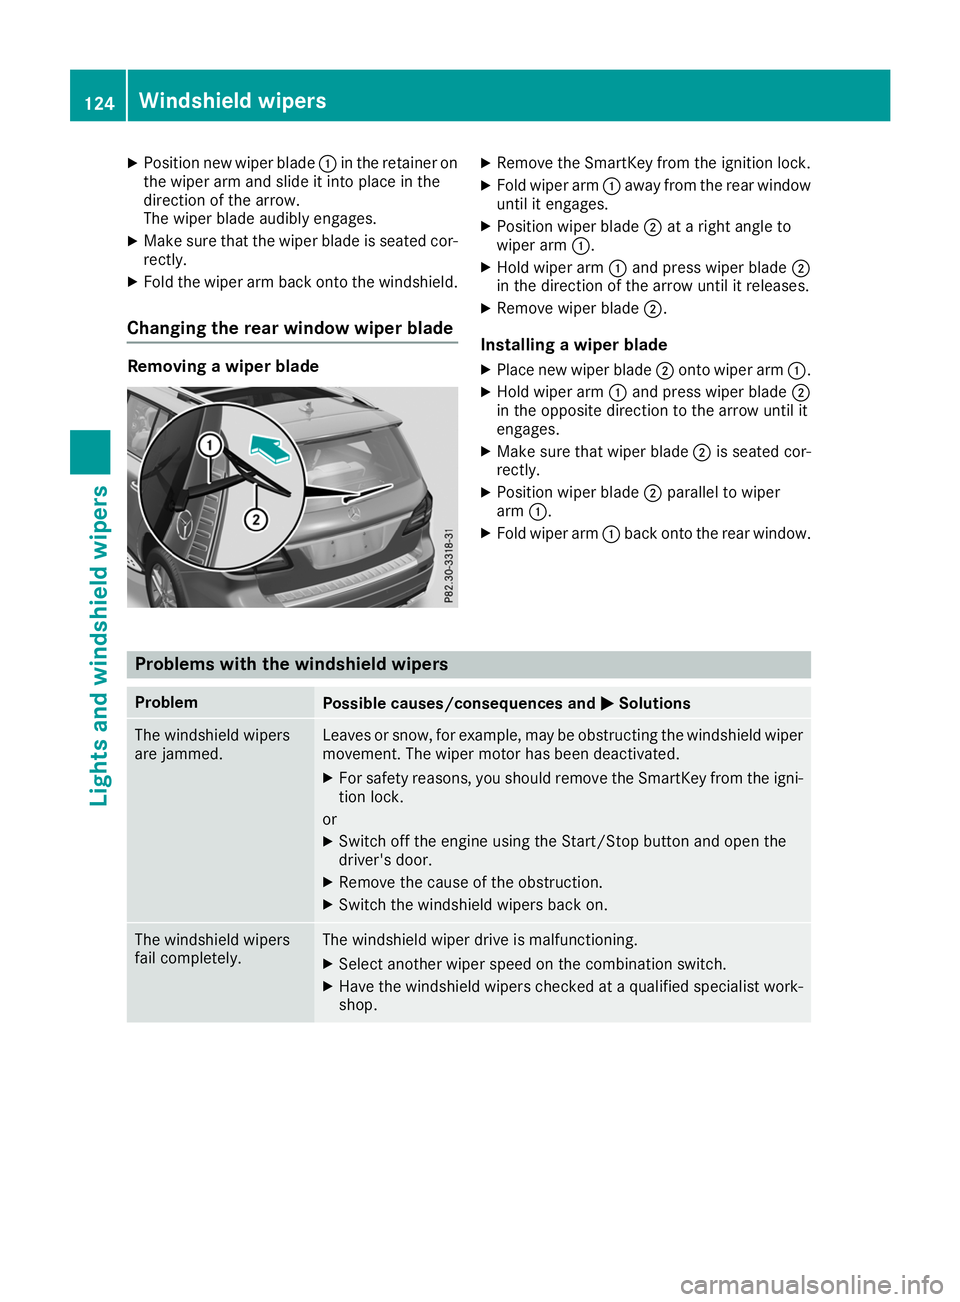
Changing the rear window wiper blade Removing a wiper blade X
Remove the SmartKey from the ignition lock.
X Fold wiper arm 0043away from the rear window
until it engages.
X Position wiper blade 0044at a right angle to
wiper arm 0043.
X Hold wiper arm 0043and press wiper blade 0044
in the direction of the arrow until it releases.
X Remove wiper blade 0044.
Installing a wiper blade
X Place new wiper blade 0044onto wiper arm 0043.
X Hold wiper arm 0043and press wiper blade 0044
in the opposite direction to the arrow until it
engages.
X Make sure that wiper blade 0044is seated cor-
rectly.
X Position wiper blade 0044parallel to wiper
arm 0043.
X Fold wiper arm 0043back onto the rear window. Problems with the windshield wipers
Problem
Possible causes/consequences and
0050 0050Solutions The windshield wipers
are jammed. Leaves or snow, for example, may be obstructing the windshield wiper
movement. The wiper motor has been deactivated.
X For safety reasons, you should remove the SmartKey from the igni-
tion lock.
or X Switch off the engine using the Start/Stop button and open the
driver's door.
X Remove the cause of the obstruction.
X Switch the windshield wipers back on. The windshield wipers
fail completely. The windshield wiper drive is malfunctioning.
X Select another wiper speed on the combination switch.
X Have the windshield wipers checked at a qualified specialist work-
shop. 124
Windshield wipersLights and windshield wipers
Page 142 of 398
!
Do not warm up the engine while stationary.
Pull away immediately. Avoid high engine
speeds and full throttle until the engine has
reached its operating temperature.
In vehicles with automatic transmission,
engage positions P and R only when the vehi-
cle is stationary.
Where possible, avoid spinning the drive
wheels when pulling away on slippery roads.
You could otherwise damage the drive train.
! Mercedes-AMG vehicles:
at low engine oil
temperatures below 68 ‡ (+20 †), the max-
imum engine speed is restricted in order to
protect the engine. To protect the engine and
maintain smooth engine operation, avoid driv-
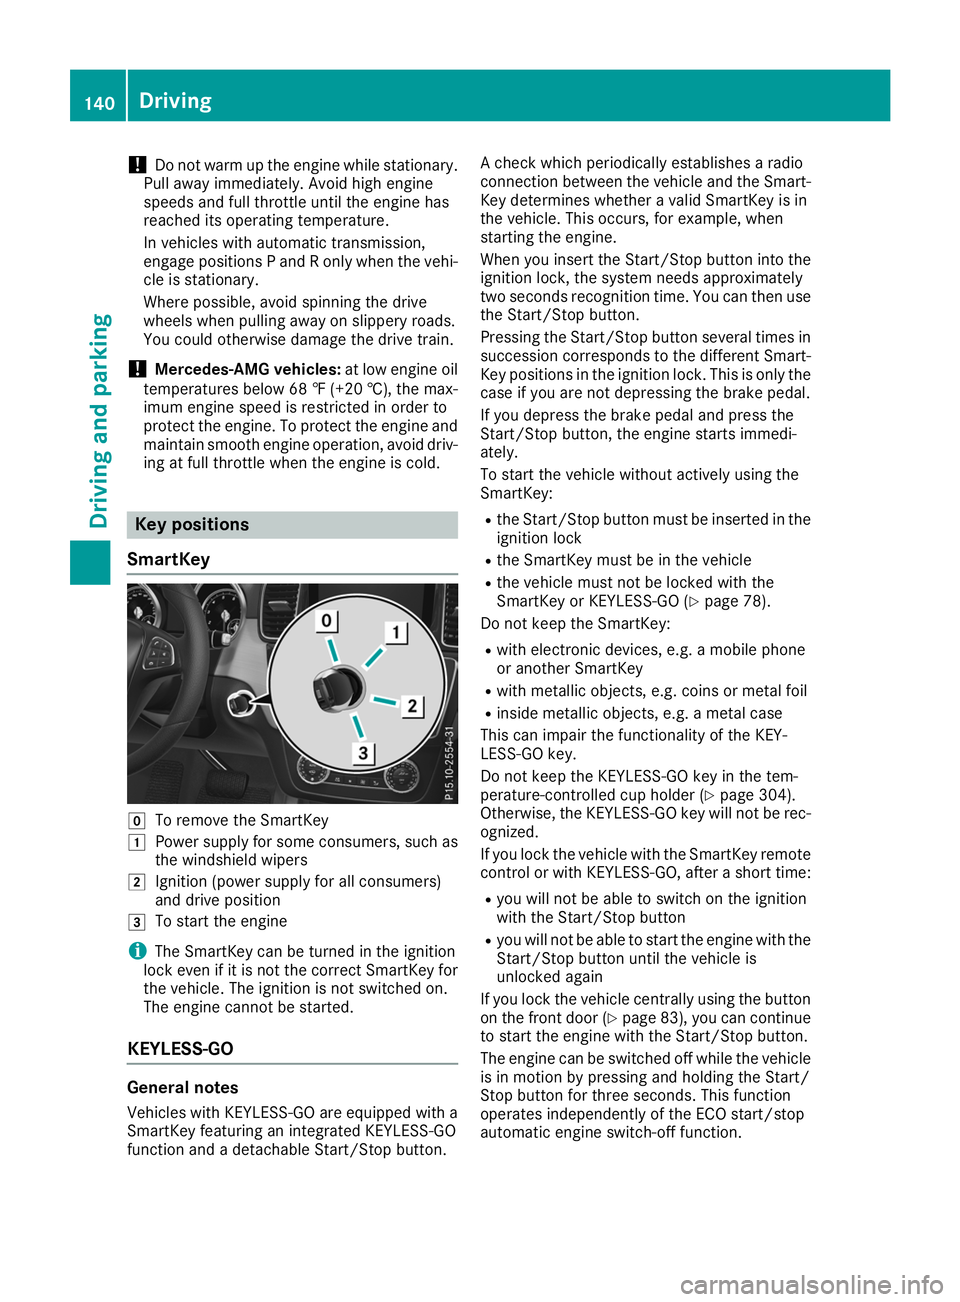
ing at full throttle when the engine is cold. Key positions
SmartKey 005A
To remove the SmartKey
0047 Power supply for some consumers, such as
the windshield wipers
0048 Ignition (power supply for all consumers)
and drive position
0049 To start the engine
i The SmartKey can be turned in the ignition
lock even if it is not the correct SmartKey for
the vehicle. The ignition is not switched on.
The engine cannot be started.
KEYLESS-GO General notes
Vehicles with KEYLESS-GO are equipped with a
SmartKey featuring an integrated KEYLESS-GO
function and a detachable Start/Stop button. A check which periodically establishes a radio
connection between the vehicle and the Smart-
Key determines whether a valid SmartKey is in
the vehicle. This occurs, for example, when
starting the engine.
When you insert the Start/Stop button into the ignition lock, the system needs approximately
two seconds recognition time. You can then usethe Start/Stop button.
Pressing the Start/Stop button several times in
succession corresponds to the different Smart-
Key positions in the ignition lock. This is only the
case if you are not depressing the brake pedal.
If you depress the brake pedal and press the
Start/Stop button, the engine starts immedi-
ately.
To start the vehicle without actively using the
SmartKey:
R the Start/Stop button must be inserted in the
ignition lock
R the SmartKey must be in the vehicle
R the vehicle must not be locked with the
SmartKey or KEYLESS-GO (Y page 78).
Do not keep the SmartKey:
R with electronic devices, e.g. a mobile phone
or another SmartKey
R with metallic objects, e.g. coins or metal foil
R inside metallic objects, e.g. a metal case
This can impair the functionality of the KEY-
LESS-GO key.
Do not keep the KEYLESS-GO key in the tem-
perature-controlled cup holder (Y page 304).
Otherwise, the KEYLESS-GO key will not be rec-
ognized.
If you lock the vehicle with the SmartKey remote
control or with KEYLESS-GO, after a short time:
R you will not be able to switch on the ignition
with the Start/Stop button
R you will not be able to start the engine with the
Start/Stop button until the vehicle is
unlocked again
If you lock the vehicle centrally using the button
on the front door (Y page 83), you can continue
to start the engine with the Start/Stop button.
The engine can be switched off while the vehicle
is in motion by pressing and holding the Start/
Stop button for three seconds. This function
operates independently of the ECO start/stop
automatic engine switch-off function. 140
DrivingDriving and parking