2019 MERCEDES-BENZ GLS SUV tailgate
[x] Cancel search: tailgatePage 20 of 398

Display in the multimedia syste
m.. 197
Function/note s............................. 196
Switching on/of f........................... 197
Rear window defroster
Problem (malfunction) ................... 135
Switching on/of f........................... 134
Rear window wiper
Replacing the wiper blad e.............. 124
Switching on/of f........................... 123
Rear-view mirror
Anti-glare (manual) ........................ 110
Dipping (automatic) ....................... 112
Reflective safety jacket .................... 334
Refrigerant (air-conditioning sys-
tem)
Important safety notes .................. 388
Refueling
Fuel gaug e....................................... 37
Important safety notes .................. 155
Refueling process .......................... 156
see Fuel
Remote control
Garage door opener ....................... 316
Replacing bulbs
General notes ................................ 120
High-beam headlamp s................... 121
Important safety notes .................. 120
Installing/removing the cover
(front wheel arch) .......................... 121
Low-beam headlamp s.................... 121
Overview of bulb types .................. 120
Turn signals (front) ......................... 122
Reporting safety defects .................... 32
Rescue card ......................................... 32
Reserve (fuel tank)
see Fuel
Reserve fuel
Display message ............................ 260
Warning lamp ................................. 282
Residual heat (climate control) ........ 135
Restraint system
Display message ............................ 253
Introduction ..................................... 44
Warning lamp ................................. 282
Warning lamp (function) ................... 45
Reversing feature
Panorama sliding sunroo f................ 93
Roller sunblind s............................... 95 Side windows ................................... 89
Sliding sunroof ................................. 93
Tailgate ............................................ 85
Reversing lamps (display mes-
sage) ................................................... 257
Roadside Assistance (breakdown) .... 29
Roller sunblind
Panorama roof with power tilt/
sliding panel ..................................... 94
Rear side window s......................... 306
Roof carrier ........................................ 303
Roof lining and carpets (cleaning
guidelines) ......................................... 333
Roof load (maximum) ........................ 389
Route (navigation)
see Route guidance (navigation)
Route guidance
see also Digital Operator's Man-
ual .................................................. 287
Route guidance (navigation) ............ 234
Route guidance active ...................... 235 S
Safety Children in the vehicle ..................... 59
see Occupant safety
see Operating safety
Safety system
see Driving safety systems
SD card
Inserting ........................................ 293
Inserting/removing ........................ 293
Removing ....................................... 293
SD memory card
see also Digital Operator's Man-
ual .................................................. 287
Selecting ........................................ 236
Search & Send
see also Digital Operator's Man-
ual .................................................. 287
Seat
Correct driver's seat position ........... 97
Seat belts
Adjusting the driver's and front-
passenger seat belt ......................... 48
Adjusting the height ......................... 48
Cleaning ......................................... 333 18
Index
Page 23 of 398

Tailgate
Display message ............................ 271
Emergency unlocking ....................... 88
Important safety notes .................... 84
Limiting the opening angle ............... 88
Opening dimensions ...................... 389
Opening/closing (automatically
from inside) ...................................... 87
Opening/closing (automatically
from outside) ................................... 86
Opening/closing (from outside) ....... 85
Power closing .................................. 84
Tank
see Fuel tank
Tank content
Fuel gaug e....................................... 37
Technical data
Capacities ...................................... 384
Drawbar load (maximum) ............... 392
Information .................................... 382
Tires/wheels ................................. 377
Trailer load s................................... 392
Vehicle data ................................... 389
Telephone
Accepting a call (multifunction
steering wheel) .............................. 237
Authorizing a mobile phone (con-
necting) ......................................... 291
Authorizing a mobile phone via the device manager (connecting) ......... 292
Connecting a mobile phone
(device manager )........................... 292
Connecting a mobile phone (gen-
eral information) ............................ 291
Display message ............................ 272
Menu (on-board computer) ............ 237
Number from the phone book ........ 237
Redialing ........................................ 237
Rejecting/ending a call ................. 237
see also Digital Operator's Man-
ua l.................................................. 287
Temperature
Coolant (display in the instrument
cluster) .......................................... 231
Coolant (on-board computer,
Mercedes-AMG vehicles) ............... 242
Engine oil (on-board computer,
Mercedes-AMG vehicles) ............... 242 Outside temperature ...................... 230
Setting (climate control
)................ 132
Transmission oil (on-board com-
puter, Mercedes-AMG vehicles) ..... 242
Through-loading feature ................... 298
Timing (RACETIMER) ......................... 243
Tire pressure
Calling up (on-board computer) ..... 359
Checking manually ........................ 358
Display message ............................ 268
Maximum ....................................... 358
Not reached (TIREFIT) .................... 339
Note s............................................. 357
Reached (TIREFIT) .......................... 339
Recommended ............................... 355
Tire pressure loss warning system
General notes ................................ 358
Important safety notes .................. 359
Restarting ...................................... 359
Tire pressure monitor
Checking the tire pressure elec-
tronically ........................................ 361
Function/note s............................. 359
General notes ................................ 359
Important safety notes .................. 360
Radio type approval for the tire
pressure monitor ........................... 362
Restarting ...................................... 362
Warning lamp ................................. 286
Warning message .......................... 361
Tire pressure table ............................ 356
TIREFIT kit
Important safety notes .................. 337
Storage location ............................ 335
Tire pressure not reached .............. 339
Tire pressure reached .................... 339
Using ............................................. 338
Tires
Aspect ratio (definition) ................. 372
Average weight of the vehicle
occupants (definition) .................... 370
Bar (definition) ............................... 370
Changing a whee l.......................... 372
Characteristics .............................. 370
Checking ........................................ 352
Curb weight (definition) ................. 371
Definition of terms ......................... 370
Direction of rotation ...................... 373 Index
21
Page 25 of 398

Towing away
Important safety guidelines ........... 346
Installing the towing eye ................ 347
Notes for 4MATIC vehicles ............ 349
Removing the towing eye ............... 347
Transporting the vehicle ................ 348
With both axles on the ground ....... 347
Towing eye ......................................... 335
Traffic reports
see also Digital Operator's Man-
ual .................................................. 287
Traffic Sign Assist
Activating/deactivating the warn-ing function .................................... 238
Display message ............................ 264
Function/note s............................. 206
Important safety notes .................. 206
Instrument cluster display ............. 206
Trailer coupling
see Towing a trailer
Trailer loads and drawbar nose-
weights ............................................... 226
Trailer towing
Active Blind Spot Assist ................. 212
Active Lane Keeping Assist ............ 215
Blind Spot Assist ............................ 208
Permissible trailer loads and
drawbar noseweights ..................... 226
Transfer case ..................................... 155
Transmission
see Automatic transmission
Transmission position display ......... 149
Transporting the vehicle .................. 348
Traveling uphill
Brow of hill ..................................... 170
Driving downhill ............................. 170
Maximum gradient-climbing capa-
bility ............................................... 170
Trim pieces (cleaning instruc-
tions) .................................................. 332
Trip computer (on-board com-
puter) .................................................. 233
Trip odometer
Calling up ....................................... 233
Resetting (on-board computer) ...... 234
Trunk
see Tailgate Turn signals
Display message ............................ 257
Replacing bulbs (front) ................... 122
Switching on/of f........................... 116
Two-way radio
Frequencies ................................... 382
Installation ..................................... 382
Transmission output (maximum) .... 382
TWR (Tongue Weight Rating) (defi-
nition) ................................................. 372
Type identification plate
see Vehicle identification plate U
Unlocking Emergency unlocking ....................... 84
From inside the vehicle (central
unlocking button) ............................. 83
Upshift indicator (on-board com-
puter, Mercedes-AMG vehicles) ....... 242
USB devices
Connecting to the Media Inter-
face ............................................... 294 V
Vanity mirror (in the sun visor) ........ 305
Vehicle
Correct use ...................................... 31
Data acquisition ............................... 32
Display message ............................ 270
Equipment ....................................... 28
Individual settings .......................... 240
Limited Warranty ............................. 32
Loading .......................................... 362
Locking (in an emergency) ............... 84
Locking (SmartKey) .......................... 77
Lowering ........................................ 377
Maintenance .................................... 29
Operating safety .............................. 30
Parking .......................................... 158
Parking for a long period ................ 160
Pulling away ................................... 143
Raising ........................................... 374
REACH Regulation ........................... 31
Reporting problems ......................... 32
Securing from rolling away ............ 374 Index
23
Page 77 of 398

The braking application of Active Brake Assist
with cross-traffic function is ended automati-
cally if:
R you maneuver to avoid the obstacle
R there is no longer a risk of collision
R there is no longer an obstacle detected in
front of your vehicle STEER CONTROL
General information STEER CONTROL helps you by transmitting a
noticeable steering force to the steering wheel
in the direction required for vehicle stabilization.
This steering assistance is provided in particular
if:
R both right wheels or both left wheels are on a
wet or slippery road surface when you brake
R the vehicle starts to skid
Important safety notes i
Observe the "Important safety notes" sec-
tion (Y page 66).
No steering assistance is provided from STEER
CONTROL, if: R ESP ®
is deactivated
R ESP ®
is malfunctioning
R the steering is malfunctioning
If ESP ®
is malfunctioning, you will be assisted
further by the electrical power steering. Protection against theft
Immobilizer
X To activate with the SmartKey: remove the
SmartKey from the ignition lock.
X To activate with KEYLESS-GO: switch the
ignition off and open the driver's door.
X To deactivate: switch on the ignition.
The immobilizer prevents your vehicle from
being started without the correct SmartKey.
When leaving the vehicle, always take the
SmartKey with you and lock the vehicle. Anyone
can start the engine if a valid SmartKey has been left inside the vehicle. i
The immobilizer is always deactivated when
you start the engine.
In the event that the engine cannot be started (yet the vehicle's battery is charged), the sys-
tem is not operational. Contact an authorized Mercedes-Benz Center or call
1-800 FOR-MERCEDES (in the USA) or
1-800-387-0100 (in Canada). ATA (anti-theft alarm system)
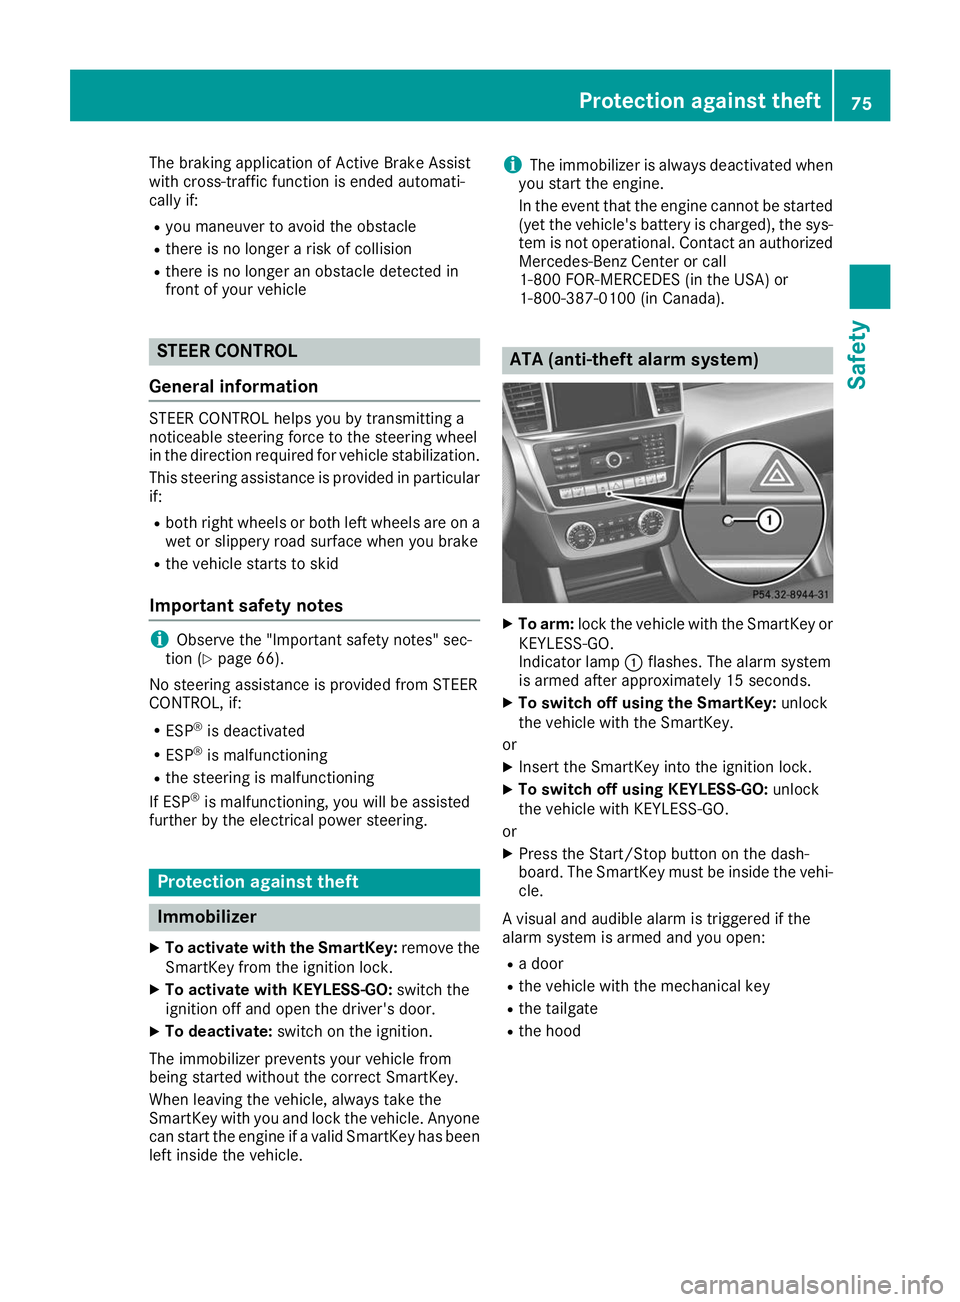
X
To arm: lock the vehicle with the SmartKey or
KEYLESS-GO.
Indicator lamp 0043flashes. The alarm system
is armed after approximately 15 seconds.
X To switch off using the SmartKey: unlock
the vehicle with the SmartKey.
or X Insert the SmartKey into the ignition lock.
X To switch off using KEYLESS-GO: unlock
the vehicle with KEYLESS-GO.
or X Press the Start/Stop button on the dash-
board. The SmartKey must be inside the vehi-
cle.
A visual and audible alarm is triggered if the
alarm system is armed and you open: R a door
R the vehicle with the mechanical key
R the tailgate
R the hood Protection against theft
75Safety Z
Page 79 of 398

SmartKey
Important safety notes
G
WARNING
If children are left unsupervised in the vehicle, they could:
R open the doors, thus endangering other
people or road users.
R get out and disrupt traffic.
R operate the vehicle's equipment.
Additionally, children could set the vehicle in
motion if, for example, they:
R release the parking brake.
R shifting the automatic transmission out of
park position P
R Start the engine.
There is a risk of an accident and injury.
When leaving the vehicle, always take the
SmartKey with you and lock the vehicle. Never
leave children or animals unattended in the
vehicle. Always keep the SmartKey out of
reach of children. G
WARNING
If you attach heavy or large objects to the
SmartKey, the SmartKey could be uninten-
tionally turned in the ignition lock. This could
cause the engine to be switched off. There is a risk of an accident.
Do not attach any heavy or large objects to the
SmartKey. Remove any bulky key rings before
inserting the SmartKey into the ignition lock.
! Keep the SmartKey away from strong mag-
netic fields. Otherwise, the remote control
function could be affected.
Strong magnetic fields can occur in the vicin- ity of powerful electrical installations.
Do not keep the SmartKey: R with electronic devices, e.g. a mobile phone
or another SmartKey.
R with metallic objects, e.g. coins or metal foil.
R inside metallic objects, e.g. a metal case.
This can affect the functionality of the Smart- Key. Do not keep the KEYLESS-GO or KEYLESS-GO
Start function key in the temperature-controlled
cup holder. Otherwise, the KEYLESS-GO or KEY- LESS-GO Start function key will not be detected.
Vehicles with KEYLESS-GO start function: do
not keep the SmartKey in the cargo compart-
ment. Otherwise, the SmartKey may not be
detected, e.g. when starting the engine using
the Start/Stop button. SmartKey functions
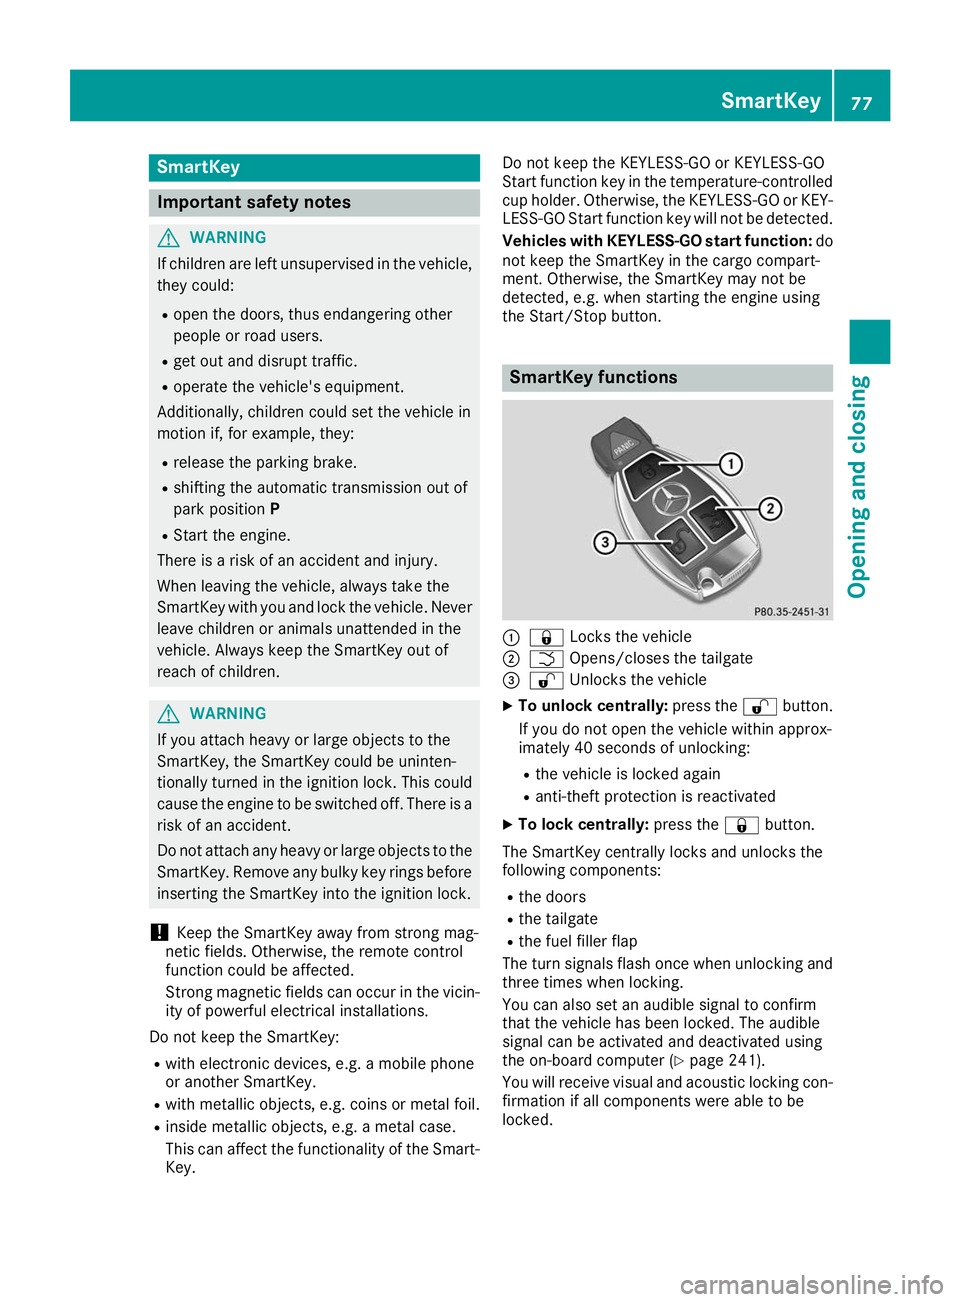
0043
0037 Locks the vehicle
0044 0054 Opens/closes the tailgate
0087 0036 Unlocks the vehicle
X To unlock centrally: press the0036button.
If you do not open the vehicle within approx-
imately 40 seconds of unlocking:
R the vehicle is locked again
R anti-theft protection is reactivated
X To lock centrally: press the0037button.
The SmartKey centrally locks and unlocks the
following components:
R the doors
R the tailgate
R the fuel filler flap
The turn signals flash once when unlocking and three times when locking.
You can also set an audible signal to confirm
that the vehicle has been locked. The audible
signal can be activated and deactivated using
the on-board computer (Y page 241).
You will receive visual and acoustic locking con-
firmation if all components were able to be
locked. SmartKey
77Opening and closing Z
Page 80 of 398

If activated in the multimedia system, the loca-
tor lighting also lights up in the dark (see the
Digital Operator's Manual).
X To open the tailgate automatically from
outside the vehicle:
press and hold the0054
button until the tailgate opens.
Vehicles with KEYLESS-GO: X To close the tailgate automatically from
outside the vehicle:
if the SmartKey is loca-
ted in the immediate vicinity of the vehicle,
press the 0054button on the SmartKey.
When the tailgate closes you can then release
the button. KEYLESS-GO
General notes Bear in mind that the engine can be started by
any of the vehicle occupants if there is a KEY-
LESS-GO key in the vehicle (Y page 142).
Locking/unlocking centrally You can start, lock or unlock the vehicle using
KEYLESS-GO. To do this, you only need carry the
SmartKey with you. You can combine the func-
tions of KEYLESS-GO with those of a conven-
tional SmartKey. Unlock the vehicle by using
KEYLESS-GO, for instance, and lock it using the 0037 button on the SmartKey.
The driver's door and the door at which the han- dle is used, must both be closed. The SmartKey
must be outside the vehicle. When locking or
unlocking with KEYLESS-GO, the distance
between the SmartKey and the corresponding
door handle must not be greater than 3 ft (1 m).
KEYLESS-GO checks whether a valid SmartKey
is in the vehicle by periodically establishing a
radio connection between the vehicle and the
SmartKey. This happens:
R when starting the engine
R while driving
R when the external door handles are touched
R during convenience closing X
To unlock the vehicle: touch the inner sur-
face of the door handle.
X To lock the vehicle: touch sensor surface 0043
or 0044.
Make sure that you do not touch the inner
surface of the door handle.
X Convenience closing feature: touch
recessed sensor surface 0044for an extended
period.
Further information on the convenience closing
feature (Y page 90).
If you pull on the handle of the tailgate, only the cargo compartment of the vehicle is unlocked.
Deactivating and activating If you do not intend to use a SmartKey for an
extended period of time, you can deactivate the
KEYLESS-GO function of the SmartKey. The
SmartKey will then use very little power, thereby conserving battery power. For the purposes of
activation/deactivation, the vehicle must not be
nearby.
X To deactivate: press the0037button on the
SmartKey twice in rapid succession.
The battery check lamp of the SmartKey
flashes twice briefly and lights up once, KEY-
LESS-GO is deactivated (Y page 80).
X To activate: press any button on the Smart-
Key.
or X Insert the SmartKey into the ignition lock.
KEYLESS-GO and all of its associated features are available again. 78
SmartKeyOpening and closing
Page 86 of 398

Automatic locking feature
X
To deactivate: press and hold button 0043for
about five seconds until a tone sounds.
X To activate: press and hold button 0044for
about five seconds until a tone sounds.
If you press one of the two buttons and do not
hear a tone, the relevant setting has already
been selected.
The vehicle is locked automatically when the
ignition is switched on and the wheels are turn-
ing.
You could therefore be locked out if:
R the vehicle is being pushed.
R the vehicle is being towed.
R the vehicle is on a roller dynamometer.
You can also switch the automatic locking func-
tion on and off using the on-board computer
(Y page 241). Power closing
Power closing pulls the doors and tailgate into
their locks automatically even if they are not
completely closed.
X To power close a door: push the door into
the lock up to the first detent position.
Power closing will pull the door fully closed.
X To power close the tailgate: lightly press
the tailgate downwards.
Power closing will pull the tailgate fully
closed. Unlocking/locking the driver's door
using the mechanical key
i If you want to centrally lock the vehicle using
the mechanical key, begin by pressing the
locking button for the interior locking mech-
anism while the driver's door is open. Then
proceed to lock the driver's door using the
mechanical key. X
Insert the mechanical key into the lock of the
driver's door as far as it will go.
X To unlock: turn the mechanical key counter-
clockwise to position 0047.
X To lock: turn the mechanical key clockwise as
far as it will go to position 0047.
If you use the mechanical key to unlock and
open the driver's door, the anti-theft alarm sys- tem will be triggered. Switch off the alarm
(Y page 75).
If you lock the vehicle as described above, the
fuel filler flap is not locked. The anti-theft alarm
system is not armed. Cargo compartment
Important safety notes
G
DANGER
Combustion engines emit poisonous exhaust
gases such as carbon monoxide. Exhaust
gases can enter the vehicle interior if the tail- gate is open while the engine is running, espe-cially if the vehicle is in motion. There is a risk of poisoning.
Always switch off the engine before opening
the tailgate. Never drive with the tailgate
open. 84
Cargo compartmentOpening and closing
Page 87 of 398

G
WARNING
If objects, luggage or loads are not secured or not secured sufficiently, they could slip, tip
over or be flung around and thereby hit vehicle
occupants. There is a risk of injury, particu-
larly in the event of sudden braking or a sud-
den change in direction.
Always store objects so that they cannot be
flung around. Secure objects, luggage or
loads against slipping or tipping before the
journey.
! The tailgate swings upwards and to the rear
when opened. Therefore, make sure that
there is sufficient clearance above and behind
the tailgate.
The opening dimensions of the tailgate can be
found in the "Vehicle data" section
(Y page 389).
You should preferably place luggage or loads in the cargo compartment. Observe the loading
guidelines (Y page 295).
Do not leave the SmartKey in the cargo com-
partment. You could otherwise lock yourself
out.
You can:
R close the tailgate manually from outside
R open and close the tailgate automatically
from outside
R open and close the tailgate automatically
from inside
R limit the opening angle of the tailgate
R unlock the tailgate from inside with the emer-
gency release Tailgate reversing feature
On vehicles with the tailgate remote closing fea- ture, the tailgate is equipped with automatic
obstacle recognition with a reversing feature. If a solid object blocks or restricts the tailgate
when automatically opening or closing, this pro-
cedure is stopped. If the tailgate is stopped dur- ing the closing procedure, it will open again
automatically. The automatic obstacle recogni-
tion with reversing feature is only an aid. It is not
a substitute for your attentiveness when open-
ing and closing the tailgate. G
WARNING
The reversing feature does not respond:
R to soft, light and thin objects, e.g. fingers
R over the last 00C2in (8 mm) of the closing
movement
The reversing feature cannot prevent some-
one from becoming trapped in these situa-
tions in particular. There is a risk of injury.
Make sure that no body parts are in close
proximity during the closing procedure.
If somebody becomes trapped:
R press the 0054button on the SmartKey, or
R pull or press the remote operating switch
on the driver's door or
R press the closing or locking button on the
tailgate or
R pull the handle on the tailgate Opening and closing manually from
outside
Opening X
Press the 0036button on the SmartKey.
X Pull handle 0043and release it.
The tailgate opens automatically. Cargo compartment
85Opening and closing Z