Page 129 of 681
Alw
ays ensure that the seat and seat back‐
re st are engaged:
R before passengers tr avel on a seat with
th e EASY -ENTRY/EXIT feature
R afte r adju sting the seat
R afte rth e EASY -ENTRY/EXIT feature is
used
R afte rth e load compartment enlar gement
has been folded down. Alw
ays ensure that all vehicle occupants ha ve
th eir seat belts fastened cor rectly and are sitting
prope rly. Pa rticular attention must be paid to
ch ildren.
If yo u no lon gerrequ irethefo lded-d own seat
ba ckrest as a loading area, fold the backrest
back into place. Fo
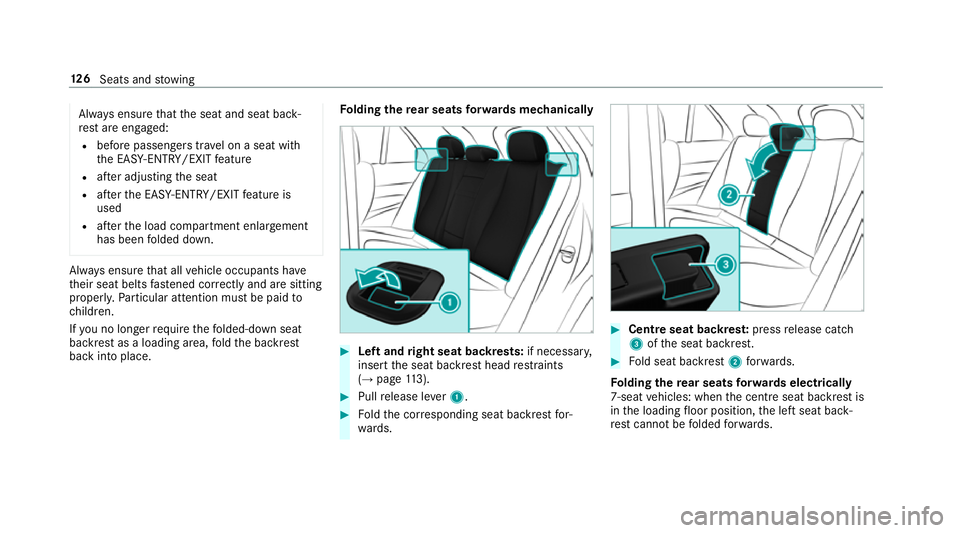
lding there ar seats forw ards mechanically #
Left andright seat backrests: if necessary,
inse rtthe seat backrest head restra ints
(→ page 113). #
Pull release le ver1. #
Foldthe cor responding seat backrest for‐
wa rds. #
Centre seat backres t:press release cat ch
3 ofthe seat backrest. #
Fold seat backrest 2forw ards.
Fo lding there ar seats forw ards electrical ly
7-seat vehicles: when the cent reseat backrest is
in the loading floor position, the left seat back‐
re st cannot be folded forw ards. 12 6
Seats and stowing
Page 130 of 681
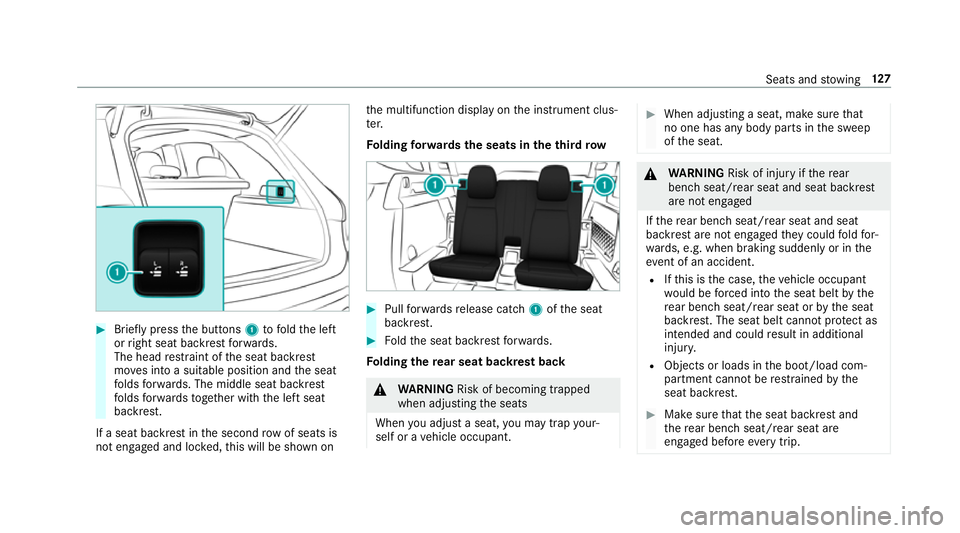
#
Brief lypress the buttons 1tofold the left
or right seat backrest forw ards.
The head restra int of the seat backrest
mo ves into a suitable position and the seat
fo lds forw ards. The middle seat backrest
fo lds forw ards toget her with the left seat
backrest.
If a seat backrest in the second rowof seats is
not engaged and loc ked, this will be shown on th
e multifunction display on the instrument clus‐
te r.
Fo lding forw ards the seats in the third row #
Pull forw ards release cat ch1 ofthe seat
backrest. #
Foldthe seat backrest forw ards.
Fo lding there ar seat backrest back &
WARNING Risk of becoming trapped
when adjusting the seats
When you adjust a seat, you may trap your‐
self or a vehicle occupant. #
When adjusting a seat, make sure that
no one has any body parts in the sweep
of the seat. &
WARNING Risk of inju ryifth ere ar
ben chseat/rear seat and seat backrest
are not engaged
If th ere ar ben chseat/rear seat and seat
backrest are not engaged they could fold for‐
wa rds, e.g. when braking suddenly or in the
ev ent of an accident.
R Ifth is is the case, theve hicle occupant
wo uld be forc ed into the seat belt bythe
re ar ben chseat/rear seat or bythe seat
backrest. The seat belt cann otprotect as
intended and could result in additional
injur y.
R Objects or loads in the boot/load com‐
partment cann otbe restra ined bythe
seat backrest. #
Make sure that the seat backrest and
th ere ar ben chseat/rear seat are
engaged before everytrip. Seats and
stowing 127
Page 131 of 681
*
NO
TEDama getothe seat belt The seat belt could become trapped and
thus
damaged when folding back the seat back‐
re st. #
Make sure that the seat belt is not trap‐
ped when folding back the seat back‐
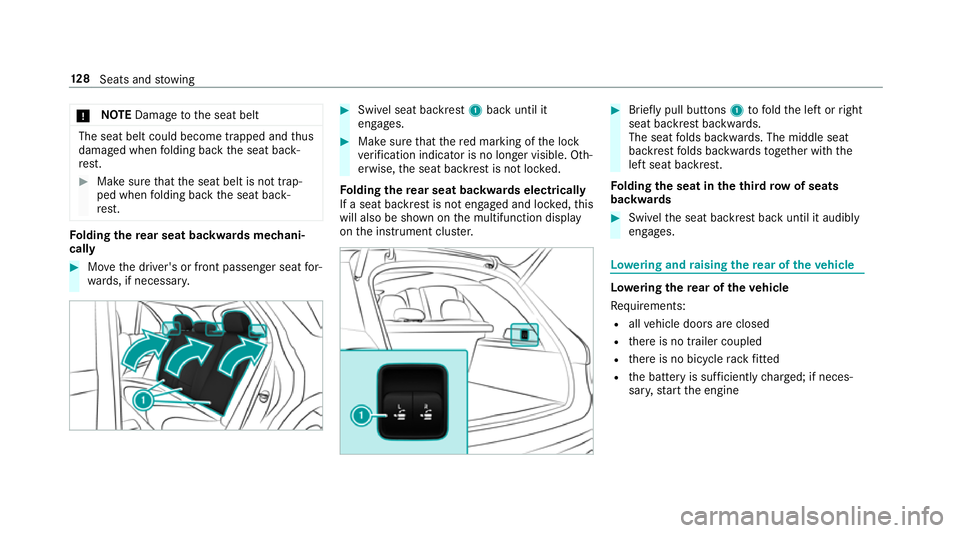
re st. Fo
lding there ar seat backwards mechani‐
cally #
Movethe driver's or front passenger seat for‐
wa rds, if necessar y. #
Swi vel seat backrest 1back until it
engages. #
Make sure that there d marking of the lock
ve rification indicator is no longer visible. Oth‐
erwise, the seat backrest is not loc ked.
Fo lding there ar seat backwards electrical ly
If a seat backrest is not engaged and loc ked, this
will also be shown on the multifunction display
on the instrument clus ter. #
Brief lypull buttons 1tofold the left or right
seat backrest backwards.
The seat folds backwards. The middle seat
backrest folds backwards toge ther with the
left seat backrest.
Fo lding the seat in theth ird row of seats
backwards #
Swi velth e seat backrest back until it audibly
engages. Lo
weri ng and raising there ar of theve hicle Lo
weri ngthere ar of theve hicle
Re quirements:
R allvehicle doors are closed
R there is no trailer coupled
R there is no bicycle rack fitted
R the battery is suf ficiently charge d; if neces‐
sar y,start the engine 12 8
Seats and stowing
Page 132 of 681
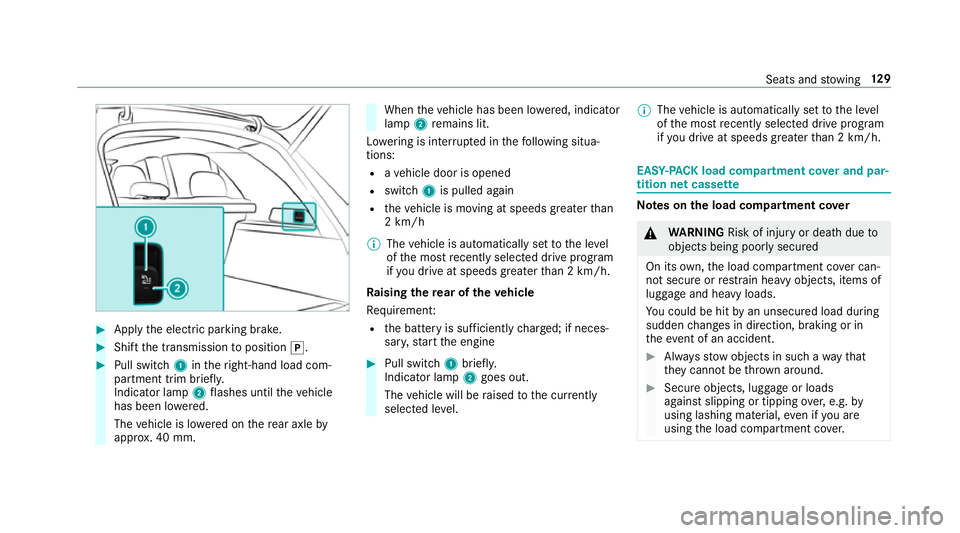
#
App lythe electric parking brake. #
Shift the transmission toposition j. #
Pull switch 1intheright-hand load com‐
partment trim brief ly.
Indicator lamp 2flashes until theve hicle
has been lo wered.
The vehicle is lo wered on there ar axle by
appr ox. 40 mm. When
theve hicle has been lo wered, indicator
lamp 2remains lit.
Lo we ring is inter rupte d in thefo llowing situa‐
tions:
R ave hicle door is opened
R switch 1is pulled again
R theve hicle is moving at speeds greater than
2 km/h
% The vehicle is automatically set tothe le vel
of the most recently selected drive program
if yo u drive at speeds greater than 2 km/h.
Ra ising there ar of theve hicle
Re quiremen t:
R the battery is suf ficiently charge d; if neces‐
sar y,start the engine #
Pull switch 1briefly.
Indicator lamp 2goes out.
The vehicle will be raised tothe cur rently
selected le vel. %
The vehicle is automatically set tothe le vel
of the most recently selected drive program
if yo u drive at speeds greater than 2 km/h. EAS
Y-PA CK load compartment co ver and par‐
tition net cass ette Note
s onthe load compa rtment co ver &
WARNING Risk of inju ryor death due to
objects being poorly secured
On its own,the load compartment co ver can‐
not secure or restra in heavy objects, items of
luggage and heavy loads.
Yo u could be hit byan unsecured load during
sudden changes in direction, braking or in
th eev ent of an accident. #
Alw aysstow objects in such a wayth at
th ey cannot be thro wn around. #
Secure objects, luggage or loads
against slipping or tipping over,e.g. by
using lashing material, even if you are
using the load compartment co ver. Seats and
stowing 12 9
Page 133 of 681
*
NO
TEDama getothe load compartment
co ver when loading theve hicle The load compartment co
ver may be dam‐
aged when loading theve hicle. #
Do not place any objects abo vethe
lo we r edge of the side windo wsor on
th e load compartment co ver. Extending/r
etra cting the load compa rtment
co ver #
2 Toextend: pull load compartment co ver
back bygrab handle 1and clip it into the
brac kets on the left and right.
Re tracting #
Remo vethe load compartment co ver from
th e brac kets on the left and right. #
Guide the load compartment co verfo rw ards
using the grab handle until it is fully retrac‐
te d.
The rolled-up load compartment co ver can be
used in two positions:
R For loading: folded 45° upwards (fold down
before starting trip)
R Horizontal position
Fi tting or removing the load co mpartment
co ver
Requ irement:
R The load compartment co ver is rolled up. 13 0
Seats and stowing
Page 134 of 681
Re
moving the load co mpartment co ver #
Press end cap 1onthe left or right
in wa rds. #
Pull out the load compartment co ver back‐
wa rds. St
ow ing the load compa rtment co ver
Depending on theve hicle model, the load com‐
partment co ver can be stowed under the load
compartment floor. #
Open the load compartment floor
(→ page 136). #
Toinser t:firs t place the load compartment
co ver in the brac kets 1 onthe left and then
th eright. Comply with the instructions on the
ve hicle toensure a cor rect seat. #
Toremo ve:ge ntly push the load compart‐
ment co verto the left using grab handle 2. #
Remo vethe load compartment co ver from
th e brac kets 1 ontheright and then the
left.
Fi tting the load co mpartment co ver #
Place the load compartment co ver in the
brac kets 1 onthe left and right.
The end caps of the load compartment co ver
engage audibly. Seats and
stowing 131
Page 135 of 681
Fi
tting/ removing partition net cass ette
Re quirement:
R The partition net has been rolled up.
Re mo val #
Press the1 button on the left or right. #
Remo vethe partition net cassette bylifting it
upwards. Fi
tting #
Using tab1, push the partition net cassette
backwards onto the brac kets 2.
The pa rtition net cassette engages. #
Ensure that there d lock verification indica‐
to rs 3 onthe left and right are no longer
visible. Otherwise, the partition net cassette
is not loc ked. 13 2
Seats and stowing
Page 136 of 681
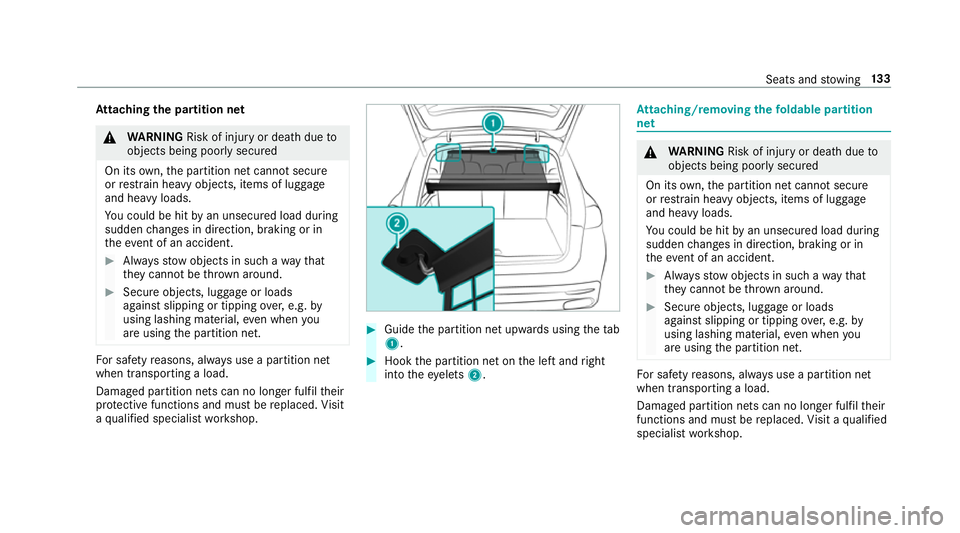
At
taching the pa rtition net &
WARNING Risk of inju ryor death due to
objects being poorly secured
On its own,the partition net cann otsecure
or restra in heavy objects, items of luggage
and heavy loads.
Yo u could be hit byan unsecured load during
sudden changes in direction, braking or in
th eev ent of an accident. #
Alw aysstow objects in such a wayth at
th ey cannot be thro wn around. #
Secure objects, luggage or loads
against slipping or tipping over,e.g. by
using lashing material, even when you
are using the partition net. Fo
r saf etyre asons, alw ays use a partition net
when transporting a load.
Damaged partition nets can no longer fulfil their
pr otective functions and must be replaced. Visit
a qu alified specialist workshop. #
Guide the partition net upwards using thetab
1 . #
Hook the partition net on the left and right
into theey elets 2. At
taching/rem oving thefo ldable partition
net &
WARNING Risk of inju ryor death due to
objects being poorly secured
On its own,the partition net cann otsecure
or restra in heavy objects, items of luggage
and heavy loads.
Yo u could be hit byan unsecured load during
sudden changes in direction, braking or in
th eev ent of an accident. #
Alw aysstow objects in such a wayth at
th ey cannot be thro wn around. #
Secure objects, luggage or loads
against slipping or tipping over,e.g. by
using lashing material, even when you
are using the partition net. Fo
r saf etyre asons, alw ays use a partition net
when transporting a load.
Damaged partition nets can no longer fulfil their
functions and must be replaced. Visit a qualified
specialist workshop. Seats and
stowing 13 3