2019 MERCEDES-BENZ GLE SUV overheating
[x] Cancel search: overheatingPage 120 of 681
high
temp eratures may be af fected or they
may even su ffer burn-like injuries. #
Do not repeatedly switch on the seat
heater. To
protect against overheating, the seat heater
may be temp orarily deactivated af ter it is
switched on repeatedly.
* NO
TEDama getothe seats caused by
objects or documents when the seat
heater is switched on When
the seat heater is switched on, over‐
heating can occur due toobjects or docu‐
ments placed on the seats e.g. seat cushions
or child seats. This could cause damage to
th e seat sur face. #
Makesure that no objects or docu‐
ments are on the seats when the seat
heater is switched on. Re
quirements:
R The po wer supply has been switched on
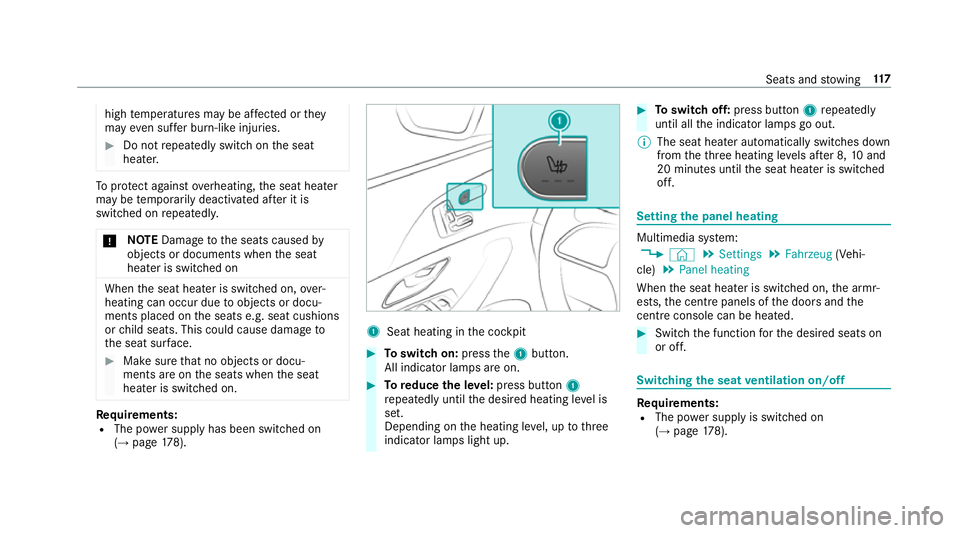
(→ page 178). 1
Seat heating in the cockpit #
Toswitch on: pressthe1 button.
All indicator lamps are on. #
Toreduce the le vel:press button 1
re peatedly until the desired heating le vel is
set.
Depending on the heating le vel, up tothree
indicator lamps light up. #
Toswitch off: press button 1repeatedly
until all the indicator lamps go out.
% The seat heater automatically switches down
from theth re e heating le vels af ter 8, 10and
20 minutes until the seat heater is switched
off. Setting
the panel heating Multimedia sy
stem:
, © .
Settings .
Fahrzeug (Vehi‐
cle) .
Panel heating
When the seat heater is switched on, the armr‐
ests, the cent repanels of the doors and the
centre console can be hea ted. #
Switch the function forth e desired seats on
or off. Switching
the seat ventilation on/off Re
quirements:
R The po wer supply is switched on
(→ page 178). Seats and
stowing 117
Page 186 of 681
sy
stem and the brake forc e boosting, for
ex ample.
Yo u will then need touse considerably more
fo rc eto steer and brake. #
Do not switch off the ignition while driv‐
ing. &
DANG ER Risk of fata l injuries due to
ex haust gases
Combustion engines emit poisonous exhaust
ga ses such as carbon monoxide. Inhaling
th ese exhaust gases is hazardous tohealth
and can lead topoisoning. #
Never lea vethe engine running in an
enclosed space wi thout suf ficient venti‐
lation. &
WARNING Risk of skidding and of an
accident due toshifting down on slippery
ro ad sur faces
If yo u shift down on slippery road sur faces to
inc rease the engine braking ef fect, the drive
wheels may lose traction. #
Do not shift down on slippery road sur‐
fa ces toinc rease the engine braking
ef fect. &
DANG ER Risk of fata l injuries due topoi‐
sonous exhaust gases
If th eta ilpipe is bloc ked or suf ficient ventila‐
tion is not possible, poisonous exhaust gases
such as carbon monoxide may enter theve hi‐
cle. This is the case, forex ample, if theve hi‐
cle is stuck in sn ow. #
When the engine or thest ationary
heater are running, keep theta ilpipe
and the area around theve hicle clear of
sno w. #
Open a window on the side of theve hi‐
cle facing the wind toensure an ade‐
qu ate supply of fresh air. &
WARNING Risk of accident due tothe
brake sy stem overheating
If yo u lea veyour foot on the brake pedal
when driving, the brake sy stem may over‐
heat.
This increases the braking dis tance and the
brake sy stem may evenfa il. #
Never use the brake pedal as a foot re st. #
Do not depress the brake pedal and the
accelerator pedal at the same time
while driving. *
NO
TECausing wearto the brake linings
by permanently depressing the brake
pedal #
Do not permanently depress the brake
pedal while driving. #
Touse braking ef fect of the engine,
shift toa lo werge ar in good time. Driving and parking
18 3
Page 512 of 681
*
NO
TEOverheating due tothe tyre infla‐
tion compressor running too long #
Do not runth e tyre inflation compres‐
sor for longer than ten minu tes without
inter ruption. Comply with
the manufacturer's saf ety no tes on
th est icke r on the tyre inflation compressor.
Ha ve the tyre sealant bottle replaced in a quali‐
fi ed specialist workshop every five years. #
Do not remo veany fore ign objects which
ha ve entered the tyre. #
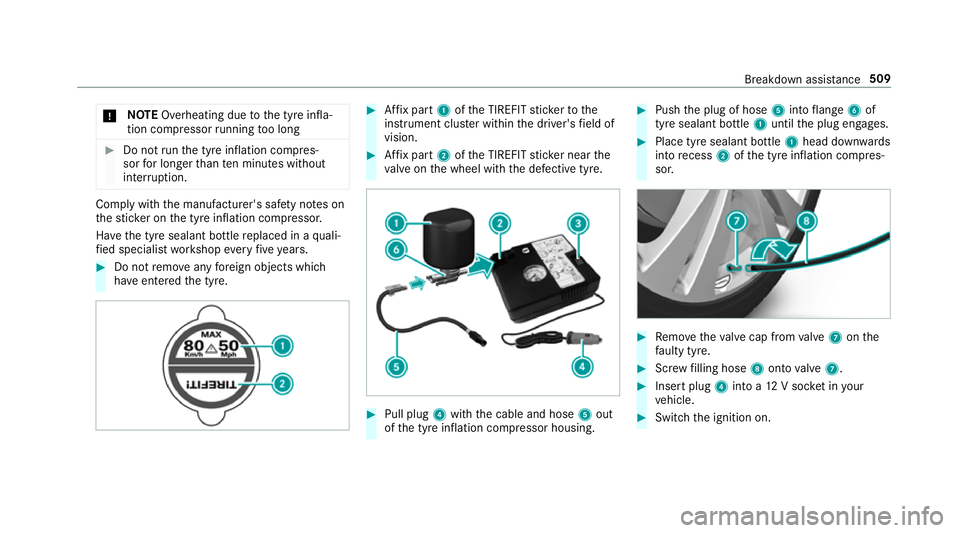
Affix pa rt1 ofthe TIREFIT sticke rto the
instrument clus ter within the driver's field of
vision. #
Affix pa rt2 ofthe TIREFIT sticke r near the
va lve on the wheel with the defective tyre. #
Pull plug 4with the cable and hose 5out
of the tyre inflation compressor housing. #
Push the plug of hose 5into flange 6of
tyre sealant bottle 1until the plug engages. #
Place tyre sealant bottle 1head down wards
into recess 2ofthe tyre inflation compres‐
sor. #
Remo vetheva lve cap from valve 7 onthe
fa ulty tyre. #
Screw filling hose 8onto valve 7. #
Insert plug 4into a 12V soc ket in your
ve hicle. #
Switch the ignition on. Breakdown assis
tance 509
Page 549 of 681
Ve
hicles with a tyre pressure monitoring
sy stem: if a collapsible spare wheel is fitted
th e tyre pressure monitoring sy stem cann ot
function reliably. Only restart the sy stem
again when the collapsible spare wheel has
been replaced with a new wheel.
Ve hicles with a tyre pressure monitoring
sy stem: for a few minutes af ter a collapsible
spare wheel is fitted, the sy stem may still
display the tyre pressure of there mo ved
wheel.
Be sure toalso obse rveth efo llowing fur ther
re lated subjects:
R Notes on tyre pressure (→ page 526)
R Tyre pressure table (→ page 527) Re
moving the collapsible spare wheel The collapsible spare wheel is secured in
the col‐
lapsible spare wheel bag in the boot. #
Obser vethe information on mounting tyres
(→ page 535). #
Open the boot. #
Detach thefast ening stra ps. #
Unhook there taining spring hooks of thefa s‐
te ning stra ps from the brac kets. #
Remo vethe emer gency spa rewheel bag
to ge ther with the collapsible spare wheel. #
Open the emer gency spa rewheel bag and
re mo vethe collapsible spare wheel. Inflating
the collapsible spa rewheel Re
quirements:
R Mount the collapsible spare wheel as descri‐
bed. (→ page542)
R Remo vethe tyre inflation compressor from
th estow agewell under the boot floor.
(→ page 507)
* NO
TEDama getothe collapsible spare
wheel when lo wering theve hicle Lo
we ring theve hicle without pr eviously
inflating the collapsible spare wheel can
damage its rim. #
Inflate the collapsible spare wheel using
th e tyre inflation compressor before
lo we ring theve hicle. *
NO
TEOverheating due tothe tyre infla‐
tion compressor running too long #
Do not runth e tyre inflation compres‐
sor for longer than ten minu tes without
inter ruption. #
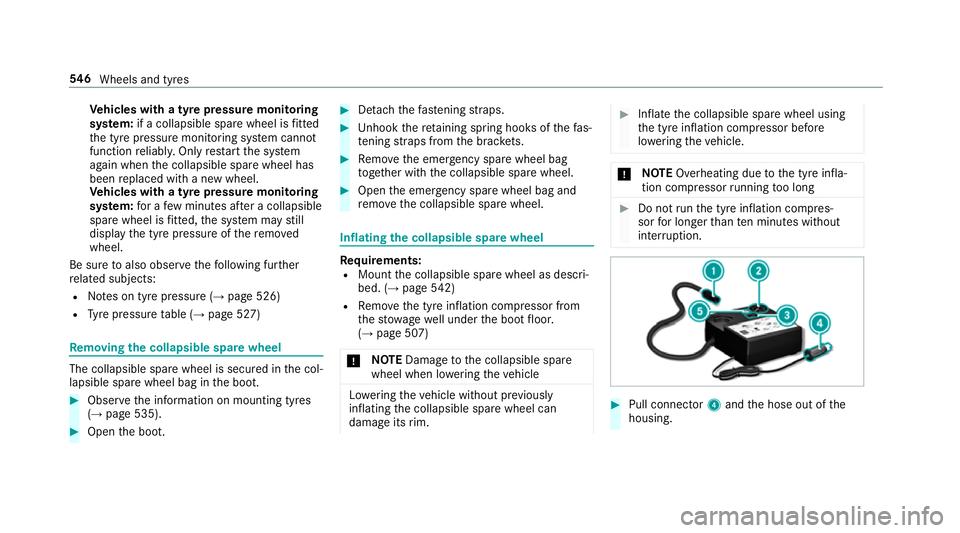
Pull connec tor4 and the hose out of the
housing. 546
Wheels and tyres
Page 562 of 681
*
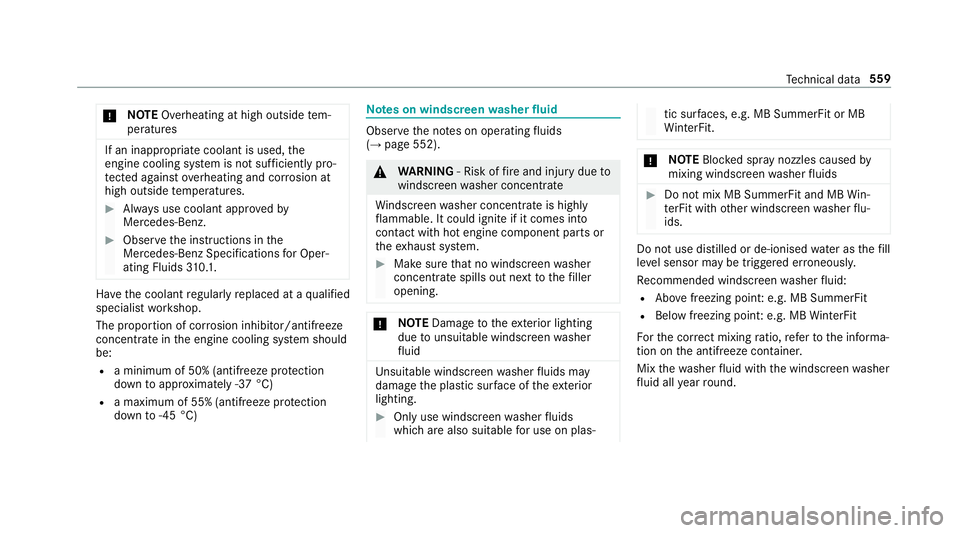
NO
TEOverheating at high outside tem‐
peratures If an inapp
ropriate coolant is used, the
engine cooling sy stem is not suf ficiently pro‐
te cted against overheating and cor rosion at
high outside temp eratures. #
Alw ays use coolant appr ovedby
Mercedes-Benz. #
Obser vethe instructions in the
Mercedes-Benz Specifications for Oper‐
ating Fluids 310.1. Ha
ve the coolant regularly replaced at a qualified
specialist workshop.
The proportion of cor rosion inhibitor/antifreeze
concentrate in the engine cooling sy stem should
be:
R a minimum of 50% (antifreeze pr otection
down toappr oximately -37 °C)
R a maximum of 55% (antifreeze pr otection
down to-45 °C) Note
s on windscreen washer fluid Obser
vethe no tes on operating fluids
(→ page 552). &
WARNING ‑ Risk of fire and injury due to
windscreen washer concentrate
Wi ndsc reen washer concentrate is highly
fl ammable. It could ignite if it comes into
con tact wi thhot engine component parts or
th eex haust sy stem. #
Make sure that no windsc reen washer
concentrate spills out next tothefiller
opening. *
NO
TEDama getotheex terior lighting
due tounsuitable windsc reen washer
fl uid Uns
uitable windsc reen washer fluids may
damage the plastic sur face of theex terior
lighting. #
Only use windscreen washer fluids
which are also suitable for use on plas‐ tic sur
faces, e.g. MB SummerFit or MB
Wi nterFit. *
NO
TEBlocked spr aynozzles caused by
mixing windscreen washer fluids #
Do not mix MB SummerFit and MB Win‐
te rFit with other windscreen washer flu‐
ids. Do not use distilled or de-ionised
water asthefill
le ve l sensor may be triggered er roneously.
Re commended windscreen washer fluid:
R Abo vefreezing point: e.g. MB SummerFit
R Below freezing point: e.g. MB WinterFit
Fo rth e cor rect mixing ratio, referto the informa‐
tion on the antif reeze contai ner.
Mix thewa sher fluid with the windscreen washer
fl uid all year round. Te
ch nical da ta559
Page 606 of 681
Display messages
Possible causes/consequences and M
MSolutions
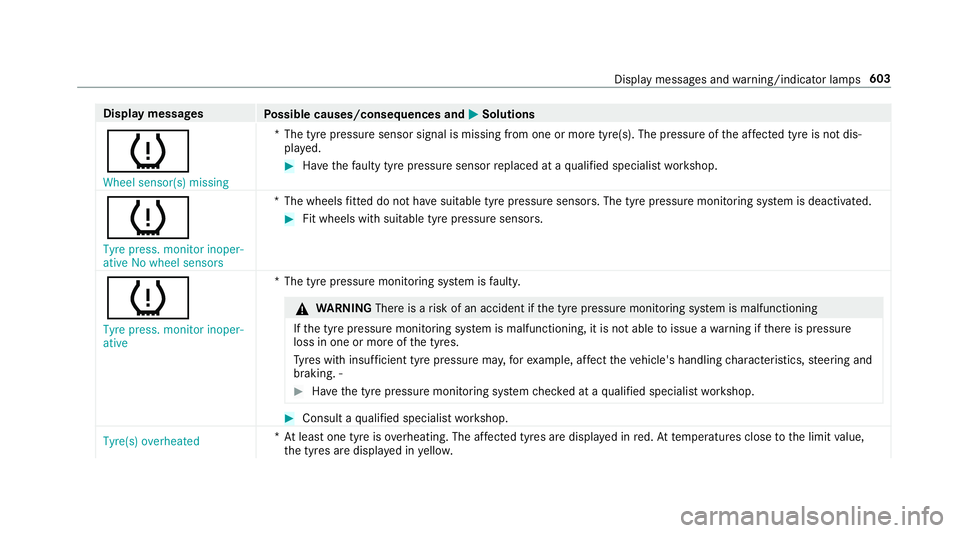
h Wheel sensor(s) missing *T
he tyre pressure sensor signal is missing from one or more tyre(s). The pressure of the af fected tyre is not dis‐
pl ay ed. #
Have thefa ulty tyre pressure sensor replaced at a qualified specialist workshop.
h Tyre press. monitor inoper-
ative No wheel sensors *T
he wheels fitted do not ha vesuitable tyre pressure sensors. The tyre pressure monitoring sy stem is deactivated. #
Fit wheels with suitable tyre pressure sensors.
h
Tyre press. monitor inoper-
ative *T
he tyre pressure monitoring sy stem is faulty. &
WARNING Thereis a risk of an accident if the tyre pressure monitoring sy stem is malfunctioning
If th e tyre pressure monitoring sy stem is malfunctioning, it is not able toissue a warning if there is pressure
loss in one or more of the tyres.
Ty res with insuf ficient tyre pressure ma y,forex ample, af fect theve hicle's handling characteristics, steering and
braking. ‑ #
Have the tyre pressure monitoring sy stem checked at a qualified specialist workshop. #
Consult a qualified specialist workshop.
Tyre(s) overheated *A
t least one tyre is overheating. The af fected tyres are displ ayed in red. At temp eratures close tothe limit value,
th e tyres are displa yed in yello w. Displ
aymessa ges and warning/indicator lamps 603
Page 607 of 681
Display messages
Possible causes/consequences and M
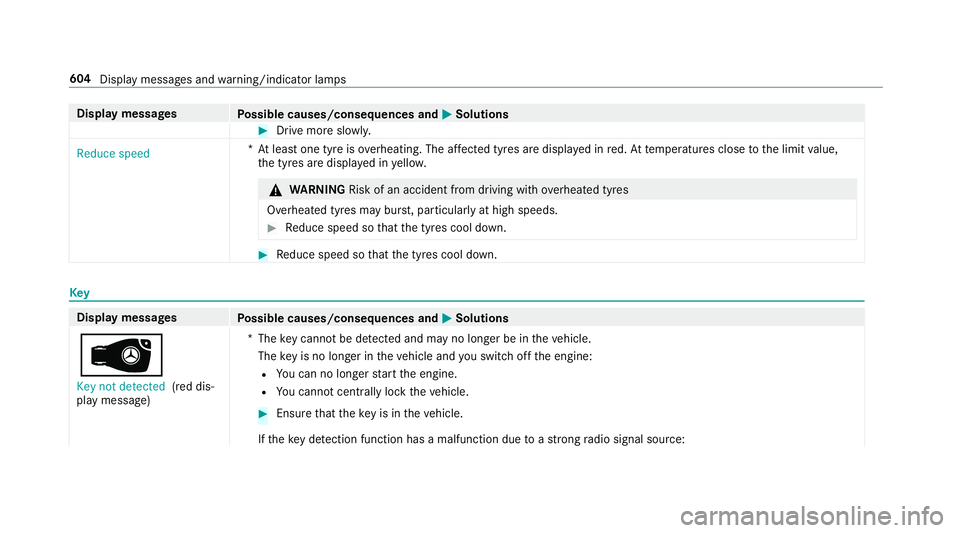
MSolutions #
Drive more slowl y.
Reduce speed *A
t least one tyre is overheating. The af fected tyres are displ ayed in red. At temp eratures close tothe limit value,
th e tyres are displa yed in yello w. &
WARNING Risk of an accident from driving wi thove rheated tyres
Overheated tyres may bur st, particularly at high speeds. #
Reduce speed so that the tyres cool down. #
Reduce speed so that the tyres cool down. Key
Display messages
Possible causes/consequences and M MSolutions
 Key not detected (red dis‐
play message) *T
hekey cannot be de tected and may no longer be in theve hicle.
The key is no lon ger in theve hicle and you swit choff the engine:
R You can no lon gerst art the engine.
R You cannot centrally lock theve hicle. #
Ensure that theke y is in theve hicle.
If th eke y de tection function has a malfunction due toast ro ng radio signal source: 604
Display messages and warning/indicator lamps
Page 611 of 681
Display messages
Possible causes/consequences and M
MSolutions
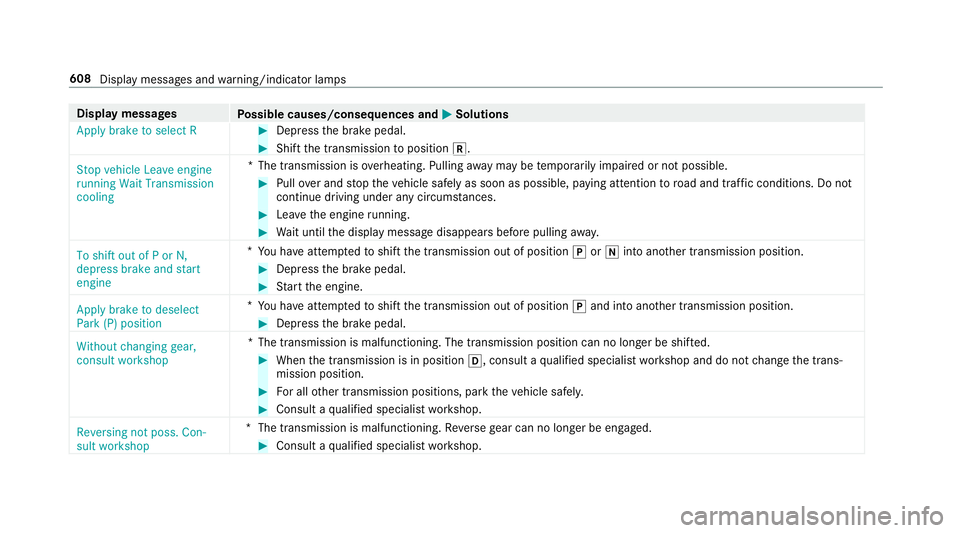
Apply brake to select R #
Depress the brake pedal. #
Shift the transmission toposition k.
Stop vehicle Leave engine
running Wait Transmission
cooling *T
he transmission is overheating. Pulling away may be temp orarily impaired or not possible. #
Pull over and stop theve hicle safely as soon as possible, paying attention toroad and traf fic conditions. Do not
continue driving under any circums tances. #
Lea vethe engine running. #
Wait until the display message disappears before pulling away.
To shift out of P or N,
depress brake and start
engine *
Yo u ha veattem ptedto shift the transmission out of position jori into ano ther transmission position. #
Depress the brake pedal. #
Start the engine.
Apply brake to deselect
Park (P) position *
Yo u ha veattem ptedto shift the transmission out of position jand into ano ther transmission position. #
Depress the brake pedal.
Without changing gear,
consult workshop *T
he transmission is malfunctioning. The transmission position can no longer be shif ted. #
When the transmission is in position h, consult aqualified specialist workshop and do not change the trans‐
mission position. #
For all other transmission positions, park theve hicle safely. #
Consult a qualified specialist workshop.
Reversing not poss. Con-
sult workshop *T
he transmission is malfunctioning. Reversege ar can no lon ger be engaged. #
Consult a qualified specialist workshop. 608
Display messages and warning/indicator lamps