2019 MERCEDES-BENZ GLC SUV warning
[x] Cancel search: warningPage 504 of 673
#
Therefore, place thefilling hose in the
plastic bag that con tained the TIREFIT
kit. +
ENVIRONMEN
TALNO TEEnvironmental
pollution caused byenvironmen tally ir re‐
sponsible disposal Ty
re sealant contains polluta nts.#
Have the tyre sealant bottle disposed of
professionall y,e.g. at a Mercedes-Benz
Service Centre. #
Stow th e tyre sealant bottle, the tyre inflation
compressor and thewa rning triangle. #
Pull away immediatel y. #
Stop driving af ter appro ximately ten minu tes
and check the tyre pressure using the tyre
inflation compressor.
The tyre pressure must now be at least
13 0 kPa (1.3 bar/19 psi). &
WARNING Risk of accident due tothe
specified tyre pressure not being ach‐
ie ved
If th e specified tyre pressure is not achie ved
af te r a brief drive, the tyre is too badly dam‐
aged. The tyre sealant cannot repair the tyre
in this ins tance.
Dama ged tyres and a tyre pressure that is
to o low can significantly impair braking and
handling characteristics. #
Do not drive on. #
Consult a qualified specialist workshop. Countries
that ha veMercedes-Benz
Service24h: you will find a sticke r with thete le‐
phone number, e.g. on the B‑pillar on the driver's
side. #
Cor rect the tyre pressure if it is still at least
13 0 kPa (1.3 bar/19 psi). See the tyre pres‐
sure table on the fuel filler flap forva lues. #
Toincrease the ty repressure: switch on
th e tyre inflation compressor. #
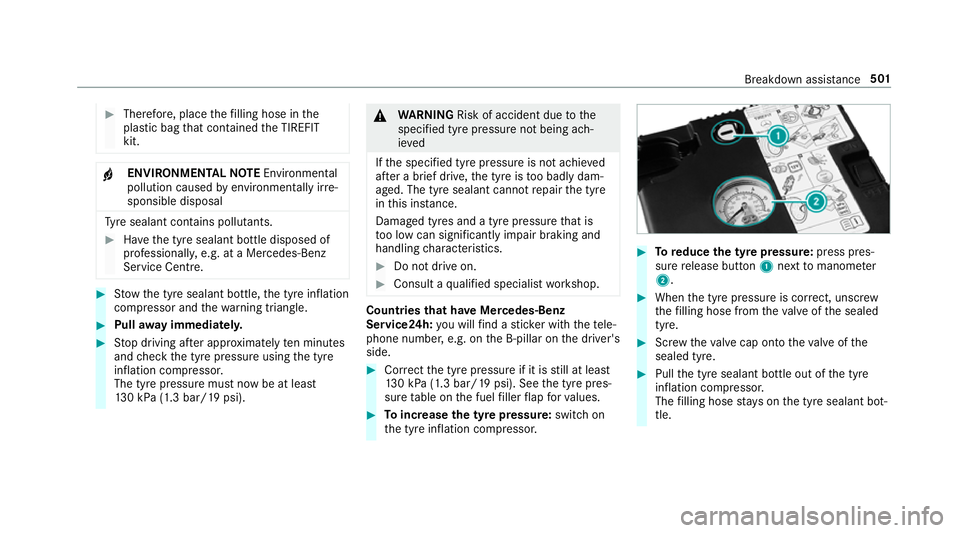
Toreduce the tyre pressure: press pres‐
su re re lease button 1next tomanome ter
2 . #
When the tyre pressure is cor rect, unscr ew
th efilling hose from theva lve of the sealed
tyre. #
Screw theva lve cap onto theva lve of the
sealed tyre. #
Pull the tyre sealant bottle out of the tyre
inflation compressor.
The filling hose stay s on the tyre sealant bot‐
tle. Breakdown assis
tance 501
Page 505 of 673
#
Drive tothe nearest qualified specialist work‐
shop and ha vethe tyre, tyre sealant bottle
and filling hose replaced there. Batte
ry(vehicle) Note
s onthe12 V battery &
WARNING Risk of an accident due to
wo rkcar ried out incor rectly on the bat‐
te ry
Wo rkcar ried out incor rectly on the battery
can, forex ample, lead toa short circuit. This
can lead tofunction restrictions in saf ety-re l‐
eva nt sy stems, e.g. the lighting sy stem, ABS
(anti-lock braking sy stem) or ESP ®
(Elec‐
tronic Stability Prog ram). The operating
saf ety of your vehicle may be restricted.
Yo u could lose cont rol of theve hicle in the
fo llowing situations:
R when braking
R intheeve nt of ab rupt steering manoeu‐
vres and/or when theve hicle's speed is
not adap tedto thero ad conditions #
Intheeve nt of a sho rtcircuit or a simi‐
lar incident, contact a qualified special‐
ist workshop immediately. #
Do not continue driving. #
Alw ays ha vewo rkon the battery car ried
out at a qualified specialist workshop. R
Further information on ABS (/ page210)
R Further information on ESP ®
(/ page 211)
Fo r saf etyre asons, Mercedes-Benz recommends
th at you on lyuse bat teries which ha vebeen tes‐
te d and appr ovedfo ryo ur vehicle byMercedes-
Benz. These batteries pr ovide inc reased impact
pr otection topreve ntvehicle occupants from
suf fering acid bu rns should the battery be dam‐
aged in theeve nt of an accident. All
vehicles except vehicles with a lithium-
ion battery &
WARNING Risk ofexplosion due toelec‐
tros tatic charge
Electros tatic charge can cause spa rks which
may ignite the highly flammable gas mixture
in the batter y. #
Todischar geany electros tatic charge
th at may ha vebuilt up, touch the me tal
ve hicle body before handling the bat‐
te ry. The highly
flammable gas mixture is created
while the battery is charging and during starting
assis tance. &
WARNING Danger of chemical burns
from the battery acid
Battery acid is caustic. #
Avoid contact with the skin, eyes or
clo thing. #
Do not lean overth e batter y. 502
Breakdown assis tance
Page 507 of 673
Note
s onstarting assi stance and on charg‐
ing the12 V battery Ve
hicles with a lithium-ion battery
When charging the battery and during starting
assis tance, al ways use the jump-s tart connec‐
tion point in the engine compartment.
* NO
TEDamaging the battery thro ugh
ove rvoltage When using a battery
charge r without a maxi‐
mum charging voltage, the battery or the
ve hicle electronics may be damaged. #
Only use battery charge rs with a maxi‐
mum charging voltage of 14.8 V. All
other vehicles
When charging the battery and during starting
assis tance, al ways use the jump-s tart connec‐
tion point in the engine compartment. *
NO
TEDamaging the battery thro ugh
ove rvoltage When using a battery
charge r without a maxi‐
mum charging voltage, the battery or the
ve hicle electronics may be damaged. #
Only use battery charge rs with a maxi‐
mum charging voltage of 14.8 V. &
WARNING Risk ofexplosion from hydro‐
ge nga s igniting
A battery generates hydrogen gas during the
ch arging process. If there is a short circuit or
spar ksstart toform ,th ere is a danger of the
hy drogen gas igniting. #
Make sure that the positive term inal of
th e connected battery does not come
into conta ct withvehicle parts. #
Never place me tal objects or tools on a
batter y. #
When connecting and disconnecting the
batter y,yo u must obse rveth e descri‐
bed order forth e battery clamps. #
When giving starting assis tance, al ways
make sure that you on lyconnect bat‐
te ry term inals with identical polarity. #
During starting assis tance, you must
obse rveth e described order for con‐
necting and disconnecting the jump
lead. #
Do not connect or disconnect the bat‐
te ry cla mp s while the engine is running. &
WARNING Risk ofexplosion during
ch arging process and starting assis tance
During thech arging process and starting
assis tance, the battery may release an explo‐
sive gas mixture. #
Avoid fire , naked flames, creating
spar ksand smoking. #
Make sure that there is suf ficient venti‐
lation du ring thech arging process and
during starting assis tance. #
Do not lean over a batter y. 504
Breakdown assis tance
Page 508 of 673

&
WARNING Risk ofexplosion from a fro‐
zen battery
A dischar ged battery may freeze at temp era‐
tures slightly abo veor below freezing point.
During starting assis tance or battery charg‐
ing, bat tery gas may be released. #
Alw aysth aw a frozen bat tery out first
before charging it or per form ing start‐
ing assis tance. If
th e indicator/warning lamps in the instrument
clus ter do not light up at low temp eratures, it is
ve ry likely that the dischar ged battery has fro‐
zen. In this case you may neither jump-s tart the
ve hicle nor charge the batter y.
The service life of a battery that has been
th awe d may be dramatically shor tened. The
st arting characteristics may be impaired, espe‐
cially at low temp eratures.
It is recommended that you ha veathaw ed bat‐
te ry checked at a qualified specialist workshop. Plug-in
hybrid: be sure toobser vethe no tes in
th e Supplement. Otherwise, you may failto rec‐
ognise dangers.
All vehicles
* NO
TEDama gecaused bynumerous or
ex tended attem ptsto start the engine Nume
rous or extended attem ptsto start the
engine may damage the catalytic con verter
due tonon-combu sted fuel. #
Avoid numerous and extended attem pts
to start the engine. Obser
vethefo llowing points during starting
assis tance and when charging the battery:
R Only use undamaged jump lead/charging
cables with a suf ficient cross-section and
insula tedte rm inal clamps.
R Non- insulated parts of thete rm inal clamps
must not come into con tact wi thother me tal
parts while the jump lead/charging cable is
connected tothe battery/jump-s tart connec‐
tion point. R
The jump lead/charging cable must not
come into contact wi thany parts which may
mo vewhen the engine is running.
R Alw ays make sure that nei ther you nor the
battery is elect rostatically charge d.
R Keep away from fire and naked flames.
R Do not lean overth e batter y.
Obser vethe additional following points when
ch arging the battery:
R Only use battery charge rs tested and
appr oved for Mercedes-Benz.
R Read the battery charge r's operating instruc‐
tions before charging the batter y.
Obser vethe additional following points during
st arting assis tance:
R Starting assis tance may only be pr ovided
using batteries with a nominal voltage of
12 V.
R The vehicles must not touch.
R Petrol engine: only acceptstarting assis‐
ta nce if the engine and exhaust sy stem are
cold. Breakdown assis
tance 505
Page 512 of 673
%
Vehicles with automatic transmission: if
th e automatic transmission cann otbe shif‐
te dto position i, orthe multifunction dis‐
play in the instrument clus ter does not show
anything, ha vetheve hicle transpor tedaw ay
( / page 510). A towing vehicle with lifting
equipment is requiredforve hicle transpor ta‐
tion.
* NO
TEDama gedue to to wing away at
exc essively high speeds or over long dis‐
ta nces The driv
etra in could be damaged when tow‐
ing at excessively high speeds or over long
dis tances. #
Atowing speed of 50 km/h must not
be exc eeded. #
Atowing dis tance of 50 km must not be
exc eeded. &
WARNING Risk of accident when towing
a ve hicle which is too heavy
If th eve hicle being tow- star ted or towed
aw ay is heavier than the permissible gross
mass, thefo llowing situations can occur:
R theto wing eye may become de tach ed.
R the car/t railer combination may swer ve
or eve nove rturn. #
If ano ther vehicle is tow- star ted or
to we daw ay, its weight must not exceed
th e permissible gross mass of your own
ve hicle. If a
vehicle must be tow- star ted or towe daw ay,
its permissible gross weight must not exceed the
permissible gross weight of theto wing vehicle. #
Information on the permissible gross weight
of theve hicle can be found on theve hicle
identification plate (/ page 539). #
Vehicles with automatic transmission: do
not open the driver's door or front passenger
door, otherwise the automatic transmission
automatically shifts toposition j. #
Fittheto wing eye (/ page512). #
Fasten theto w bar.
* NO
TEDama gedue toincor rect connec‐
tion of theto w bar #
Onlyconnect theto w rope or tow bar to
th eto wing eyes. #
Deactivate the automatic locking mechanism
(/ page 81). #
Do not activate the HOLD function. #
Deactivate tow- aw ay protection
(/ page 101). #
Deactivate Active Brake Assi st
( / page 221). #
Vehicles with automatic transmission:
shift the automatic transmission toposition
i. #
Release the electric parking brake. Breakdown assis
tance 509
Page 513 of 673
&
WARNING Risk of accident due tolimi‐
te d saf ety-re lated functions during the
to wing process
Saf ety-re lated functions are limited or no lon‐
ge rav ailable in thefo llowing situations:
R the ignition is switched off.
R the brake sy stem or po werst eering sys‐
te m is malfunctioning.
R the energy supply or the on-board electri‐
cal sy stem is malfunctioning.
When your vehicle is then towe daw ay, signif‐
icantly more ef fort may be requ ired tosteer
and brake than is no rmally requ ired. #
Use a tow bar. #
Make sure that thesteering wheel can
mo vefreely, before towing theve hicle
aw ay. *
NO
TEDama gedue toexcessive tracti ve
po wer If
yo u pull away sharpl y,the tractive po wer
may be too high and theve hicles could be
damaged. #
Pull away slowly and smoo thly. Loading the
vehicle for transport #
Obser vethe no tes on towing away
( / page 508). #
Connect theto w bar totheto wing eye in
order toload theve hicle.
% You can also attach theto w bar tothe trailer
hitch. #
Vehicles with automatic transmission:
shift the automatic transmission toposition
i.
% Ve
hicles with automatic transmission:
th e automatic transmission may be loc ked in
position jintheeve nt of dama getothe
electrical sy stem. Toshift toi , pr ovide the on-board electrical sy
stem with po wer
( / page 506). #
Load theve hicle onto the transpor ter. #
Vehicles with automatic transmission:
shift the automatic transmission toposition
j. #
Use the electric parking brake tosecure the
ve hicle against rolling away. #
Only secure theve hicle bythe wheels.
AMG vehicles with ADS PLUS (Adaptive
Damping Sy stem PLUS) &
WARNING Risk of an accident when
transporting vehicles with Adaptive
Damping Sy stem PLUS
The reduced damping forc es on theve hicle
being transpor ted can cause theve hicle/
trailer combination tostart toswing.
As a result, when transporting vehicles with
th eAd aptive Damping Sy stem PLUS, the
ve hicle/trailer combination may start toskid.
Consequentl y,yo u could lose cont rol of your
ve hicle. 51 0
Breakdown assis tance
Page 515 of 673
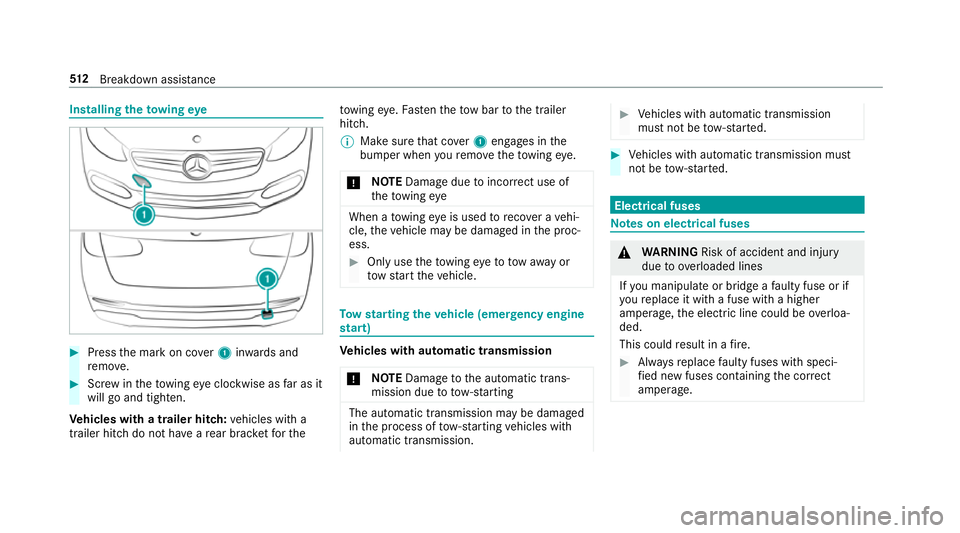
Installing
theto wing eye #
Press the mark on co ver1 inwa rds and
re mo ve. #
Screw intheto wing eyeclockwise as far as it
will go and tighten.
Ve hicles with a trailer hitch: vehicles with a
trailer hitch do not ha veare ar brac ketfo rthe to
wing eye. Fasten theto w bar tothe trailer
hitch.
% Make sure that co ver1 engages in the
bumper when youre mo vetheto wing eye.
* NO
TEDama gedue toincor rect use of
th eto wing eye When a
towing eye is used toreco ver a vehi‐
cle, theve hicle may be damaged in the proc‐
ess. #
Only use theto wing eyeto to waw ay or
to w start theve hicle. To
w starting theve hicle (eme rgency engine
st art) Ve
hicles with automatic transmission
* NO
TEDama getothe automatic trans‐
mission due to tow-starting The automatic transmission may be damaged
in the process of tow- starting vehicles with
automatic transmission. #
Vehicles with automatic transmission
must not be tow- star ted. #
Vehicles with automatic transmission must
not be tow- star ted. Electrical fuses
Note
s on electrical fuses &
WARNING Risk of accident and inju ry
due to ov erloaded lines
If yo u manipulate or bridge a faulty fuse or if
yo ure place it with a fuse with a higher
amperage, the electric line could be overloa‐
ded.
This could result in a fire. #
Alw aysre place faulty fuses with speci‐
fi ed new fuses conta iningthe cor rect
amperage. 512
Breakdown assis tance
Page 516 of 673

*
NO
TEDama gedue toincor rect fuses Electrical components or sy
stems may be
damaged byincor rect fuses, or their func‐
tionality may be significant lyimpaired. #
Only use fuses that ha vebeen appr oved
by Mercedes-Benz and which ha vethe
cor rect fuse rating. Blown fuses mu
stbe replaced with fuses of the
same rating, which you can recognise bythe col‐
our and fuse rating. The fuse ratings and fu rther
information tobe obser ved are lis ted in the fuse
assignment diagram.
Fu se assignment diag ram: onthe fuse box in
th e load compartment (/ page515).
* NO
TEDama geor malfunctions caused
by moisture Moisture may cause dama
getothe electrical
sy stem or cause it tomalfunction. #
When the fuse box is open, make sure
th at no moisture can enter the fuse
box. #
When closing the fuse box, make sure
th at the seal of the lid is positioned cor‐
re ctly on the fuse box. If
th e newly inser ted fuse also blo ws, ha vethe
cause traced and rectified at a qualified special‐
ist workshop.
Ensure thefo llowing before replacing a fuse:
R The vehicle is secured against rolling away.
R All electrical consumers are switched off.
R The ignition is switched off.
The electrical fuses are located in various fuse
bo xes:
R Fuse box in the engine compartment on the
driver's side (/ page513)
R Fuse box on the driver's side of the cockpit
(/ page 514)
R Fuse box in the front passenger foot we ll
(/ page 514) R
Fuse box in the load compartment on the
ri ght-hand side of theve hicle, when vie wed
in the direction of tr avel (/ page515) Opening and closing
the fuse box in the
engine compa rtment Requ
irements:
R A dry clo thand a sc rewdriver are available.
Obse rveth e no tes on electrical fuses
(/ page 512).
Opening &
WARNING Risk of inju ryfrom using the
windscreen wipers while the engine bon‐
net is open
When the engine bonn etis open, and the
windscreen wipers are set in motion, you can
be trapped bythe wiper linkage. #
Alw ays switch off the windscreen wip‐
ers and ignition before opening the
engine bonn et. Breakdown assis
tance 513