2019 MERCEDES-BENZ GLC SUV height
[x] Cancel search: heightPage 18 of 673
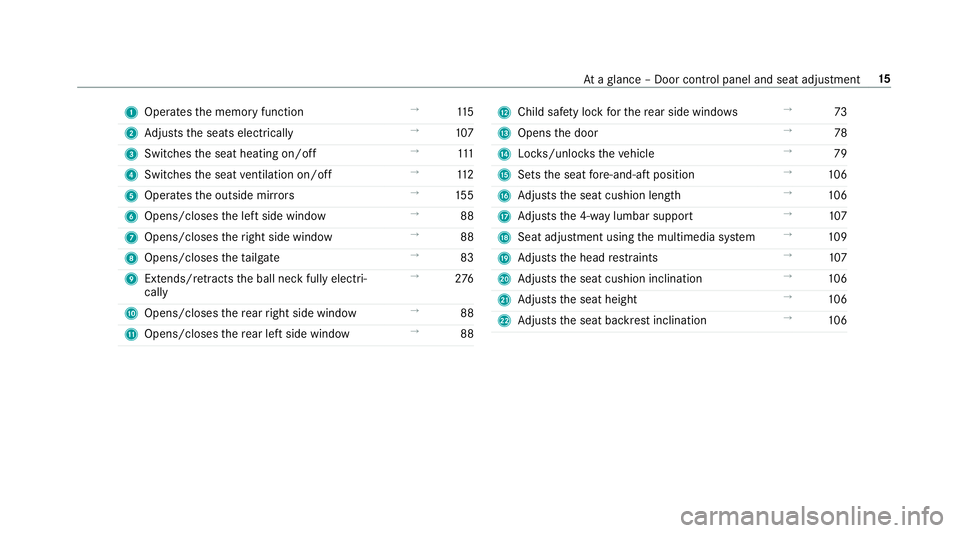
1
Operates the memory function →
11 5
2 Adjusts the seats electrically →
107
3 Switches the seat heating on/off →
111
4 Switches the seat ventilation on/o ff →
11 2
5 Operates the outside mir rors →
15 5
6 Opens/closes the left side window →
88
7 Opens/closes theright side window →
88
8 Opens/closes theta ilgate →
83
9 Extends/ retracts the ball neck fully electri‐
cally →
276
A Opens/closes there ar right side window →
88
B Opens/closes there ar left side wind ow→
88 C
Child saf ety lock forth ere ar side wind ows →
73
D Opens the door →
78
E Locks/unloc kstheve hicle →
79
F Sets the seat fore -and-aft position →
106
G Adjusts the seat cushion length →
106
H Adjusts the 4-w aylumbar support →
107
I Seat adjustment using the multimedia sy stem →
109
J Adjusts the head restra ints →
107
K Adjusts the seat cushion inclination →
106
L Adjusts the seat height →
106
M Adjusts the seat backrest inclination →
106 At
aglance – Door control panel and seat adjustment 15
Page 52 of 673
Safely transporting
children in theve hicle Alw
ays obser vewhen children are tr avelling
in theve hicle %
Also strictly obser vethe saf ety no tesfo rthe
specific situation. In this wa yyo u can recog‐
nise po tential risks and avoid dangers if chil‐
dren are tr avelling in theve hicle
(/ page 50).
Be diligent
Bear in mind that neglecting tosecure a child in
th ech ild restra int sy stem may ha veserious con‐
sequences. Alw ays be diligent in securing a child
carefully before everyjou rney.
To impr oveprotection forch ildren younger than
12 years old or under 1.50 m in height,
Mercedes-Benz recommends you obse rvethe
fo llowing information:
R Alw ays secure thech ild in a child restra int
sy stem suitable forth is Mercedes-Benz vehi‐
cle.
R The child restra int sy stem must be appropri‐
ate tothe age, weight and size of thech ild. R
The vehicle seat must be suitable forfitting a
ch ild restra int sy stem (/ page 55).
Ac cident statistics show that children secured
on there ar seats are general lysafer than chil‐
dren secured on the front seats. Forth is reason,
Mercedes-Benz strongly advises that youfit a
ch ild restra int sy stem toare ar seat.
Generic term"child restra int sy stem"
The generic term child restra int sy stem is used
in this Owner's Manual. A child restra int sy stem
is, forex ample:
R a baby car seat
R are ar wa rd-f acing child seat
R afo rw ard-facing child seat
R ach ild boos ter seat with a backrest and seat
belt guide
Mercedes-Benz recommends using a child
boos ter seat with a backrest.
The child restra int sy stem must be appropriate
to the age, weight and size of thech ild. Observing la
wsand legal requirements
Alw ays obser vethe legal requ irements when
using a child restra int sy stem in theve hicle.
Make sure that thech ild restra int sy stem is
appr oved in accordance with theva lid test speci‐
fi cations and guidelines. Further information can
be obtained at a qualified specialist workshop.
Mercedes-Benz recommends that you use a
Mercedes-Benz Service Centre forth is purpose.
Only use appr ovedch ild restra int sy stems
On lych ild restra int sy stems that meet thefo l‐
lowing UNECE standards are permit tedfo r use in
th eve hicle:
R UN-R44
R UN-R129 (i-Size child restra int sy stems)
Information on child restra int sy stem appr oval
categories and de tails on the appr oval label on
th ech ild restra int sy stem (/ page 56). Occupant saf
ety49
Page 107 of 673
Seats
Ad
justing the front seat mechanically and
electrically (without Seat Comfort Package) &
WARNING Risk of becoming trapped if
th e seats are adjus tedby children
Children could become trapped if they adjust
th e seats, particularly when unattended. #
When leaving theve hicle, alw aysta ke
th eke y with you and lock theve hicle.
This also applies tothe digital vehicle
ke y if the "Digital Vehicle Key" function
is activated via Mercedes me connect. #
Never lea vechildren unat tended in the
ve hicle. The seats can be adjus
ted when the ignition is
switched off. &
WARNING Risk of becoming trapped
when adjusting the seats
When you adjust a seat, you or other vehicle
occupants could become trapped, e.g. on the
seat guide rail. #
When adjusting a seat, make sure that
no one has any body parts in the sweep
of the seat. Obser
vethe saf ety no tes on "Airbags" and "Chil‐
dren in theve hicle". &
WARNING Risk of accident due tothe
driver's seat not being engaged
If th e driver's seat is not engaged, it could
mo veunexpectedly while theve hicle is in
motion.
This could cause youto lose control of the
ve hicle. #
Alw ays make sure that the driver's seat
is engaged before starting theve hicle. &
WARNING Risk of inju rythro ugh adjust‐
ing vehicle settings while theve hicle is in
motion
Yo u could lose cont rol of theve hicle in the
fo llowing situations:
R ifyo u adjust the driver's seat, the head
re stra ints, thesteering wheel or the mir‐
ro r while theve hicle is in motion
R ifyo ufast enyour seat belt while theve hi‐
cle is in motion #
Before starting the engine: adjust the
driver's seat, the head restra ints, the
st eering wheel or the mir ror and fasten
yo ur seat belt. &
WARNING Risk of becoming trapped if
th e seat height is adjus ted carelessly
If yo u adjust the seat height carelessly, you
or other vehicle occupants could be trapped
and thereby injured. 104
Seats and stowing
Page 108 of 673
Children in particular could acciden
tally
press the electrical seat adjustment buttons
and become trapped. #
While moving the seats, make sure that
hands or other body parts do not get
under the le ver assembly of the seat
adjustment sy stem. &
WARNING Risk of inju rydue tohead
re stra ints which are not fitted or are
adjus ted inco rrectly
If head restra ints are not fitted or are adjus‐
te d incor rectl y,they cannot pr ovide pr otec‐
tion as intended.
There is an increased risk of injury in the
head and neck area, e.g. in theeve nt of an
accident or when braking. #
Alw ays drive with the head restra ints
fi tted. #
Before driving off, ma kesure forev ery
ve hicle occupant that the cent reofthe
head restra int supports the back of the
head at about eye le vel. Do not inter
change the head restra ints of the
front and rear seats. Otherwise, you will not be
able toadjust the height and angle of the head
re stra ints cor rectl y.
Ad just the head restra int fore -and-aft position so
th at it is as close as possible tothe back of your
head. &
WARNING Risk of inju ryor death due to
incor rect seat position
The seat belt does not of ferth e intended
le ve l of pr otection if you ha venot mo vedthe
seat backrest toan almost vertical position.
When braking or in theeve nt of an accident,
yo u could slide underneath the seat belt and
sus tain abdominal or neck injuries, forex am‐
ple. #
Adjust the seat proper lybefore begin‐
ning your journe y. #
Alw ays ensure that the seat backrest is
in an almost vertical position and that
th e shoulder section of your seat belt is
ro uted across the cent reofyour shoul‐
der. *
NO
TEDama getothe seats when moving
th e seats back The seats may be damaged
byobjects when
moving the seats bac k. #
When moving the seats bac k,make
sure that there are no objects in the
fo ot we ll, under or behind the seats. Seats and
stowing 105
Page 109 of 673
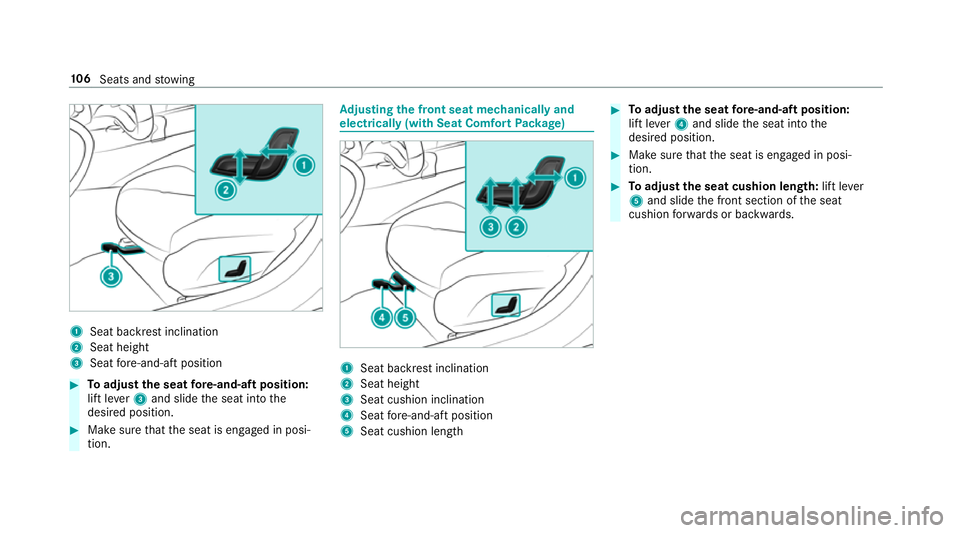
1
Seat ba ckrest inclination
2 Seat height
3 Seat fore -and-aft position #
Toadjust the seat fore -and-aft position:
lift le ver3 and slide the seat into the
desired position. #
Make sure that the seat is engaged in posi‐
tion. Ad
justing the front seat mechanically and
electrically (with Seat Comfort Package) 1
Seat backrest inclination
2 Seat height
3 Seat cushion inclination
4 Seat fore -and-aft position
5 Seat cushion length #
Toadjust the seat fore -and-aft position:
lift le ver4 and slide the seat into the
desired position. #
Make sure that the seat is engaged in posi‐
tion. #
Toadjust the seat cushion length: lift lever
5 and slide the front section of the seat
cushion forw ards or backwards. 106
Seats and stowing
Page 110 of 673
Ad
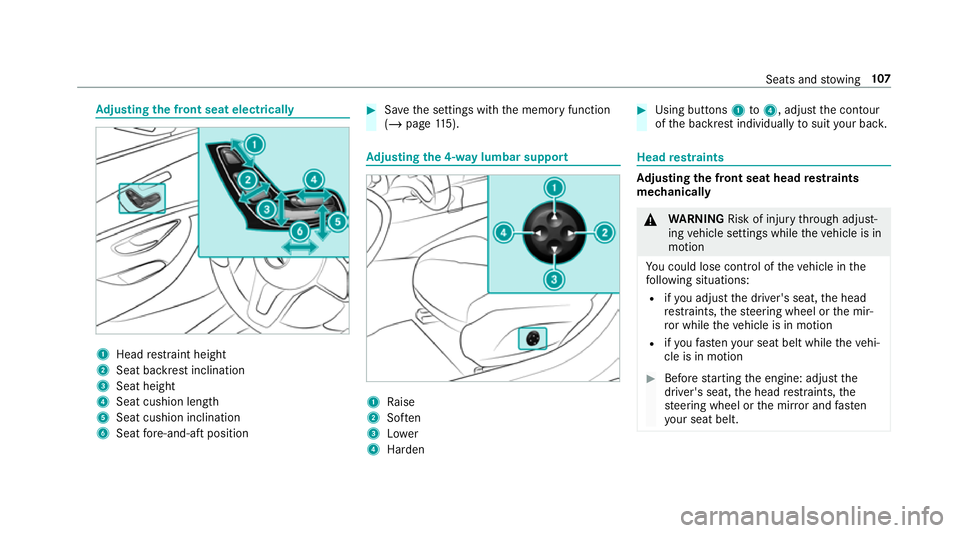
justing the front seat electrically 1
Head restra int height
2 Seat backrest inclination
3 Seat height
4 Seat cushion length
5 Seat cushion inclination
6 Seat fore -and-aft position #
Save the settings with the memory function
(/ page 115). Ad
justing the 4-w aylumbar support 1
Raise
2 Soften
3 Lower
4 Harden #
Using buttons 1to4 , adjust the conto ur
of the backrest individually tosuit your bac k. Head
restra ints Ad
justing the front seat head restra ints
mechanically &
WARNING Risk of inju rythro ugh adjust‐
ing vehicle settings while theve hicle is in
motion
Yo u could lose cont rol of theve hicle in the
fo llowing situations:
R ifyo u adjust the driver's seat, the head
re stra ints, thesteering wheel or the mir‐
ro r while theve hicle is in motion
R ifyo ufast enyour seat belt while theve hi‐
cle is in motion #
Before starting the engine: adjust the
driver's seat, the head restra ints, the
st eering wheel or the mir ror and fasten
yo ur seat belt. Seats and
stowing 107
Page 111 of 673
&
WARNING Risk of inju rydue tohead
re stra ints which are not fitted or are
adjus ted incor rectly
If head restra ints are not fitted or are adjus‐
te d incor rectl y,they cannot pr ovide pr otec‐
tion as intended.
There is an increased risk of injury in the
head and neck area, e.g. in theeve nt of an
accident or when braking. #
Alw ays drive with the head restra ints
fi tted. #
Before driving off, ma kesure forev ery
ve hicle occupant that the cent reofthe
head restra int supports the back of the
head at about eye le vel. Do not inter
change the head restra ints of the
front and rear seats. Otherwise, you will not be
able toadjust the height and angle of the head
re stra ints cor rectl y.
Ad just the head restra int fore -and-aft position so
th at it is as close as possible tothe back of your
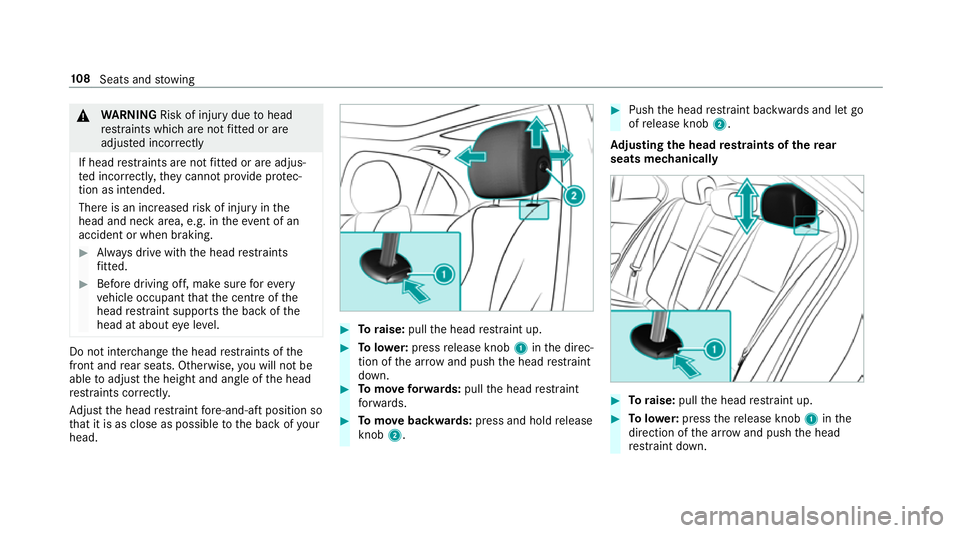
head. #
Toraise: pullthe head restra int up. #
Tolowe r:press release knob 1inthe direc‐
tion of the ar row and push the head restra int
down. #
Tomo veforw ards: pullthe head restra int
fo rw ards. #
Tomo vebackwards: press and hold release
knob 2. #
Push the head restra int backwards and let go
of release knob 2.
Ad justing the head restra ints of there ar
seats mechanically #
Toraise: pullthe head restra int up. #
Tolowe r:press there lease knob 1inthe
direction of the ar row and push the head
re stra int down. 108
Seats and stowing
Page 116 of 673
#
Toswitch off/reduce the le vel:press but‐
to n1 repeatedly until the desired ventila‐
tion le vel is set.
If all indicator lamps are off, the seat ventila‐
tion is switched off. Ste
ering wheel Ad
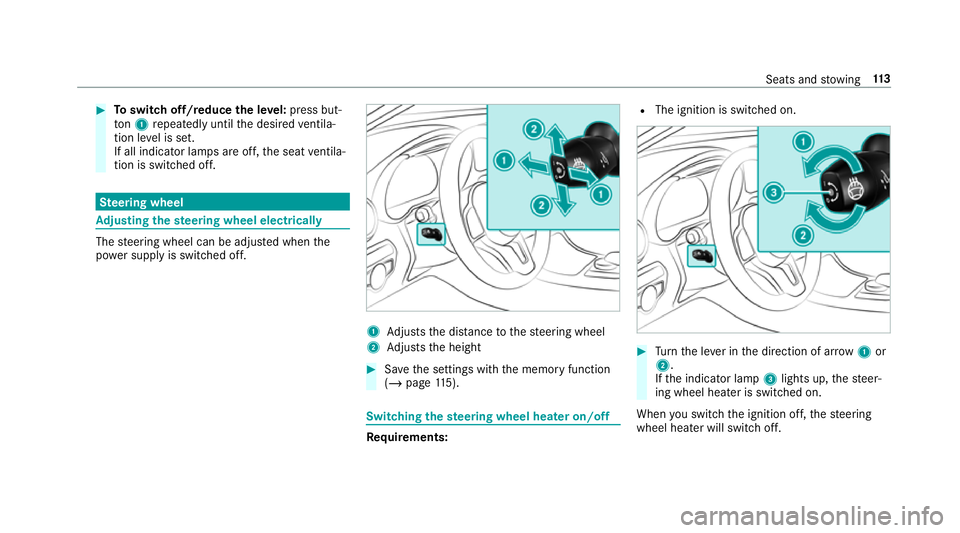
justing the steering wheel electrically The
steering wheel can be adjus ted when the
po we r supp lyis switched off. 1
Adjusts the dis tance tothesteering wheel
2 Adjusts the height #
Save the settings with the memory function
(/ page 115). Swi
tching the steering wheel heater on/off Re
quirements: R
The ignition is switched on. #
Turn the le ver in the direction of ar row1or
2.
If th e indicator lamp 3lights up, thesteer‐
ing wheel heater is switched on.
When you swit ch the ignition off, thesteering
wheel heater will switch off. Seats and
stowing 11 3